-
Notifications
You must be signed in to change notification settings - Fork 373
User_App_ROS_TransferURDFFromROS
Note: This tutorial assumes that you have completed tutorial:
ROS2 Humble
- Notice that the file_server2 package comes bundled with two additional launch files that publish TurtleBot4 lite and standard. And of course they need the TurtleBot4 ROS Humble package installed (turtlebot4_bringup, specifically) to work. Again, we will only use R2D2; and TurtleBot4 files are included for convenience.
# Inside the root of your workspace folder (not /src)
colcon build
source install/local_setup.bash

# R2D2
ros2 launch file_server2 publish_description_r2d2.launch.py
# TB4 - Standard
ros2 launch file_server2 publish_description_turtlebot4_standard.launch.py
# TB4 - Lite
ros2 launch file_server2 publish_description_turtlebot4_lite.launch.py

# file_server2/publish_description_<robot_name>.launch.py files combine:
# 1. ros_sharp_communication.launch.py (from file_server2)
# 2. <selected_robot>_description.launch
# 3. joint_state_publisher
Alternatively, for your convenience, you can follow the step two of our tutorial video on YouTube.
ROS1 Noetic
Run the following command to launch the publish_description_TurtleBot2.launch file previously downloaded in the TurtleBot Setup tutorial. This will start rosbridge_websocket and file_server and publish the necessary robot description and robot name parameters to be captured by Unity.
catkin_make
source devel/setup.bash
roslaunch file_server publish_description_turtlebot2.launch- Go to
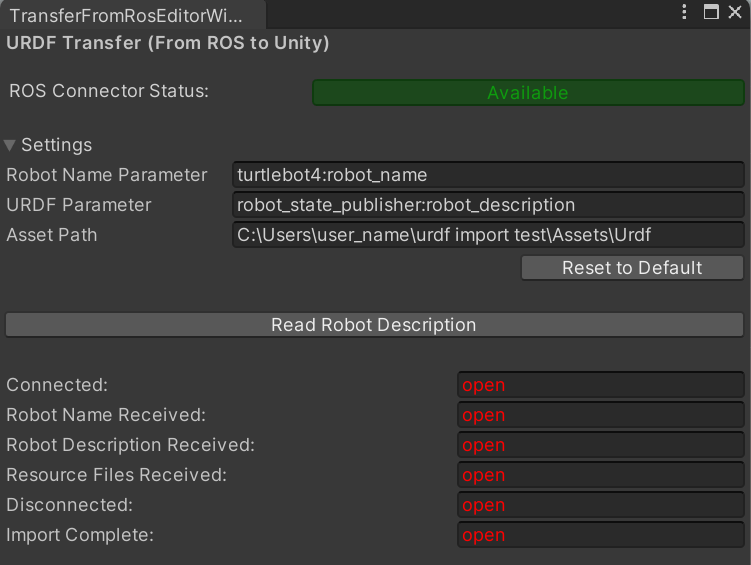
RosBridgeClient>Transfer URDF from ROS...
- The URDF tools in the ROS# Unity package do not use an additional ROS# Connector instance, but use the connector already present in the scene. If there is none, the button next to
ROS Connector Statuswill turn red and be pressable. If you click on it, you can create an empty game object with a ROS Connector component. Don't forget to adjust your ROS Connector settings!
Note: If you are transferring large files, it is advised that you should increase the
Seconds Timeoutin your ROS Connector. Otherwise, it may disconnect without completing all the files.
- In ROS2, parameters are handled as
<node_name>:<parameter_name>and, in ROS1, just the parameter name is sufficient. You can select your ROS version from the ROS Connector andReset to Defaultbutton will fill the input files according to your ROS version. You can also hover your mouse over them to get a syntax hint.
- Initiate the transfer by clicking on the
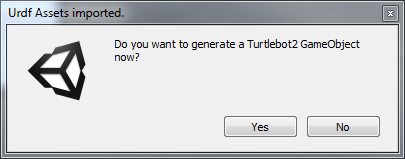
Read Robot Descriptionbutton. Once all the files have been transferred, the following dialogue box will appear.
- Click
Yes. This leads to a creation of a GameObject in the scene

Next tutorial: Transfer a URDF from Unity to ROS
© Siemens AG, 2017-2024
-
- 1.3.1 R2D2 Setup
- 1.3.2 Gazebo Setup on VM
- 1.3.3 TurtleBot Setup (Optional for ROS2)
-
- 2.1 Quick Start
- 2.2 Transfer a URDF from ROS to Unity
- 2.3 Transfer a URDF from Unity to ROS
- 2.4 Unity Simulation Scene Example
- 2.5 Gazebo Simulation Scene Example
- 2.6 Fibonacci Action Client
- 2.7 Fibonacci Action Server
- 3.1 Import a URDF on Windows
- 3.2 Create, Modify and Export a URDF Model
- 3.3 Animate a Robot Model in Unity
- Message Handling: Readers & Writers
- Thread Safety for Message Reception
- File Server Package
- ROS-Unity Coordinate System Conversions
- Post Build Events
- Preprocessor Directives in ROS#
- Adding New Message Types
- RosBridgeClient Protocols
- RosBridgeClient Serializers
- Action Server State Machine Model
© Siemens AG, 2017-2024

