-
Notifications
You must be signed in to change notification settings - Fork 23
Tips & Tricks
This chapter is dedicated to helping to get the Tips & Tricks related to QLog. The chapter is aimed not only at beginners
In general, the time/date format in QLog is controlled by the OS settings (not by Gnome or KDE settings, but through LC variables). If you wish to change the format, you can adjust these settings.
For example, to use a 24-hour time format, you can use the following settings (note that the date format will be YYYY/MM/DD):
for Linux:
LC_TIME=en_ZA.UTF-8 ./qlog
for Windows:
SET LC_TIME=en_ZA.UTF-8
qlog.exe
Originally published via QLog's email list. Published with the permission of the author: Adam VK4IM.
If you are like me and have recently moved to Linux, or are transitioning away from MS Windows, you would have noticed there are some differences with regards to USB ports. You can no longer use “COM#” as an entry. It won't work.
You can use “ttyUSB#”, but as Ladislav mentioned in this post https://groups.io/g/qlog/message/428 “It's not a very good practice to use ttyUSB# devices. These device files can change during disconnection or reboot."
I have found a couple of ways to determine the correct "Device ID" and "Path" to use: The Terminal Shell method (Alias: console, or command prompt) or the Graphical method.
Note: Both methods described below relate to Linux Mint 22 Cinnamon. It may, or may not, be the same for your flavor of Linux, but should give you a clue on where to look.
Terminal Shell:
For the purists and those wanting to learn a little about the Terminal Shell.
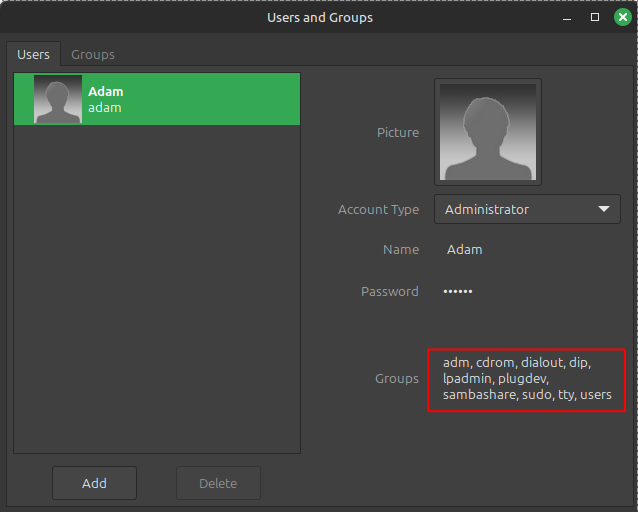
Add Yourself To The "dialout" Group
-
Open "Terminal" from the menu… right click the Linux logo in the bottom left corner and type "Terminal" in the search bar and click the "Terminal".
-
Type
groups <your username> -
The result is a list of all your groups
<your username> : adm tty dialout cdrom sudo ... -
If you do not see "dialout" listed type the following:
sudo adduser <your username> dialout- Enter your Administrator Password and hit enter.
-
Logout/Login or Reboot the computer to changes to take effect
Find the Device ID
-
Open a Terminal Shell
-
Type
ls /dev/serial/by-id -
The result is a list of all serial devices currently connected
TODO -
In this example
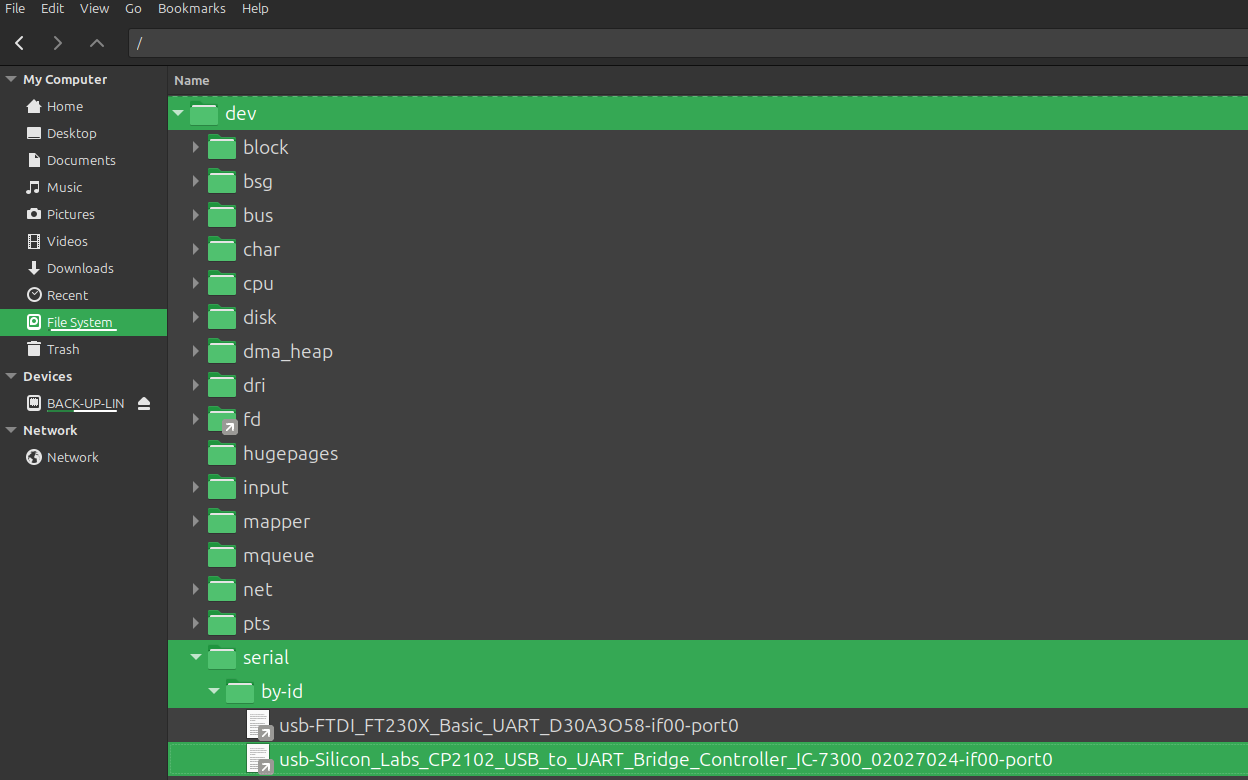
usb-FTDI...is my rotator controller and theUSB-Silicone_Labs...is my Icom IC-7300. -
In your terminal, select/ highlight the Device ID you want to use, right click and select copy
-
Append the Device ID to the file path:
/dev/serial/by-id/.- Like:
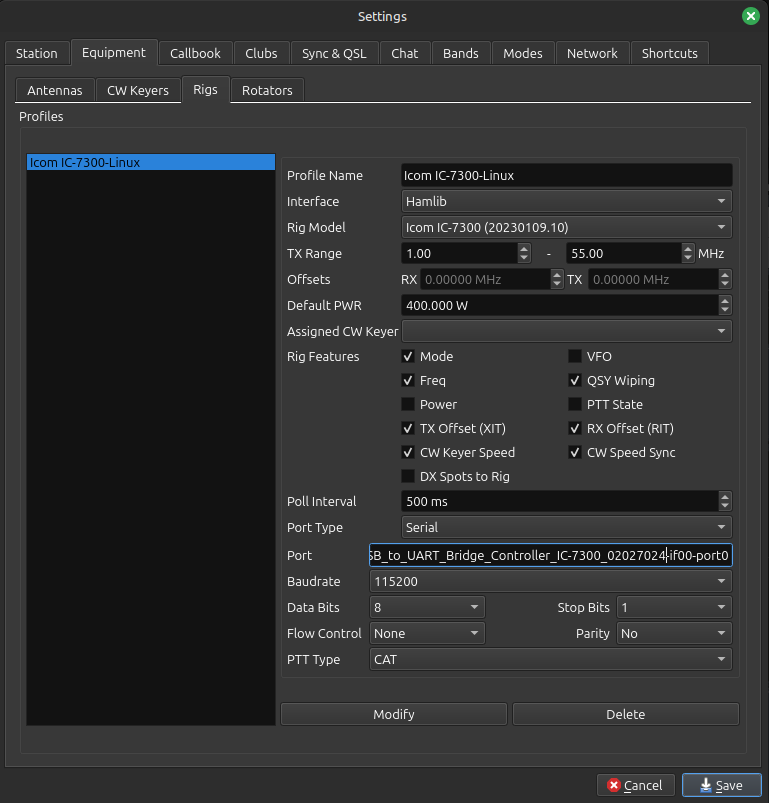
/dev/serial/by-id/PLUSusb-Silicon_Labs_CP2102_USB_to_UART_Bridge_Controller_IC-7300_02027024-if00-port0 - NOTE: The Device ID “numbering” will be different for your situation. You must use the exact same Device ID as listed in you terminal screen.
- Like:
-
Paste the file name into the Port section under Rigs (or as appropriate) in your setup screen in QLOG.
-
Click “Modify” and “Save”
-
In the Menu bar click "Equipment" and then "Connect"
-
If all is correct your device should connect and keep the same path between reboots.
Graphical Method:
Add Yourself To The "dialout" Group
-
Open
Users and Groupsfrom the menu… right click the Linux logo in the bottom left corner and typeUsers and Groupsin the search bar and click theUsers and Groups. -
Enter your Administrator Password and hit enter
-
Select the user to update
-
If you do not see
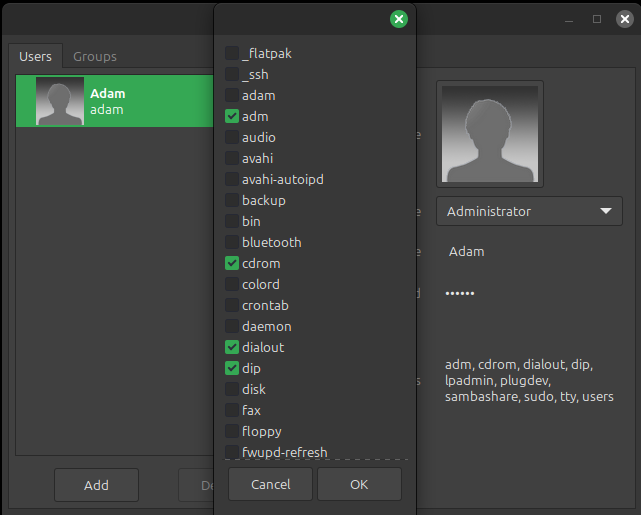
dialoutlisted under theGroupssection, left click on the red highlighted area to open theGroupssection. -
Put a tick in the box for "dialout" and click OK
- Click 'X" to close and then reboot the computer for changes to take effect
Find the Device ID
This method may be more intuitive than the Terminal Shell method mentioned above if you are coming from MS Windows. I'd encourage you to try the Terminal Shell method as it can be quicker and easier.
- Open your favorite "Files Explorer" from the menu… right click the Linux logo in the bottom left corner and type "Files" in the search bar and click the "Files Explorer".
- Make sure you are in the root directory. Type “/” in the search bar at the top
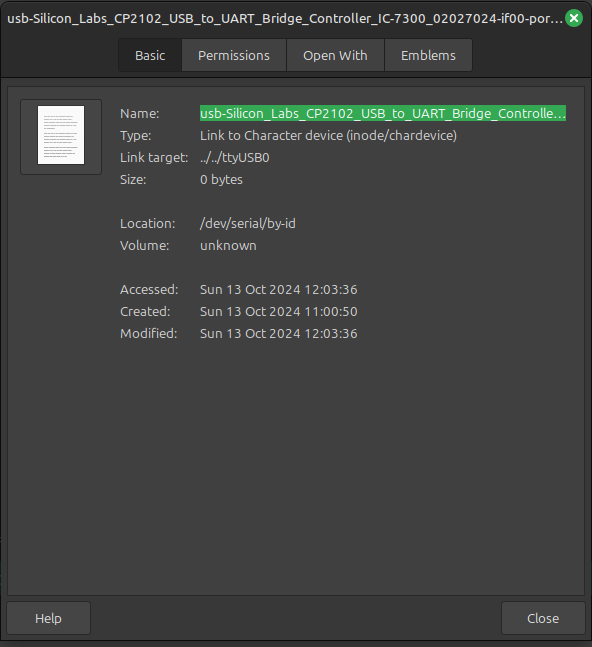
- Right click on the device you need and select properties.
- At the top under name hover over the “Name” of the file and right click to select all.
- Right click over the name again and select copy
- From here, refer to point 5 in the "Terminal Shell Method" under "Find the Device ID" above
