-
Notifications
You must be signed in to change notification settings - Fork 11
Adding Annotations
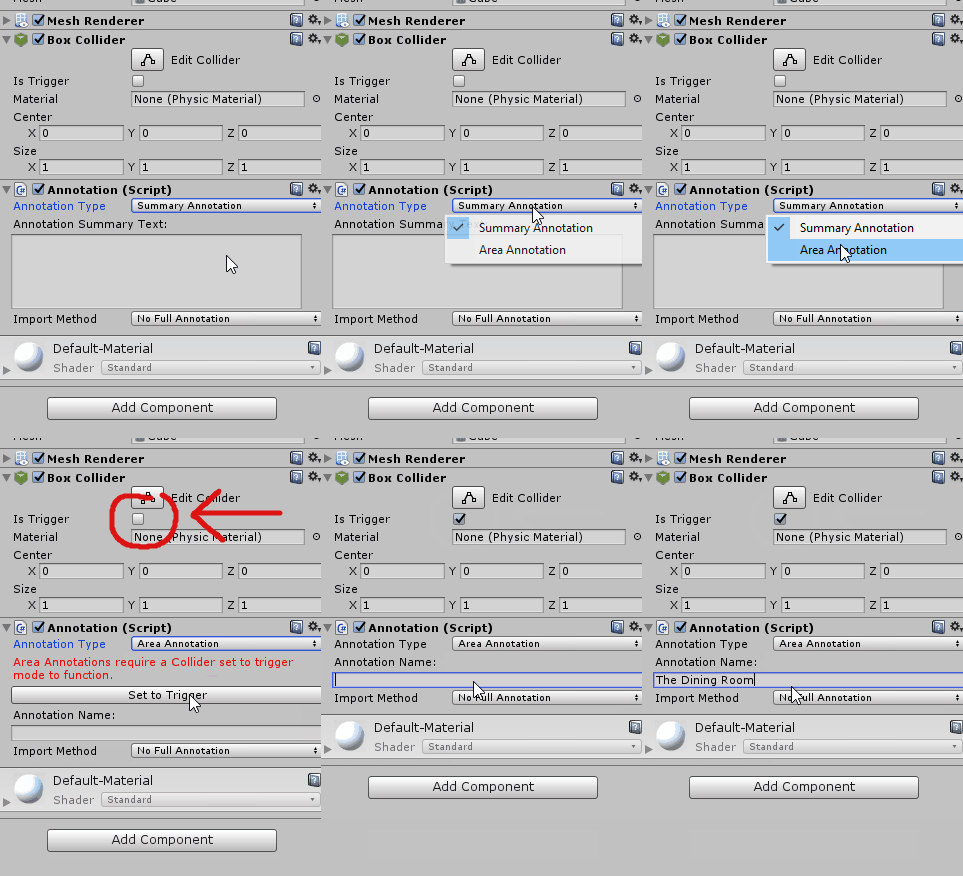
Annotations can be added to a game object by searching 'annotation' in the component menu.
First you will have to choose which type of annotation to create.
In the Annotation Type menu, choose 'Summary Annotation.' A text box will appear where a brief summary describing the object can be written. This summary is limited to 250 characters.
In the Annotation Type menu, choose 'Area Annotation.' If the game object does not have does not have a collider attached to it, with isTrigger set to true, a warning and option to set isTrigger will appear. This is required for area annotations to work.
Once that is complete you can enter in a short name for the annotation, which is what will appear in the 'annotation menu' when the game is played.
When writing the full annotation (this is the pop-up that appears once the player interacts with an annotation, and is the same no matter what type of annotation is chosen), there are three options to choose from: 'no full annotation', 'import from text file', and 'write in inspector.' For more information on how to format text, and the use of richtext, for annotations, see here.
This is useful if you want a brief description of an object, but don't have need for a large block of text. It works best with summary annotations. If switching from one of the other formats, all changes made to the full annotation will be lost upon switching to this.
After selecting 'Import Text File' form the Import Method menu, click the Select File button to open a file explorer, and then navigate to and select the .txt file you wish to import.
Once you have imported a file, you can see and edit it under the 'Write in Inspector' tab. Any changes made in the Write in Inspector' tab will not be reflected in the original file, unless the 'save to text file' utility is used.
If images are included, check the box next to 'Include Images' and choose whether images are in the same location as the text file, or if they are stored in a different directory. If the latter is the case, uncheck 'shared directory' and select the folder in which the images are contained.
NOTE: The text file and images must all be within the Assets folder of your project.
After choosing 'Write in Inspector', A large text input area will appear. If you have already imported a file, the text from that file will appear in this area. There is a check-box above this area that allows you to switch modes between displaying a richtext preview (how the text will look in the end, excluding images), and a plain-text mode. It is suggested to make any edits in plain-text mode, as the editor in richtext mode can be difficult to work with, but useful for previewing formatting.
Below the text-box, there is a 'Save to text file' button. This allows for any text in the text-area to be saved to a text file. Any changes made to the text of a previously imported file will not be reflected back to that file unless saved through this function.
If images are included, check the 'Include Images' box, and choose what folder they are in. If a file has been imported, or an image folder has already been selected in 'Import Text File,' this will default to that location.


