Importing into Oracle Developer Studio 12.6
- Getting started on Solaris 11.3 for x86
- Building a simple Challenge solution (with Boost headers and Google Test)
- Using the Hunspell library
- Linking in a Boost library
- Using the Crypto++ library
- Using the OpenSSL library
- You're done!
So ... on to yet another C++ development platform. This time it is Oracle Developer Studio 12.6, the workhorse C/C++ and Fortran toolchain for Oracle's Solaris operating system. It comes with a NetBeans-based IDE that can used for local development on the server, or remote development from a Windows PC. Originally produced by Sun Microsystems until their 2009-2010 acquisition by Oracle, the toolchain has withstood the test of time under multiple product names and currently offers C++14 support for both x86 (running Linux or Solaris) and SPARC (running Solaris) architectures.
I, of course, can afford only the former type of computer for personal use ☺, so will be covering only that here. Solaris on SPARC should not be materially different, though. I am using the OSs inside virtual machines under hypervisors like Microsoft Hyper-V and VMWare Workstation, although directly installing in a dual-boot configuration is another (more adventurous) possibility.
A few things to keep in mind about this toolchain:
-
It ships with several implementations of the C++ standard library, mostly for historical reasons:
- RogueWave Standard C++ Library v2 (
libCstd). (When this is used, the<iostream>functionality can optionally be swapped for a pre-Standard, 1986-era<iostream.h>for really legacy code.) - STLport v4.5.3 (
stlport4) - Apache
stdcxxv4 - GCC v5.4
libstdc++
Only the last one can be used for modern C++ code like ours. It needs one setting to be changed from the default project template.
- RogueWave Standard C++ Library v2 (
-
The compiler seems to be fairly memory-hungry with large files. I've encountered some out-of-memory errors during compilation of Google Test, with error traces like:
"<null>", line 809201 : Trouble writing; probably out of temporary file space. I managed to work around this issue by following the advice in this StackExchange answer, i.e. to setTMPDIRto the much-larger/var/tmpfilesystem. Even then, my initial VM setting of 3.5 GB RAM wasn't enough to compile Crypto++; I had to raise it to 4 GB.
A basic installation of Solaris 11.3 from the "x86 Live Media" DVD download went like a breeze in a Hyper-V VM (2 CPU cores + 3.5 GB RAM), except that I had to change to a "Legacy Network Adapter" to get Internet connectivity. Microsoft does not provide Hyper-V Guest Services for Solaris, unfortunately.
Oracle has released Solaris 11.4 now. It installs fine on Hyper-V but has no Internet connectivity due to the removal of the dnet driver for the DEC/Intel 21140 Ethernet NIC, which Hyper-V emulates. To make it work I had to do the following (after completing installation from the "x86 Text Installer" download):
-
Copy over the
/kernel/drv/amd64/dnetdriver file from my Solaris 11.3 VM (ISO image still available for download here).- I had to copy out this file via SFTP from my Windows 10 host.
- Then I made an ISO image with
genisoimagein Windows Subsystem for Linux. (I initially tried with ISO Recorder but Solaris was unable to mount it.) - Finally I mounted the ISO into the Solaris 11.4 VM and
cp-ed it from there.
-
Install the
dnetdriver using the same parameters that the OpenIndianadnetpackage manifest uses (and ignore the "driver signature verification failure" warning):$ sudo add_drv -m '* 0666 root sys','dnet 0666 root sys' \ -i '"pci1011,14" "pci1011,19" "pci1011,2" "pci1011,9" "pci10b8,2001" "pci1109,1400" "pci1109,2400" "pci2646,1"' \ dnet -
Ensure that the VM is using the "Default Switch" of the Legacy Network Adapter in Hyper-V settings.
-
Enable the basic networking services and reboot:
$ sudo svcadm enable svc:/network/install:default
$ sudo svcadm clear svc:/network/install:default
$ sudo svcadm enable svc:/network/dhcp/client:default
$ sudo svcadm enable svc:/network/dns/client:default
$ sudo shutdown -y -g 3 -r
Now Internet-facing commands like sudo pkg update && sudo pkg install solaris-desktop should work.
Around June 2019, a Windows Update introduced an issue in the emulated IDE controller of Generation 1 Hyper-V VMs, causing Solaris to no longer boot. Rather than rolling back the update (and refraining from installing any more Windows Updates going forward), a workaround is to run Solaris inside a nested Hyper-V 2016 VM without that buggy update. Follow these steps:
-
Visit Microsoft's Windows Server Evaluation Center and download the unlimited Hyper-V Server 2016 ISO with your personal info.
-
With your existing VM shut down, edit its settings to:
- Mount this ISO in the DVD drive at startup.
- Move the existing Solaris installation disk to Location 1 of its IDE Controller, and add a new 50 GB hard disk in Location 0.
- Boot with the DVD drive.
- Replace the Legacy Network Adapter with a (non-legacy) Network Adapter with "Enable MAC Address Spoofing" selected in its Advanced Features. Connect it to the relevant switch for Internet access.
- Raise the RAM to at least 6 GB.
-
Open an elevated PowerShell window and run this to enable nested virtualization:
> Set-VMProcessor -VMName "YOUR_VM_NAME" -ExposeVirtualizationExtensions $true
-
Launch the VM and install Hyper-V Server 2016 to the new empty disk. The process will restart the VM several times and ask for a new Administrator password.
-
Once the installation finishes in the VM, log in to Hyper-V Server. Use the Server Configuration menu to:
- Change the Computer Name to something easy to type (and remember).
- Ensure Remote Management is enabled.
- Disable automatic checking of Windows Updates.
- Confirm in the Network Settings screen that DHCP has correctly configured the Subnet Mask, Default Gateway and Preferred DNS Server. (These must match the Subnet Mask and IPv4 Address of one of the entries listed by
ipconfigon the host PC.) Make a note of the IP Address of the VM.
Now we'll need to establish a Windows Remote Management connection to the VM. The following few steps are taken from this blog post, but we'll be supplying the IPv4 address of the VM instead of its Computer Name because we don't want to switch to a private network profile.
-
Still in the VM, use the other Command Prompt window to enter
powershell, and inside it run:> Enable-PSRemoting > Enable-WSManCredSSP -Role server
and confirm "Y".
-
In the host PC, open an elevated PowerShell window and type:
> Enable-PSRemoting
> Enable-WSManCredSSP -Role client -DelegateComputer "YOUR_VM_COMPUTER_NAME"
-
Still in the host PC, open Local Group Policy Editor (
gpedit.msc) and navigate to Computer Configuration -> Administrative Templates -> System -> Credential Delegation. Enter the property page for Allow delegating fresh credentials and:- Enable it.
- Click the "Show" button to view the server list, and enter:
WSMan/YOUR.VM.IP.ADDRESS
Repeat the same steps for Allow delegating fresh credentials with NTLM-only server authentication.
-
At this point, running this command in the host PC PowerShell window should succeed in testing the host-to-VM connection (after supplying the VM Administrator's password in the popup):
> Test-WSMan -ComputerName YOUR.VM.IP.ADDRESS -Credential YOUR_VM_COMPUTER_NAME\Administrator -Authentication CredSSP
If it fails with a "Request not supported" error, try enabling Encryption Oracle Remediation to "Vulnerable" in Group Policy Editor as above.
-
Go to Hyper-V Manager and use Action -> Connect to Server. In the popup:
- Click "Another computer" and enter the VM's IP address.
- Enable "Connect as another user".
- Click the "Set User" button. Enter the username like "YOUR_VM_COMPUTER_NAME\Administrator" and the VM Administrator's password below it.
In a few seconds, this will enlist the VM's Hyper-V instance below the host's one.
-
Visit the Virtual Switch Manager to create an External network switch inside the VM. Allow its management operating system to share it.
-
Go to the Command Prompt of the VM and run
diskpart. Inside it, run:-
list diskto list the two hard disks. -
select disk <N>to select the disk with the Solaris installation in it. -
offline diskto free that disk for use by the Hyper-V of the VM.
-
-
Back in the Hyper-V Manager window (showing the VM's Hyper-V instance), create a new Generation 1 VM with:
- 2 processor cores
- 4 GB RAM
- The Solaris installation disk connected to IDE Controller 0 at Location 0 (as a "physical hard disk").
- A Legacy Network Adapter connected to the newly-created switch.
- No non-legacy Network Adapter or SCSI Controller.
Solaris 11.4 should now start inside the nested VM. Check if it manages to configure Internet access via DHCP. If not, then first retry enabling the basic networking services (in the last paragraph of the previous section), and if it still doesn't establish connectivity then you'll need to set it up manually:
-
Delete any existing IP interface:
sudo ipadm delete-ip net0. -
Create a IP interface:
sudo ipadm create-ip net0. -
Create a DHCP-based address in this interface:
sudo ipadm create-addr -T dhcp net0. -
List the new address with
ipadm, and check that the network prefix length (in CIDR notation, e.g. "/28") matches the Subnet Mask in the Hyper-V VM's Network Settings above (e.g. "255.255.255.240").- If it doesn't match, you'll need to create a static address instead:
- Delete the DHCP-based address:
sudo ipadm delete-addr net0/v4. - Create a static address:
sudo ipadm create-addr -a YOUR.NEW.IP.ADDRESS/PREFIX net0. This new IP address must match the network ID portion of the Hyper-V VM, and must have a different computer ID portion. Also, the new prefix must correspond to the subnet mask.
- Delete the DHCP-based address:
- If it doesn't match, you'll need to create a static address instead:
-
Test DNS capability:
nslookup www.oracle.com.-
If it doesn't succeed (especially if you had to create a static IP above), configure the name service:
$ echo 'setprop config/nameserver = HYPERV.VM.DNS.SERVER' | sudo svccfg -s network/dns/client
$ { echo refresh; echo validate } | sudo svccfg -s network/dns/client:default
$ echo 'setprop config/host = "files dns"' | sudo svccfg -s name-service/switch
$ { echo refresh; echo validate } | sudo svccfg -s name-service/switch:default
$ sudo svcadm enable dns/client
$ sudo svcadm enable name-service/switch
-
Now
/etc/resolv.confshould contain anameserverentry with the DNS server IP address. I have encountered a weird situation where it contains an incorrect address, and a hacky workaround is to manually fix it (withsudo vim /etc/resolv.conf), but the bad entry gets restored upon reboot, DHCP release, etc. and needs manual fixing again.
-
-
Test Internet connectivity:
ping www.oracle.com.- If the ping-test failed, configure the default gateway:
sudo route -pf add default HYPERV.VM.DEFAULT.GATEWAY.
- If the ping-test failed, configure the default gateway:
The nested VM should now be as functional as before.
For the toolchain, the recommended installation procedure is via the package manager (Image Packaging System), although a few prerequisite steps are detailed in the Installation Guide, namely:
- Install the
sunpro-incorporationanddeveloper-studio-utilitiespackages. -
Register to get access to the
solarisstudiopublisher, and then download and install the certificate and key into the package manager.
On Solaris 11.3, at this point I managed to install up to the command-line C++ compiler package (developerstudio-126/c++), but not the entire IDE. That required disabling a restriction on installing Python 3.4 (runtime/python-34) beforehand, as it was needed by the debugger package (developerstudio-126/dbx):
$ sudo pkg change-facet facet.version-lock.runtime/python-34=false
The toolchain installation then went fine, but did not adjust the PATH and MANPATH to locate the toolchain executables and manuals. So I wrote a quick souce-able shell script to do so:
export PATH=$PATH:/opt/developerstudio12.6/bin
export MANPATH=$MANPATH:/opt/developerstudio12.6/man
export TMPDIR=/var/tmp
We'll also need up-to-date versions of Git (developer/versioning/git) and -- on Solaris 11.3 -- GNU Make (developer/build/gnu-make). They were also restricted by the userland-incorporation by default, so we need to disable those restrictions in order to install them:
$ sudo pkg change-facet facet.version-lock.developer/versioning/git=false
$ sudo pkg change-facet facet.version-lock.developer/build/gnu-make=false
On Solaris 11.3, to install any version of Git higher than v1.7.9 required me to also disable the version-lock restrictions on OpenSSL (library/security/openssl) and Perl v5.12 (runtime/perl-512):
$ sudo pkg change-facet facet.version-lock.library/security/openssl=false
$ sudo pkg change-facet facet.version-lock.runtime/perl-512=false
Finally, consider installing the EditorConfig plugin for NetBeans. This will help setting up some common settings like line length, end-of-line character, spaces for indentation, and so on.

-
In a Terminal, source in the script created earlier so that the toolchain is located in the
PATH. -
Clone the modular Boost repo (including submodules) and set up the headers. The bootstrap script expects to find the "sunpro" toolchain in
/opt/SUNWspro, so we need to set up a symlink. Also the generatedproject-config.jamcauses problems so we can delete it:$ git clone https://github.com/boostorg/boost.git $ cd boost $ git submodule update --init --recursive $ sudo ln -s /opt/developerstudio12.6 /opt/SUNWspro $ ./bootstrap.sh -with-toolset=sunpro $ rm project-config.jam $ ./b2 headersWe will refer to this directory as
${BOOST_DIR}from now on.
-
Download the Google Test repo, and check out the v1.10.x tag to avoid C++17 code introduced into the master branch. We'll refer to the directory as
${GTEST_DIR}from now on.$ git clone https://github.com/google/googletest.git $ cd googletest $ git checkout v1.10.x -
Source in the script above to set up the environment variables, and then run
devstudioin the Terminal to launch the IDE. -
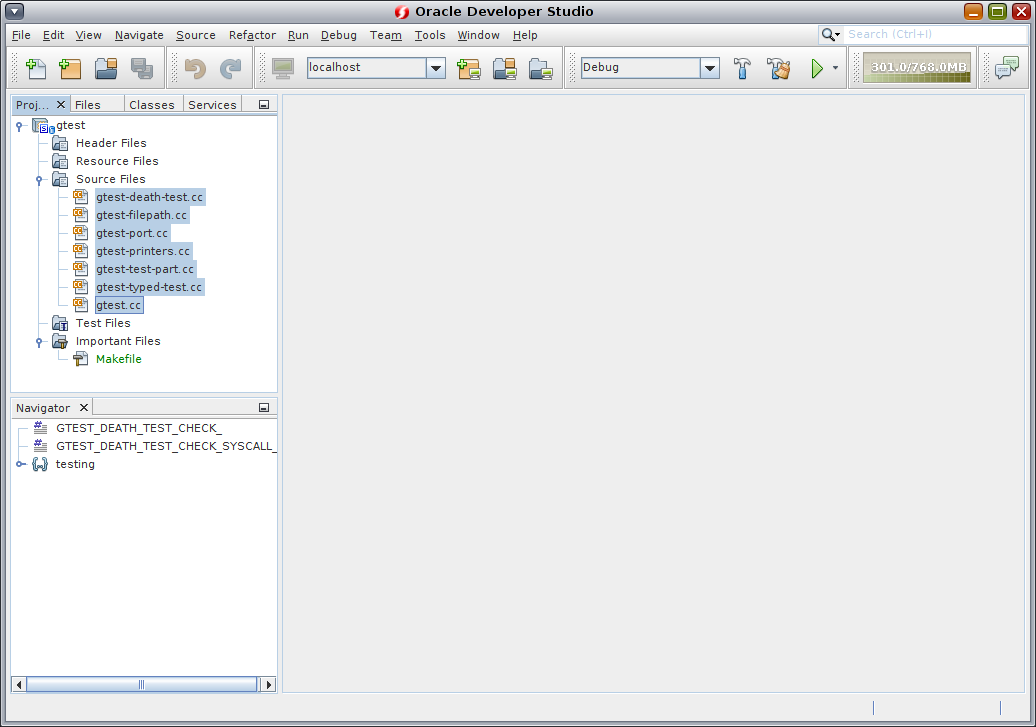
Create a new C/C++/Fortran Static Library project called
gtestinside a newdevstudiosubdirectory inside${GTEST_DIR}/googletest.

-
In the Projects pane, right-click Source Files and click Add Existing Item .... Navigate to
${GTEST_DIR}/googletest/srcand choose all.ccfiles exceptgtest-all.ccandgtest_main.ccfor inclusion into the project, then click Select.
-
Right-click the gtest project name and click Properties. In the dialog box, change the Configuration at the top to <All Configurations>, then go into the Build -> C++ Compiler page and:
-
Enlist
${GTEST_DIR}/googletest/includeand${GTEST_DIR}/googletestin Include Directories. -
Change C++ Standard to C++11. (This enables the
libstdc++standard library implementation.) -
Change Multithreading Level to Safe.

Click OK to save changes and close the popup.
-
-
At this point the
googletestproject should normally build fine. However, due to a bug in the compiler reported here, the compilation ofgtest.ccfails with this error:>> Assertion: (../lnk/symdescr.cc, line 96) while processing ../../src/gtest.cc at line 0. *** Error code 2After some experimentation I managed to work around this issue only by removing the
staticspecifier from thetesting::internal::ParseStringFlag()function template. I have raised a pull request with this. Since that was declined, you'll need to use my branch:$ git remote add tanzislam https://github.com/tanzislam/googletest.git $ git fetch tanzislam $ git checkout tanzislam/workaround-oracle-devstudio-126-compiler-bug $ git merge v1.10.x -
Create another new C/C++/Fortran Static Library project called
gtest_maininside${GTEST_DIR}/googletest/devstudio.
-
Enlist
${GTEST_DIR}/googletest/src/gtest_main.cppunder Source Files of gtest_main. Also configure gtest_main similarly to gtest.
-
Create a new C/C++/Fortran Application project in the Challenge-specific subdirectory, and clear the Create Main File option.


-
Enlist the source files from the
SRCS=list in the Challenge-specificGNUmakefileunder Source Files of the new project. Optionally also enlist the needed headers under Header Files for a better code-editing experience.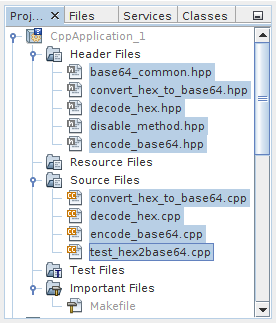
-
Configure the Build -> C++ Compiler page of this Challenge-specific project in a similar manner to gtest and gtest_main above. For the Include Directories, enlist:
-
the Challenge-specific subdirectory
-
${GTEST_DIR}/googletest/include -
${BOOST_DIR} -
any directory listed in the
VPATH=list in the Challenge-specificGNUmakefile
-
-
Ensure that the gtest and gtest_main projects are already open. Go to the Build -> Linker page of this Challenge-specific project, and then select either Debug or Release configuration at the top. Then go into the Libraries setting and the dialog box click the Add Project button to enlist the
gtest_mainandgtestproject files (with the same configuration as currently selected).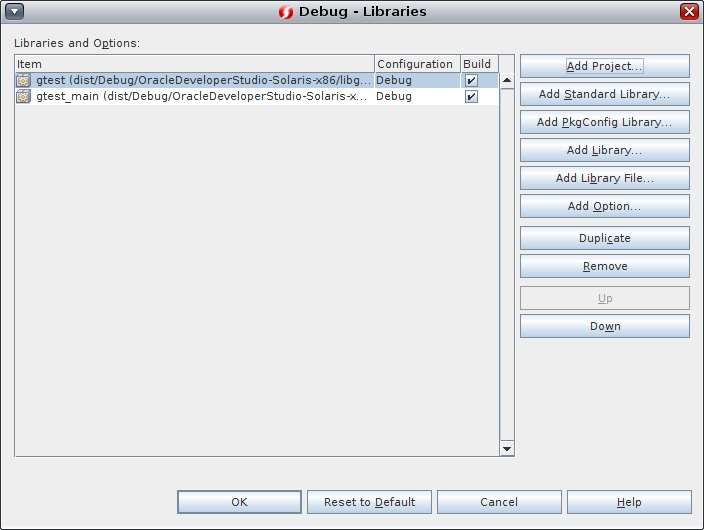
Click OK to confirm the list in the dialog for the current configuration. In the outer Project Properties dialog, click Apply to save the current configuration, then change to the other configuration at the top, then re-enter the Libraries setting and re-enlist gtest and gtest_main projects for this other configuration. Finally click OK to save the settings.
-
Download the Hunspell repo and use GNU AutoTools to "configure" it. We'll refer to it as
${HUSNPELL_DIR}.$ git clone https://github.com/hunspell/hunspell.git $ cd hunspell $ autoreconf -vfi $ ./configure -
Inside the IDE, create a new C/C++/Fortran Static Library project called
hunspellinside a newdevstudiosubdirectory inside${HUNSPELL_DIR}.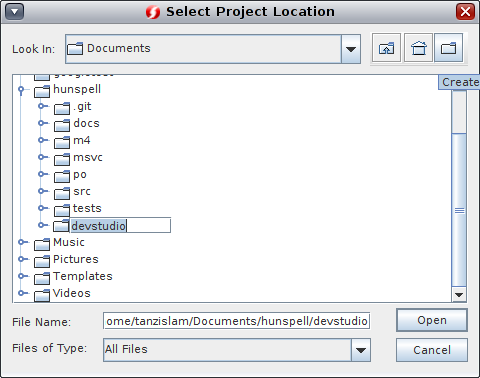

-
Expand the hunspell project, right-click Source Files and click Add Existing Item.... In the popup, select all the
.cxxfiles inside${HUNSPELL_DIR}/src/hunspell(use the Files of Type: filter to facilitate this) and click the Select button.
-
Configure this hunspell project similarly to gtest above, with this exception: enlist
${HUNSPELL_DIR}/src/hunspellin the Include Directories.
-
Now to use the hunspell project from the Challenge-specific projct, do the following in the properties:
-
In the Build -> C++ Compiler page, choose All Configurations and then add
${HUNSPELL}/src/hunspellin the Include Directories.
-
Go to the Build -> Linker page and first click Apply to save the changes so far. Then choose the Debug configuration, click Libraries and enlist the
${HUNSPELL_DIR}/devstudio/hunspellproject in Debug configuration in the popup.
Click OK to close the Libraries popup, then click Apply to save the configuration so far, and then repeat with the Release configuration.
-
Download the SCOWL pacakge from the URL in the
prepare_depsscript (located in the root directory of the Cryptopals project) to a fresh directory. I've encountered problems with the system-installed version ofwget, so you might prefer usingcurlinstead:$ mkdir scowl $ cd scowl $ url='https://downloads.sourceforge.net/project/wordlist/speller/...' $ curl --location $url --output hunspell-en_US.zip $ unzip -o -d hunspell hunspell-en_US.zip $ rm hunspell-en_US.zipThen go to the Run page of the configuration dialog and set up the
HUNSPELL_AFFIX_PATHandHUNSPELL_DICT_PATHenvironment variables to point to the downloaded files.
-
-
When compiling against Boost.Asio on Solaris 11.3, the compiler settings so far will cause a compilation failure:
"../../../../boost/boost/asio/detail/impl/socket_ops.ipp", line 1057: Error: msg_flags is not a member of msghdr.This is because on Solaris 11.3 the
msg_flagsmember exists only in the libxnet interface and not the libsocket interface. Boost.Asio's own tests set a couple of preprocessor flags to fix this problem, so you'll need to do the same.
NOTE: On Solaris 11.4 this problem has been fixed by guarding the libsocket interface under the
__USE_SUNOS_SOCKETS__flag. -
Build the required libraries using Boost Build, using the
cxxflagsoption to force the compiler into C++11 mode as hinted in the Getting Started guide:$ ./b2 toolset=sun threading=multi variant=debug link=static cxxflags=-std=c++11 --with-system --with-chrono
-
In the Build -> Linker property page of the Challenge-specific project:
-
Change to All Configurations and enlist
${BOOST_DIR}/stage/libin the Additional Library Directories. -
Click Apply to save the changes so far, then change to the Debug configuration and open the Libraries setting. Use the Add Library... button to enlist
${BOOST_DIR}/stage/lib/libboost_system.aand${BOOST_DIR}/stage/lib/libboost_chrono.a, and -- on Solaris 11.3 -- use the Add Standard Library... button to enlist Sockets and Network Services Library.
Click OK to close the popup, then click Apply to save the configuration so far, then change to the Release configuration and repeat.
-
OUTSTANDING ISSUE: On Solaris 11.3, I haven't managed to get the boost::asio::ip::tcp::iostream class download the data files from the Cryptopals website. (Reading from the stream is failing to receive any bytes and setting badbit.) Those tests are currently failing. This problem does not happen on Solaris 11.4.
-
Download the Crypto++ repo; we'll call the target location
${CRYPTOPP_DIR}from now on.$ git clone https://github.com/weidai11/cryptopp.git -
Inside the IDE, create a new C/C++/Fortran Static Library project called
cryptoppinside a newdevstudiosubdirectory inside${CRYPTOPP_DIR}. -
Expand the cryptopp project, right-click Source Files and click Add Existing Item.... In the popup, select all the
.cppfiles inside${CRYPTOPP_DIR}that are neither listed in theTESTSRCSvariable nor filtered out in theSRCSexpression inside theGNUmakefile. -
Configure this cryptopp project similarly to gtest above, with these differences:
-
Enlist
${CRYPTOPP_DIR}in the Include Directories. -
Add
-xarch=avx2to the Additional Options, in order to avoid compilation errors like:"../../aria-simd.cpp", line 144: ube: error: _mm_shuffle_epi8 intrinsic requires at least -xarch=ssse3. "../../blake2-simd.cpp", line 351: ube: error: _mm_blend_epi16 intrinsic requires at least -xarch=sse4_1. "../../crc-simd.cpp", line 148: ube: error: _mm_crc32_u8 intrinsic requires at least -xarch=sse4_2. "../../rijndael-simd.cpp", line 607: ube: error: _mm_aeskeygenassist_si128 intrinsic requires at least -xarch=aes. "../../chacha_avx.cpp", line 98: ube: error: _mm256_broadcastsi128_si256 intrinsic requires at least -xarch=avx2.
-
-
Now to use the cryptopp project from the Challenge-specific projct, do the following in the properties:
-
In the Build -> C++ Compiler page, choose All Configurations and then add
${CRYPTOPP_DIR}in the Include Directories.
-
In the Build -> Linker page, add the
${CRYPTOPP_DIR}/devstudio/cryptoppproject in the Libraries setting popup for each configuration.
-
-
You may need to allocate at least 4 GB of RAM to the virtual machine for compiling Crypto++.
OpenSSL currently supports building with Oracle Developer Studio only in 64-bit mode. Follow these steps:
-
Clone the library to some location (we'll refer to it as
${OPENSSL_DIR}):$ git clone https://github.com/openssl/openssl.git $ cd openssl $ git submodule update --init --recursive -
Source in the script above to set up the environment variables. Then build the library:
./config solaris64-x86_64-ccgmake -j 3

-
Right-click your Challenge-specific project and go to Properties. Make these changes in the dialog box:
-
In the Build -> C++ Compiler page, choose All Configurations and then:
- Add
${OPENSSL_DIR}/includein the Include Directories. - Change Architecture to 64 Bits.
- Add
-
In the Build -> Linker page:
- Add
${OPENSSL_DIR}to Additional Library Directories. - Change to the Debug configuration and enlist
${OPENSSL_DIR}/libssl.aand${OPENSSL_DIR}/libcrypto.ain Libraries. Repeat for the Release configuration.
- Add
-
In the Run page, set the
SSL_CERT_DIRenvironment variable to/etc/openssl/certs, as documented for Solaris 11.4.
-
-
Change all open library projects (e.g.
gtest,gtest_main,hunspell,cryptopp) to Architecture of 64 Bits in the Build -> C++ Compiler page of their Properties. -
Clean-build the Boost libraries as above, with the
address-model=64option.
