Importing into Embarcadero C┼┼Builder Starter 10.2
NOTE: I had to hack around GitHub's limitation in displaying certain symbols in the title of this page. It should really be two plus-signs (U+002B) there.
- Getting started
- Building a simple Challenge solution (with Boost headers and Google Test)
- Using the Hunspell library
- Linking in a Boost library
- Using the Crypto++ library
- Using the OpenSSL library
- You're done!
Following the write-up about importing this project into Microsoft Visual Studio, I decided to try out some of the other free IDEs/toolchains out there. Among the most well-marketed ones is Embarcadero's RAD Studio lineup, of which the hobbyist-friendly free edition is Embarcadero C++Builder Starter 10.2. Their C++ toolchain hails from from the Borland/CodeGear tools of the past 2 decades, and their compiler has recently been revamped with a Clang-based frontend to support C++11.
The first thing one should know about this environment is that there are actually two C++ compilers for 32-bit Windows: the classic bcc32.exe (which completely lacks C++11 support) and the Clang-enhanced bcc32c.exe. We need the latter for this project, however, the C++ project template still defaults to the old one. It is an easy setting to change in Project Options.
Aside from this, our core dependencies Boost and Google Test used to support the Borland/CodeGear tools once upon a time, but have decided to drop official support at least several years ago. Whatever toolchain-specific logic I found was written with the old bcc32.exe toolchain in mind, and neither project seems to have officially reconsidered their position after the Clang-enhanced bcc32c.exe was released in 2016. So I decided it would be a fun exercise to try and re-port them to the modern C++Builder toolchain.
There is a final usability note to keep in mind: the code editor allows the cursor to travel anywhere in the line, even beyond the end. The cursor also does not line-wrap backwards. There is no way to disable this behavior, and it is apparently a signature feature of the RAD Studio IDE and so is here to stay.
NOTE: The IDE (at least for the Community Edition) needs to be installed in a Windows user account that is a member of the Administrators group. (Otherwise, using the User Account Control prompt to supply the credentials of another admin user will cause the license key to be registered for that admin user account, and this user account will then be disallowed from launching the IDE.) Once the installation of the IDE is completed, the user account may be downgraded to a non-admin user without problems.
WARNING: The default installation of this toolchain enlists some of its own bin directories at the beginning of the system PATH. This prioritizes some of its own Unix-like utilities -- grep.exe, touch.exe and make.exe -- that have some non-standard behavior (e.g. emitting banner text in stdout, or grep.exe emitting a filename of STDIN in stdout when input is piped in to it), which can break our GCC-based build in the default Windows Command Prompt. To avoid this you'll need to move these extra directories to the end of the system PATH setting.
-
Clone the
cryptopalsproject somewhere in your computer.> git clone https://github.com/tanzislam/cryptopals.git -
Embarcadero provides their own configured/supported version of the Boost v1.55.0 libraries (for the
bcc32c.execompiler) as a GetIt Package. However, that version of Boost is just a bit too old for us; in particular,boost::optional<>::value_or()wasn't implemented until Boost v1.56.0. (UPDATE: Since C++Builder v10.3 the GetIt Package has been upgraded to Boost v1.68.0, but I am retaining these notes for using the latest upstream version at any time -- which has been updated to work with Clang-basedbcc32x.exe(introduced in C++Builder 10.2.3) as theembarcaderotoolchain.) To get started we'll need to compile some of Boost's header-only libraries using C++Builder:-
Fully clone the modular Boost repository from GitHub (this is a substantial download) and prepare the headers as described in the Getting Started guide using the following commands in Windows Command Prompt.
> git clone https://github.com/boostorg/boost.git
> cd boost
> git submodule update --init --recursive
> bootstrap.bat borland
> b2 headers
We will refer to this directory as
${BOOST_DIR}from now on. -
Boost.Build's
embarcaderotoolchain expects both the 32-bit and the 64-bit toolchain to be installed, so if you have installed only the 32-bit toolchain then the finalb2 headerscommand above will fail. In that situation you need to register a version of theembarcaderotoolchain to invokebcc32x.exe, and the easiest way to do so is to create a%HOMEDRIVE%%HOMEPATH%\user-config.jamfile containing the following lines:using embarcadero : 7.40 : bcc32x.exe ; using gcc ;(The second line is necessary to avoid breaking the MinGW-based build.)
Afterwards, delete the
project-config.jamand re-run the build command:> mv project-config.jam project-config.jam.disabled > b2 headers
-
-
Google Test
still hashad some unmaintained project files for C++Builder, which work well for the most part (apart from needing to change to the Clang-based compiler). It also has some#ifdeflogic intended forbcc32.exe, which similarly needed adapting for the capabilities of the newerbcc32c.exe. My patch was declined by the Google Test maintainers, but it is still available as follows:> git clone https://github.com/google/googletest.git > cd googletest > git remote add tanzislam https://github.com/tanzislam/googletest.git > git fetch tanzislam > git checkout tanzislam/port-to-borland > git merge masterWe will refer to this directory as
${GTEST_DIR}from now on.
-
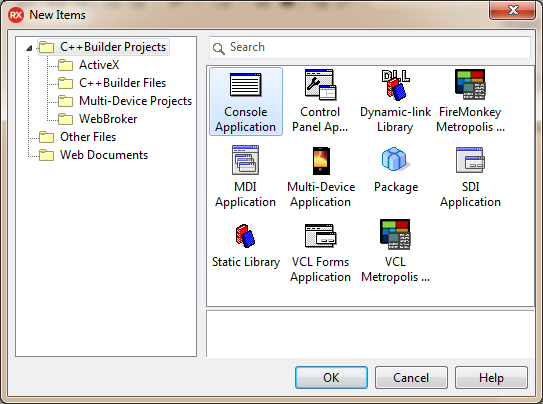
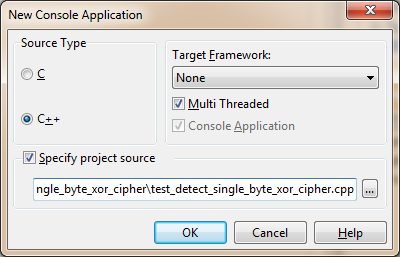
Create a new Console Application project, specifying one of the Challenge-specific source files as project source in the dialog. Also specify "None" for Target Framework, and enable the Multi Threaded option.
-
In the Project Manager, right-click Project 1.exe and use the Add... item to add the source files listed in the
SRCS=variable of theGNUmakefile.
-
Change the toolchain to the Clang-enhanced compiler (
bcc32c.exe) as follows:-
Right-click your Challenge project and go to Options....
-
At the top of the dialog box, choose "All Configurations - All Platforms" in the Target dropdown.
-
Then go to the C++ Compiler page, and under Classic Compiler uncheck the Use 'classic' Borland compiler, 32-bit Windows platform only option to "false".

-
Click OK to save your changes and close the Properties dialog box.
-
-
Boost has a lot of workarounds for conformance issues in different C++ implementations. The C++Builder workarounds were prepared with an earlier release of
bcc32.exeand are not needed with the Clang-based compiler. However, Boost's compiler/version-detection logic doesn't distinguish between the two compilers, so we need to disable those version-specific workarounds by definingBOOST_STRICT_CONFIGin C++ (Shared Options) -> Conditional defines (for all configurations and platforms). Also consider definingBOOST_ASSERT_CONFIGto be safe.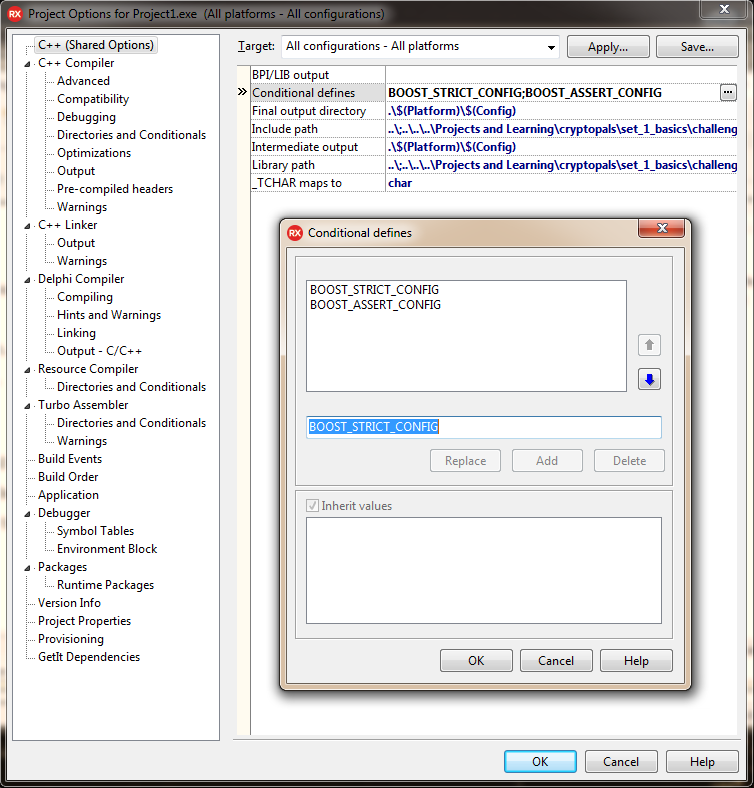
-
The standard library in C++Builder (from Dinkumware) seems to have a bug in checking whether the compiler has
constexprsupport, and ends up defining thestd::numeric_limits<T>::max()function as notconstexpr. I have reported this to Embarcadero; in the meantime it can be worked around by defining_HAS_CONSTEXPRin C++ (Shared Options) -> Conditional defines (for all configurations and platforms) as above.UPDATE: This has been fixed in C++Builder 10.3.
-
Boost.SmartPtr has its own compiler-specific implementations of the C++11
<atomic>header, as a workaround for bugs in early implementations. Unfortunately, the compiler-detection logic (in<boost/smart_ptr/detail/sp_counted_base.hpp>andsp_has_sync.hpp) does not know aboutbcc32c.exe, and ends up choosing the overrides for Clang -- which encounters some compilation errors because C++Builder uses a different standard library implementation (Dinkumware instead of libc++). If this happens, the override-selection logic needs to be suppressed by definingBOOST_SP_USE_STD_ATOMICin C++ (Shared Options) -> Conditional defines (for all configurations and platforms) as above. -
In the Project Manager, right-click ProjectGroup1 and use the Add Existing Project... option to open the existing
gtest.cbprojandgtest_main.cbprojproject files under${GTEST_DIR}\googletest\codegear(where${GTEST_DIR}is the root directory of your Google Test repository clone).
-
The addition of the existing project files would have changed the active project. Change it back to Project1.exe by right-clicking it and choosing Activate, so that it is shown in bold again. Also ensure that all three projects are at the same configuration (Debug or Release), by using the Set active configuration menu in the Project Manager tool window. At this point your Project Manager tool window should look like this:

-
Right-click the Challenge-specific project and click Dependencies.... In the popup, enable both the
gtestandgtest_mainprojects as dependencies ofProject1.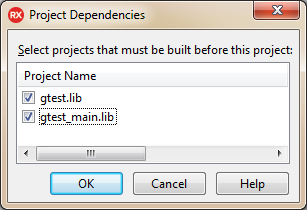
-
Right-click Project1.exe and go to Options.... In the dialog box:
-
Change the Target dropdown to "All configurations - All platforms" if it isn't already so.
-
Go to the C++ (Shared Options) page, and in Include path enlist:
${GTEST_DIR}\googletest\include-
${BOOST_DIR}(i.e. the top-level directory of your Boost repo clone) - any other Challenge directories listed in a
VPATHvariable in theGNUmakefileof this Challenge.

-
Click OK to save your changes and close the dialog box.
-
-
At this point the source files should compile fine, but the link step will not be able to find the required libraries (
gtest.libandgtest_main.lib) -- resulting in several[ilink32 Error]messages in the Build tool window. We need to specify the names and locations of the two libraries; follow these steps:-
In the Project Manager, double-click the
Project1PCH1.hfile to open it. Then in the Code Editor window add these two lines at the end of the file:#pragma link "gtest.lib" #pragma link "gtest_main.lib"
-
Right-click Project1.exe and go to Options.... In the dialog box:
- Ensure that the Target dropdown is at "All configurations - All platforms" target.
- Go to the C++ (Shared Options) page.
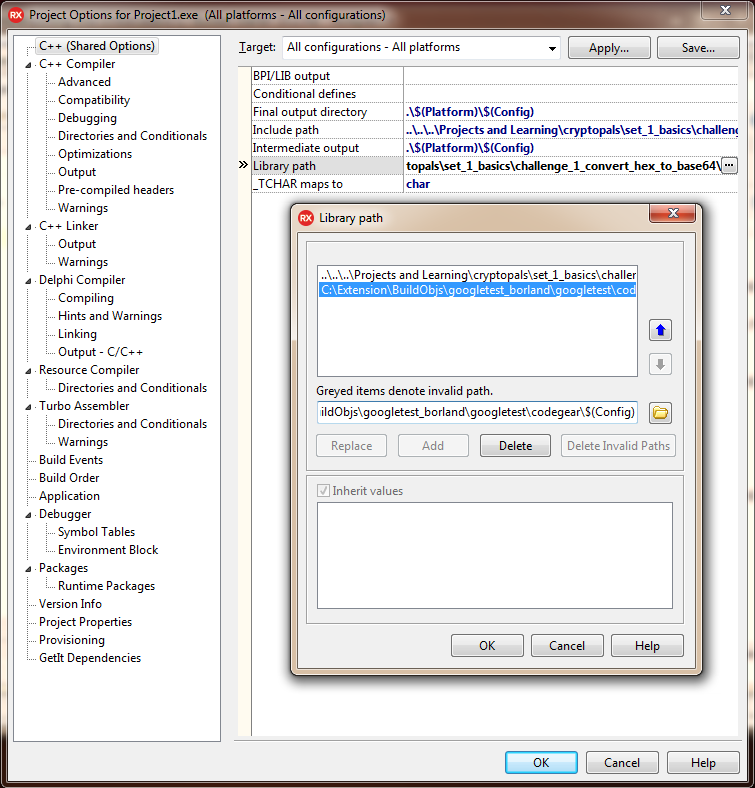
- In Library path, enlist:
${GTEST_DIR}\googletest\codegear\$(Config). (Note that you should type in$(Config)exactly like this. It will be expanded to either "Debug" or "Release" when the project builds.)
- Click OK to save your changes and close the dialog box.
-
-
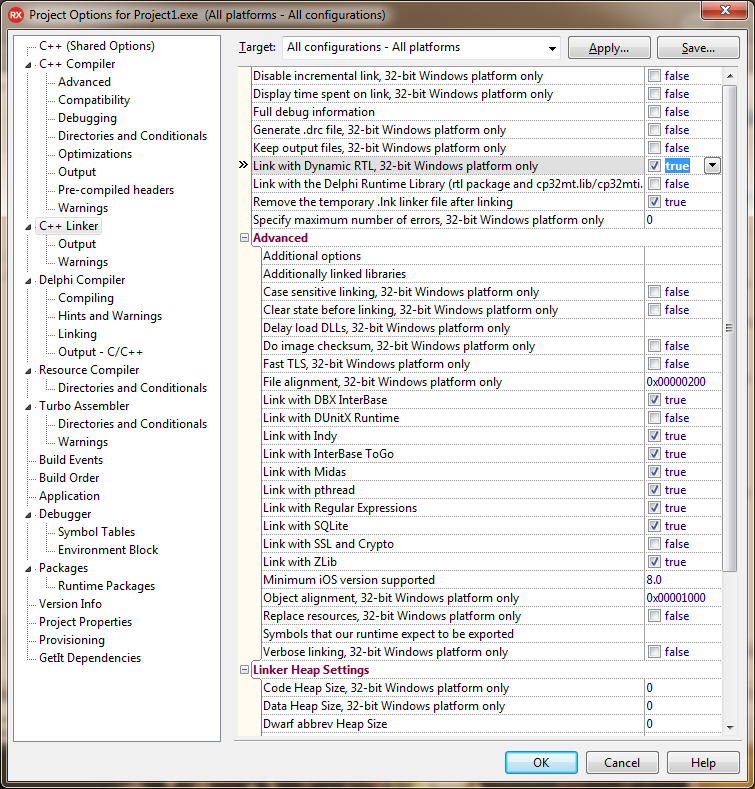
Most (if not all) of the link errors should now be resolved. I was still encountering some undefined symbols in the C++ iostreams library, and I managed to remedy them by enabling the Link with Dynamic RTL, 32-bit Windows platform only setting in the C++ Linker page of Project1.exe -> Options....
-
The test program should now start, but you may run into trouble with the debugger stopping the execution on any C++ exception being fired, even the ones that will be caught. To disable this behavior:
-
Go to Tools menu and click Options....
-
In the dialog box, go to the Debugger Options -> Embarcadero Debuggers -> Language Exceptions page, and uncheck the Notify on language exceptions option.

-
Click OK to save your change and close the dialog box.
-
The Hunspell library doesn't support C++Builder out-of-the-box. To build it we will need a few maneuvers:
-
Clone the Hunspell project:
> git clone https://github.com/hunspell/hunspell.gitWe will refer to this directory as
${HUNSPELL_DIR}from now on. -
The Hunspell codebase does not have any project files for C++Builder, so create one:
-
In the Project Manager, right-click ProjectGroup1 and go to Add New Project.... Choose Static Library in the dialog box.

-
Select the new Project1.lib in the Project Manager, wait a second, then click it a second time to rename it to
hunspell.lib. -
Right-click it and go to Add..., select all the
.cxxfiles in${HUNSPELL_DIR}\src\hunspelland click Open to include them into the project. (You may want to change the filter to Any file (*.*) and sort by the Type column to accomplish this effectively.)
-
Save the new project in a new
codegeardirectory inside the Hunspell repository root, ashunspell.cbproj. -
Right-click it and go to Options.... In the dialog box:
- Change the Target dropdown to "All Configurations - All Platforms".
- Go to the C++ (Shared Options) page and set Include Path to
..\src\hunspell\, and both the Final output directory and the Intermediate output to.\$(Platform)\$(Config). Also in Conditional Defines addHUNSPELL_STATICto force the compilation to assume that we are building a static library. (This may be necessary if the Autotools-based build system has already been invoked, in which case you would otherwise find some symbols not being exported from the static library.) - Go to the C++ Compiler page and disable the Use 'classic' Borland compiler, 32-bit Windows platform only option.
- Go to the TLib page and enable the Link with Dynamic RTL, 32-bit Windows platform only option.

- Click OK to save your changes and close the dialog box.
-
-
Change the active project back to Project1.exe.
-
Enlist
hunspell.libas a dependency ofProject1.exe.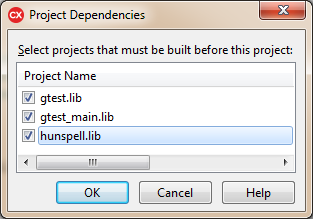
-
Use the Set active configuration menu in the Project Manager to switch all projects in the solution to the same configuration (Debug or Release).

-
Add this line to the
Project1PCH1.hfile under Project1.exe:#pragma link "hunspell.lib" -
Right-click Project1.exe and go to Options.... In the dialog box:
-
Change the Target dropdown to "All Configurations - All Platforms".
-
In the C++ (Shared Options) page, enlist
${HUNSPELL_DIR}\src\hunspellin the Include path, and enlist${HUNSPELL_DIR}\codegear\$(Platform)\$(Config)in the Library path. -
In the Debugger -> Environment Block page, under User overrides set up the environment variables
HUNSPELL_AFFIX_PATHandHUNSPELL_DICT_PATHto point to theen_US.affanden_US.dicfiles in your SCOWL download.
-
-
When compiling against Boost.System, the Windows SDK included with C++Builder encounters a compilation error because the
ntverp.hheader cannot find thentverp.verfile for inclusion. The issue is worked around by creating a blank file of that name inC:\Program Files (x86)\Embarcadero\Studio\19.0\include\windows\sdkwith administrative access.UPDATE: This problem has been fixed in C++Builder 10.3 update 2.
-
Starting with C++Builder 10.3, the Clang-based compiler encounters problems with some double-braced initialization code in Boost.Asio. You'll need my patch to work around that:
> cd ${BOOST_DIR}\libs\asio
> git remote add tanzislam https://github.com/tanzislam/asio.git
> git fetch tanzislam
> git merge tanzislam/fix-build-on-cppbuilder
UPDATE: This problem has been fixed with C++Builder v10.3.3.
-
Now build the Boost.System, Boost.DateTime, and Boost.Regex libraries with:
- the embarcadero-7.40 toolchain that we just registered
- the versioned layout
- multi-threaded mode
- shared C++ runtime
- the release variant
- the 32-bit address model
> cd ${BOOST_DIR}
> b2 --layout=versioned toolset=embarcadero-7.40 variant=release threading=multi runtime-link=shared address-model=32 --with-system --with-date_time --with-regex
-
Finally add
${BOOST_DIR}\stage\libto the library search path in C++Builder for all configurations and platforms.
Similar to Hunspell, the Crypto++ library doesn't support building with C++Builder by default. We'll create our own project to mimic the actions taken by the GNUmakefile for the static library build.
-
Clone the
cryptoppproject somewhere in your filesystem:> git clone https://github.com/weidai11/cryptopp.gitWe will refer to this location as
${CRYPTOPP_DIR}from now on. -
Right-click ProjectGroup1 and click Add New Project..., and choose Static Library in the popup.
-
Right-click and rename the newly-created project to
cryptopp.lib. -
Right-click it again and use Save As... to save it inside
${CRYPTOPP_DIR}ascryptopp.cbproj. -
Right-click cryptopp.lib and choose Add.... In the popup, select all the
.cppfiles in${CRYPTOPP_DIR}that are neither listed in theTESTSRCSvariable nor filtered out in theSRCSexpression inside theGNUmakefile.
-
Right-click cryptopp.lib and go to Options.... In the dialog box:
-
Change the Target dropdown to "All configurations - All platforms".
-
In the C++ (Shared Options) page, ensure that both the Include Path and the Library Path are blank, and that both the Final output directory and the Intermediate output are set to
.\$(Platform)\$(Config). Also enlist the following in Conditional defines:-
CRYPTOPP_NO_CXX11, since some corner-case features (e.g. alignment) of the C++11 Standard are not implemented inbcc32c.exe. -
CRYPTOPP_DISABLE_SSSE3, since this Clang-based toolchain does not provide the<tmmintrin.h>header needed for SSSE3 intrinsics. -
__SSE2__,__SSE__, and__MMX__. These are needed for enabling SSE2 intrinsics needed bysse_simd.cpp.
-
NOTE: In C++Builder 10.3 the Clang frontend has been updated to have this patch, but the Intel intrinsics headers inside the bundled Windows SDK were not updated. This leads to errors due to retired compiler builtins used in
<xmmintrin.h>. This issue has been fixed in C++Builder 10.3.3, but with earlier 10.3 releases you will need to work around it by definingCRYPTOPP_DISABLE_ASM(in both cryptopp.lib and your Challenge-specific project) instead of__SSE2__/__SSE__/__MMX__above.
-
NOTE: In C++Builder 10.3 the Clang frontend has been updated to have this patch, but the Intel intrinsics headers inside the bundled Windows SDK were not updated. This leads to errors due to retired compiler builtins used in
-
-
In the C++ Compiler page, uncheck Use 'classic' Borland compiler, 32-bit Windows platform only.
-
In the C++ Linker page, ensure that Link with Dynamic RTL, 32-bit Windows platform only is checked.
-
In the Build Order page, rearrange
cryptlib.cpp,cpu.cppandinteger.cppto the top of the list, in that sequence. (This follows from the advice on initialization order in theReadme.txtfile.)
-
Click OK to close the dialog box.
-
-
Right-click your Challenge-specific project (Project1.exe) and choose Activate to set it as the main project.
-
Right-click Project1.exe again and go to Dependencies.... Enable
cryptopp.libas a dependency, then click OK.
-
Right-click Project1.exe again and go to Options.... In the dialog box:
-
Change the Target dropdown to "All configurations - All platforms".
-
In the C++ (Shared Options) page, enlist
${CRYPTOPP_DIR}in the Include path, and enlist${CRYPTOPP_DIR}\$(Platform)\$(Config)in the Library path.
-
Click OK to close the dialog box.
-
-
Add this line to Project1PCH1.h:
#pragma link "cryptopp.lib" -
Use the Set active configuration dropdown in the Project Manager to ensure that all projects in the project group are set to the same configuration.
You will need to install a Perl 5 distribution like Strawberry Perl or ActivePerl before continuing with these steps.
-
In a RAD Studio Command Prompt, clone the project somewhere in your filesystem (we'll call it
${OPENSSL_DIR}):> git clone https://github.com/openssl/openssl.git > cd openssl > git submodule update --init --recursive -
Build the library for 32-bit:
perl Configure BC-32 --prefix=%CD% no-asmmake -N

-
Right-click your Challenge-specific project (Project1.exe) and go to Options.... In the dialog box:
- Change the Target dropdown to "All configurations - All platforms".
- In the C++ (Shared Options) page, enlist
${OPENSSL_DIR}\includein the Include path, and enlist${OPENSSL_DIR}in the Library path. - To ensure that the DLL loader can find
libcrypto-3.dlland its dependencies, change the Target dropdown to "All configurations - Windows 32-bit platform" and then do either one of the following:- In the Debugger page, specify
${OPENSSL_DIR}as the Working Directory. - In the Environment Block page, add an override to the Path environment variable, and add
${OPENSSL_DIR}to it with a;-delimiter.
- In the Debugger page, specify
- Click OK to close the dialog box.
-
Add these lines to Project1PCH1.h:
#pragma link "libcrypto.lib"
#pragma link "libssl.lib"
That should be all the configuration required, and the programs should run now.

