Software ~ Advanced ~ Telemetry & OSD
1. configure general OSD and telemetry parameters in wifibroadcast-1.txt (both on AirPi and GroundPi)
-
Set the Pi's serial port baudrate to the same baudrate as the serial telemetry data stream coming from the flight control. E.g.
FC_TELEMETRY_BAUDRATE=57600if your flightcontrol sends it's telemetry data using 57600 baud. -
For the onboard Pi serial port leave default
FC_TELEMETRY_SERIALPORT=/dev/serial0, if using an external USB2Serial adapter, setFC_TELEMETRY_SERIALPORT=/dev/ttyUSB0 -
If you want to connect your flight controller to the AirPi and use wifibroadcast for telemetry transmission, leave
TELEMETRY_TRANSMISSION=wbc -
If you have some other means of transmitting the telemetry to the ground (e.g. an LRS with serial downlink or 3DR dongles) choose
TELEMETRY_TRANSMISSION=externalto receive the telemetry stream on the ground Pi serial port. If using external telemetry transmission, also configureEXTERNAL_TELEMETRY_SERIALPORT_GROUND=andEXTERNAL_TELEMETRY_SERIALPORT_GROUND_BAUDRATE=
NOTE: Before Release 1.6 there is a bug and a workaround that can (but not necessarily will) cause telemetry data corruption. Read this for details.
-
Choose the telemetry protocol used, Mavlink is default, other options supported are Frsky and Lightweight telemetry (LTM). E.g.:
#define LTM -
Choose graphical OSD options you would like to have enabled in osdconfig.txt. Should be self-explanatory.
Generally, try to configure your flight control so that it does not send out unnecessary large amounts of data to keep the packet rate as low as possible.
The received telemetry data stream will also be saved in text and raw form to an USB memory stick automatically for later review.
-
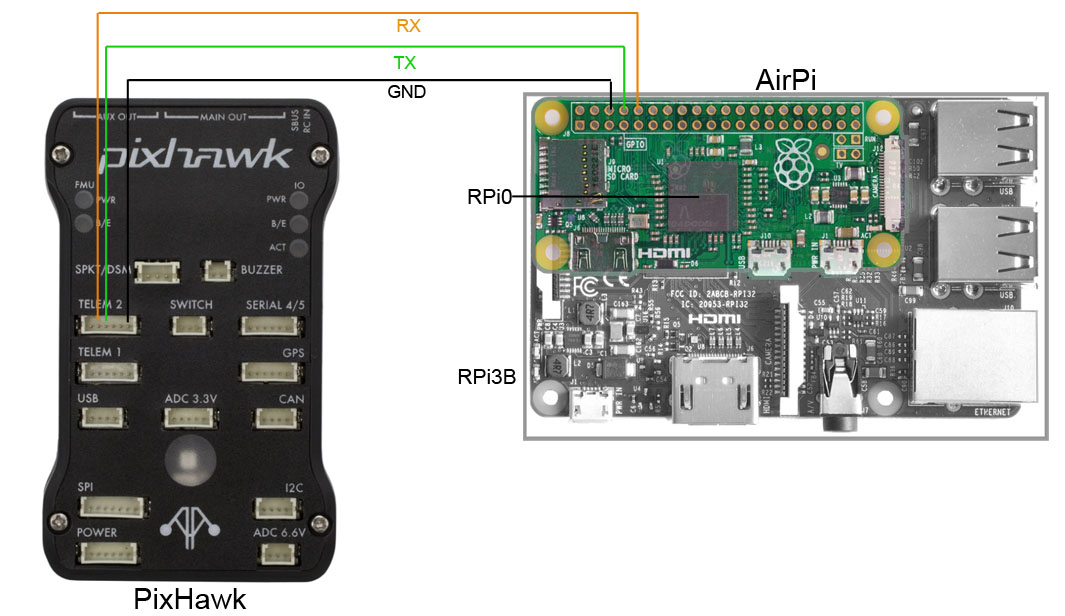
Connect the serial port TX pin of your flight controller to the serial port RX pin on the Pi. WARNING: The Pi uses 3.3V logic level on the serial ports, make sure your flight control also uses 3.3V. 5V might destroy the Pi serial port! So don't connect the + 5V ! (See https://pinout.xyz/ for pinout).
-
For a Pixhawk follow this link (http://ardupilot.org/dev/docs/raspberry-pi-via-mavlink.html).
Example of a Pi zero W H (H for already soldered hat) connected with a PixHawk 3 Pro :

-
For Cleanflight/Betaflight/Inav/etc.: Do not send an inverted serial signal, the Pi doesn't support this. When using a Naze32 clone with softserial, disable this on the CLI with e.g.
set telemetry_inversion = OFF(may differ depending on firmware used) -
Power the system up, you should see the received data and decoded data counters for telemetry (last two numbers in the RSSI display in the upper left corner) increasing. If the first number stays at zero, there is no telemetry being transmitted/received, re-check wiring, baudrate and flight control settings in that case. If the first number increases, but the second number stays at zero, there is data being received, but it cannot be decoded, usually this is caused by wrong baudrate settings or wrong telemetry protocol chosen.

| Number | Desciption |
|---|---|
| 1 | Best signal strength received from all cards (in the example above, card Rx3 has the best signal strength). |
| 2 | Bad blocks/visible glitches counter. With stock settings, one "block" consists of 8 data and 4 FEC packets, thus allowing for a maximum of 4 lost packets without the badblock counter increasing (and visible glitches appearing) |
| 3 | Lost packet counter |
| 4 | "FEC/packetloss display". Green (or low): no packetloss. Yellow (or medium): packetloss is occuring, but still being corrected by the FEC (i.e. not enough to lead to visible glitches yet). Red (or high): heavy packetloss with visible glitches |
| 5 | RSSI value from Mavlink telemetry data, i.e. non-WBC R/C RSSI |
| 6 | Video bitrate (the bitrate that raspivid has been set to). Number in parentheses is the maximum available bitrate that was measured |
| 7 | Injection fail count. Increased whenever the TX card could not inject data because the channel was already occupied |
| 8 | FEC packets skipped count. Increases whenever the TX had to skip FEC packets because the channel was already occupied |
| 9 | Live video bitrate, i.e. the amount of video data per second that is currently being received |
| 10 | CTS mode |
| 11 | lost packets for R/C and telemetry uplink |
| 12 | signal strength for uplink |
| 13 | CPU load/temperature of AirPi |
| 14 | CPU load/temperature of GroundPi |
| 15 | GPS Heading in degrees |
| 16 | GPS Speed |
| 17 | GPS height (MSL) |
| 18 | Climb/Fall rate in m/s |
| 19 | Airspeed |
| 20 | Barometric altitude |
| 21 | Distance to Home/Starting point |
| 22 | GPS Latitude |
| 23 | GPS Longitude |
| 24 | Flight mode |
| 25 | Aircraft's Battery voltage |
| 26 | Aircraft's Battery consumption |
| 27 | Number of GPS satellites acquired |
| 28 | Signal strength and number of lost packets for each individual RX cards |