-
Notifications
You must be signed in to change notification settings - Fork 2
Home
The standalone application VideoAnalysis allows for simple analysis on a set of video files. The application runs on both Windows and OSX computers and it should be able to analyze all video files that can be played on the computer.

There are three ways of loading video files into VideoAnalysis. The simplest way is probably to just drag and drop it anywhere on the interface.

You can also open a video file by clicking on the File button on the Add Video panel.

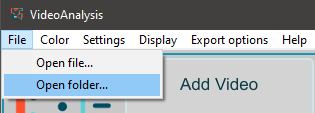
Alternatively you can open a video file by selecting File > Open file... from the menu.

One of the unique things of VideoAnalysis is that it also allows for batch processing a large number of files. This is particularly useful if you have a lot of recordings to analyze. This can be done by loading an entire folder of video files. Again, the easiest way open a folder is to drag and drop it on the interface. After the folder has been loaded, you can see its contents as items in a drop-down list.

You can also load a folder by clicking on the Folder button on the Add Video panel.

Alternatively you can open a folder by selecting File > Open folder... from the menu.

After loading one (or more) files, you will get up a preview of the video in the Source display.

You can toggle playback either by clicking on the Play icon, or by pressing the Space bar.
Below the Play icon you can find two yellow arrows, which you can use to nudge the playback one frame forward or back. You can also do this by pressing Shift + Left arrow or Shift + Right arrow on your keyboard.
Next to the Play icon you can see the Timeline. This can be used to quickly skim through the video, and more importantly to select the trimming points of the analysis (see below).
In the Source Display you can set the in- and out-points of the analysis by selecting either edge of the yellow area on the Timeline and dragging it to the desired time-point.

Only the trimmed part of the video will be processed during the analysis.
In order to save time during processing, it may be worth skipping frames. If you set the skipping value to 1, it means skipping one frame between every analyzed frame. This will consequently also reduce the processing time to 50%. If skipping is set to 2, then the analysis will skip two frames between every analyzed frame, and so on.

You can get an idea about how it works by observing the number of Processed frames. Skipping frames can be a huge time saver when working with extremely long videos.
To crop the source video here is what you should do:
- In the Cropping panel activate cropping with the toggle.
- In the Source Display draw a rectangle over the area you wish to keep.
- Optionally you can also fine tune the position of this cropping rectangle with the number boxes.

In addition to improving the visual result, this is also a way to reduce the processing time, since fewer pixels have to be processed.
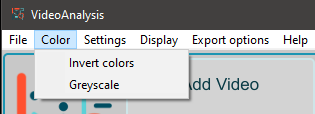
There are two ways to change the color space of your source video in VideoAnalysis. To invert the colors, go to Color in the menu and check Invert colors. This will change dark colors to light, and the other way around.

It is also possible to convert a color video to greyscale by checking Color > Greyscale. Since a greyscale video only contains 1 plane, processing speed will quite a lot faster than for a color video with 4 planes.
Note that these two options (inversion and color) are independent from each other, so you can check either or both.
A real-time preview of the analysis can be observed in the Display window. Please note that this is, indeed, only a preview, and will adjust its quality based on the available resources on the computer. The actual analysis will be performed in full quality (and in non-realtime), so there may be a difference between the preview and the final result.

The Display window consists of the bounding box video (left), the history video (middle) and the motion video (right). You can toggle these independently from the Display menu, with the additional option to make a floating window.
The Display window always resizes automatically when you are changing the cropping dimension. To adjust its scale, use the dial in the lower-right corner of the interface.

When you are satisfied with the current settings it is time to decide what kind of images and videos to render. You can toggle these in the Export options menu.

Here it is also possible to select which file type you want to use for the exported images. JPEG images are compressed (and smaller in file size), while TIFF and PNG files are uncompressed. The file type chosen does not impact the pixel size of the exported images, this will be based on size of the original video.
When you have made your selections in the other boxes, just press the button which says 'Click to export data'.

This will perform the analysis, render all the chosen images, videos, as well as perform extraction of some motion features. All the exported files will be saved to the same folder as the source video.
When importing a folder with video files, VideoAnalysis will by default use independent setting for each video file. You can change this behavior by selecting Settings > Use same settings for each file. In this case the last settings (that is, the ones you had at the moment of changing to this mode) will apply to each video file during the batch export.

To go back to using independent settings for each file, select Remember settings for each file. It is also possible to save or load all settings into a .json file. This can make it easy to pick up your work where you left off, or to share your settings with other users.
Have you experienced errors or any strange behavior from VideoAnalysis? If you take a moment and report it to us, you can greatly contribute to the development of this software. Clicking on Help > Report a problem... opens your default internet browser and takes you straight to the Issues page at our Github repository for VideoAnalysis. Here you can click on the (green) New issue button, and tell us about the problem.

A project from the fourMs Lab, RITMO Centre for Interdisciplinary Studies in Rhythm, Time and Motion, Department of Musicology, University of Oslo.