-
Notifications
You must be signed in to change notification settings - Fork 2
NanoLIMS v2.0 Manual For Basic Usage
#Table Of Contents
- User Registration
- Request Project Name
- Populate Dropdown Options (optional)
- Add Samples To An Existing Project
- Updating Samples
- Query Info
- Bulk Update Samples
- Add Custom Info
- Pooling Samples
- Recording and Viewing Sequencing Submission Info
- Label Making
- FAQ
- Notes for Users
In your web browser go to http://youripaddress.com/login.php and select ‘Create an account’

Fill Out Form and check optional checkbox if requesting to be added as an admin
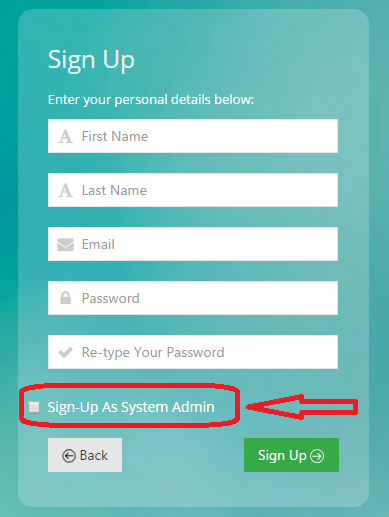
An email will be sent to admin notifying them of your request. Admin will activate your account and manually email you back once the account has been activated
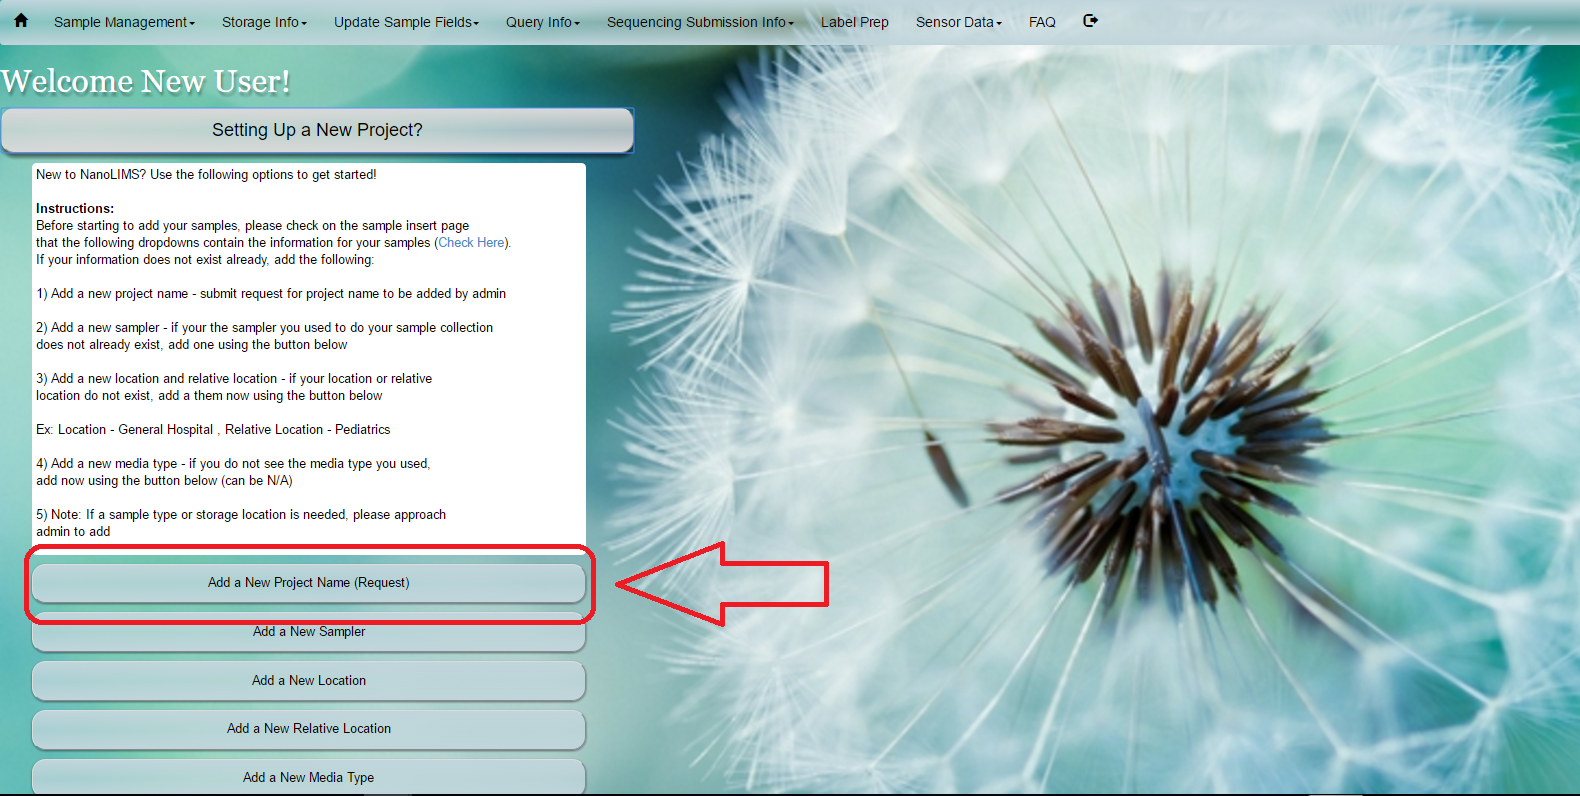
#Request Project Name Select ‘Add a New Project’ under the ‘Setting Up a New Project?’ button on the home screen. Alternatively, select ‘Add Project Name For Approval’ under the ‘Update Sample Fields’ in the main toolbar
or
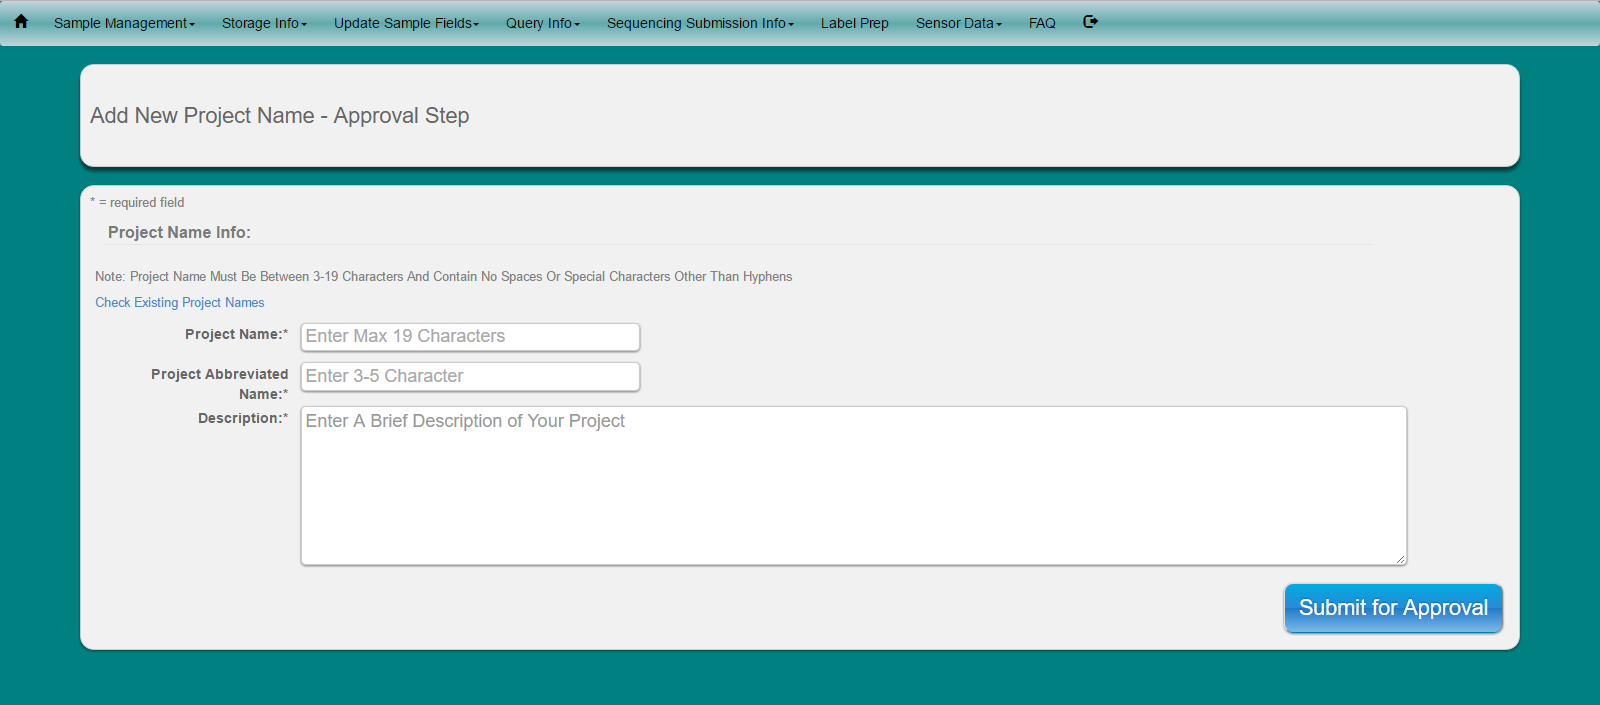
Fill in information about project. Currently the ‘Project Abbreviated Name’ is used along with the 3-digit sample numbers in the project to build a unique name for each of our samples for use when submitting samples to our sequencing facility to our sequencing facility ( see ‘Sequencing Submission Info’ for more information)
An email will be sent to the admin notifying them of your request. The admin will enter the project name information and an email will be sent to you once they have entered your new project information
Dropdown options can be added to for sample entry (Ex: Add media TSA to dropdown for media type)
Select ‘Update Sample Fields’ from toolbar -
Add Samplers/ Add Analysis/ Add DNA Extraction Kit/ Add Media Typ /Add Sampling Location/ Add Sampling Relative Location/ Add New Sensor
Select the dropdown you would like to add to or populate
Fill in form and Submit
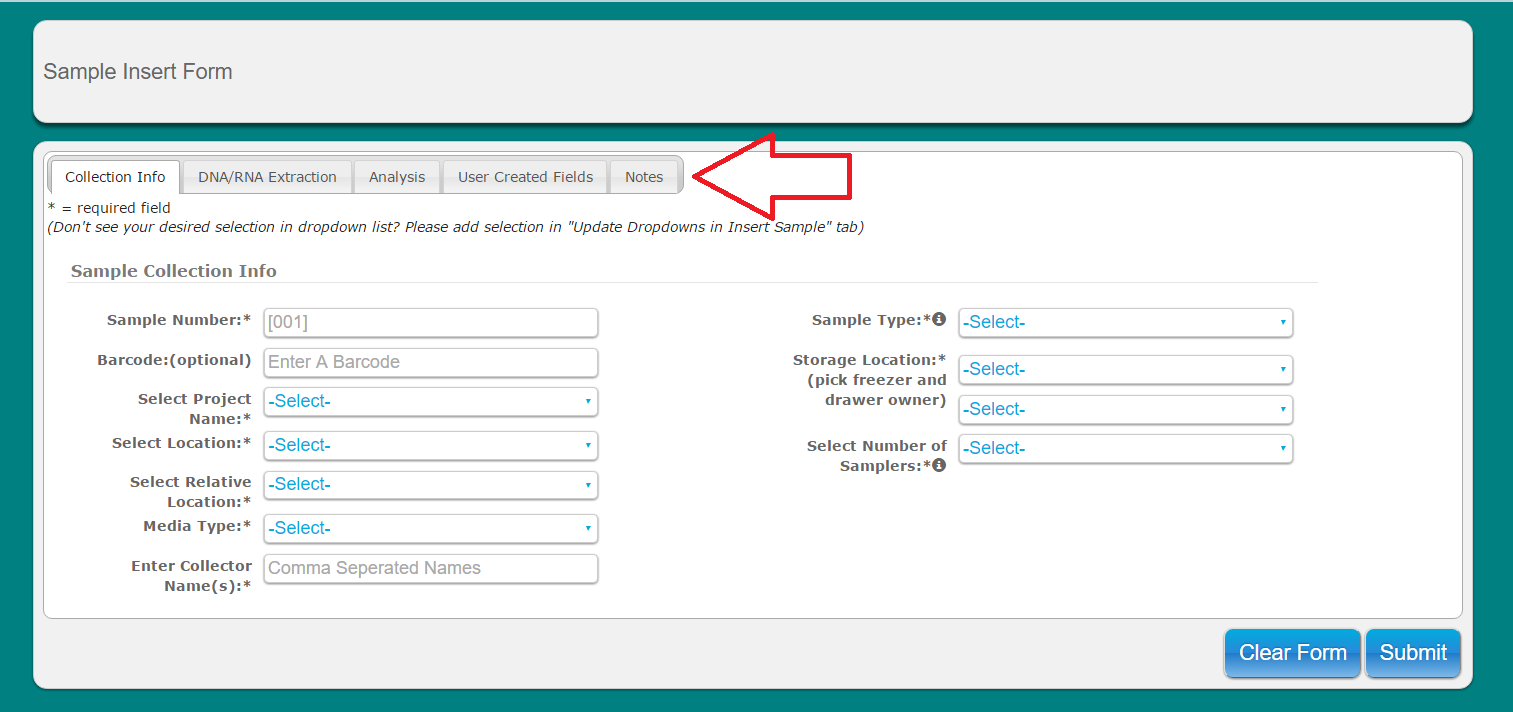
Select ‘Sample Management’ from toolbar. Select ‘Insert Sample’ from dropdown menu
Alternatively, select ‘Adding Samples to Existing Project?’ button on home screen and select ‘Insert Sample(s)’ Below are i) first option ii) alternative option
i)
ii)
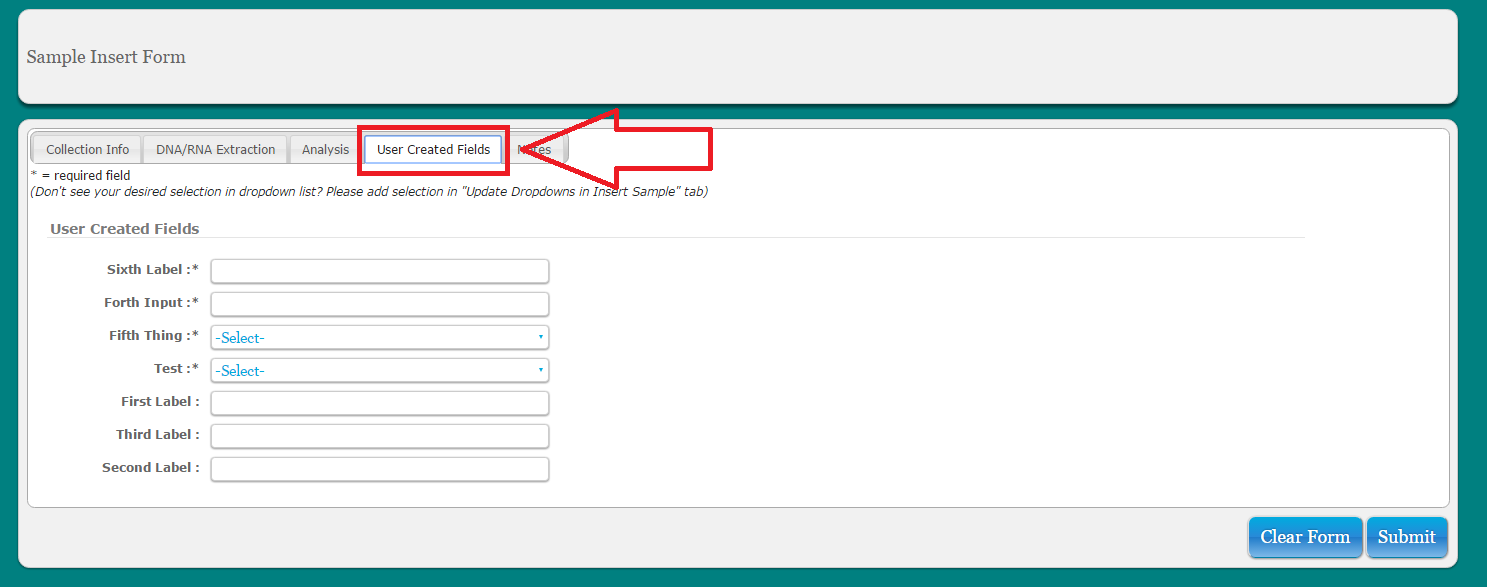
Click on alternate tabs to fill in remaining info for sample. Please note that some User Created Fields will be required
**Note: Samples cannot be deleted via the web-ui at this time. However, samples entries that were entered incorrectly or by mistake can be edited using the 'update samples' option to change many fields including date/time, project name, project type, and sample number (as long as it does not exist already for the given project)
Select ‘Sample Management’ from toolbar. Select ‘Update Sample’ from dropdown menu
Populate field with sample name and click ‘Lookup’
Edit desired fields and click ‘Update’ button
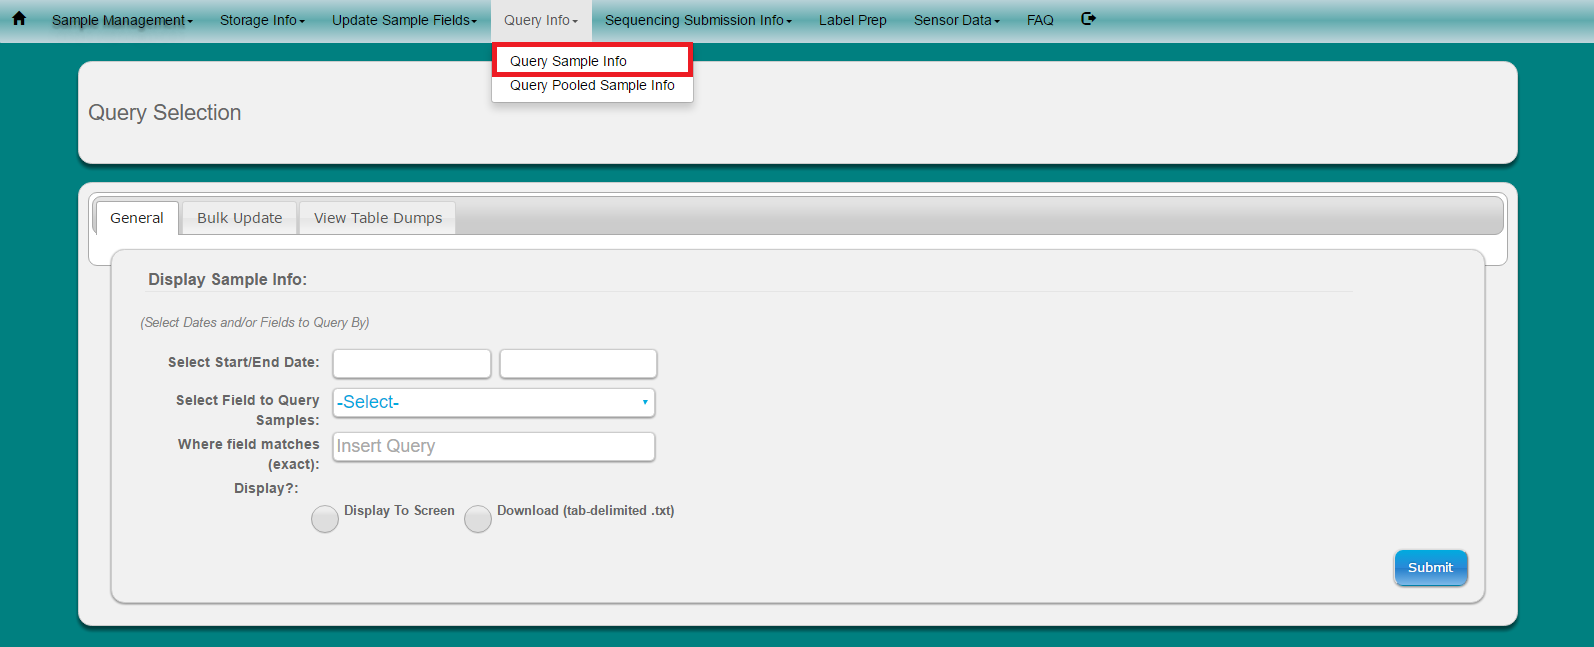
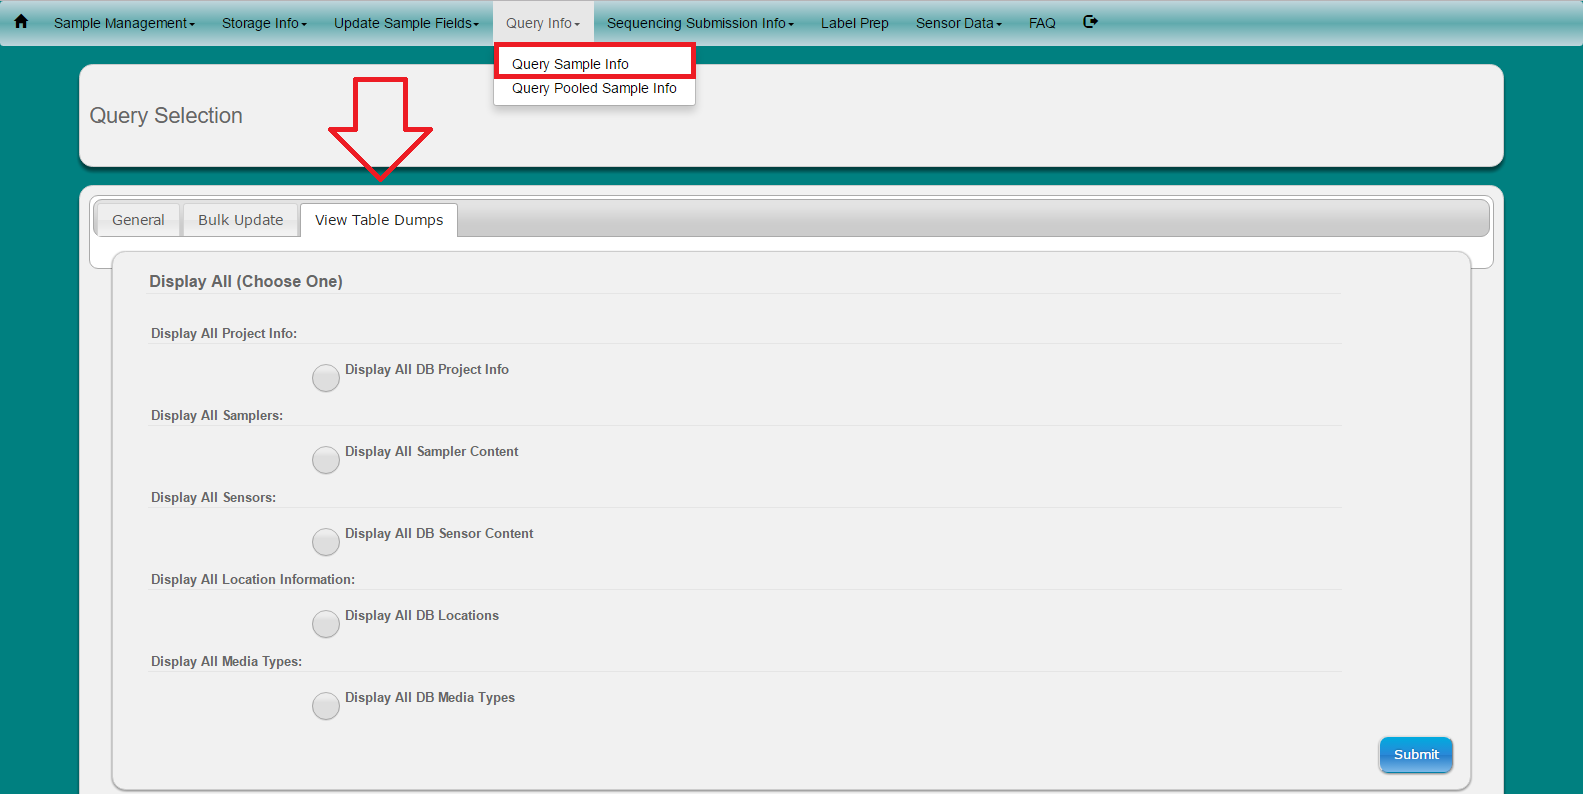
Select ‘Query Info’ from toolbar
Select ‘Query Sample Info’ from dropdown menu
Choose if you want to search samples by Date And/Or Specific field
Choose if you would like to display the results to the screen or if you would like to download an tab-delimited text file
If you choose to Display to Screen, click on headers to sort your samples by that column. Use 'Sample Sort' Column to correctly sort your samples by number
Use Search bar to search samples by information. If you are searching for a word that contains spaces or is part of another word, try putting double quotes around the word you are searching for. Ex: “Sam” would find the word “Sam” but Sam without the double quotes would also find ‘Sample’
Search boxes in footers of each column will enable user to narrow down search results by multiple fields Ex: Search column media type 'TSA' and then by collector 'Dan'
Data-Dump - If you want to quickly know information about all of the projects,locations, samplers, media types, or sensors, select the tab ‘Data Dump’ and select submit
Option available to bulk update samples:
- DNA Extraction
- Storage Info
- Insert Read Submission IDs
- Update & View Read Submission IDs
- User Created Fields
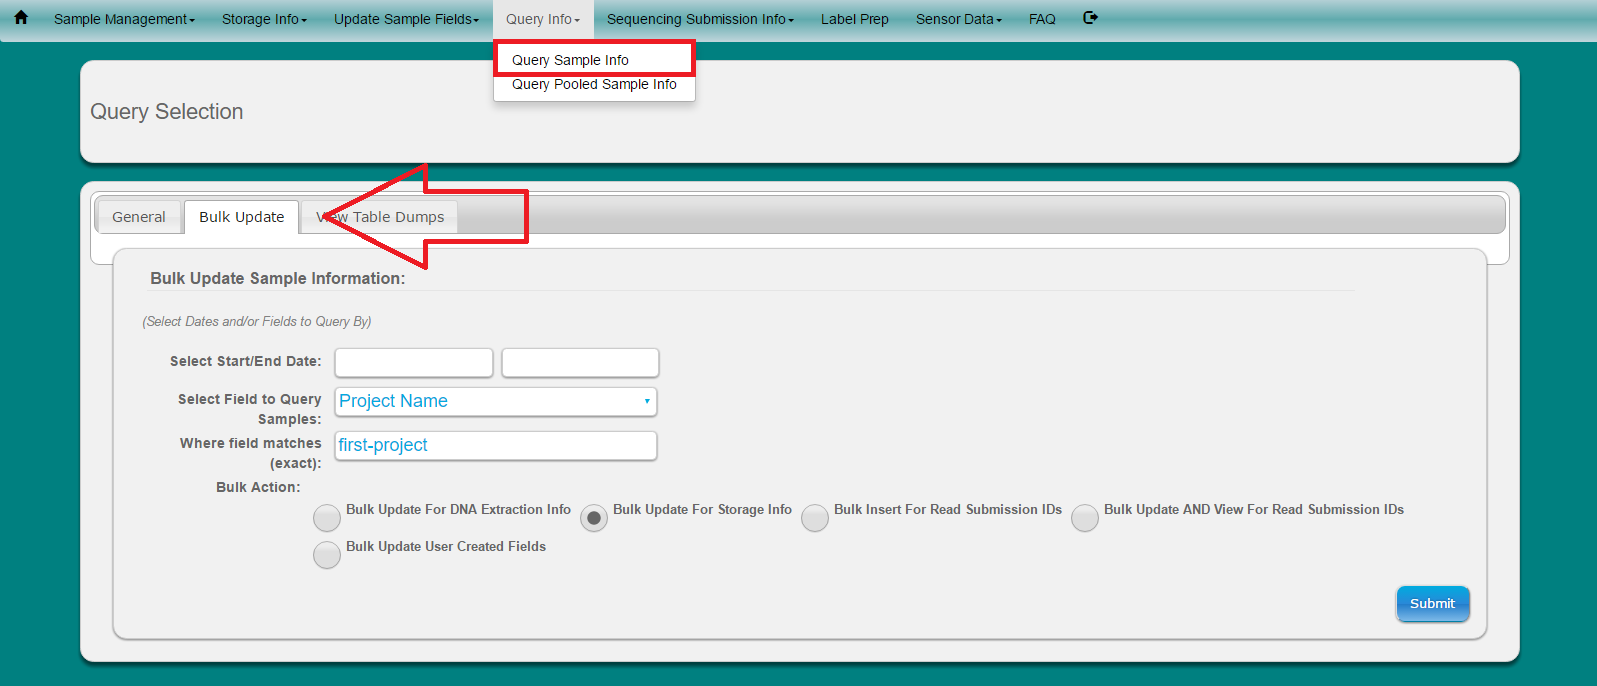
Select ‘Query Info’ from main toolbar
Select ‘Query Sample Info’ from dropdown
Select ‘Bulk Update’ tab
Look-up samples to update by using Select Dates or Select Field to Query Samples
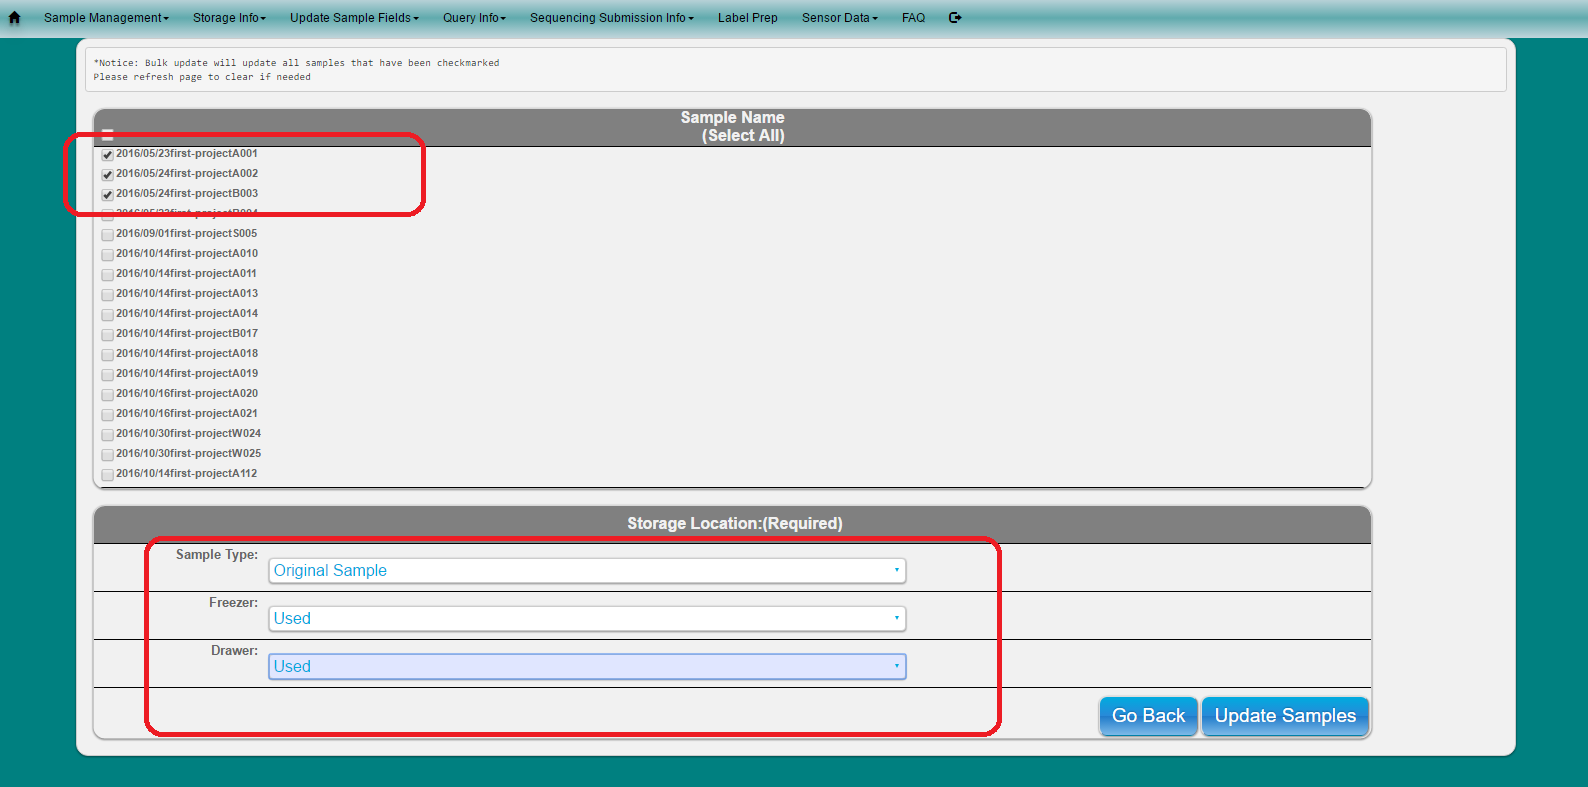
Note: This will narrow down the numbers of samples to select from to update. Only samples which have a check are updated
Select Bulk Action
Click Submit
Fill out information and click button to update
Only samples which have a check will be updated
###Daily Data Users can record custom daily sampling info based on date and location
Select ‘Daily Data’ from main toolbar
Select ‘Add Daily Data’ from dropdown menu
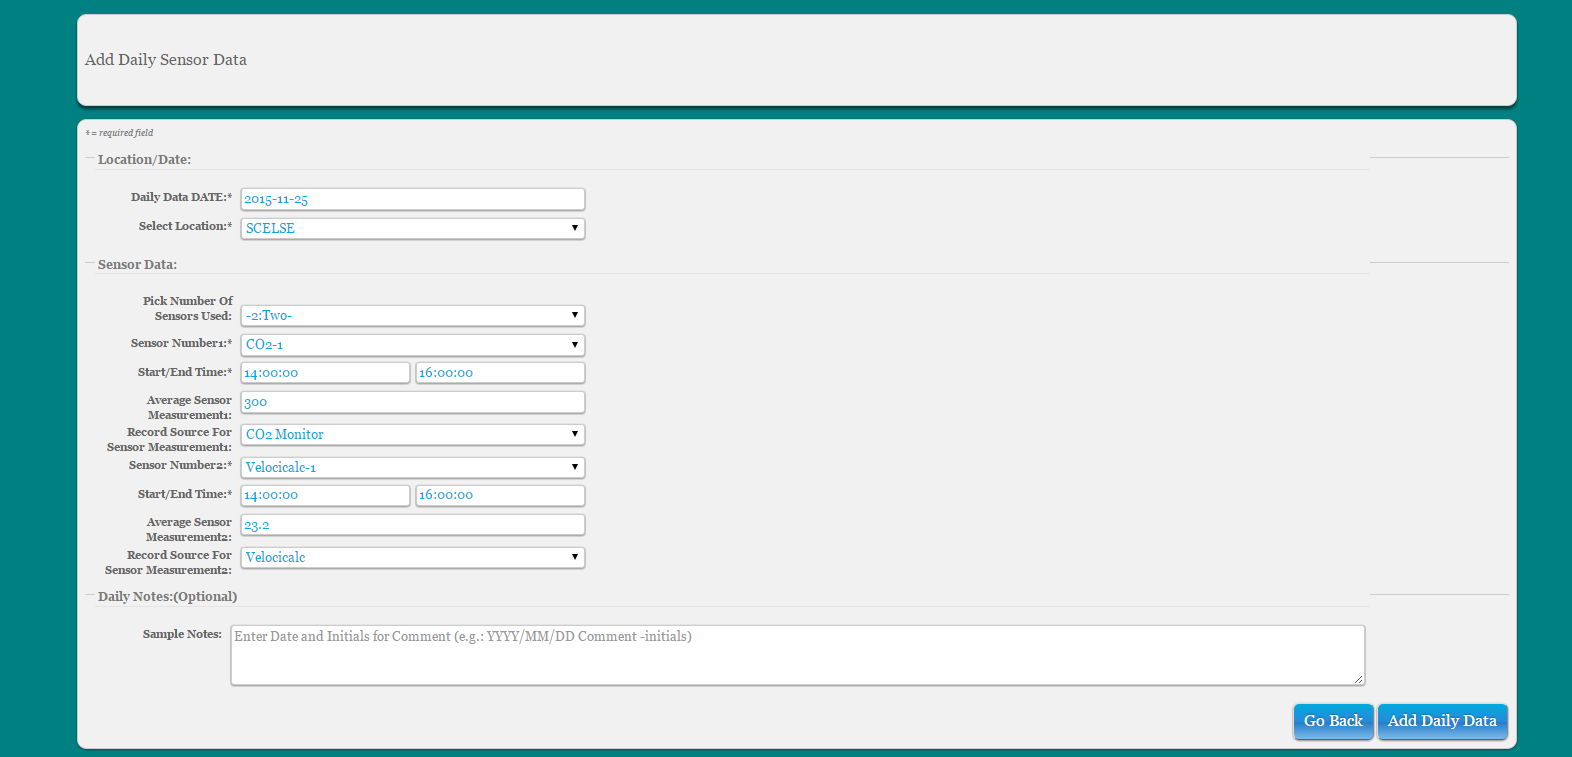
Fill out form
- Choose which date and location the user is adding the information for
- Select the number of sensors being recorded for that entire date and location
- Once the number of sensors is selected, the form will automatically expand to include fields for recording the sensor name, the start and end times and the sensor measurement
Note: all measurements are record to 3 digits and 2 decimal places ex: 999.99
To update daily data info, select ‘Daily Data’ from main toolbar and select ‘Update Daily Data’. Edit entries as needed, delete sensors, or add more sensors
To query daily data info, select ‘Daily Data’ from main toolbar and select ‘Query Daily Data’ from dropdown. Select date and/ or location interested in. Option to view all daily data info. Note that only sensor information can be viewed here. To view sample and sensor information together, please user the Query Info function
###Custom Sample Fields NanoLIMS currently allows admins to add up to 10 custom numeric entries and 10 custom text entries (free text or dropdown). All numeric entries are of the form 999.99 and are checked for this format. These can then be populated using the ‘custom fields’ tab on the ‘Insert Samples’ or ‘Update Samples’ forms
If you are pooling raw samples for processing, do this by adding multiple samplers used when entering the multiple samples as a single sample into the database
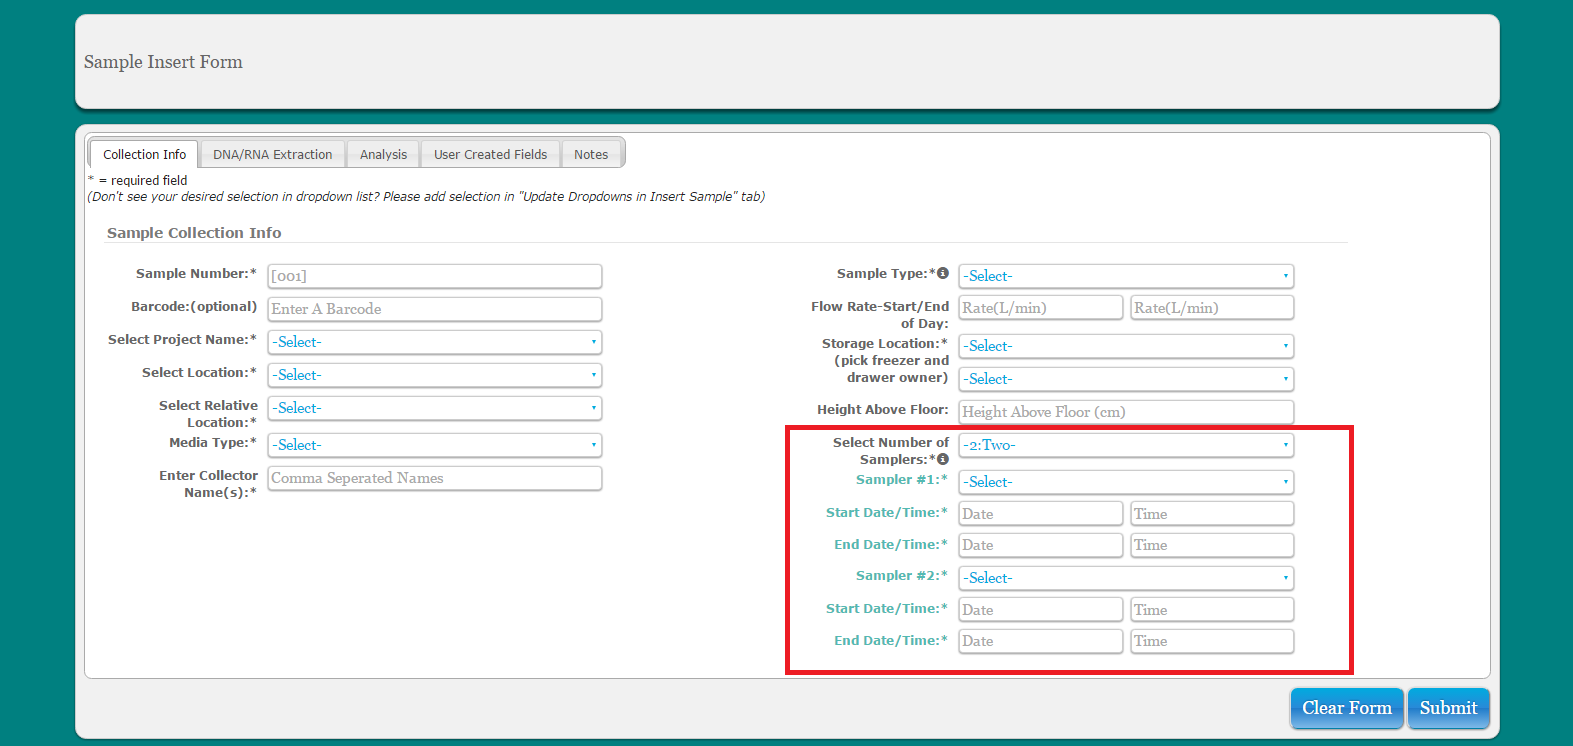
If you are pooling samples that are already entered into the database for DNA extraction, these samples will need be assigned new sample number
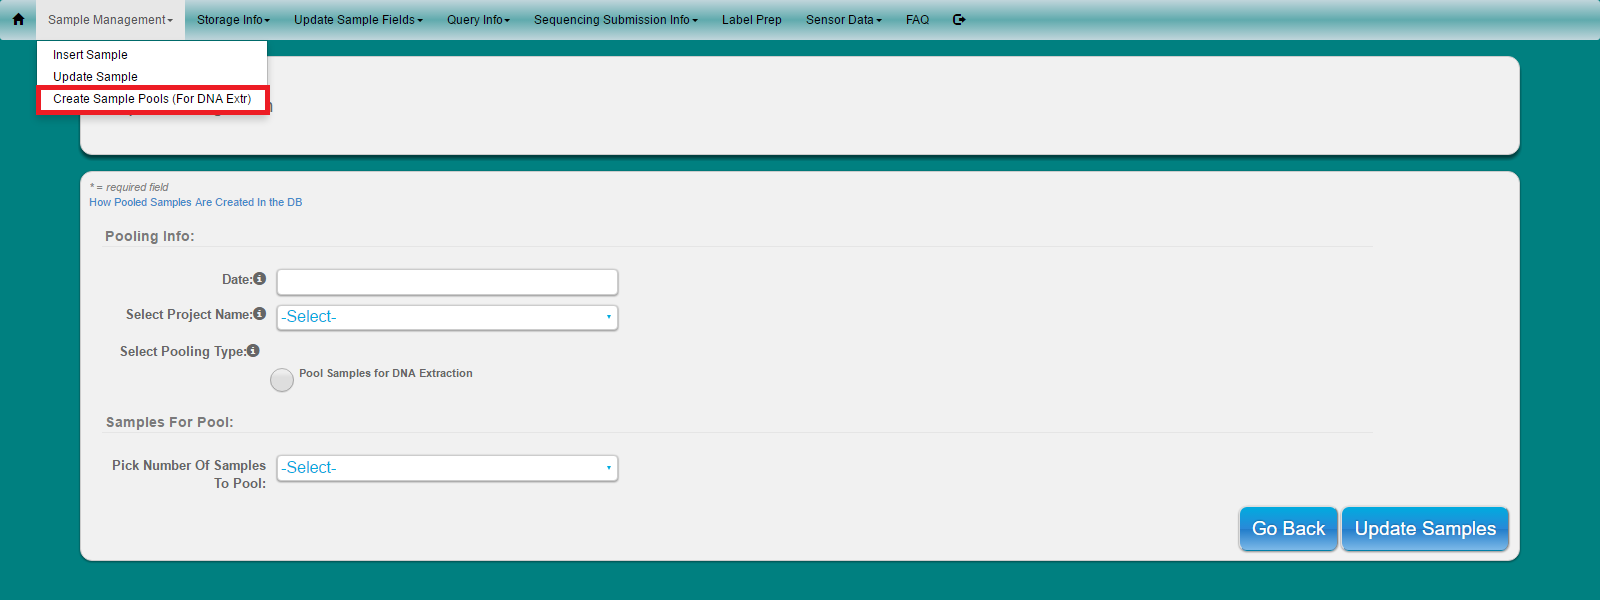
Select ‘Sample Management’ from main toolbar
Select ‘Create Sample Pools’ from dropdown
Enter date, project name and pooling type
Select number of samples the user wishes to pool
Enter each sample name to be pooled
A note with the sample names included in the pool with be put in the note section of the new sample created
The new sample created will have sample type ‘P’ for pooled and location, relative location,sampler_name, and media type will be set to (pooled)
Old samples can not longer be edited and will block you from doing so
Warning: At this time, pools cannot be edited.Final pooled sample can also have pooled options changed to other options. Samplers of pooled samples have a start and end time of 01:00:00
Follow same instructions as querying samples. View multiple samplers used in the dropdown residing in the ‘samplers’ column
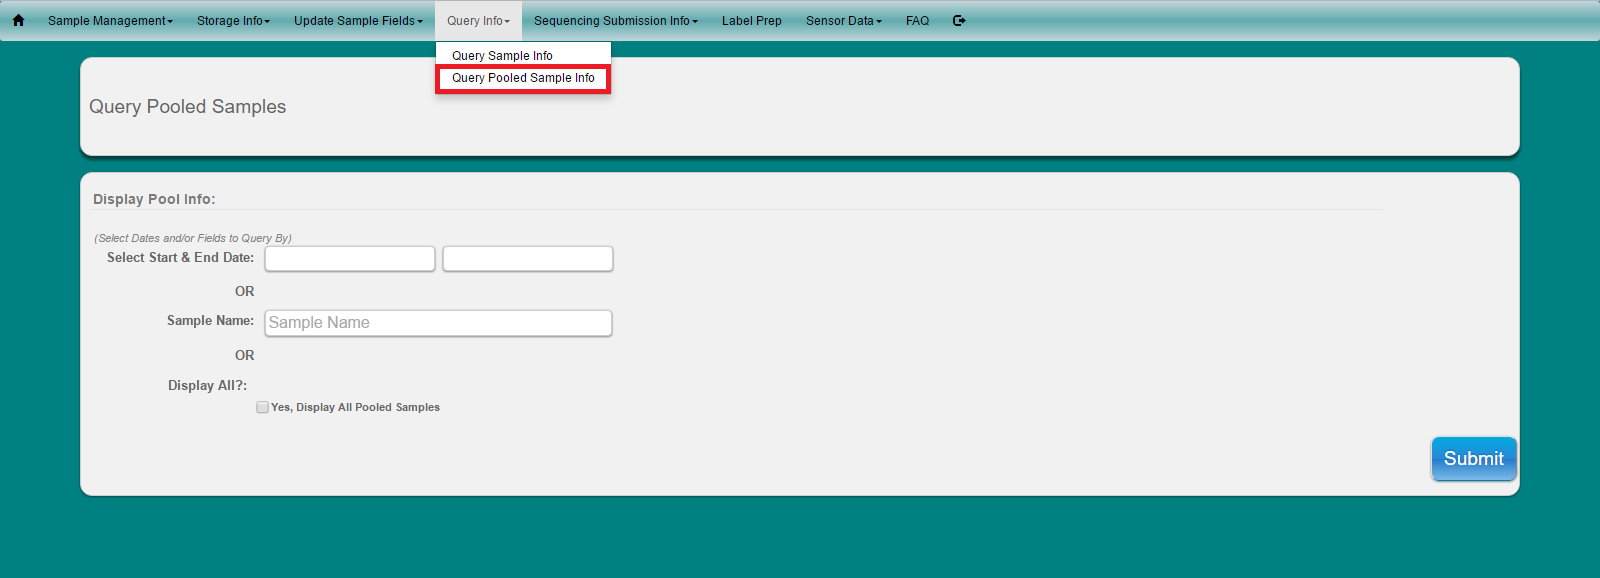
Select ‘Query Info’ from main toolbar
Select “Query Pooled Sample Info’ from the dropdown
Select Date and/or sample name or display all
Click Submit
Click on sample name you wish to view to expand pooling information

Select ‘Query Info’ from the main toolbar
Select ‘Query Sample Info’ from dropdown
Choose the date and/or field you would like to query your samples by
Select ‘Bulk Insert For Read Submission IDs’ or ‘Bulk Update For Read Submission IDs’ under ‘Bulk Action’
Press ‘Submit’
Fill out form. Ensure that the samples you would like to update have the checkbox next to them checkmarked
To view past read submissions, see Query Info and choose ‘Bulk Update AND View For Read Submission IDs’
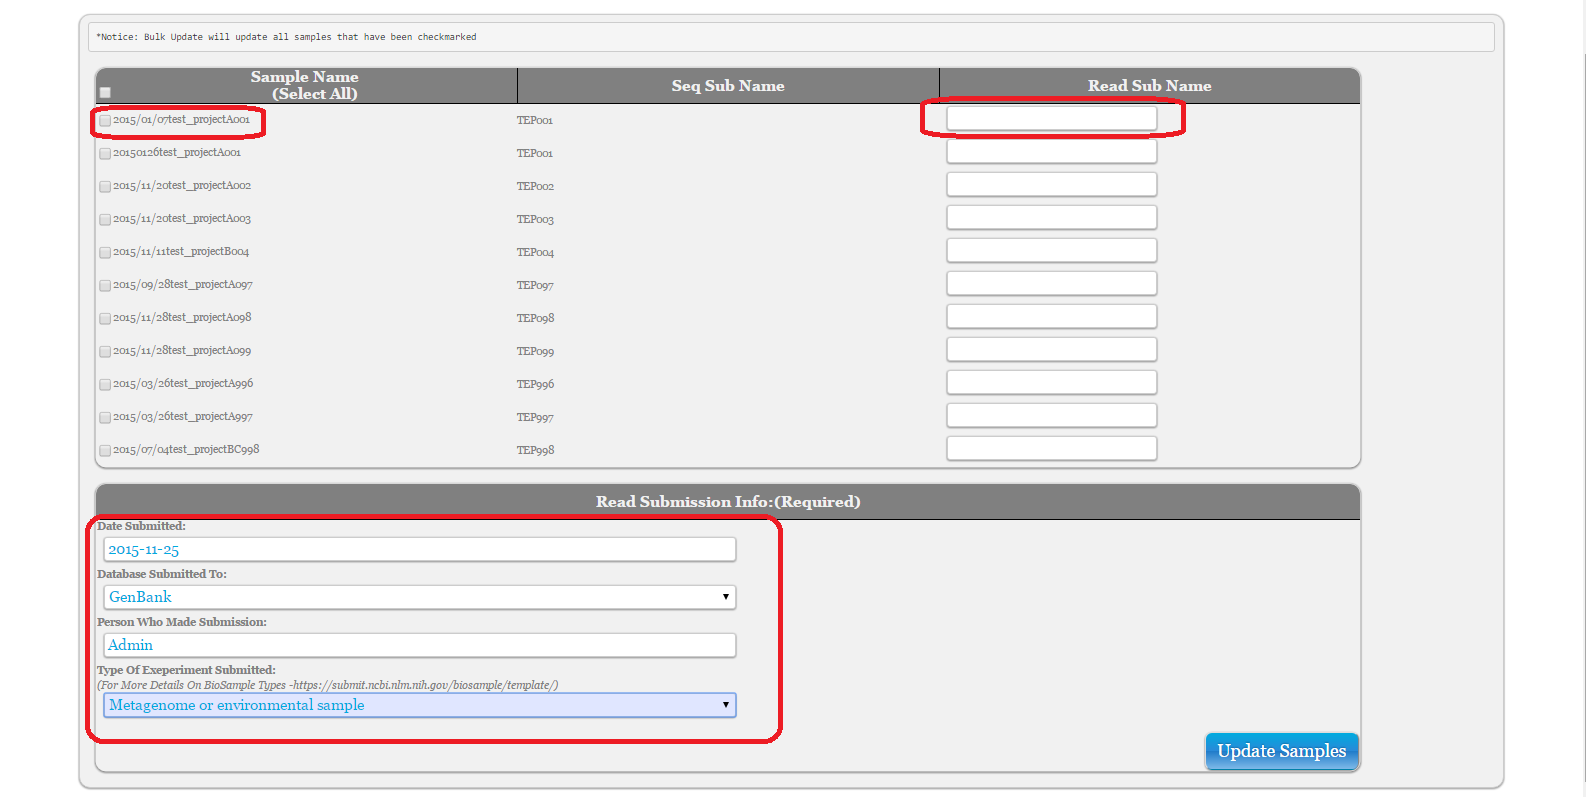
Note: If you do not see the correct options under ‘Database Submitted To’ or ‘Type Of Experiment Submitted, ask Admin to update under ‘Admin Tools’ -> ‘Add Dropdown options’ and choose table names ‘Read Subm Database’ or ‘Read Subm Exp Types’
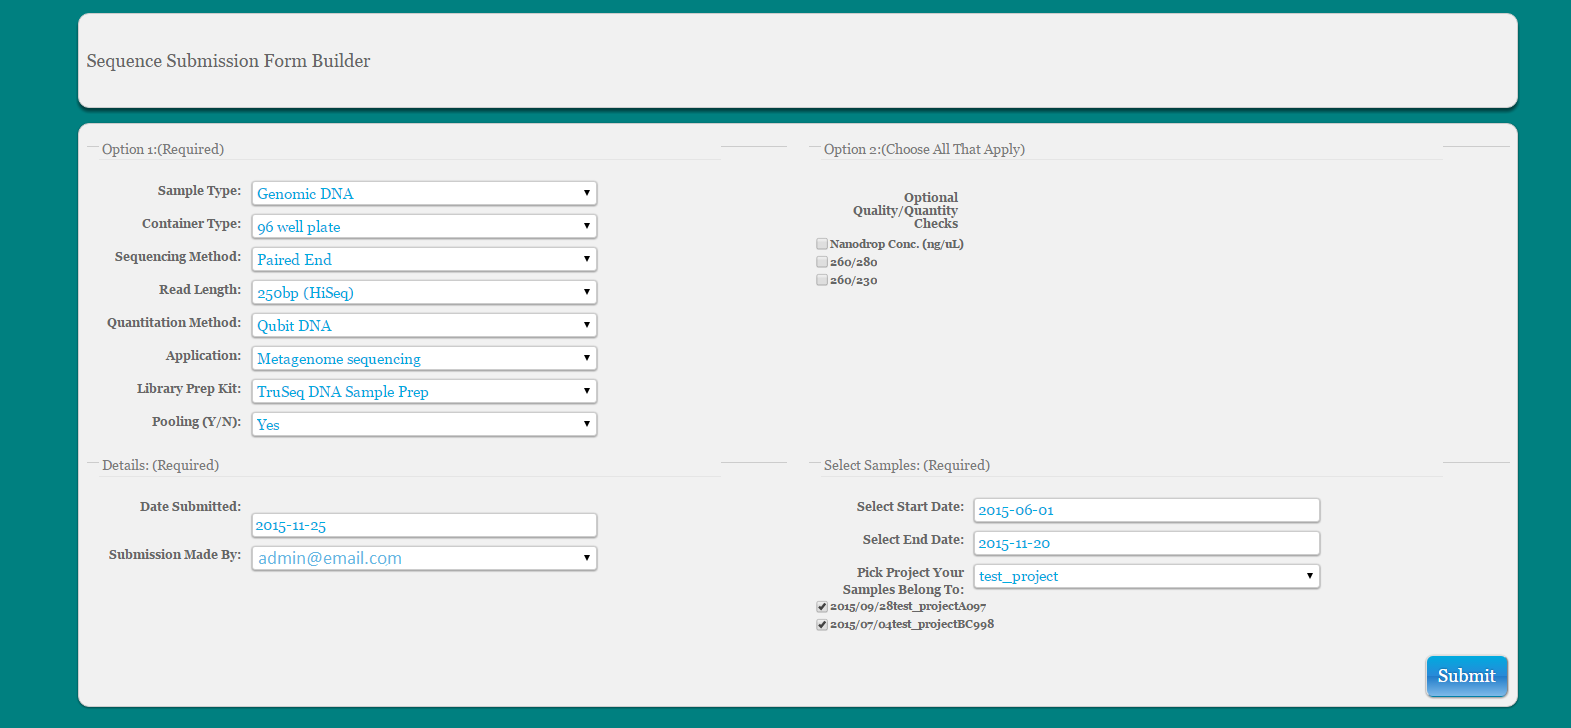
Note: the sequencing submission ids and forms were built specifically for the current SCELSE lab needs
Sample submission forms are currently output using the current Genologics Clarity LIMS formatting for upload to our sequencing core. At the moment this cannot be altered by the user, but information can be trimmed from the current spreadsheet and used for the users’ own purposes
Sequence names generated are with the following name generation to easily parse out samples from other samples sequenced in the same batch
Ex: Project Name Abbreviation-Sample Number-Sequencing type-#of submissions
Note: if you do not see the desired information in each dropdown, please have the Admin add it
Select Information from dropdown to build your form
Select samples by date and project name and select samples for sequencing submission
Populate cells in ‘Choose Form’
If Volume of Aliquot (uL) is unknown the user can leave this blank or choose 0
SequencingID is the base ID in the database that is used to build the current project name. It is an abbreviation of the project name plus the sample number. There should be no need to edit this information here.

Click link to download xls sheet for submission to sequencing center
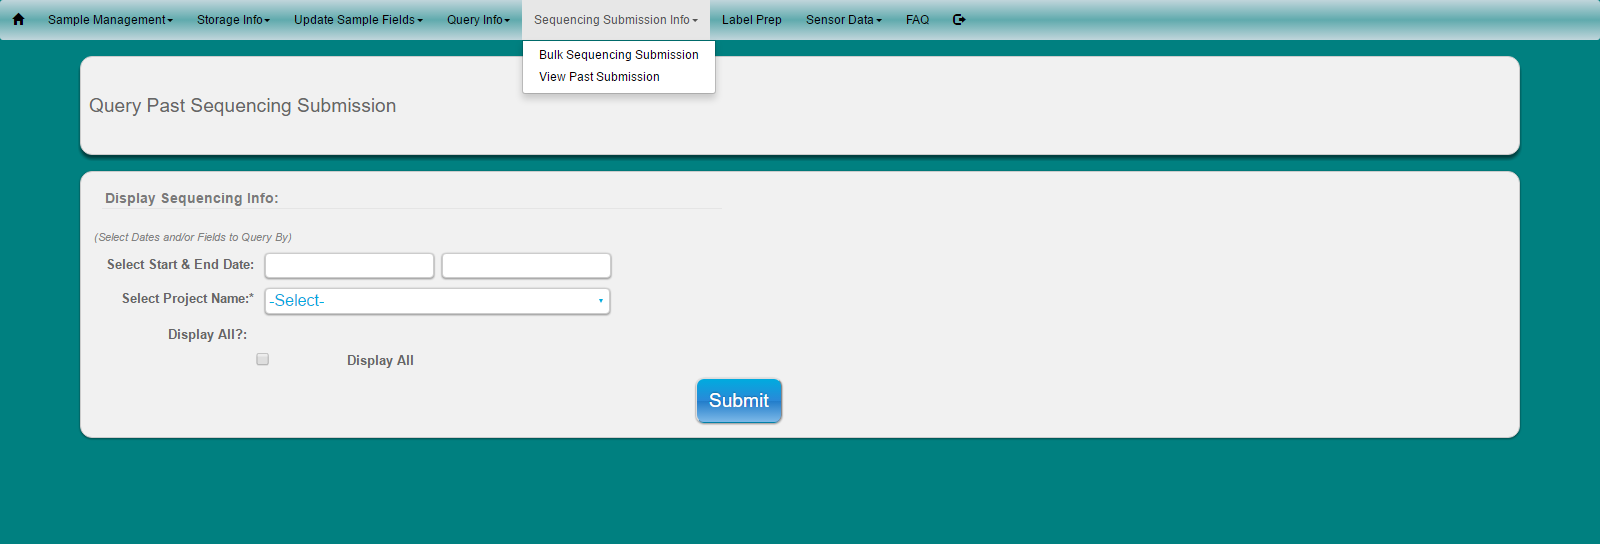
Select ‘Sequencing Submission Info’ from main toolbar
Select ‘View Past Submission’ from dropdown
Make Selection by Date and/or Project Name or Display All
Click on button to expand sequencing information
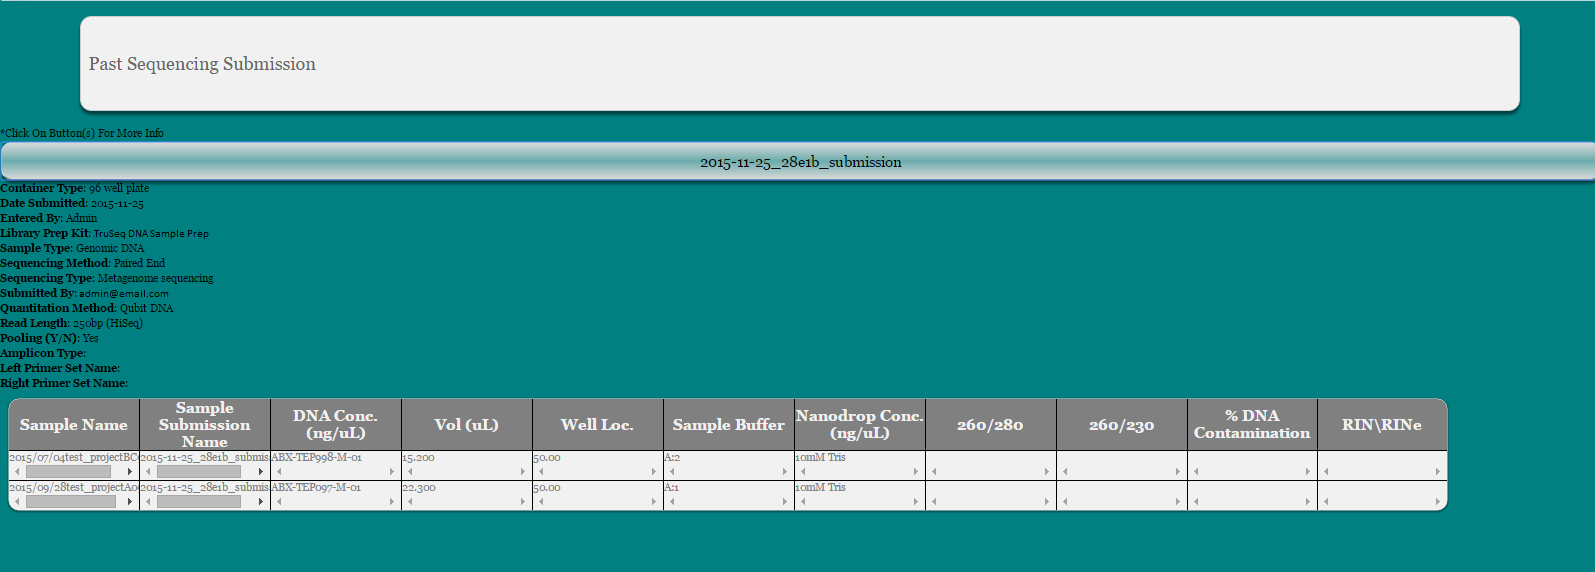
To confirm that sequencing results have been received by user, click link next to ‘Results Received’. A date stamp will appear in its place
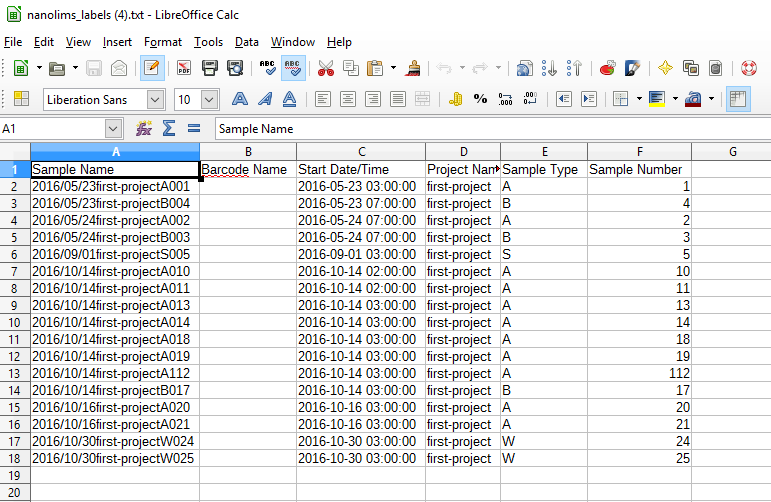
Currently users are able to export xls sheet for use by any label making software that will use an xls sheet. NanoLIMS exports entire database of samples with the following information - sample name, start date/time, project name, sample type, and sample number
Select ‘Label Prep’ from main toolbar
Use search function to look-up samples you would like to print labels for
Select to generate QR codes by sample name or by barcode field (user populated)
Option 1:
Right click on browser window to print QR codes
Option 2:
Click on 'download alternative file' to download a tab-delimited .txt file to use in an external label printing software such as Brady LabelMark or Zebra
FAQ can be found on the main toolbar as ‘FAQ’
FAQ can be edited by admin in FAQ.php
FAQ will come with a few basic questions but will need to be updated to suit the user's own lab needs
-
Blank-Sterilization sample types are currently are set to have no sampling duration regardless of what is input
-
No Sample Deletion - Samples cannot be deleted via the web-ui at this time. However, samples entries that were entered incorrectly or by mistake can be edited using the 'update samples' option to change many fields including date/time, project name, project type, and sample number (as long as it does not exist already for the given project)
-
Read submission recording - Read submission function is only for keeping a record of reads submitted public database, it does not actually create the formal submission of the reads to that database
-
No Sequencing submission update - Currently there is no form to update past sequencing submission info
