Tasmota firmware that has been customized for use as a Blinds Controller using an ESP8266 (specifically an ESP12) like the one found at MK Smarthouse Blinds Controller with MG995 Servo. It used to control a "Servo" motor, such as an MG995/996, which is used to control the tilt angle of blind slats and does so in a slow motion manner. Up to 3 individual blinds can be independently controlled by a single controller.
It has been written for use with an Arduino IDE and tested on board types "Generic" and "NodeMCU".
The software is based on Sonoff-Tamota version 6.2.1. It was compiled with "Arduino Core for ESP8266" version 2.3.0.
The software was written in particular for use with Home Assistant's MQTT support (but does not provide MQTT auto-discovery).
See RELEASENOTES.md for release information
Download the released binary from https://github.com/tommyjlong/Blinds-Control/ and flash it to your ESP8266 hardware using your favorite method.
If you want to compile this yourself with the Arduino IDE on Windows 10, here are a few steps to follow:
- Don't yet start Arduino IDE. If you already have it running, then exit it out.
- Copy the repository's
\libfiles to C:\Users\UserName\Documents\Arduino\ directory. This Assumes Arduino->File->Preferences->Sketch Location set to: C:\Users\UserName\Documents\Arduino. This also assumes no other interfering libraries are present in this same directory. - Goto your
sonoffdirectory. Double-Click on the filesonoff.inoto startup the Arduino IDE. - When setting up the Board Manager for esp8266, choose version 2.3.0.
- Set the board type parameters acording to ESP module being used (See below).
- Click on the "Verify" button (the one with the check mark). This should compile successfully.
- If successful, you can now flash the compiled binary.
The following devices are supported:
-
ESP12
Example, see MK Smarthouse Blinds Controller with MG995 ServoYou can use the following Arduino IDE Board settings (Choose your own COM port):

-
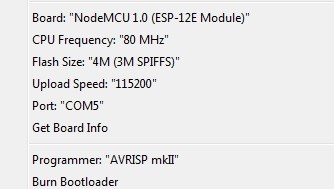
Node MCU
You can use the following Arduino IDE Board settings (Choose your own COM port):
After flashing the ESP12 and restarting the Blinds Controller, it will come up just like any normal Sonoff-Tasmota device which puts it in WiFi AP mode and will broadcast a sonoff SSID (Ex. SSID= sonoff-4331). Use a WiFi Client and connect to this AP. Then use a Web Browser to configure the Blinds-Controller.
- SSID YourAP-SSID
- Password Your-AP-password
- Host hostname
Then Hit "Save" which should reboot the ESP.
Reconnect your WiFi Client to your regular WiFi network then try to connect with your Web Browser to URL http://hostname.local.
Note: It is recommended that you connect a console to the controller (set Baud Rate to 114200) to see if any errors occur. After restart, you may see
WIF: Connect failed with AP incorrect password. If so, then goto the console and re-enter your AP's password using the command passwordYour-AP-password.
(Optional) Configure Static IP Address:
The Blinds-Controller by default uses DHCP to get its IP address, etc. If you would like to set up as static instead, then:
Goto: Main Menu->Console. In the "Enter Command" text box, type in the following (hit return each time)
ipaddress1 <blinds-control-static-ipaddress>
ipaddress2 <g/w-ipaddress>
ipaddress3 <subnet-mask> Ex. 255.255.255.0
ipaddress4 <dns-ipaddress>
restart 1
The last command restarts the module for these settings to take effect. Note: you may temporarily loose the ability to use http://hostname.local If you do, then use http://blinds-control-static-ipaddress instead.
Goto: Main Menu->Configuration->Configure MQTT
- Host: MQTT Broker/Server IP Address or Name
- Port: 1883 This is the default which should work
- Client: this Blind-Controller's mqtt client name
If you require a username and password to authenticate with the MQTT Broker:
- User (DVES_xxxx): Broker's username
- Password: Broker's password
Topics by default uses a 3-tier hierarchy with the middle tier generally used as a name for the device with the default being "sonoff". For example: ex. stat/sonoff/RESULT
To change the middle tier name from "sonoff" to something else:
- Topic = middle-tier-name Ex.
my_blinds
When finished hit "Save"
Goto: Main menu->Configuration->Configure Module
- Module Type: The Blinds-Controller firmware retains all the different modules used by the Sonoff-Tasmota v6.2.1 but changes the default to "Generic" which can be used for ESP12 and NodeMCU.
⚠️ Any other module type is to be used at your own risk. - GPIO: The Blinds-Controller firmware supports PWM1, PWM2, PWM3 in any combination to control the blinds. Do NOT select PWM1i, PWM2i nor PWM3i. It has been tested on ESP12 GPIOs 13,14,16. For those using MK Smarthouse Blinds Controller, set GPIO 13 to PWM1.
When finished hit "Save" which will cause it to reboot.
The following settings are optional: Goto: Main Menu->Console. Use the "Enter Command" text box.
timezoneX where X is hour from UTC. Ex. New York, X is -4webpasswordpassword By default no login is needed by the Web broswer, but use this to setup a password (Note: username is "admin").friendlynamefriendly-name-string Use this to change the banner in the Web page.teleperiodperiod Periodically Tamota sends out a couple of health status messages. Default is 300s (5 min); Max is 3600s (1hr); 0 to disable
Checkout
The following is optional and can be skipped but otherwise it but can be used as a sanity check. This will ensure the Blinds-Controller's modification of the Tamota code is set to operate properly.
Goto: Main Menu->Console. In the "Enter Command" text box, type in the following (hit return each time)
setoption15: This should show{"SetOption15":"OFF"}This sets the pwm_control to 0 by default. 0 means "pwm" command is used (See Tasmota Command Documentation)pwmfrequency: This should show{"PWMFrequency":50}. This is the frequency required by the servos.setoption65: This should show{"SetOption65":"ON"}. This is a new option that activates the specific usage of PWM to control the blinds (See Note1).setoption4: This should show{"SetOption4":"ON"}. (See Tasmota Command Documentation for details).setoption66: This should show{"SetOption66":"ON"}. This is a new option that when set to true (and when setoption65 is set to true) will cause the normally published status of a PWM topic to be retained. This is used for the scenario where Home Assistant reboots, and when it comes back up, it can receive retained MQTT messages. This allows HA to immediately update the last known status of the blind's state and tilt angle.
Note1: The main modification to the Tasmota code is for it to track the last PWM value sent to the servo and changes it incrementally by 1 every time every 50ms (which is every time the Tasmota executive loop runs). It will continue to increment (or decrement) until it reaches the target PWM value. This gives it the slow motion effect.
Test Out and Setup the Servo:
Goto: Main Menu->Console and use the "Enter Command" text box.
The following CLI syntax is to be used:
pwmN value where N is the PWM channel number 1, 2, or 3 (1 is the default).
When this command is entered, this should return:
{{"PWM":{"PWM1":<value1>,"PWM2":<value2>, etc.}} depending on the number of PWM channels configured for the module.
When using for the first time on a servo, the Blinds-Controller does not know what the previous PWM value was (because it never had one) so when entering a PWM value, the servo will run full speed (i.e. not slow-motion). Use a safe value such as 55.
The theoretical range for value corresponds to the servo pulse width: 28 (corresponding to servo angle of 0 degrees) to 123 (180 degrees) with 73 (90 degrees) being middle ways. However the servo motors in practice are not very precise and vary from motor to motor. They can even support lower and higher PWM values meaning they can go below 0 degrees and above 180 degrees (but this is not recommended). Attaching the servo motors to the blinds also adds a variability to the desired tilt angle of the blinds.
In general these PWM values will have to be determined empirically by playing around with the numbers and watching the tilt postion of the blind's slats, and this will have to be done for each individual blind in a two or three blind set. One other caution is that when servo motors strain having to use too much force, they will back themselves off at an angle that differs from what the Blinds-Controller tracked causing the two to get out of sync. Try to avoid straining the motors when choosing the final values.
HA's MQTT is used to interact with the Blinds-Controller. Based on the MQTT topic setting in the example above using my_blinds as the mid-tier naming, this configuration example has two blinds that are controlled by one Blinds-Controller.
The topics of interest are:
cmnd/my_blinds/pwmNpwmN-value This is the command HA sends to the Blinds-Controller to set the tilt position where N is the pwm channel configured for that particular blind.stat/my_blinds/PWM {"PWM":{"PWMN":pwm1-value,"PWM2":pwm2-value}}This is the status the Blinds-Controller reports back to HA. It reports the PWM value of both blinds in one report.tele/my_blinds/LWT OnlineThis is the Last Will and Testament topic sent by the Broker to HA (here it is showing as Online).
The following shows an example of a single Blinds Controller controlling two independent set of blinds. The state of the blinds "open" or "closed" will be based on the tile angle of the slats.
For Blind#1
cover:
  - platform: mqtt
    name: "My Blinds Right"
    state_topic: "stat/my_blinds/PWM"
    state_open: "on"
    state_closed: "off"
    value_template: '{% if value_json["PWM"]["PWM1"] == 24 -%}off{%- else -%}on{%- endif %}'
    tilt_command_topic: "cmnd/my_blinds/pwm1"
    tilt_min: 24                #PWM min theoretically 28; Intentionally overshifted.
    tilt_max: 123               #PWM max theoreticaly 123
    tilt_closed_value: 24       #PWM value
    tilt_opened_value: 84       #PWM value. 90 degrees theoretically 73
    tilt_status_topic: "stat/my_blinds/PWM"
    tilt_status_template: '{{ value_json["PWM"]["PWM1"] }}'
   #tilt_status_optimistic: true #not needed if tilt_status_topic is used.
    availability_topic: "tele/my_blinds/LWT"
    payload_available: "Online"
    payload_not_available: "Offline"
    retain: true
   #optimistic: true
For Blinds#1, the PWM value 24 has the blind's slats closed; value 84 has the slots horizontal and is the position we want when HA is told to "open" the blinds; value 123 has the blind slats tilted in the opposite direction. Home Assistant will convert these values into a percentage 0 to 100%.
For Blind#2:
  - platform: mqtt
    name: "My Blinds Left"
    state_topic: "stat/my_blinds/PWM"
    state_open: "on"
    state_closed: "off"
    value_template: '{% if value_json["PWM"]["PWM2"] == 28 -%}off{%- else -%}on{%- endif %}'
    tilt_command_topic: "cmnd/my_blinds/pwm2"
    tilt_min: 28                #PWM min theoretically 28;
    tilt_max: 123               #PWM max theoreticaly 123
    tilt_closed_value: 28       #PWM value
    tilt_opened_value: 77       #PWM value. 90 degrees theoretically 73
    tilt_status_topic: "stat/my_blinds/PWM"
    tilt_status_template: '{{ value_json["PWM"]["PWM2"] }}'
   #tilt_status_optimistic: true #not needed if tilt_status_topic is used.
    availability_topic: "tele/my_blinds/LWT"
    payload_available: "Online"
    payload_not_available: "Offline"
    retain: true
    #optimistic: true
For Blinds#2, the PWM values (in this case PWM2) are slightly different due to the variability mentioned above between servos and their attachments to the tilt mechanisms.
And finally you can group these two independent blinds into one:
  - platform: group
    name: My Blinds
    entities:
      - cover.my_blinds_right
      - cover.my_blinds_left
As a note, there are a few quirks in Home Assistant's Group entity for tilt covers. For example when both blinds are moved to the open position (tilt_opened_value), the cover Group entity will show the tilt position as 100%, even though the two blind's open position is say 54 and 61 percent respectively.
Credit goes to arendst/Tasmota, formerly https://github.com/arendst/Sonoff-Tasmota, for the original code base.
This program is licensed under GPL-3.0