-
Notifications
You must be signed in to change notification settings - Fork 30
Integrate Build Activities
The Community TFS Build Custom Activities contains a wide variety of activities that can be used with the TFS 2013 build process (for earlier versions if TFS see the original Community TFS Build Extensions Codeplex Project. However, the way to use them is sometime less than obvious. This is not helped by the complexity in using any custom activity within TFS builds.
In this is example we do not show how to get any specific activity working, it is assumed you will follow this process once, doing this initial setup before you follow the documentation for the specific activity you wish to use.
-
Download any external tools required for the activity you are using and install on you development PC e.g. the StyleCop distribution files if you the StyleCop activity
-
Download and unzip the Community TFS Custom Activities to a directory on you development PC. Note the zip file contains versions of the assemblies for different versions of TFS, make sure you use the right ones.
The assemblies that contain the custom activity and StyleCop need to put under source control so they are available to the build controller and agent(s).
-
In Visual Studio open Source Control Explorer select your Team Project and map the BuildProcessTemplates folder to a location on your local disk.
-
Create a new folder under the BuildProcessTemplates called Custom Assemblies
-
In this Custom Assemblies new folder copy all the assemblies from the unzipped TFS Build Extensions Make sure you copy the correct version of the assemblies as required.
-
Also copy any extra files you require e.g for StyleCop you also need the StyleCop DLL from C:\Program Files (x86)\StyleCop 4.7 to Custom Assemblies
-
From within Source Control Explorer add these new files to the new Custom Assemblies folder and check the files into TFS.
-
Open Team Explorer, right-click on Builds and select Manage Build Controllers
-
Select the controller to configure, and then select Properties
-
Set the Version control path to custom assemblies to the location just created under version control containing your added assemblies
Next we need to get the activity into Visual Studio so we can add it to build process
-
Open Visual Studio (use the version that match the version of TFS you are using)
-
Create new Class Library project, this new project is only going to be used as a container for the editing of the build process template. IMPORTANT - this project must target .NET 4.0 if on TFS 2010 and .NET 4.5 if in TFS 2013.
-
Delete the Class1.cs file
-
In Solution Explorer right click and select Properties., make sure the new project does not build in any configuration.
Now we have a project to work with, we now need to get a process template into it. In previous versions of TFS all the build process templates were stored in BuildProcessTemplates folder of your team project. However, in 2013 the default templates are not initially here. You need to download the process to your local disk (from within Visual Studio) and then upload your copy to the BuildProcessTemplates folder (which you might need to create). Once this is done
-
Make sure BuildProcessTemplates is mapped in you current workspace and get a local copy on your development PC
-
In the new project select Add Existing Item and browse to local folder mapped to the BuildProcessTemplates, select the template your wish to edit. But, don’t just press the Add button, but use the drop down to select Add as link.
-
On the added file set the build action property to none
-
Select Add Reference and add references to all the assemblies from the unzipped TFS Build Extensions
-
Open the newly added process template in VS2010, this can be slow, so wait…..
-
Open the toolbox and you should see all the standard build activities
-
Right click in the toolbox and select Choose Item, select browse and select the file assembly files you need e.g for for StyleCop select the TfsBuildExtensions.Activities.StyleCop.dll.
-
The new activity should now be in the toolbox
We can now start to edit the process template mapped in the previous step to add our custom activities.
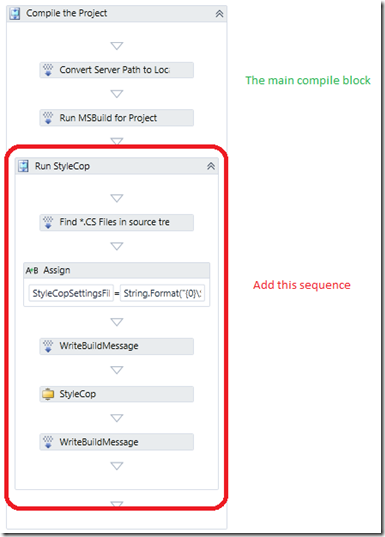
In this example we are Using the DefaultTemplate, find the ‘Compile the Project’ sequence and add the activities as show in a graphic below. How and where you add the activities to the workflow will depend on activity in use, some require the compilation to be completed some do not.
The follow figure show a possible workflow for using the StyleCop activity

If you have not done so already create a build using this process template. It is worth remembering here that you do not need to do any previous steps on a development PC as long as you DO NOT wish to edit the process template on that PC. You can create a new build that uses your template with custom activity on any PC.
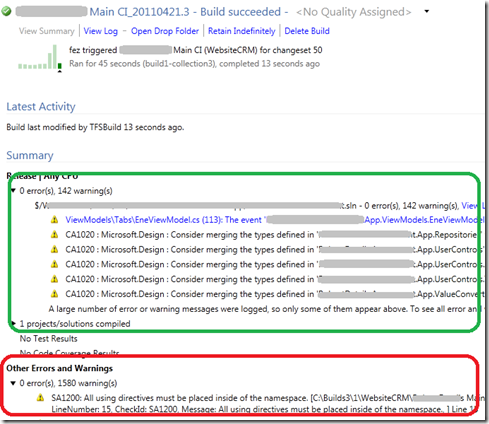
So create a new build using the edited template. Run the build and if it is all OK you should see a build log similar to the graphic below including your new activities output
