-
Notifications
You must be signed in to change notification settings - Fork 3
Rendering process

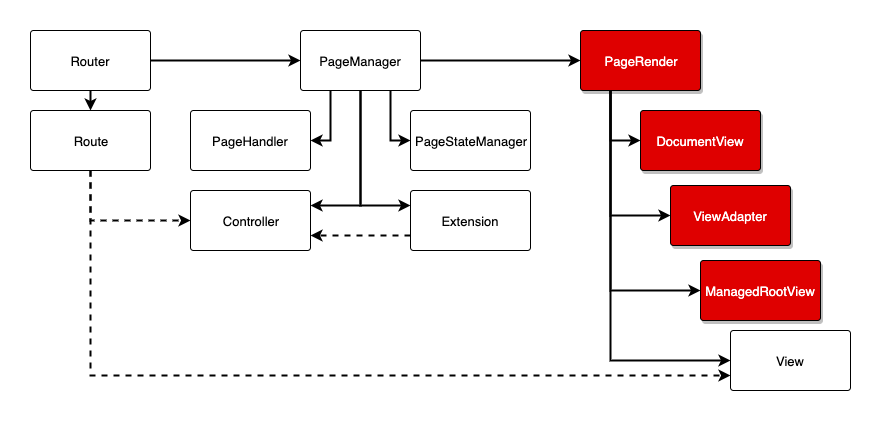
The rendering process goes through many points you can customize or take advantage of. First thing IMA.js will want to render is a DocumentView followed by ViewAdapter and ManagedRootView.
DocumentView is the root of your application's html markup and a mounting point for all the views. It's only rendered at the server-side and then send to the client with the application state inlined as a string. The application state is then revived and your application re-rendered.
DocumentView component can be found in app/component/document/DocumentView.jsx
and is registered in a file app/config/settings.js in property
$Page.$Render.documentView.
// app/config/settings.js

import DocumentView from 'app/component/document/DocumentView';

export default (ns, oc, config) => {
    return {
        prod: {
            // ...
            $Page: {
                $Render: {
                    // ...
                    documentView: DocumentView
                }
            }
        }
    };
}
This configuration affects all pages across the
application. To change DocumentView for an individual route use option
documentView when registering the route (See Route options
for more information). This feature is extremely useful when creating pages
that are embedded in an iframe.
If you take a closer look at the contents of the DocumentView you'll see it
consists of 3 main HTML elements (div#page, script#revivalSettings and
script#scripts). For documentation about the MetaManager and how it's used in
the <meta/> tags see the SEO & MetaManager page.
This is the actual point where your application will mount with the help of
ViewAdapter. The whole component tree (starting with the ViewAdapter) is
contained in the page property and is embedded into the div#page via
a React workaround dangerouslySetInnerHTML={{ __html: this.props.page }}.
You're completely free to change the #page ID of the div but IMA.js needs to know where
the mounting point is. Therefore there is a static get masterElementId()
method that should return the ID as a string.
Inside this <script/> tag will be inlined the application state from the
server. The state is embedded into the script tag via the same workaround as
the component tree.
This <script/> tags takes care of loading all the bundles you've defined in
app/build.js. It also
tests if a client browser is capable of running ES6 version of the bundle. For
more details check the this.getAsyncScripts() method.
This component does exactly what it's named after. It serves as an adapter
for the current controller's View. The ViewAdapter receives 2 props:
state object which holds the current page state and view component that
should be rendered with the state as input props.
This component is also a great place for creating the React context. Either the
old way by using the getChildContext() method or the new way by utilizing a
Provider from React.createContext().
If you want to customize the ViewAdapter you should extend the base
ViewAdapter from ima/page/renderer/ViewAdapter and call superior
constructor and render method.
Custom ViewAdapter can be applied the same way as DocumentView:
- In
app/config/setting.js - On a specific route by specifying it in the route options.
// app/config/settings.js

import DocumentView from 'app/component/document/DocumentView';
import CustomViewAdapter from 'app/page/CustomViewAdapter';

export default (ns, oc, config) => {
    return {
        prod: {
            // ...
            $Page: {
                $Render: {
                    // ...
                    documentView: DocumentView,
                    viewAdapter: CustomViewAdapter
                }
            }
        }
    };
} As we have mentioned above, ViewAdapter is the place to define React Context. Since v17 IMA.js uses new React Context API. The context value contains property $Utils with all registered utils from ComponentUtils.
Context is defined in separate file and its Provider is rendered in ViewAdapter. Then the Context is used in AbstractComponent in static get contextType().
The ManagedRootView is just another wrapper before rendering the actual
controller view. Remember when we told you that the ViewAdapter is
rendering the actual View? We lied ¯\_(ツ)_/¯.
If you're wondering what is the ManagedRootView good for, it's for creating components that persist through the life of SPA and are not unmounted when the Controller or View changes. Good example of this is a page that displays a map on one side and page content on the other (https://en.mapy.cz/, https://www.kiwi.com/en/search/, https://airbnb.com/).
// app/page/MapManagedRootView.js

import PropTypes from 'prop-types';
import React from 'react';
import BlankManagedRootView from 'ima/page/renderer/BlankManagedRootView';
import Map from 'app/component/map/Map';
import MapResult from 'app/component/map/MapResult';

export default class MapManagedRootView extends BlankManagedRootView {

    // ...

    render() {
        // Obtain search results and map settings from page state.
        const { searchResults, mapType } = this.props;

        return (
            <React.Fragment>
                {super.render()}
                <Map
                    type = { mapType }
                    centerOnResults = { true }>
                    { searchResults.map(result => (
                        <MapResult place = { result }/>
                    ))}
                </Map>
            </React.Fragment>
        );
    }
}
Then the MapManagedRootView can be used in app/config/setting.js
(property managedRootView) or in route options the same
way as DocumentView or ViewAdapter.
As you may have notices MapManagedRootView extends BlankManagedRootView which is also the default ManagedRootView when you don't specify your own. render() method of BlankManagedRootView simply renders View for current route with props containing current page state.
Now when you know how a big part of the rendering process goes it's time to have a look subsequent View and Component rendering.
- Introduction
- Static view
- Adding some state
- Fetching the data from the server
- Writing posts
- Final polish