Home
Pushmix - web push notification service
Service allows to create and push customised web notification including
- audience segmentation via topic subscription
- customised opt in prompt
- real time user interactions in Google Analytics
- custom notification icon and badge
- action buttons with icons
- notification logs
- large image support
- write access to the website files
- website url must starts with
https://
This instructions will describe how to creating your first subscription opt in prompt, start build up your subscribers audience and push notifications.
First step is to create new account,simply login using Google or Facebook accounts Pushmix - login. Alternatively create new account here - Pushmix - register. Only details that required is a name of your choice and email address.
1. Details
In the dashboard you will be asked to create your first subscription, go for it.
Enter your website address, starting with https:// where you wish visitors to subscribe for web notifications.
Enter opt in title and optional line of text to provide subscribers with more details about this subscription.
All subscription details can be changed at later time in exception of website address. If you have added website address wrong simply delete subscription and start again.
User can create more than one website subscription.
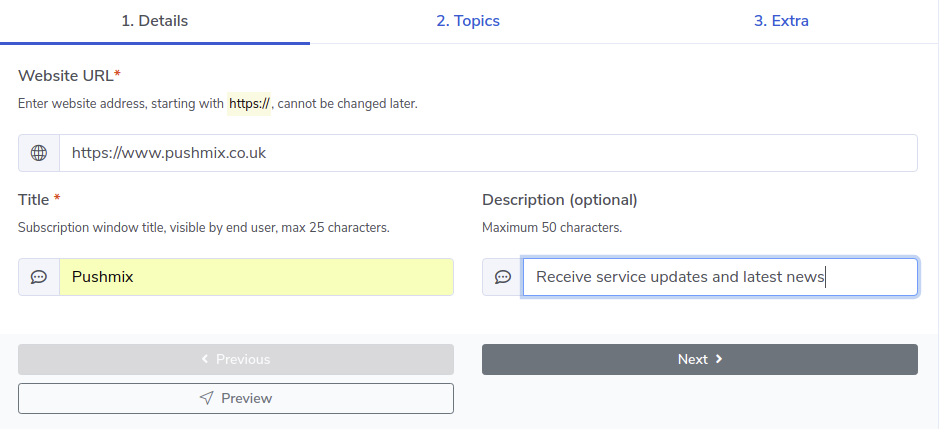
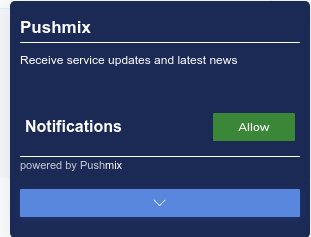
You can review opt in prompt by pressing Preview button, continue entering details and see changes in real time.
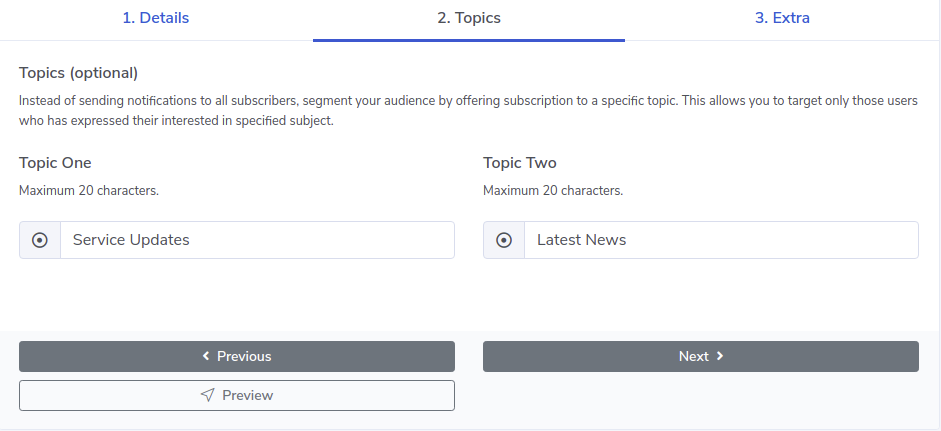
2. Topics
Instead of sending notifications to all subscribers, you may offer subscription to up to two additional topics of user interest. When sending notification this allows segment and target only those users who has expressed interested in specific subject.

3. Extra
Notification icon, badge and Google Analytics tracking id, all these parameters are optional.
Icon is the small image that displayed next to the title and the body if the notification. Recommended icon image dimensions is 192x192 pixels.
Badge is monochrome icon that used to provide more information to the user about where the notification sender. At the time of writing the badge is only used on Chrome for Android.
Some browsers only allow icon and badge images to be served over HTTPS.
Both of these fields are optional, however if the icon and badge parameters are not provided, default Pushmix icons will be used.
Track user interactions in real time with Google Analytics Event Tracking. Enter your GA Tracking Id to receive web notification views and action button click events.
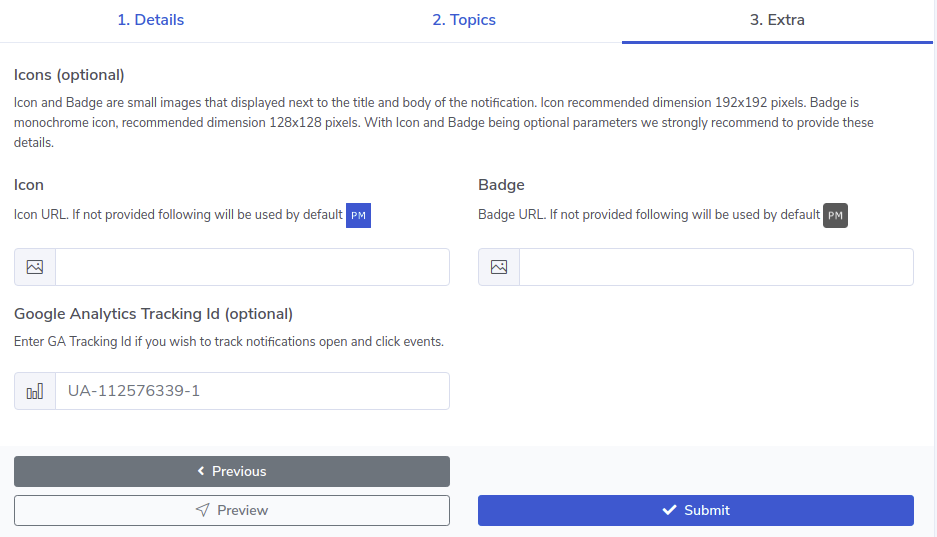
Press Submit to create subscription, if all mandatory fields supplied you will be shows the Subscription Code and instructions on how to embed the code.
Service Worker
After you have created subscription, first thing to do is to download service worker and upload it to the root of public directory on your web server. The service worker file must be accessible via public URL under the domain name you wish to push web notifications from.
For example https://www.pushmix.co.uk/pm_service_worker.js
If you wish to place service worker file inside of any other folders on your server, fill free to do so. However please don't forget to update service worker URL path in the tracking code, see bellow.
- What is the Service Worker ?
A Service Worker is a script that allows access to push notifications. Web Browser executes this script in the background, separate from the web page. Service workers only run over HTTPS, for security reasons.
See Google search results for details and use of service workers.
- Do I have to use Service Worker?
Yes, Push Notifications are built on top of Service Worker API, which responds to push message events in the background and relays them to your application
Subscription Code
Copy subscription code from dashboard and paste it at the bottom of the web page to start building your audience. You can add subscription code to more than one page. When webpage is loaded subscription code trigger the opt in prompt to be displayed. In the event when web browser is not supported opt in prompt will not be shown.
The subscription code can also be added via Google Tag Manager, please see Google search results for articles that describes the process.
You can easily change the behaviour and trigger opt in prompt to be displayed on the click event instead of the page load.
<script type="text/javascript">
    var _pm = {
        "subscriber_id": "UNIQUE_SUBSCRIPTION_ID",
        "sw" : "https://YOUR_DOMAIN_NAME/pm_service_worker.js",
        "api": "https://www.pushmix.co.uk/api/"
    };
    (function(){
        var block = document.createElement('script');
        block.type = 'text/javascript';
        block.async = false;
        block.defer = true;
        block.src = 'https://www.pushmix.co.uk/js/pm.js';
        var el = document.getElementsByTagName('script')[0];
        el.parentNode.insertBefore(block, el);
    })();
</script>
Visit the section of your website where you have added the subscription code to ensure the opt in prompt is working as expected. Any changes to the subscription details applied on the dashboard will have immediate effect in the opt in prompt, reload is required. Keep in mind that subscription is based on Web Browser token and one device can subscribe multiply times.
For example: on my Samsung mobile phone using Google Chrome browser I can opt in for Notifications and using Firefox browser on the same device I can opt in for Notifications and Service Updates. This means when notification send to Service Update topic I will only receive one message via Firefox browser. However when notification send to All Audience I would receive two notifications via Google Chrome and Firefox browsers.
Opt in prompt can't only be used for subscribing, users can toggle their subscription states and/or topic subscription.
Dashboard displays one or more of your subscriptions summary. Press Push Notification button at the bottom of subscription card.There are three steps that you will need to go through to prepare notification message: Select Audience, Enter Content and Actions.
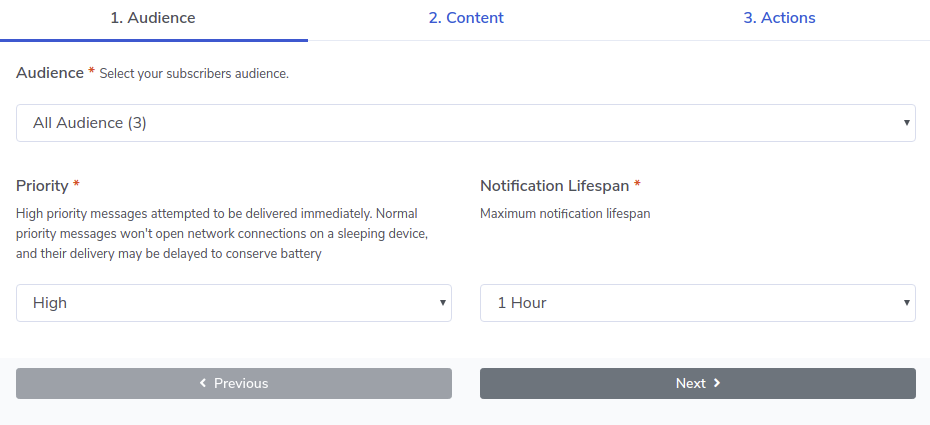
Audience
From the dropdown select subscribers audience you would like to target, by default all subscribers are selected. Number in the brackets indicating total number of subscribers for each topic.
During subscription creation process, if you have specified additional topics, they also be available for selection from dropdown box. Only one audience group can be selected at a time.
Priority
Priority dropdown consists of two choices High and Normal, High is selected by default. This feature regulate how push notification being delivered.
High priority messages attempted to be delivered immediately.
Normal priority messages won't open network connections on a sleeping device, and their delivery may be delayed to conserve battery.
Notification Lifespan
Maximum notification lifespan of a message correspond to the maximum period of time for which message delivery will be attempted, 1 Hour is default choice. This feature helps to prevent from delivering messages with content that no longer relevant.
Consider subscriber device is turned off and you sending a message containing discount code that expire today at 6pm. Subscriber switch on it's device on the following day to receive push notification with discount code that can't be used.
Notification Title, Body and URL
Enter title and notification body here, keep it brief.
In the URL field enter valid website address, when user clicks or press on notification this URL will be loaded in the web browser.
You can define up to two action buttons to be displayed with a notification. All fields are optional, however if you choose to specify Action Title than Action URL is required.
Additionally you can select an icon from dropdown list to displayed on the button. Please not action icons may not be displayed.
Image URL
Large image can be included in notification and displayed to the user, recommended width of 1350px or more would be a good bet. Simply enter valid image URL.
Push Test
It's always good to push the test and preview results before sending message to your subscribers, simply press Push Test button.
If you web browser supports push notifications you will see one shortly. In case when your web browser is not compatible with push notifications you can still send the message by pressing Push Notification button.
Once you happy with test press Push Notification button and your notifications will start being dispatched. Check your Google Analytics Real-Time Events section to see user interaction.