
- Controlling the browsers programmatically
- Installation
- Getting started with Puppeteer
- Scraping an element from a page
- Scraping multiple elements
- Scraping a hotel listing page
- Summary
This Puppeteer tutorial will cover web scraping with Puppeteer in much detail. Puppeteer, however, is a Node.js package, making it exclusive for JavaScript developers. Python programmers, therefore, have a similar option – Pyppeteer.
Pyppeteer is an unofficial port of Puppeteer for Python. This also bundles Chromium and works smoothly with it. Pyppeteer can work with Chrome as well, similar to Puppeteer.
The syntax is very similar as it uses the asyncio library for Python, except the syntactical differences between Python and JavaScript. Here are two scripts in JavaScript and Python that load a page and then take a screenshot of it.
Puppeteer example:
const puppeteer = require('puppeteer');
async function main() {
  const browser = await puppeteer.launch();
  const page = await browser.newPage();
  await page.goto('https://oxylabs.io/');
  await page.screenshot({'path': 'oxylabs_js.png'})
  await browser.close();
}
main();
Pyppeteer Example:
import asyncio
import pyppeteer

async def main():
    browser = await pyppeteer.launch()
    page = await browser.newPage()
    await page.goto('https://oxylabs.io/')
    await page.screenshot({'path': 'oxylabs_python.png'})
    await browser.close()
asyncio.get_event_loop().run_until_complete(main())
The code is very similar. For web scraping dynamic websites, Pyppeteer can be an excellent alternative to Selenium for Python developers. But for the sake of making a Puppeteer tutorial, the following sections, we will cover Puppeteer, starting with the installation.
Before moving on with this Puppeteer tutorial, let’s get the basic tools installed.
Prerequisite
There are only two pieces of software that will be needed:
Node.js (which is bundled with npm—the package manager for Node.js)
Any code editor
The only thing that you need to know about Node.js is that it is a runtime framework. This means that JavaScript code, which typically runs in a browser, can run without a browser. Node.js is available for Windows, Mac OS, and Linux. It can be downloaded at their official download page.
Before writing any code to web scrape using node js, create a folder where JavaScript files will be stored. All the code for Puppeteer is written in .js files and is run by Node. Once the folder is created, navigate to this folder and run the initialization command:
npm init -y
This will create a package.json file in the directory. This file will contain information about the packages that are installed in this folder. The next step is to install the Node.js Packages in this folder.
Installing Puppeteer is very easy. Just run the npm install command from the terminal. Note that the working directory should be the one which contains package.json:
npm install puppeteer
Note that Puppeteer is bundled with a full instance of Chromium. When it is installed, it downloads a recent version of Chromium that is guaranteed to work with the version of Puppeteer being installed.
Create a new file in your node project directory (the directory that contains package.json and node_modules). Save this file as example1.js and add this code:
const puppeteer = require('puppeteer');
async function main() {
    // Add code here
}
main();`
The code above can be simplified by making the function anonymous and calling it on the same line:
const puppeteer = require('puppeteer');
(async () => {
    // Add code here
})();
The required keyword will ensure that the Puppeteer library is available in the file. The rest of the lines are the placeholder where an anonymous, asynchronous function is being created and executed. For the next step, launch the browser.
const browser = await puppeteer.launch();Note that by default, the browser is launched in the headless mode. If there is an explicit need for a user interface, the above line can be modified to include an object as a parameter.
const browser = await puppeteer.launch({headless:false}); // default is trueThe next step would be to open a page:
const page = await browser.newPage();Now that a page or in other words, a tab, is available, any website can be loaded by simply calling the goto() function:
await page.goto('https://oxylabs.io/');Once the page is loaded, the DOM elements, as well the rendered page is available. This can be verified by taking a quick screenshot:
await page.screenshot({path: 'oxylabs_1080.png'})This, however, will create only an 800×600 pixel image. The reason is that Puppeteer sets an initial page size to 800×600px. This can be changed by setting the viewport, before taking the screenshot.
  await page.setViewport({
    width: 1920,
    height: 1080,
  });
Finally, remember to close the browser:
await browser.close();Putting it altogether, here is the complete script.
const puppeteer = require('puppeteer');
(async () => {
  const browser = await puppeteer.launch();
  const page = await browser.newPage();
  await page.setViewport({
    width: 1920,
    height: 1080,
  });
  await page.goto('https://oxylabs.io/');
  await page.screenshot({path: 'oxylabs_1080.png'})
  await browser.close();
})();
Run this file from the terminal using this command:
node example1.js
This should create a new file oxylabs_1080.png in the same directory.
Bonus tip: If you need a PDF, you can use the pdf() function:
await page.pdf({path: 'oxylabs.pdf', format: 'A4'});Puppeteer loads the complete page in DOM. This means that we can extract any data from the page. The easiest way to do this is to use the function evaluate(). This allows to execute JavaScript functions like document.querySelector(). Consequently, it lets us extract any Element from the DOM.
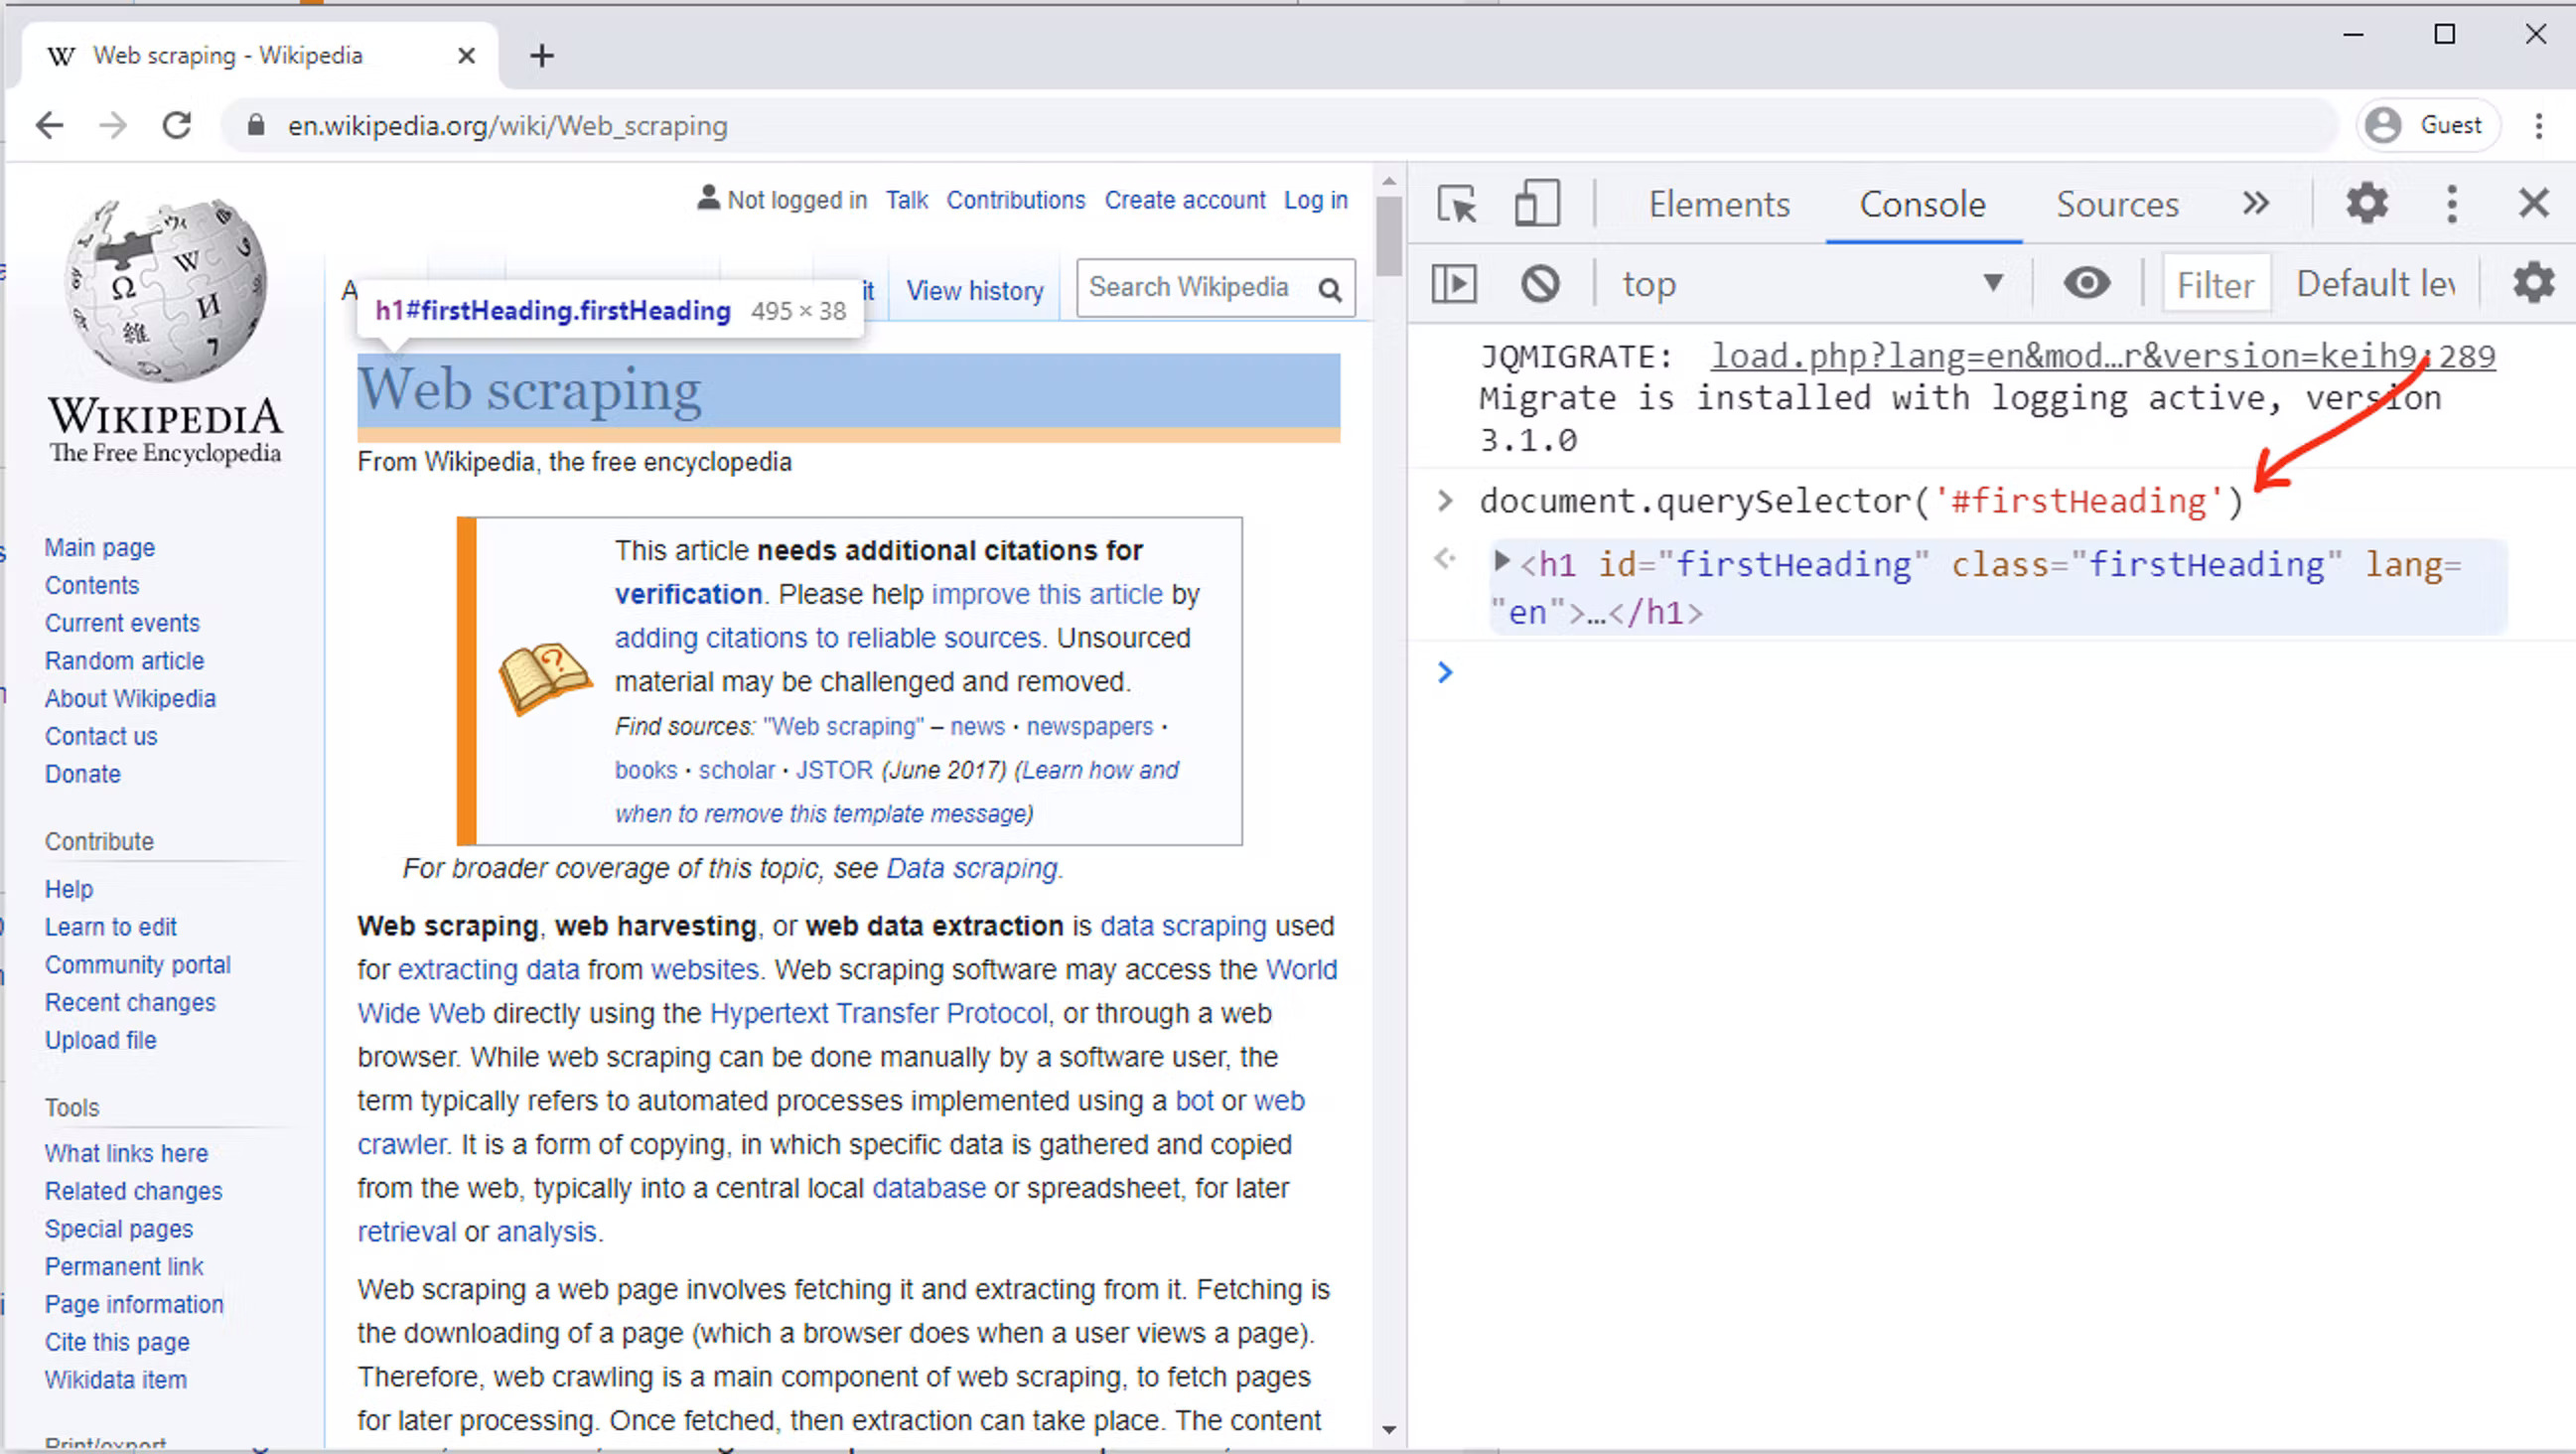
To understand this, open this link in your preferred browser.
Once the page is loaded, right-click the heading of the page, and select Inspect. This should open developer tools with the Elements tab activated. Here it is visible that the page’s heading is in h1 element, with id and class both set to firstHeading.
Now, go to the Console tab in the developer toolbox and write in this line:
document.querySelector('#firstHeading')You will immediately see that our desired tag is extracted.
This returns one element from the page. For this particular element, all we need is text. Text can be easily extracted with this line of code:
document.querySelector('#firstHeading').textContentThe text can now be returned using the return keyword. The next step is to surround this in the evaluate method. This will ensure that this querySelector can be run.
await page.evaluate(() => {
    return document.querySelector("#firstHeading").textContent;
});
The result of the evaluate() function can be stored in a variable to complete the functionality. Finally, do not forget to close the browser. Here is the complete script:
const puppeteer = require("puppeteer");

(async () => {
  const browser = await puppeteer.launch();
  const page = await browser.newPage();
  await page.goto("https://en.wikipedia.org/wiki/Web_scraping");

  title = await page.evaluate(() => {
    return document.querySelector("#firstHeading").textContent.trim();
  });
  console.log(title);
  await browser.close();
})();Extracting multiple elements would involve three steps:
- Use of querySelectorAll to get all elements matching the selector:
headings_elements = document.querySelectorAll("h2 .mw-headline");- create an array, as heading_elements is of type NodeList.
headings_array = Array.from(headings_elements);- Call the map() function can be called to process each element in the array and return it.
return headings_array.map(heading => heading.textContent);This of course needs to be surrounded by page.evaluate() function. Putting everything together, this is the complete script. You can save this as wiki_toc.js:
const puppeteer = require("puppeteer");

(async () => {
  const browser = await puppeteer.launch();
  const page = await browser.newPage();
  await page.goto("https://en.wikipedia.org/wiki/Web_scraping");

  headings = await page.evaluate(() => {
    headings_elements = document.querySelectorAll("h2 .mw-headline");
    headings_array = Array.from(headings_elements);
    return headings_array.map(heading => heading.textContent);
  });
  console.log(headings);
  await browser.close();
})();
This file can now be run from your terminal:
node wiki_toc.js
Bonus tip: Array.from() function can be supplied with a map function directly, without a separate call to map. Depending on the comfort level, the same code can thus be written as:
headings = await page.evaluate(() => {
    return Array.from(document.querySelectorAll("h2 .mw-headline"),
      heading => heading.innerText.trim());
});This section will explain how a typical listing page can be scraped to get a JSON object with all the required information. The concepts presented in this section will be applicable for any listing, whether it is an online store, a directory, or a hotel listing.
The example that we will take is an Airbnb. Apply some filters so that you reach a page similar to the one in the screenprint. In this particular example, we will be scraping this Airbnb page that lists 20 hotels. To scrape all 20 hotels, the first step is to identify the selector for each hotel section.
root = Array.from(document.querySelectorAll("#FMP-target [itemprop='itemListElement']"));This returns a NodeList of length 20 and stores in the variable root. Note that so far, text or any attribute has not been extracted. All we have is an array of elements. This will be done in the map() function.
hotels = root.map(hotel => ({
// code here
}));
The URL of the photo of the hotel can be extracted with a code like this:
hotel.querySelector("img").getAttribute("src")Getting the name of the hotel is a little trickier. The classes used on this page are some random words like _krjbj and _mvzr1f2. These class names appear to be generated dynamically and may change later on. It is better to have selectors which do not rely on these class names.
The hotel name can be extracted by combining parentElement and nextElementSibling selectors:
hotel.querySelector('ol').parentElement.nextElementSibling.textContentThe most important concept to understand here is that we are concatenating querySelectors. Effectively, the first hotel name is being extracted with this line of code:
document.querySelectorAll("#FMP-target [itemprop='itemListElement']")[0].querySelector('ol').parentElement.nextElementSibling.textContent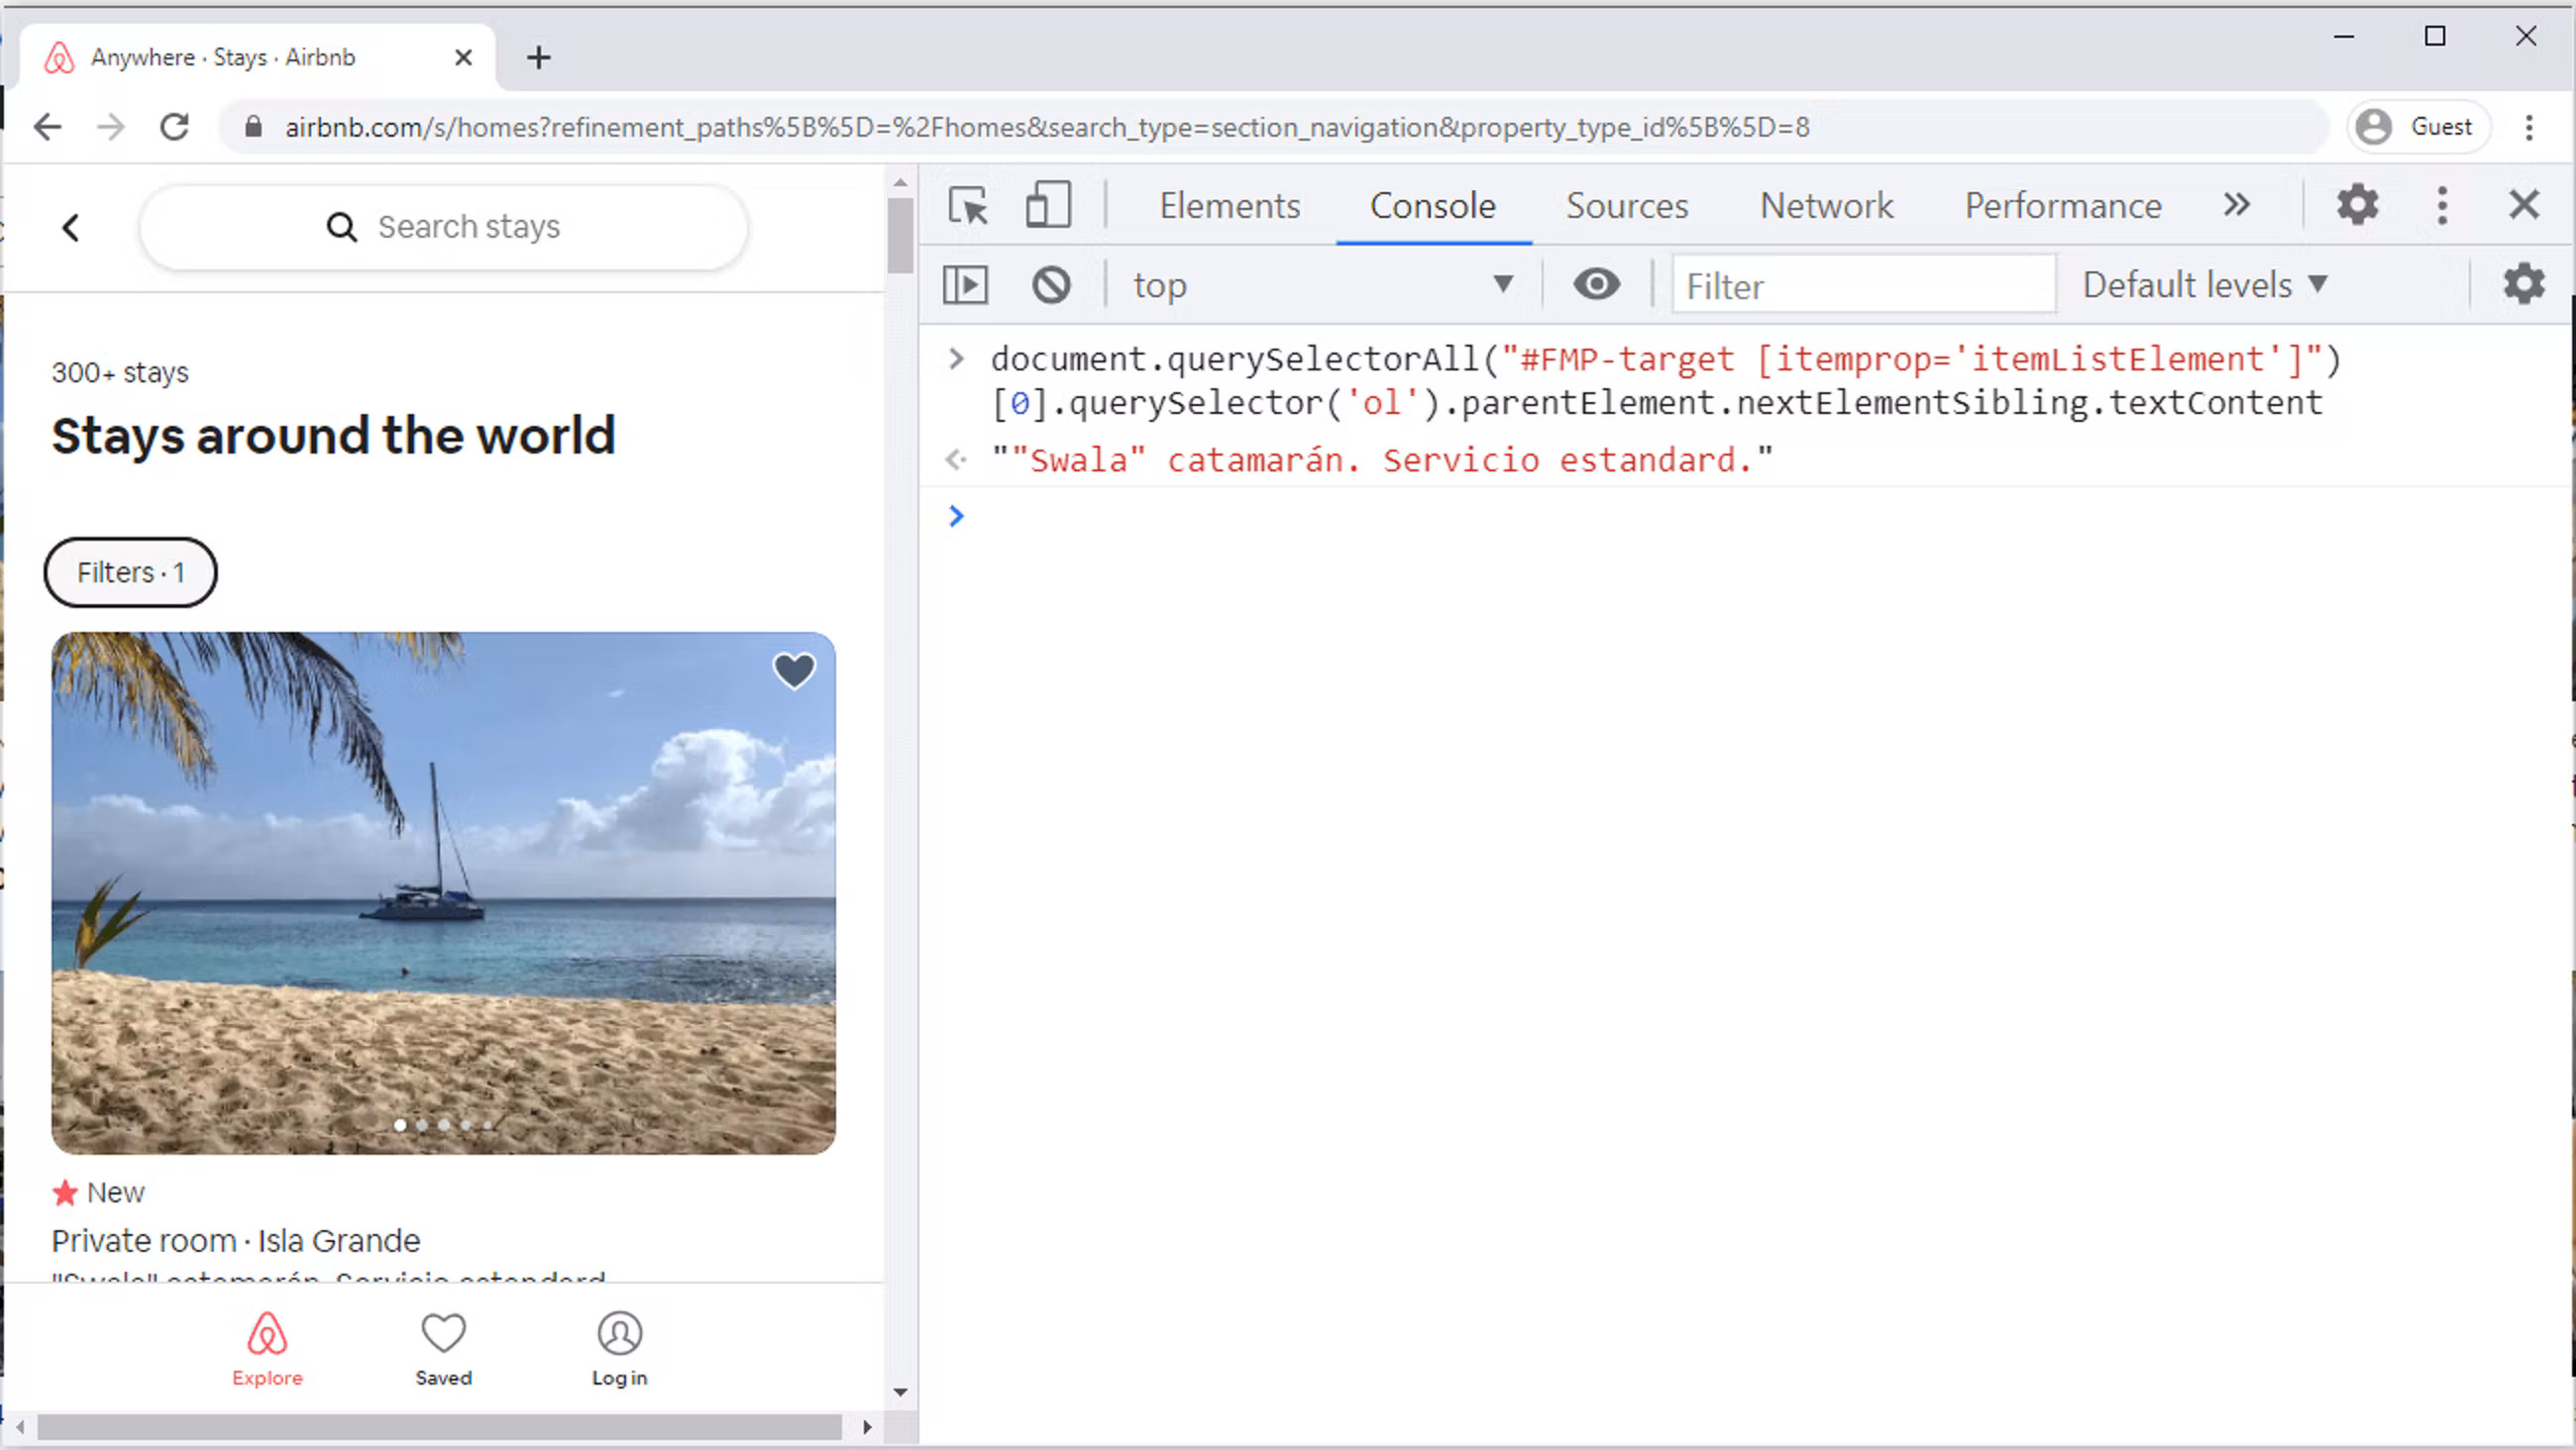
Finally, we can create an object containing both of these values. The syntax to create an object is like this:
Hotel = {
    Name: 'x',
    Photo: 'y'
}
Putting everything together, here is the final script. Save it as bnb.js.
const puppeteer = require("puppeteer");
(async () => {
  let url = "https://www.airbnb.com/s/homes?refinement_paths%5B%5D=%2Fhomes&search_type=section_navigation&property_type_id%5B%5D=8";
  const browser = await puppeteer.launch(url);
  const page = await browser.newPage();
  await page.goto(url);
  data = await page.evaluate(() => {
    root = Array.from(document.querySelectorAll("#FMP-target [itemprop='itemListElement']"));
    hotels = root.map(hotel => ({
      Name: hotel.querySelector('ol').parentElement.nextElementSibling.textContent,
      Photo: hotel.querySelector("img").getAttribute("src")
    }));
    return hotels;
  });
  console.log(data);
  await browser.close();
})();
Run this file from the terminal using:
node bnb.js
You should be able to see a JSON object printed on the console.
To get more detailed information, take a look at the official Puppeteer documentation.