Deploy a Decision Service
Here is a brief overview of how to deploy a Decision Service in your Azure Subscription. Please see the MWT White Paper for more information on MWT concepts and terminology.
- Go to the DS Home Page.
- Click on "Deploy To Azure". You will be redirected to the Azure Portal and prompted with a blade titled "Custom deployment" as shown below. Tip: Click on the tooltip button (i) next to each parameter to view its description. For advanced users who want to customize the deployment further, the code can be found on our Github repository.
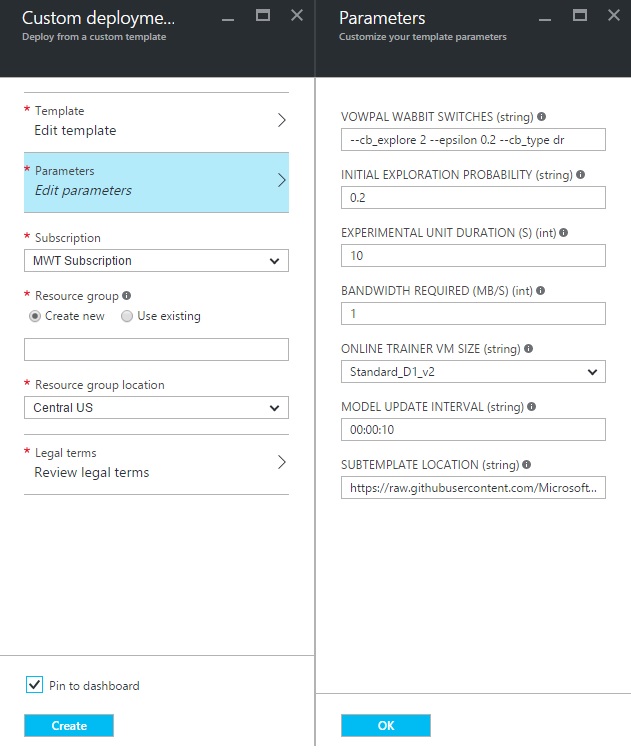
- Fill out the parameter values for your application, accept the terms, and click Create. Also make sure to check the "Pin to Dashboard" option so that you can more easily observe deployment progress.
- IMPORTANT: Only use "Resource group locations" that your Azure subscription has access to. Otherwise, the deployment is likely to fail. See our FAQ for known issues with deployment related to location. Typically, if you encounter a failure of this type, choosing a different location should work.
- IMPORTANT: Do NOT try to "Use existing" Resource Group. Always select a new one. Otherwise, your deployment is likely to fail.
- Enter a unique name for the new resource group. When creating multiple resource groups, a consistent naming scheme is advisable.
- In the "legal terms" blade, the "Purchase" button just means "Accept". In particular, if a free Azure subscription is used, no charges will result.
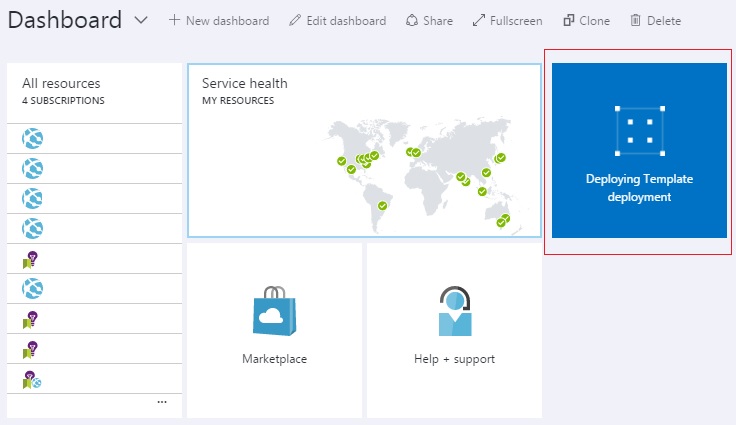
- After clicking Create, Azure portal will validate parameters and submit the actual deployment. To track progress, click on the "Deploying Template deployment" box on the dashboard as shown below. Once this opens, to see live updates you will need to click Refresh in the top navigation menu of the Deployment panel to see progress. (Note: we are aware that there are some existing issues with deployment, usually redeploying would resolve these. Please visit our Troubleshooting Guide and FAQ List for more details)
- Alternatively, you can also check the status of deployment through the Resource Group itself. On the left hand side menu, click Resource Groups and choose the one you named earlier.
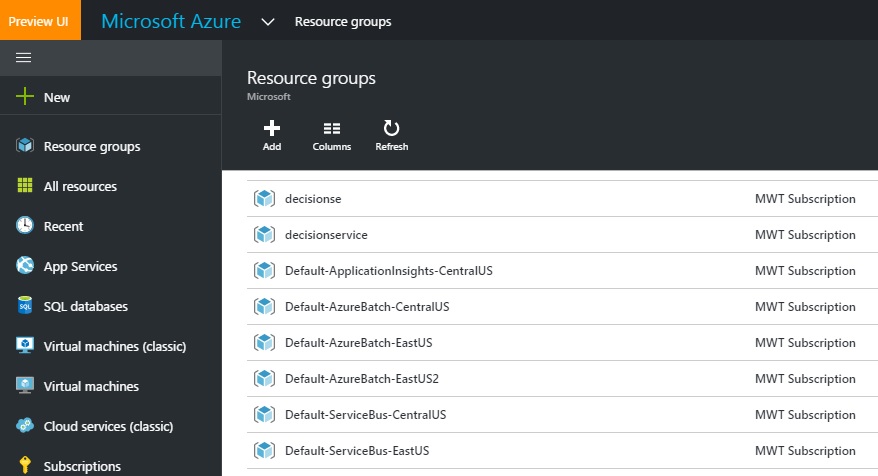
The deployment status is displayed under "Last Deployment" in the "Essentials" box of the Resource Group panel. - Once you see a deployment status of "Succeeded", either in the Deployment panel or the Resource Group panel, the deployment is finished. However, it will take a few more minutes for the training service to initialize. You can track its progress by clicking on the resource named trainer-*, where * is a unique string generated during deployment. Once the trainer's status is "Running", your DS is ready to make decisions!
- When your DS is ready, you can either try the API Test Drive, or try to interact with it directly, using either of the 2 ways described in the Tutorial. Either way, you will likely need access to your Management Center. If at any point you lose track of where your Management Center is, you can find its URL and password as described in the FAQ List.
- When you finish using a DS instance, don't forget to delete it! Otherwise, you might exceed one or more resource quotas on your next deployment attempt. Click here for instructions on Cleaning Up.