-
Notifications
You must be signed in to change notification settings - Fork 33
Pre amplifier
The electret microphones require a supply voltage of 2 to 10 volts, and the signals they output need to be amplified in order to match the dynamic range of the analog-to-digital converter. Unfortunately, we did not find a sufficiently mobile and affordable consumer product for this purpose. These instructions describe our own semi-custom solution, which you can build up based on a commercially available kit, or put together yourself from scratch. We provide the ordering information for the parts we used, which were delivered by stores located in Germany.
Corresponding author: Florian Denk
The device is optimized for the Roland CS-10EM Binaural Microphones/Earphones, however it can be operated with any two-pin electret microphone that is functional with 9V supply voltage.
The amplifiers are modified from a complete kit available at ELV as shown in the Figure below ((C) ELV, published with kind permission based on https://www.elv.de/controller.aspx?cid=726&detail=33818)

We recommend to replace the delivered IC by a Texas Instruments OPA 2134, which has the same layout but provides superior noise levels and THD. The gain of the 2-stage amplifier can be adjusted by the resistor R11.
The gain is computed by G = (1+R6/R5) * R11/R10 = 11 * R11/1kΩ
| Gain | 20 dB | 25 dB | 30 dB | 35 dB | 40 dB |
|---|---|---|---|---|---|
| R11 / kΩ | 0.901 | 1.617 | 2.875 | 5.112 | 9.091 |
- See the supplied manual. For correct configuration, the bridges BR1 should be closed and BR2 left open.
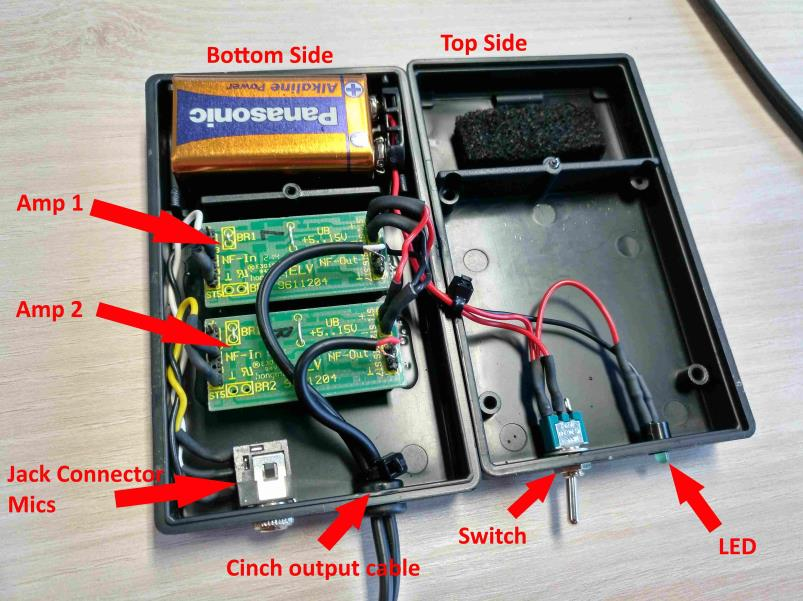
- For a stereo amplifier, two amplifiers can be placed in one housing
- External Connections:
- Input: 1x 3.5 mm stereo jack female (connection to microphones). Tip: Microphone 1 signal, Ring: Microphone 2 signal, Sleeve: Ground
- Output: 50 cm stereo Cinch cable male (to soundcard). Make sure there is a cable relief!
- Put both to short side of the housing
- Internal connections:
- Battery: ST1 / ST2, both amplifiers in parallel
- Connection to microphones: Tip: Microphone 1/left signal (-> ST4, Amp 1), Ring: Microphone 2/right (-> ST4, Amp 2), Sleeve: Ground (-> ST5 Amp 1 + Amp 2),
- Connection to Soundcard: white cinch cable: Signal to ST6, Ground to ST7 (both Amp 1/left). red cinch cable: Signal to ST6, Ground to ST7 (both Amp 2/right). A length of 50 cm is usually sufficient.
- ST3 not connected on either amp.
- 1x 9V Block battery. Capacity is 500-700 mAh, should last about 20 h
- It is handy to use an operation LED parallel to the voltage supply
- A one-channel switch of the positive voltage terminal of the battery is sufficient
- The amplifier inverts the signal
- The supply voltage is delivered to the signal port of the microphone. Make sure the particular electret microphone is compatible with the supply voltage of the amplifier.
- The maximum output voltage amplitude of the amplifier is a bit less than half the supply voltage – keep this in mind when setting the gain
- Consider the sensitivity of your soundcard when setting the amplifier gain, we recommend to allow for 120 dB SPL - the microphone itself generates about 0.01V for 94 dB SPL, and 0.2V for 120 dB SPL.

| Components per Box | Units required | Unit price | Price |
|---|---|---|---|
| Microphone amplifier set incl. PCB | 2 | 6 € | 12 € |
| Additional SMD resistor, cables, solder | 2 | 0.5 € | 1 € |
| Texas Instruments OPA 2134 Operational Amplifier (Make sure the layout is compatible with the PCB) | 2 | 3 € | 6 € |
| Jack socket, cinch cable | 1 | 5 € | 5 € |
| Housing | 1 | 2 € | 2 € |
| --- | --- | --- | --- |
| Total | 26 € |