Note: This is a fork of the original repo by Divam Gupta. It is a refactor of the source code to make it easier to follow.
Primary Changes are:
-
A model wrapper class that simplifies the process of training and inference. It can be found under
keras_segmentation/model_wrapper.py -
An alternate CLI interface that uses docopt for parsing arguments. This can be found under
keras_segmentation/__main__.py
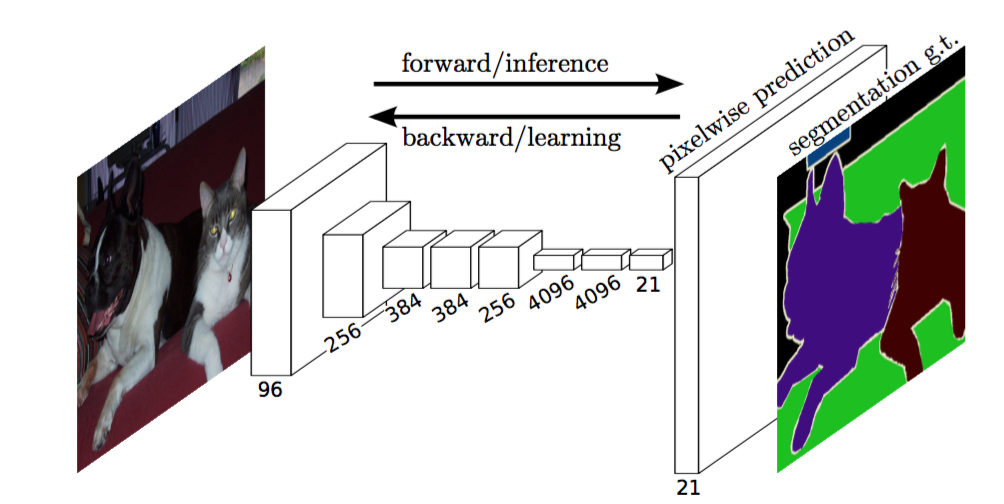
Implementation of various Deep Image Segmentation models in keras.
Following models are supported:
| model_name | Base Model | Segmentation Model |
|---|---|---|
| fcn_8 | Vanilla CNN | FCN8 |
| fcn_32 | Vanilla CNN | FCN8 |
| fcn_8_vgg | VGG 16 | FCN8 |
| fcn_32_vgg | VGG 16 | FCN32 |
| fcn_8_resnet50 | Resnet-50 | FCN32 |
| fcn_32_resnet50 | Resnet-50 | FCN32 |
| fcn_8_mobilenet | MobileNet | FCN32 |
| fcn_32_mobilenet | MobileNet | FCN32 |
| pspnet | Vanilla CNN | PSPNet |
| vgg_pspnet | VGG 16 | PSPNet |
| resnet50_pspnet | Resnet-50 | PSPNet |
| unet_mini | Vanilla Mini CNN | U-Net |
| unet | Vanilla CNN | U-Net |
| vgg_unet | VGG 16 | U-Net |
| resnet50_unet | Resnet-50 | U-Net |
| mobilenet_unet | MobileNet | U-Net |
| segnet | Vanilla CNN | Segnet |
| vgg_segnet | VGG 16 | Segnet |
| resnet50_segnet | Resnet-50 | Segnet |
| mobilenet_segnet | MobileNet | Segnet |
(Only required for GPU inference and training)
CUDA & CuDNN. This repo was developed and tested with:
- Nvidia Driver Version: 418.56
- CUDA Version: 10.0
- CuDNN Version: 7.5
Other versions of the above may also work.
If you wish to use your GPU and the above prerequisites are satisfied:
pip install -r requirements-gpu.txtIf you do not have a capable NVIDIA GPU or do not wish to use it:
pip install -r requirements-cpu.txtDownload and extract the following:
https://drive.google.com/file/d/0B0d9ZiqAgFkiOHR1NTJhWVJMNEU/view?usp=sharing
You will get a folder named dataset1
You need to make two folders
- Images Folder - For all the training images
- Annotations Folder - For the corresponding ground truth segmentation images
The filenames of the annotation images should be same as the filenames of the RGB images.
The size of the annotation image for the corresponding RGB image should be same.
For each pixel in the RGB image, the class label of that pixel in the annotation image would be the value of the blue pixel.
Example code to generate annotation images :
import cv2
import numpy as np

ann_img = np.zeros((30,30,3)).astype('uint8')
ann_img[ 3 , 4 ] = 1 # this would set the label of pixel 3,4 as 1

cv2.imwrite( "ann_1.png" ,ann_img )
Only use bmp or png format for the annotation images.
You can import keras_segmentation in your python code and use the module. Examples are provided
below, refer to the docstrings in the WrappedModel class to get a comprehensive
overview.
import keras_segmentation
import matplotlib.pyplot as plt

model = keras_segmentation.model_wrapper.WrappedModel(
    keras_model=keras_segmentation.models.segnet.resnet50_segnet,
    n_classes=50
)

hist = model.train_model(
    train_images="dataset1/images_prepped_train/",
    train_annotations="dataset1/annotations_prepped_train/",
    checkpoints_path="resnet_segnet",
    epochs=20,
    resume_training=True,
    validate=True,
    val_images="dataset1/images_prepped_test/",
    val_annotations="dataset1/annotations_prepped_test/",
    verify_dataset=True
)

# Create plot of Model Accuracy across epochs
plt.plot(hist.history['acc'])
plt.plot(hist.history['val_acc'])
plt.title('Model Accuracy')
plt.ylabel('accuracy')
plt.xlabel('epoch')
plt.legend(['train', 'val'], loc='upper left')
plt.show()

# Create plot of Model Loss across epochs
plt.plot(hist.history['loss'])
plt.plot(hist.history['val_loss'])
plt.title('Model Loss')
plt.ylabel('loss')
plt.xlabel('epoch')
plt.legend(['train', 'val'], loc='upper left')
plt.show()

out = model.predict(
    input_img="dataset1/images_prepped_test/0016E5_07965.png",
    out_fname="/tmp/out.png"
)

plt.imshow(out)
The keras_model argument of the keras_segmentation.model_wrapper.WrappedModel class
can either be the relevant model module itself (i.e. explicitly specifying the model as above),
or it can be a string that is a key of the model_from_name dictionary found in
keras_segmentation/models/__init__.py. These keys are the same as the models listed in the first
column of the table above.
This repo comes with trained weights for resnet50_segnet. To load existing weights do the following.
import keras_segmentation
import matplotlib.pyplot as plt

model = keras_segmentation.model_wrapper.WrappedModel(
    keras_model=keras_segmentation.models.segnet.resnet50_segnet,
    n_classes=50
)

model.load_weights("pretrained_models/resnet_segnet/saved_weights-epoch_12.hdf5")

out = model.predict(
    input_img="dataset1/images_prepped_test/0016E5_07965.png",
    out_fname="/tmp/out.png"
)

plt.imshow(out)
A model can also have weights loaded, and then be trained after. This is useful when you have a prolonged training job and your code or computer errors out before all epochs are complete.
You can also use the tool just using command line. Examples are provided below, run python -m keras_segmentation -h
to see all possible arguments and options.
Note that sets of arguments enclosed in [...] are optional. Sets of arguments enclosed in (...) are required.
Sets of arguments enclosed in [(...)] are optional, but if you wish to use them, ALL arguments enclosed in that
set of [(...)] are required.
To train or predict using a different model, replace resnet50_segnet with another model from the
first column of the table above.
To train a model run the following command:
python -m keras_segmentation resnet50_segnet train \
    --n_classes=50 \
    --train_images=dataset1/images_prepped_train/ \
    --train_annotations=dataset1/annotations_prepped_train/ \
    --validate \
    --val_images=dataset1/images_prepped_test/ \
    --val_annotations=dataset1/annotations_prepped_test/ \
    --epochs=20 \
--new_checkpoints_dir=resnet_segnetTo get the predictions of a trained model
python -m keras_segmentation resnet50_segnet predict \
    --n_classes=50 \
    --input_directory=dataset1/images_prepped_test/ \
    --output_directory=segmented_images \
    --load_checkpoint=pretrained_models/resnet_segnet/saved_weights-epoch_12.hdf5