Releases: huggingface/transformers
Deepseek v3 (based on 4.50.3)
A new model is added to transformers: DeepSeek 3 (Also known as DeepSeek R1).
It is added on top of the v4.50.3 release, and can be installed from the following tag: v4.50.3-DeepSeek-3.
In order to install this version, please install with the following command:
pip install git+https://github.com/huggingface/[email protected]
If fixes are needed, they will be applied to this release; this installation may therefore be considered as stable and improving.
DeepSeek 3 (Also known as DeepSeek R1)

The model is detailed in the following paper.
Overview
The DeepSeek-V3 model was proposed in DeepSeek-V3 Technical Report by DeepSeek-AI Team.
The abstract from the paper is the following:
We present DeepSeek-V3, a strong Mixture-of-Experts (MoE) language model with 671B total parameters with 37B activated for each token. To achieve efficient inference and cost-effective training, DeepSeek-V3 adopts Multi-head Latent Attention (MLA) and DeepSeekMoE architectures, which were thoroughly validated in DeepSeek-V2. Furthermore, DeepSeek-V3 pioneers an auxiliary-loss-free strategy for load balancing and sets a multi-token prediction training objective for stronger performance. We pre-train DeepSeek-V3 on 14.8 trillion diverse and high-quality tokens, followed by Supervised Fine-Tuning and Reinforcement Learning stages to fully harness its capabilities. Comprehensive evaluations reveal that DeepSeek-V3 outperforms other open-source models and achieves performance comparable to leading closed-source models. Despite its excellent performance, DeepSeek-V3 requires only 2.788M H800 GPU hours for its full training. In addition, its training process is remarkably stable. Throughout the entire training process, we did not experience any irrecoverable loss spikes or perform any rollbacks. The model checkpoints are available at https://github.com/deepseek-ai/DeepSeek-V3.
Limitations and call for contribution!
We are super happy to make this code community-powered, and would love to see how you can help optimize the following:
- current implementation uses the "naive" attention compution (so not really MLA)
- current implementation loops through the experts. This should be replaced. Pointers to use
get_packed_weightsfromintetrations/tensor_parallel. - current implementation uses the eleuther formula for ROPE, using the orginal one would be more efficient! (should still follow our API)
- static cache is not supported (this should be just a generation config issue / config shape issues)
Usage tips
The model uses Multi-head Latent Attention (MLA) and DeepSeekMoE architectures for efficient inference and cost-effective training. It employs an auxiliary-loss-free strategy for load balancing and multi-token prediction training objective. The model can be used for various language tasks after being pre-trained on 14.8 trillion tokens and going through Supervised Fine-Tuning and Reinforcement Learning stages.
You can run the model in FP8 automatically, using 2 nodes of 8 H100 should be more than enough!
# `run_deepseek_v1.py`
from transformers import AutoModelForCausalLM, AutoTokenizer
import torch
torch.manual_seed(30)

tokenizer = AutoTokenizer.from_pretrained("deepseek-r1")

chat = [
  {"role": "user", "content": "Hello, how are you?"},
  {"role": "assistant", "content": "I'm doing great. How can I help you today?"},
  {"role": "user", "content": "I'd like to show off how chat templating works!"},
]


model = AutoModelForCausalLM.from_pretrained("deepseek-r1", device_map="auto", torch_dtype=torch.bfloat16)
inputs = tokenizer.apply_chat_template(chat, tokenize=True, add_generation_prompt=True, return_tensors="pt").to(model.device)

outputs = model.generate(inputs, max_new_tokens=50)
print(tokenizer.batch_decode(outputs))
This generated:
<|Assistant|><think>
Okay, the user wants to demonstrate how chat templating works. Let me break down what that means. Chat templating is about structuring the conversation data, especially for models that need specific input formats. Maybe they're referring to something like how messages are formatted with roles (user, assistant, system) in APIs like OpenAI.

First, I should explain what chat templating is. It's the process of formatting conversation data into a structured format that the model can understand. This usually includes roles and content. For example, user messages, assistant responses, and system messages each have their own role tags.

They might want an example. Let me think of a simple conversation. The user says "Hello, how are you?" and the assistant responds "I'm doing great. How can I help you today?" Then the user follows up with wanting to show off chat templating. So the example should include the history and the new message.

In some frameworks, like Hugging Face's Transformers, chat templates are applied using Jinja2 templates. The template might look something like combining system messages, then looping through user and assistant messages with appropriate tags. For instance, using {% for message in messages %} and assigning roles like <|user|>, <|assistant|>, etc.

I should structure the example with the messages array, showing each role and content. Then apply a hypothetical template to convert that into a formatted string the model uses. Also, mention that different models have different templating requirements, like using special tokens or varying role labels.

Wait, the user mentioned "chat templating" in the context of showing off. Maybe they want a practical example they can present. So providing a code snippet or a structured data example would be helpful. Let me outline a typical messages array and then the templated output.

Also, it's important to note that proper templating ensures the model knows the conversation flow, which is crucial for generating coherent responses. Maybe include a note about why it's important, like maintaining context and role-specific processing.

Let me check if there are any common mistakes or things to avoid. For example, not closing tags properly, or mismatching roles. But maybe that's too detailed unless the user asks. Focus on the positive example first.

Putting it all together, the response should have an example messages array, the applied template, and the final formatted string. Maybe use angle brackets or special tokens as placeholders. Also, mention that this helps in training or fine-tuning models with structured data.

I think that's a solid approach. Let me structure it step by step to make it clear.
</think>

Chat templating is a way to structure conversation data (e.g., user/assistant interactions) into a format that language models understand. This is especially important for models trained to handle multi-turn dialogues, where the input must explicitly separate roles (user, assistant, system, etc.) and messages. Let’s break this down with an example!

---

### **Step 1: Raw Conversation History**
Suppose we have this conversation:
- **User**: "Hello, how are you?"
- **Assistant**: "I'm doing great. How can I help you today?"
- **User**: "I'd like to show off how chat templating works!"

---

### **Step 2: Structured Messages**
In frameworks like Hugging Face Transformers or OpenAI, conversations are often formatted as a list of dictionaries with `role` and `content`:
```python
messages = [
    {"role": "user", "content": "Hello, how are you?"},
    {"role": "assistant", "content": "I'm doing great. How can I help you today?"},
    {"role": "user", "content": "I'd like to show off how chat templating works!"},
]
```

---

### **Step 3: Apply a Chat Template**
A **chat template** converts this structured data into a single string formatted for the model. For example, using a Jinja-style template (common in Hugging Face):

```jinja
{% for message in messages %}
    {% if message['role'] == 'user' %}
        <|user|>{{ message['content'] }}<|end|>
    {% elif message['role'] == 'assistant' %}
        <|assistant|>{{ message['content'] }}<|end|>
    {% endif %}
{% endfor %}
<|assistant|>
```

---

### **Step 4: Final Templated Output**
Applying the template to our `messages` list would produce:
```text
<|user|>Hello, how are you?<|end|>
<|assistant|>I'm doing great. How can I help you today?<|end|>
<|user|>I'd like to show off how chat templating works!<|end|>
<|assistant|>
```

This tells the model:
1. The conversation history (user/assistant turns).
2. The model’s turn to generate a response (`<|assistant|>` at the end).

---

### **Key Notes**:
- **Role Separation**: Tags like `<|user|>` and `<|assistant|>` help the model distinguish speakers.
- **Special Tokens**: Models often use unique tokens (e.g., `<|end|>`) to mark message boundaries.
- **Flexibility**: Templates vary by model (e.g., OpenAI uses `{"role": "user", "content": "..."}` instead of tags).

---

### **Why This Matters**:
- **Consistency**: Ensures the model understands dialogue structure.
- **Context Preservation**: Maintains the flow of multi-turn conversations.
- **Alignment**: Matches the format the model was trained on for better performance.

Want to dive deeper or see a specific framework’s implementation (e.g., OpenAI, Llama, Mistral)? Let me know! 😊<|end▁of▁sentence|>
Use the following to run it
torchrun --nproc_per_node=8 --nnodes=2 --node_rank=0|1 --rdzv-id an_id --rdzv-backend c10d --rdzv-endpoint master_addr:master_port run_deepseek_r1.pyIf you have:
[rank0]: ncclInternalError: Internal check failed.
[rank0]: Last error:
[rank0]: Bootstrap : no socket interface found
error, it means NCCL was pr...
Patch release v4.50.3
Patch release v4.50.3
Thanks to the vllm team we have a few more bugs that slipped in!
-
[generate] beam search -- fix output cropping (#37080) by @gante
-
[blip-2] Fix dtype mismatch when keep in fp32 (#37068) by @zucchini-nlp
-
Fix PixtralProcessor patch_size when spatial_merge_size is used (#37019)
Contributors
Assets 2
Patch release v4.50.2
Patch release v4.50.2
I completely forgot to put these in the previous patch sorry!
Should put the transformers backend in a good spot!
-
[Utils] torch version checks optionally accept dev versions (#36847) by @gante
-
Fix processor kwargs qwen2 vl (#36890) by @yonigozlan
-
Fix Pan and Scan on batched images Gemma3 (#36864) by @yonigozlan
Contributors
Assets 2
Patch release v4.50.1
Patch release v4.50.1
There were some very minor bugs with the new hub kernels, and with remote code that we had to fix
-
Deprecate #36741 and map Causal to Conditional (#36917) by @zucchini-nlp
-
[chameleon] fix num image token check (#36918) by @zucchini-nlp
-
Fix torch version guard at import (#36907) by @zucchini-nlp
Contributors
Assets 2
Release v4.50.0
Release v4.50.0
New Model Additions
Model-based releases
Starting with version v4.49.0, we have been doing model-based releases, additionally to our traditional, software-based monthly releases. These model-based releases provide a tag from which models may be installed.
Contrarily to our software-releases; these are not pushed to pypi and are kept on our GitHub. Each release has a tag attributed to it, such as:
v4.49.0-Gemma-3v4.49.0-AyaVision
Each new model release will always be based on the current state of the main branch at the time of its creation. This ensures that new models start with the latest features and fixes available.
For example, if two models—Gemma-3 and AyaVision—are released from main, and then a fix for gemma3 is merged, it will look something like this:
              o---- v4.49.0-Gemma-3 (includes AyaVision, plus main fixes)
            /                  \
---o--o--o--o--o-- (fix for gemma3) --o--o--o main
       \
        o---- v4.49.0-AyaVision
We strive to merge model specific fixes on their respective branches as fast as possible!
Gemma 3

Gemma 3 is heavily referenced in the following model-based release and we recommend reading these if you want all the information relative to that model.
The Gemma 3 model was proposed by Google. It is a vision-language model composed by a SigLIP vision encoder and a Gemma 2 language decoder linked by a multimodal linear projection.
It cuts an image into a fixed number of tokens same way as Siglip if the image does not exceed certain aspect ratio. For images that exceed the given aspect ratio, it crops the image into multiple smaller pacthes and concatenates them with the base image embedding.
One particularity is that the model uses bidirectional attention on all the image tokens. Also, the model interleaves sliding window local attention with full causal attention in the language backbone, where each sixth layer is a full causal attention layer.
- Gemma3 by @RyanMullins in #36658
Shield Gemma2
ShieldGemma 2 is built on Gemma 3, is a 4 billion (4B) parameter model that checks the safety of both synthetic and natural images against key categories to help you build robust datasets and models. With this addition to the Gemma family of models, researchers and developers can now easily minimize the risk of harmful content in their models across key areas of harm as defined below:
- No Sexually Explicit content: The image shall not contain content that depicts explicit or graphic sexual acts (e.g., pornography, erotic nudity, depictions of rape or sexual assault).
- No Dangerous Content: The image shall not contain content that facilitates or encourages activities that could cause real-world harm (e.g., building firearms and explosive devices, promotion of terrorism, instructions for suicide).
- No Violence/Gore content: The image shall not contain content that depicts shocking, sensational, or gratuitous violence (e.g., excessive blood and gore, gratuitous violence against animals, extreme injury or moment of death).
We recommend using ShieldGemma 2 as an input filter to vision language models, or as an output filter of image generation systems. To train a robust image safety model, we curated training datasets of natural and synthetic images and instruction-tuned Gemma 3 to demonstrate strong performance.
- Shieldgemma2 #36678 by @RyanMullins
Aya Vision
AyaVision is heavily referenced in the following model-based release and we recommend reading these if you want all the information relative to that model.

The Aya Vision 8B and 32B models is a state-of-the-art multilingual multimodal models developed by Cohere For AI. They build on the Aya Expanse recipe to handle both visual and textual information without compromising on the strong multilingual textual performance of the original model.
Aya Vision 8B combines the Siglip2-so400-384-14 vision encoder with the Cohere CommandR-7B language model further post-trained with the Aya Expanse recipe, creating a powerful vision-language model capable of understanding images and generating text across 23 languages. Whereas, Aya Vision 32B uses Aya Expanse 32B as the language model.
Key features of Aya Vision include:
- Multimodal capabilities in 23 languages
- Strong text-only multilingual capabilities inherited from CommandR-7B post-trained with the Aya Expanse recipe and Aya Expanse 32B
- High-quality visual understanding using the Siglip2-so400-384-14 vision encoder
- Seamless integration of visual and textual information in 23 languages.
- Add aya by @ArthurZucker in #36521
Mistral 3.1
Mistral 3.1 is heavily referenced in the following model-based release and we recommend reading these if you want all the information relative to that model.

Building upon Mistral Small 3 (2501), Mistral Small 3.1 (2503) adds state-of-the-art vision understanding and enhances long context capabilities up to 128k tokens without compromising text performance. With 24 billion parameters, this model achieves top-tier capabilities in both text and vision tasks.
It is ideal for:
- Fast-response conversational agents.
- Low-latency function calling.
- Subject matter experts via fine-tuning.
- Local inference for hobbyists and organizations handling sensitive data.
- Programming and math reasoning.
- Long document understanding.
- Visual understanding.
- Add Mistral3 by @Cyrilvallez in #36790
Smol VLM 2
SmolVLM-2 is heavily referenced in the following model-based release and we recommend reading these if you want all the information relative to that model.

SmolVLM2 is an adaptation of the Idefics3 model with two main differences:
- It uses SmolLM2 for the text model.
- It supports multi-image and video inputs
SigLIP-2
SigLIP-2 is heavily referenced in the following model-based release and we recommend reading these if you want all the information relative to that model.

The SigLIP2 model was proposed in SigLIP 2: Multilingual Vision-Language Encoders with Improved Semantic Understanding, Localization, and Dense Features by Michael Tschannen, Alexey Gritsenko, Xiao Wang, Muhammad Ferjad Naeem, Ibrahim Alabdulmohsin,
Nikhil Parthasarathy, Talfan Evans, Lucas Beyer, Ye Xia, Basil Mustafa, Olivier Hénaff, Jeremiah Harmsen,
Andreas Steiner and Xiaohua Zhai.
The model comes in two variants
- FixRes - model works with fixed resolution images (backward compatible with SigLIP v1)
- NaFlex - model works with variable image aspect ratios and resolutions (SigLIP2 in
transformers)
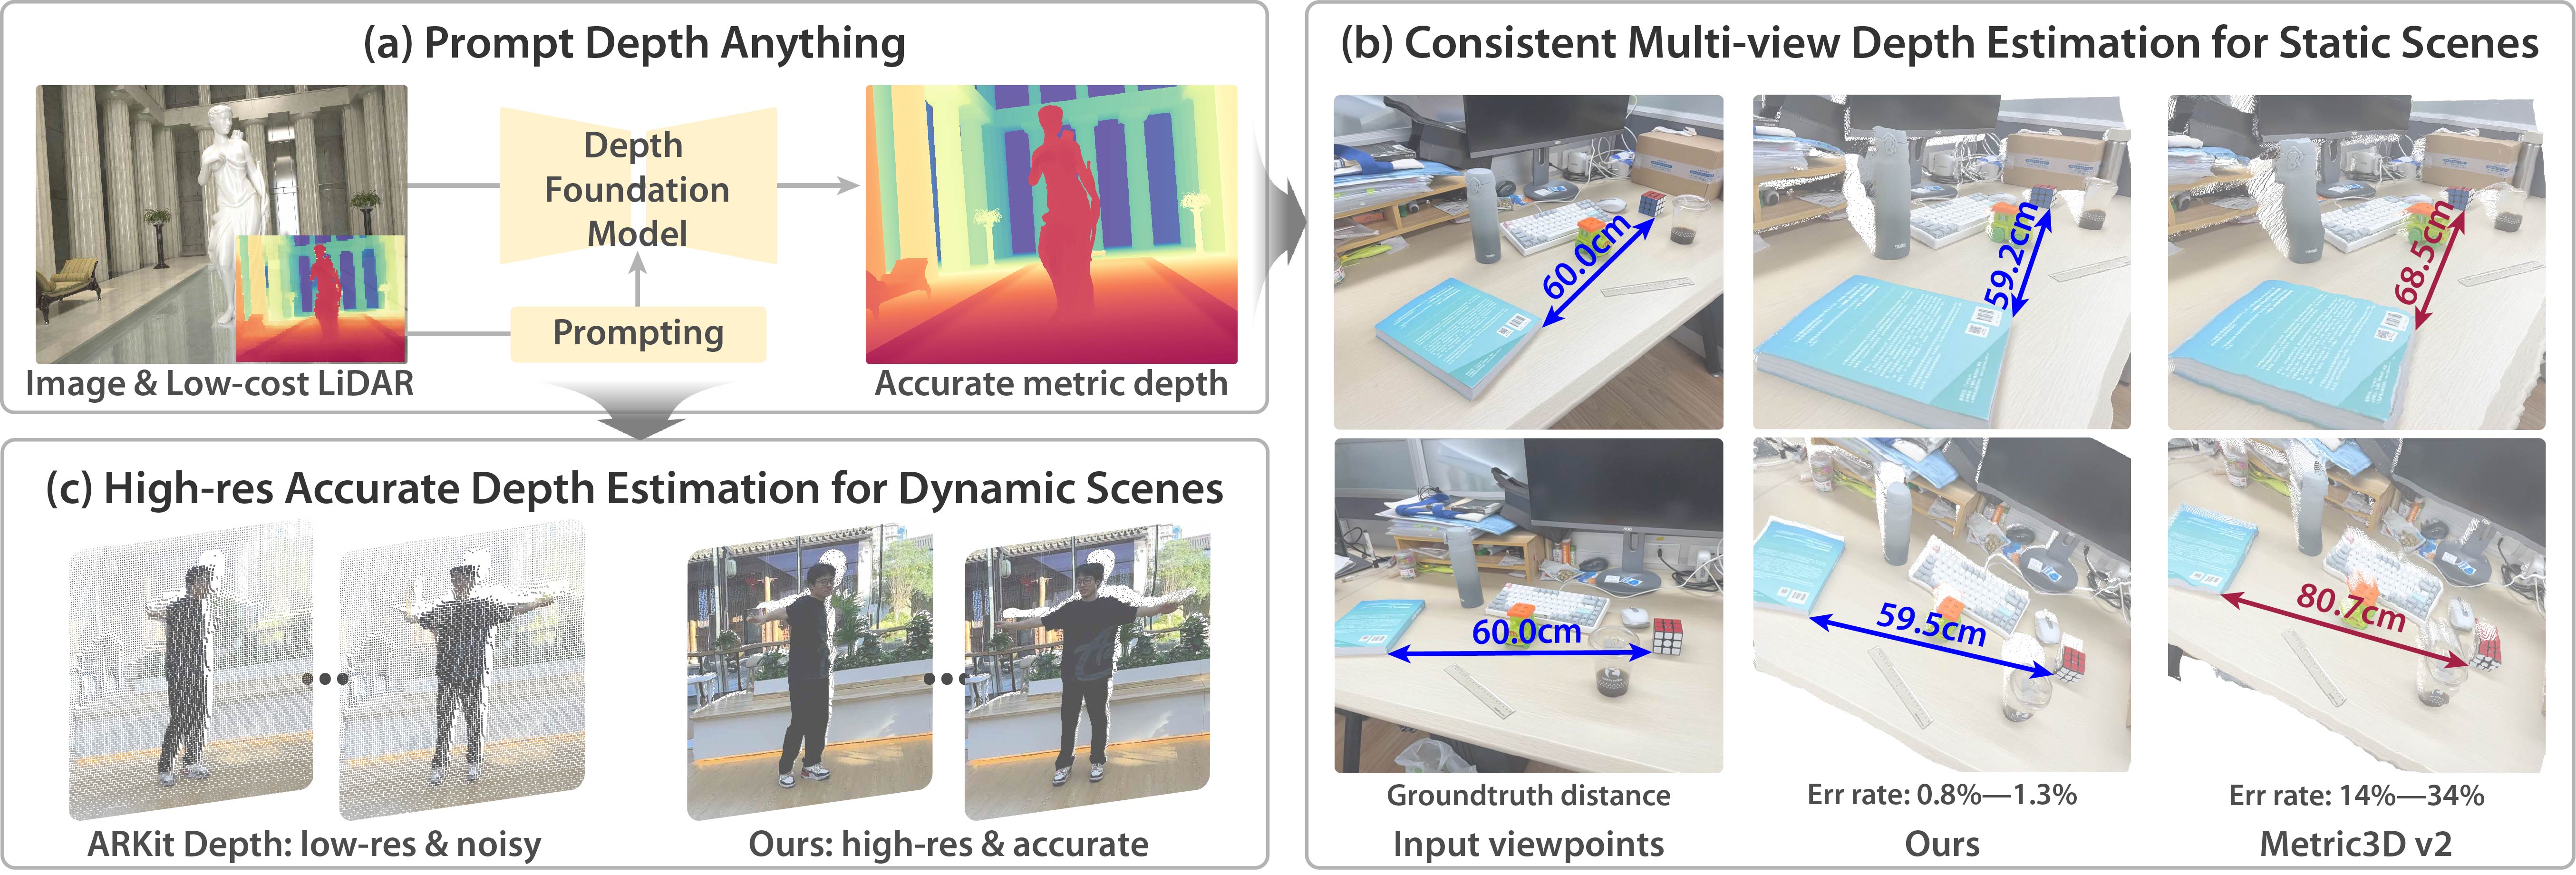
Prompt Depth Anything
PromptDepthAnything is a high-resolution, accurate metric depth estimation model that leverages prompting, inspired by its success in vision-language (VLMs) and large language models (LLMs). Using iPhone LiDAR as a prompt, the model generates precise depth maps at up to 4K resolution, unlocking the potential of depth foundation models.
New tool: attention visualization
We add a new tool to transformers to visualize the attention layout of a given model. It only requires a model ID as input, and will load the relevant tokenizer/model and display what the attention mask looks like. Some examples:
from transformers.utils.attention_visualizer import AttentionMaskVisualizer
visualizer = AttentionMaskVisualizer("meta-llama/Llama-3.2-3B-Instruct")
visualizer("A normal attention mask")

visualizer = AttentionMaskVisualizer("mistralai/Mistral-Small-24B-Instruct-2501")
visualizer("A normal attention mask with a long text to see how it is displayed, and if it is displayed correctly")

visualizer = AttentionMaskVisualizer("google/paligemma2-3b-mix-224")
visualizer("<img> You are an assistant.", suffix = "What is on the image?")

visualizer = AttentionMaskVisualizer("google/gemma-2b")
visualizer("You are an assistant. Make sure you print me") # we should have slidiing on non sliding side by side

visualizer = AttentionMaskVisualizer("google/gemma-3-27b-it")
visualizer("<img>You are an assistant. Make sure you print me") # we should have slidiing on non sliding side by side
- Add attention visualization tool by @ArthurZucker in #36630
Deprecating transformers.agents in favor of smolagents
We are deprecating transformers.agents in favour of the smolagents library. Read...
Contributors
Assets 2
Mistral 3 (Based on v4.49.0)
A new model is added to transformers: Mistral 3.
It is added on top of the v4.49.0 release, and can be installed from the following tag: v4.49.0-Mistral-3.
In order to install this version, please install with the following command:
pip install git+https://github.com/huggingface/[email protected]
If fixes are needed, they will be applied to this release; this installation may therefore be considered as stable and improving.
Mistral 3
The model is detailed in the following blog post.
The models are available on the Hub with the following tag: mistral3
Overview
Building upon Mistral Small 3 (2501), Mistral Small 3.1 (2503) adds state-of-the-art vision understanding and enhances long context capabilities up to 128k tokens without compromising text performance. With 24 billion parameters, this model achieves top-tier capabilities in both text and vision tasks.
It is ideal for:
- Fast-response conversational agents.
- Low-latency function calling.
- Subject matter experts via fine-tuning.
- Local inference for hobbyists and organizations handling sensitive data.
- Programming and math reasoning.
- Long document understanding.
- Visual understanding.
This model was contributed by cyrilvallez and yonigozlan.
The original code can be found here and here.
Usage example
Inference with Pipeline
Here is how you can use the image-text-to-text pipeline to perform inference with the Mistral3 models in just a few lines of code:
>>> from transformers import pipeline

>>> messages = [
...     {
...         "role": "user",
...         "content": [
...             {
...                 "type": "image",
...                 "image": "https://huggingface.co/datasets/huggingface/documentation-images/resolve/main/bee.jpg",
...             },
...             {"type": "text", "text": "Describe this image."},
...         ],
...     },
... ]

>>> pipe = pipeline("image-text-to-text", model="mistralai/Mistral-Small-3.1-24B-Instruct-2503", torch_dtype=torch.bfloat16)
>>> outputs = pipe(text=messages, max_new_tokens=50, return_full_text=False)
>>> outputs[0]["generated_text"]
'The image depicts a vibrant and lush garden scene featuring a variety of wildflowers and plants. The central focus is on a large, pinkish-purple flower, likely a Greater Celandine (Chelidonium majus), with a'
Inference on a single image
This example demonstrates how to perform inference on a single image with the Mistral3 models using chat templates.
>>> from transformers import AutoProcessor, AutoModelForImageTextToText
>>> import torch

>>> torch_device = "cuda"
>>> model_checkpoint = "mistralai/Mistral-Small-3.1-24B-Instruct-2503"
>>> processor = AutoProcessor.from_pretrained(model_checkpoint)
>>> model = AutoModelForImageTextToText.from_pretrained(model_checkpoint, device_map=torch_device, torch_dtype=torch.bfloat16)

>>> messages = [
...     {
...         "role": "user",
...         "content": [
...             {"type": "image", "url": "http://images.cocodataset.org/val2017/000000039769.jpg"},
...             {"type": "text", "text": "Describe this image"},
...         ],
...     }
... ]

>>> inputs = processor.apply_chat_template(messages, add_generation_prompt=True, tokenize=True, return_dict=True, return_tensors="pt").to(model.device, dtype=torch.bfloat16)

>>> generate_ids = model.generate(**inputs, max_new_tokens=20)
>>> decoded_output = processor.decode(generate_ids[0, inputs["input_ids"].shape[1] :], skip_special_tokens=True)

>>> decoded_output
"The image depicts two cats lying on a pink blanket. The larger cat, which appears to be an"...
Text-only generation
This example shows how to generate text using the Mistral3 model without providing any image input.
>>> from transformers import AutoProcessor, AutoModelForImageTextToText
>>> import torch

>>> torch_device = "cuda"
>>> model_checkpoint = ".mistralai/Mistral-Small-3.1-24B-Instruct-2503"
>>> processor = AutoProcessor.from_pretrained(model_checkpoint)
>>> model = AutoModelForImageTextToText.from_pretrained(model_checkpoint, device_map=torch_device, torch_dtype=torch.bfloat16)

>>> SYSTEM_PROMPT = "You are a conversational agent that always answers straight to the point, always end your accurate response with an ASCII drawing of a cat."
>>> user_prompt = "Give me 5 non-formal ways to say 'See you later' in French."

>>> messages = [
...    {"role": "system", "content": SYSTEM_PROMPT},
...    {"role": "user", "content": user_prompt},
... ]

>>> text = processor.apply_chat_template(messages, tokenize=False, add_generation_prompt=True)
>>> inputs = processor(text=text, return_tensors="pt").to(0, dtype=torch.float16)
>>> generate_ids = model.generate(**inputs, max_new_tokens=50, do_sample=False)
>>> decoded_output = processor.batch_decode(generate_ids[:, inputs["input_ids"].shape[1] :], skip_special_tokens=True)[0]

>>> print(decoded_output)
"1. À plus tard!
2. Salut, à plus!
3. À toute!
4. À la prochaine!
5. Je me casse, à plus!

```
 /\_/\
( o.o )
 > ^ <
```"
Batched image and text inputs
Mistral3 models also support batched image and text inputs.
>>> from transformers import AutoProcessor, AutoModelForImageTextToText
>>> import torch

>>> torch_device = "cuda"
>>> model_checkpoint = "mistralai/Mistral-Small-3.1-24B-Instruct-2503"
>>> processor = AutoProcessor.from_pretrained(model_checkpoint)
>>> model = AutoModelForImageTextToText.from_pretrained(model_checkpoint, device_map=torch_device, torch_dtype=torch.bfloat16)

>>> messages = [
...     [
...         {
...             "role": "user",
...             "content": [
...                 {"type": "image", "url": "https://llava-vl.github.io/static/images/view.jpg"},
...                 {"type": "text", "text": "Write a haiku for this image"},
...             ],
...         },
...     ],
...     [
...         {
...             "role": "user",
...             "content": [
...                 {"type": "image", "url": "https://www.ilankelman.org/stopsigns/australia.jpg"},
...                 {"type": "text", "text": "Describe this image"},
...             ],
...         },
...     ],
... ]


>>> inputs = processor.apply_chat_template(messages, padding=True, add_generation_prompt=True, tokenize=True, return_dict=True, return_tensors="pt").to(model.device, dtype=torch.bfloat16)

>>> output = model.generate(**inputs, max_new_tokens=25)

>>> decoded_outputs = processor.batch_decode(output, skip_special_tokens=True)
>>> decoded_outputs
["Write a haiku for this imageCalm waters reflect\nWhispers of the forest's breath\nPeace on wooden path"
, "Describe this imageThe image depicts a vibrant street scene in what appears to be a Chinatown district. The focal point is a traditional Chinese"]
Batched multi-image input and quantization with BitsAndBytes
This implementation of the Mistral3 models supports batched text-images inputs with different number of images for each text.
This example also how to use BitsAndBytes to load the model in 4bit quantization.
>>> from transformers import AutoProcessor, AutoModelForImageTextToText, BitsAndBytesConfig
>>> import torch

>>> torch_device = "cuda"
>>> model_checkpoint = "mistralai/Mistral-Small-3.1-24B-Instruct-2503"
>>> processor = AutoProcessor.from_pretrained(model_checkpoint)
>>> quantization_config = BitsAndBytesConfig(load_in_4bit=True)
>>> model = AutoModelForImageTextToText.from_pretrained(
...     model_checkpoint, quantization_config=quantization_config
... )

>>> messages = [
...     [
...         {
...             "role": "user",
...             "content": [
...                 {"type": "image", "url": "https://llava-vl.github.io/static/images/view.jpg"},
...                 {"type": "text", "text": "Write a haiku for this image"},
...             ],
...         },
...     ],
...     [
...         {
...             "role": "user",
...             "content": [
...                 {"type": "image", "url": "https://cdn.britannica.com/61/93061-050-99147DCE/Statue-of-Liberty-Island-New-York-Bay.jpg"},
...                 {"type": "image", "url": "https://thumbs.dreamstime.com/b/golden-gate-bridge-san-francisco-purple-flowers-california-echium-candicans-36805947.jpg"},
...                 {"type": "text", "text": "These images depict two different landmarks. Can you identify them?"},
...             ],
...         },
...     ],
>>> ]

>>> inputs = processor.apply_chat_template(messages, padding=True, add_generation_prompt=True, tokenize=True, return_dict=True, return_tensors="pt").to(model.device, dtype=torch.bfloat16)

>>> output = model.generate(**inputs, max_new_tokens=25)

>>> decoded_outputs = processor.batch_decode(output, skip_special_tokens=True)
>>> decoded_outputs
["Write a haiku for this imageSure, here is a haiku inspired by the image:\n\nCalm lake's wooden path\nSilent forest stands guard\n", "These images depict two different landmarks. Can you identify them? Certainly! The images depict two iconic landmarks:\n\n1. The first image shows the Statue of Liberty in New York City."]Gemma 3 (Based on v4.49.0)
A new model is added to transformers: Gemma 3.
It is added on top of the v4.49.0 release, and can be installed from the following tag: v4.49.0-Gemma-3.
In order to install this version, please install with the following command:
pip install git+https://github.com/huggingface/[email protected]
If fixes are needed, they will be applied to this release; this installation may therefore be considered as stable and improving.
Gemma 3

The model is detailed in the following blog post.
The models and demos using the model are available in the following collection.
A Space to play around with the 12B-it flavor is available here.
Overview
The Gemma 3 model was proposed by Google. It is a vision-language model composed by a SigLIP vision encoder and a Gemma 2 language decoder linked by a multimodal linear projection.
It cuts an image into a fixed number of tokens same way as Siglip if the image does not exceed certain aspect ratio. For images that exceed the given aspect ratio, it crops the image into multiple smaller pacthes and concatenates them with the base image embedding.
One particularity is that the model uses bidirectional attention on all the image tokens. Also, the model interleaves sliding window local attention with full causal attention in the language backbone, where each sixth layer is a full causal attention layer.
Usage tips
- For image+text and image-only inputs use
Gemma3ForConditionalGeneration. - For text-only inputs use
Gemma3ForCausalLMfor generation to avoid loading the vision tower. - Each sample can contain multiple images, and the number of images can vary between samples. However make sure to pass correctly batched images to the processor, where each batch is a list of one or more images.
- The text passed to the processor should have the
"<start_of_image_>"token where the images should be inserted. - The processor has its own
apply_chat_templatemethod to convert chat messages to text that can then be passed as text to the processor. You can also get a vectorized output fromapply_chat_template. See the examples below for more details on how to use it.
Image cropping for high resolution images
The model supports cropping images into smaller patches when the image aspect ratio exceeds a certain value. By default the images are not cropped and only the base image is forwarded to the model. Users can set do_pan_and_scan=True to obtain several crops per image along with the base image to improve the quality in DocVQA or similar tasks requiring higher resolution images.
Pan and scan is an inference time optimization to handle images with skewed aspect ratios. When enabled, it improves performance on tasks related to document understanding, infographics, OCR, etc.
from transformers import AutoProcessor

processor = AutoProcessor.from_pretrained("google/gemma-3-4b-it", padding_side="left")

url = "https://media.istockphoto.com/id/1192867753/photo/cow-in-berchida-beach-siniscola.jpg?s=612x612&w=0&k=20&c=v0hjjniwsMNfJSuKWZuIn8pssmD5h5bSN1peBd1CmH4="
messages = [
    {
        "role": "system",
        "content": [
            {"type": "text", "text": "You are a helpful assistant."}
        ]
    },
    {
        "role": "user", "content": [
            {"type": "image", "url": url},
            {"type": "text", "text": "What is shown in this image?"},
        ]
    },
]
inputs = processor.apply_chat_template(
    messages,
    tokenize=True,
    return_dict=True,
    return_tensors="pt",
    add_generation_prompt=True,
    do_pan_and_scan=True,
).to(model.device)
Usage Example
Single-image Inference
from transformers import AutoProcessor, Gemma3ForConditionalGeneration

model_id = "google/gemma-3-4b-it"
model = Gemma3ForConditionalGeneration.from_pretrained(model_id, device_map="auto")
processor = AutoProcessor.from_pretrained(model_id, padding_side="left")

url = "https://media.istockphoto.com/id/1192867753/photo/cow-in-berchida-beach-siniscola.jpg?s=612x612&w=0&k=20&c=v0hjjniwsMNfJSuKWZuIn8pssmD5h5bSN1peBd1CmH4="
messages = [
    {
        "role": "system",
        "content": [
            {"type": "text", "text": "You are a helpful assistant."}
        ]
    },
    {
        "role": "user", "content": [
            {"type": "image", "url": url},
            {"type": "text", "text": "What is shown in this image?"},
        ]
    },
]
inputs = processor.apply_chat_template(
    messages,
    tokenize=True,
    return_dict=True,
    return_tensors="pt",
    add_generation_prompt=True,
).to(model.device)

output = model.generate(**inputs, max_new_tokens=50)
print(processor.decode(output[0], skip_special_tokens=True)[inputs.input_ids.shape[1]: ])
Multi-image Inference
from transformers import AutoTokenizer, Gemma3ForCausalLM

model_id = "google/gemma-3-4b-it"
model = Gemma3ForConditionalGeneration.from_pretrained(model_id, device_map="auto")
processor = AutoProcessor.from_pretrained(model_id, padding_side="left")

url_cow = "https://media.istockphoto.com/id/1192867753/photo/cow-in-berchida-beach-siniscola.jpg?s=612x612&w=0&k=20&c=v0hjjniwsMNfJSuKWZuIn8pssmD5h5bSN1peBd1CmH4="
url_stop = "https://www.ilankelman.org/stopsigns/australia.jpg"
messages = [
    {
        "role": "system",
        "content": [
            {"type": "text", "text": "You are a helpful assistant."}
        ]
    },
    {
        "role": "user", "content": [
            {"type": "image", "url": url_cow},
            {"type": "image", "url": url_stop},
            {"type": "text", "text": "Are these two images identical?"},
        ]
    },
]
inputs = processor.apply_chat_template(
    messages,
    tokenize=True,
    return_dict=True,
    return_tensors="pt",
    add_generation_prompt=True,
).to(model.device)

output = model.generate(**inputs, max_new_tokens=50)
print(processor.decode(output[0], skip_special_tokens=True)[inputs.input_ids.shape[1]: ])
Text-only inference
from transformers import AutoTokenizer, Gemma3ForCausalLM

model_id = "google/gemma-3-1b-it"

tokenizer = AutoTokenizer.from_pretrained(model_id)
model = Gemma3ForCausalLM.from_pretrained(model_id, device_map="auto")

input_ids = tokenizer("Write me a poem about Machine Learning.", return_tensors="pt").to(model.device)

outputs = model.generate(**input_ids, max_new_tokens=100)
text = tokenizer.batch_decode(outputs, skip_special_tokens=True)

print(text)Aya Vision (Based on v4.49.0)
A new model is added to transformers: Aya Vision.
It is added on top of the v4.49.0 release, and can be installed from the following tag: v4.49.0-AyaVision.
In order to install this version, please install with the following command:
pip install git+https://github.com/huggingface/[email protected]
If fixes are needed, they will be applied to this release; this installation may therefore be considered as stable and improving.
Aya Vision
The model is detailed in the following blog post.
Overview
The Aya Vision 8B and 32B models is a state-of-the-art multilingual multimodal models developed by Cohere For AI. They build on the Aya Expanse recipe to handle both visual and textual information without compromising on the strong multilingual textual performance of the original model.
Aya Vision 8B combines the Siglip2-so400-384-14 vision encoder with the Cohere CommandR-7B language model further post-trained with the Aya Expanse recipe, creating a powerful vision-language model capable of understanding images and generating text across 23 languages. Whereas, Aya Vision 32B uses Aya Expanse 32B as the language model.
Key features of Aya Vision include:
- Multimodal capabilities in 23 languages
- Strong text-only multilingual capabilities inherited from CommandR-7B post-trained with the Aya Expanse recipe and Aya Expanse 32B
- High-quality visual understanding using the Siglip2-so400-384-14 vision encoder
- Seamless integration of visual and textual information in 23 languages.
Usage Example
Here's an example usage of the Aya Vision model.
from transformers import AutoProcessor, AutoModelForImageTextToText
import torch

model_id = "CohereForAI/aya-vision-32b"

processor = AutoProcessor.from_pretrained(model_id)
model = AutoModelForImageTextToText.from_pretrained(
    model_id, device_map="auto", torch_dtype=torch.float16
)

# Format message with the aya-vision chat template
messages = [
    {"role": "user",
     "content": [
       {"type": "image", "url": "https://pbs.twimg.com/media/Fx7YvfQWYAIp6rZ?format=jpg&name=medium"},
        {"type": "text", "text": "चित्र में लिखा पाठ क्या कहता है?"},
    ]},
    ]

inputs = processor.apply_chat_template(
    messages, padding=True, add_generation_prompt=True, tokenize=True, return_dict=True, return_tensors="pt"
).to(model.device)

gen_tokens = model.generate(
    **inputs,
    max_new_tokens=300,
    do_sample=True,
    temperature=0.3,
)

print(processor.tokenizer.decode(gen_tokens[0][inputs.input_ids.shape[1]:], skip_special_tokens=True))SigLIP-2 (Based on v4.49.0)
A new model is added to transformers: SigLIP-2.
It is added on top of the v4.49.0 release, and can be installed from the following tag: v4.49.0-SigLIP-2.
In order to install this version, please install with the following command:
pip install git+https://github.com/huggingface/[email protected]
If fixes are needed, they will be applied to this release; this installation may therefore be considered as stable and improving.
SigLIP2
The paper page for the model is available here.
It is detailed in the following blog post.
The models and demos using the model are available in the following collection.
Overview
The SigLIP2 model was proposed in SigLIP 2: Multilingual Vision-Language Encoders with Improved Semantic Understanding, Localization, and Dense Features by Michael Tschannen, Alexey Gritsenko, Xiao Wang, Muhammad Ferjad Naeem, Ibrahim Alabdulmohsin,
Nikhil Parthasarathy, Talfan Evans, Lucas Beyer, Ye Xia, Basil Mustafa, Olivier Hénaff, Jeremiah Harmsen,
Andreas Steiner and Xiaohua Zhai.
The model comes in two variants
- FixRes - model works with fixed resolution images (backward compatible with SigLIP v1)
- NaFlex - model works with variable image aspect ratios and resolutions (SigLIP2 in
transformers)
The abstract from the paper is the following:
We introduce SigLIP 2, a family of new multilingual vision-language encoders that build on the success
of the original SigLIP. In this second iteration, we extend the original image-text training objective with
several prior, independently developed techniques into a unified recipe—this includes decoder-based
pretraining, self-supervised losses (self-distillation, masked prediction) and online data curation. With
these changes, SigLIP 2 models outperform their SigLIP counterparts at all model scales in core capabilities,
including zero-shot classification (best SigLIP 2 ViT-g/16 achieves 85.0% ImageNet zero-shot
accuracy), image-text retrieval, and transfer performance when extracting visual representations for
Vision-Language Models (VLMs). Furthermore, the new training recipe leads to significant improvements
on localization and dense prediction tasks. We also train variants which support multiple resolutions
and preserve the input’s native aspect ratio. Finally, we train on a more diverse data-mixture that
includes de-biasing techniques, leading to much better multilingual understanding and improved fair-
ness. To provide users with the ability to trade-off inference cost with performance, we release model
checkpoints at four sizes (ViT-B/86M, L/303M, So400m/400M, and g/1B).
Usage tips
- Usage of SigLIP2 is similar to SigLIP and CLIP. The main difference from CLIP is the training loss, which does not require a global view of all the pairwise similarities of images and texts within a batch. One needs to apply the sigmoid activation function to the logits, rather than the softmax.
- Training is supported but does not use
torch.distributedutilities which may limit the scalability of batch size. However, DDP and FDSP works on single-node multi-gpu setup. - When using the standalone [
GemmaTokenizerFast] make sure to passpadding="max_length"andmax_length=64as that's how the model was trained. - Model was trained with lowercased text, make sure you make the same preprocessing for your text labels.
- To get the same results as the pipeline, a prompt template of "this is a photo of {label}" should be used.
- The NaFlex variant supports processing images at higher resolutions by adjusting the
max_num_patchesparameter in theProcessor. The default value ismax_num_patches=256. Increasingmax_num_patchesto 1024 (4x) will approximately double processed image height and width, while preserving the aspect ratio.

This model was contributed by qubvel.
The original code can be found here.
Usage example
There are 2 main ways to use SigLIP2: either using the pipeline API, which abstracts away all the complexity for you, or by using the Siglip2Model class yourself.
FixRes variant
Pipeline API
The pipeline allows to use the model in a few lines of code:
>>> from transformers import pipeline
>>> from PIL import Image
>>> import requests

>>> # load pipe
>>> image_classifier = pipeline(
...     task="zero-shot-image-classification",
...     model="google/siglip2-base-patch16-224",
... )

>>> # load image
>>> url = 'http://images.cocodataset.org/val2017/000000039769.jpg'
>>> image = Image.open(requests.get(url, stream=True).raw)

>>> # inference
>>> candidate_labels = ["2 cats", "a plane", "a remote"]
>>> outputs = image_classifier(image, candidate_labels=candidate_labels)
>>> outputs = [{"score": round(output["score"], 4), "label": output["label"] } for output in outputs]
>>> print(outputs)
[{'score': 0.1499, 'label': '2 cats'}, {'score': 0.0008, 'label': 'a remote'}, {'score': 0.0, 'label': 'a plane'}]
Using the model yourself
If you want to do the pre- and postprocessing yourself, here's how to do that:
>>> from PIL import Image
>>> import requests
>>> from transformers import AutoProcessor, AutoModel
>>> import torch

>>> model = AutoModel.from_pretrained("google/siglip2-base-patch16-224")
>>> processor = AutoProcessor.from_pretrained("google/siglip2-base-patch16-224")

>>> url = "http://images.cocodataset.org/val2017/000000039769.jpg"
>>> image = Image.open(requests.get(url, stream=True).raw)

>>> candidate_labels = ["2 cats", "2 dogs"]
# follows the pipeline prompt template to get same results
>>> texts = [f"This is a photo of {label}." for label in candidate_labels]

# IMPORTANT: we pass `padding=max_length` and `max_length=64` since the model was trained with this
>>> inputs = processor(text=texts, images=image, padding="max_length", max_length=64, return_tensors="pt")

>>> with torch.no_grad():
...     outputs = model(**inputs)

>>> logits_per_image = outputs.logits_per_image
>>> probs = torch.sigmoid(logits_per_image) # these are the probabilities
>>> print(f"{probs[0][0]:.1%} that image 0 is '{candidate_labels[0]}'")
15.0% that image 0 is '2 cats'
NaFlex variant
NaFlex combines ideas from FlexiViT, i.e. supporting multiple, predefined sequence lengths
with a single ViT model, and NaViT, namely processing images at their native aspect ratio.
This enables processing different types of images at appropriate resolution, e.g. using a
larger resolution to process document images, while at the same time minimizing the impact
of aspect ratio distortion on certain inference tasks, e.g. on OCR.
Given a patch size and target sequence length, NaFlex preprocesses the data by first resizing
the input image such that the height and width after resizing are multiples of the patch size,
while
1. keeping the aspect ratio distortion as small as possible
2. producing a sequence length of at most the desired target sequence length (`max_num_patches`)
The resulting distortion in width and height is at most (patch_size - 1) / width and
(patch_size - 1) / height, respectively, which tends to be small for common resolutions and aspect ratios.
After resizing, the image is split into a sequence of patches, and a mask with padding information is added.
>>> from PIL import Image
>>> import requests
>>> from transformers import AutoProcessor, AutoModel
>>> import torch

>>> model = AutoModel.from_pretrained("google/siglip2-base-patch16-naflex")
>>> processor = AutoProcessor.from_pretrained("google/siglip2-base-patch16-naflex")

>>> url = "http://images.cocodataset.org/val2017/000000039769.jpg"
>>> image = Image.open(requests.get(url, stream=True).raw)

>>> candidate_labels = ["2 cats", "2 dogs"]
# follows the pipeline prompt template to get same results
>>> texts = [f"This is a photo of {label}." for label in candidate_labels]

# default value for `max_num_patches` is 256, but you can increase resulted image resolution providing
# higher values e.g. `max_num_patches=512`
>>> inputs = processor(text=texts, images=image, max_num_patches=256, return_tensors="pt")

>>> with torch.no_grad():
...     outputs = model(**inputs)

>>> logits_per_image = outputs.logits_per_image
>>> probs = torch.sigmoid(logits_per_image) # these are the probabilities
>>> print(f"{probs[0][0]:.1%} that image 0 is '{candidate_labels[0]}'")
21.1% that image 0 is '2 cats'SmolVLM-2 (Based on v4.49.0)
A new model is added to transformers: SmolVLM-2.
It is added on top of the v4.49.0 release, and can be installed from the following tag: v4.49.0-SmolVLM-2.
In order to install this version, please install with the following command:
pip install git+https://github.com/huggingface/[email protected]If fixes are needed, they will be applied to this release; this installation may therefore be considered as stable and improving.
SmolVLM-2
SmolVLM-2 is detailed in the following blog post.
The models and demos using the model are available in the following collection.
Overview
SmolVLM2 is an adaptation of the Idefics3 model with two main differences:
- It uses SmolLM2 for the text model.
- It supports multi-image and video inputs
Usage tips
Input images are processed either by upsampling (if resizing is enabled) or at their original resolution. The resizing behavior depends on two parameters: do_resize and size.
Videos should not be upsampled.
If do_resize is set to True, the model resizes images so that the longest edge is 4*512 pixels by default.
The default resizing behavior can be customized by passing a dictionary to the size parameter. For example, {"longest_edge": 4 * 512} is the default, but you can change it to a different value if needed.
Here’s how to control resizing and set a custom size:
image_processor = SmolVLMImageProcessor(do_resize=True, size={"longest_edge": 2 * 512}, max_image_size=512)Additionally, the max_image_size parameter, which controls the size of each square patch the image is decomposed into, is set to 512 by default but can be adjusted as needed. After resizing (if applicable), the image processor decomposes the images into square patches based on the max_image_size parameter.
This model was contributed by orrzohar.
Usage example
Single Media inference
The model can accept both images and videos as input, but you should use only one of the modalities at a time. Here's an example code for that.
import torch
from transformers import AutoProcessor, AutoModelForImageTextToText

processor = AutoProcessor.from_pretrained("HuggingFaceTB/SmolVLM2-256M-Video-Instruct")
model = AutoModelForImageTextToText.from_pretrained(
    "HuggingFaceTB/SmolVLM2-256M-Video-Instruct",
    torch_dtype=torch.bfloat16,
    device_map="cuda"
)

conversation = [
    {
        "role": "user",
        "content":[
            {"type": "image", "url": "http://images.cocodataset.org/val2017/000000039769.jpg"},
            {"type": "text", "text": "Describe this image."}
        ]
    }
]

inputs = processor.apply_chat_template(
    conversation,
    add_generation_prompt=True,
    tokenize=True,
    return_dict=True,
    return_tensors="pt",
).to(model.device, dtype=torch.bfloat16)

output_ids = model.generate(**inputs, max_new_tokens=128)
generated_texts = processor.batch_decode(output_ids, skip_special_tokens=True)
print(generated_texts)


# Video
conversation = [
    {
        "role": "user",
        "content": [
            {"type": "video", "path": "/path/to/video.mp4"},
            {"type": "text", "text": "Describe this video in detail"}
        ]
    },
]

inputs = processor.apply_chat_template(
    conversation,
    add_generation_prompt=True,
    tokenize=True,
    return_dict=True,
    return_tensors="pt",
).to(model.device, dtype=torch.bfloat16)

generated_ids = model.generate(**inputs, do_sample=False, max_new_tokens=100)
generated_texts = processor.batch_decode(generated_ids, skip_special_tokens=True)
print(generated_texts[0])