-
Notifications
You must be signed in to change notification settings - Fork 2.2k
Build instructions
(for additional information that's partially outdated, see the development page)
Install git and check out the source code (git clone --recurse-submodules https://github.com/hrydgard/ppsspp.git, or fork and clone that).
After doing an update, or if you forgot --recurse-submodules, run this command:
git submodule update --init --recursive
in order to update the translations (lang), FFmpeg libraries, and other submodules.
Recommended way to get up-to-date is (git pull --rebase https://github.com/hrydgard/ppsspp.git) and then the above command.
If you choose to build from tarballs of the source code instead of cloning the full git repository, you will need to manually download the tarball releases of each of the submodules as well (submodules are listed in this repo's .gitmodules file).
First, install Python 3.
Supported Platforms
- Windows :: Microsoft Visual Studio 2015 Community Edition or higher. NOTE: It is necessary to install the Visual Studio component "Windows XP support for C++", can be found under "Individual Components" to the right in the Visual Studio installer.
-
Linux :: clang/gcc/g++.
- Debian/Ubuntu
sudo apt install build-essential cmake libgl1-mesa-dev libsdl2-dev libsdl2-ttf-dev libfontconfig1-dev libvulkan-dev libglew-dev - Fedora/RHEL
sudo dnf group install "Development Tools"
- Debian/Ubuntu
-
Mac OS X :: Command Line Tools (
xcode-select --install). You will also need Homebrew installed with thesdl2,cmake,libzipandsnappypackages (brew install sdl2 cmake libzip qt5 snappy). - Android :: You should have the latest Android Studio installed. From the SDK manager within, install CMake and NDK.
- Raspbian :: It seems to be required to compile SDL2 manually, the package doesn't work. See the CMake instructions and Raspberry Pi specific instructions.
-
iOS :: OS X 10.10+ with Xcode 6+ installed. If compiling a fakesigned binary intended for jailbroken iOS, you also need iOSOpenDev installed with a patched iPhoneOS SDK (
sudo iod-setup sdk)
Compilers --- you will need one of the following (if you follow the above, you probably have them):
- Clang :: Minimum version of 3.4 is required. Clang is preferred over GCC.
- GCC :: Minimum version of 4.8 is required.
- MSVC :: Minimum version of MSVC 2015 is required, 2017 updated to latest is recommended.
CMake (minimum version of 3.6) is also required if not building on Windows (and you have it if you follow the above Android instructions).
Open the solution and just build, it'll work. You may just need to set up a path or two to the Windows SDK (which includes the DX SDK) nowadays. A step-by-step compiling guide can be found here.
Open the PPSSPP folder as a project in Android Studio (IMPORTANT: Just use File->Open... and pick the folder. Do not use the Import button). Change the build variant to "normalOptimized" in the Build Variant panel, and run on your device. Everything should work, provided you have installed the NDK and CMake properly through the SDK manager.
you must build in linux, not support windows. ubuntu is tested.
- install NDK 21e, and execute command "export NDK= your ndk dir"
- goto /libretro/jni
- execute $NDK/ndk-build -b
- you can find .so file in /libretro/libs
The Qt frontend currently supports Linux and any other platform that has Qt available (though not officially, apart from Linux). We use CMake to build for Qt.
A Qt-based frontend is available in the Qt/ dir.
For building the package via command-line, you will need to
ensure Qt5 is installed for your target platform
(on Linux: Development libraries are qt5-qmake qtsystems5-dev qtmultimedia5-dev qttools5-dev-tools libqt5opengl5-dev libcurl4-openssl-dev for Qt5. Install SDL 1.2 if you want to use USB Gamepad or improve Linux audio. For Qt's built-in audio, use qtmultimedia5-dev on Qt5.). After installing these package components, simply open up the terminal and:
./b.sh --qt
You need to have the Command Line Tools installed (XCode is not needed):
xcode-select --install
Use Homebrew to install the required dependencies:
brew upgrade
brew install sdl2 cmake
Then build using:
./b.sh
for the SDL build. You can then run it like this, for convenience:
build/PPSSPPSDL.app/Contents/MacOS/PPSSPPSDL
Or if you want to try the experimental (and largely unmaintained) Qt build, try:
brew install qt5
./b.sh --qtbrew
Unfortunately, the Qt build doesn't work with Vulkan yet.
For Ubuntu (and possibly other distros) make sure to run
sudo apt install libgl1-mesa-dev libsdl2-dev libsdl2-ttf-dev libfontconfig1-dev libcurl4-openssl-dev libglew-dev .
PPSSPP currently uses CMake on platforms that do not have Qt installed and wish to target SDL or native (iOS/Android/Blackberry) frontends. In order to build for most systems, create a build directory and run:
cmake path/to/ppsspp
make -j 4
or:
./b.sh
You can specify the -G parameter to cmake to choose a generator.
The NMake Makefiles, Visual Studio 11 (projects + sln),
GNU Makefiles and Unix Makefiles generators have been tested.
Alternatively, run b.sh, on Linux, which will create the directory for you.
If you are on Windows, you will need GNU and CMake to run the bash scripts.
When using Intel integrated Graphics and Ubuntu 20.04 or newer you have to launch PPSSPPSDL with the following command to load the old drivers and prevent a crash:
MESA_LOADER_DRIVER_OVERRIDE=i965 ./build/PPSSPPSDL
The first method to build PPSSPP is by Xcode, which is recommended (Especially if you're debugging).
When compiling a .app for a real device rather than the iOS Simulator, run the following command:
cmake -DCMAKE_TOOLCHAIN_FILE=./cmake/Toolchains/ios.cmake -DIOS_PLATFORM=OS -H. -Bbuild.ios -GXcode
If you're building for the iOS Simulator, run this command instead (DISCARD IF YOU ARE BUILDING FOR A REAL DEVICE)
cmake -DCMAKE_TOOLCHAIN_FILE=./cmake/Toolchains/ios.cmake -DIOS_PLATFORM=SIMULATOR -H. -Bbuild.ios -GXcode
the xcodeproj will be generated in build.ios/PPSSPP.xcodeproj.
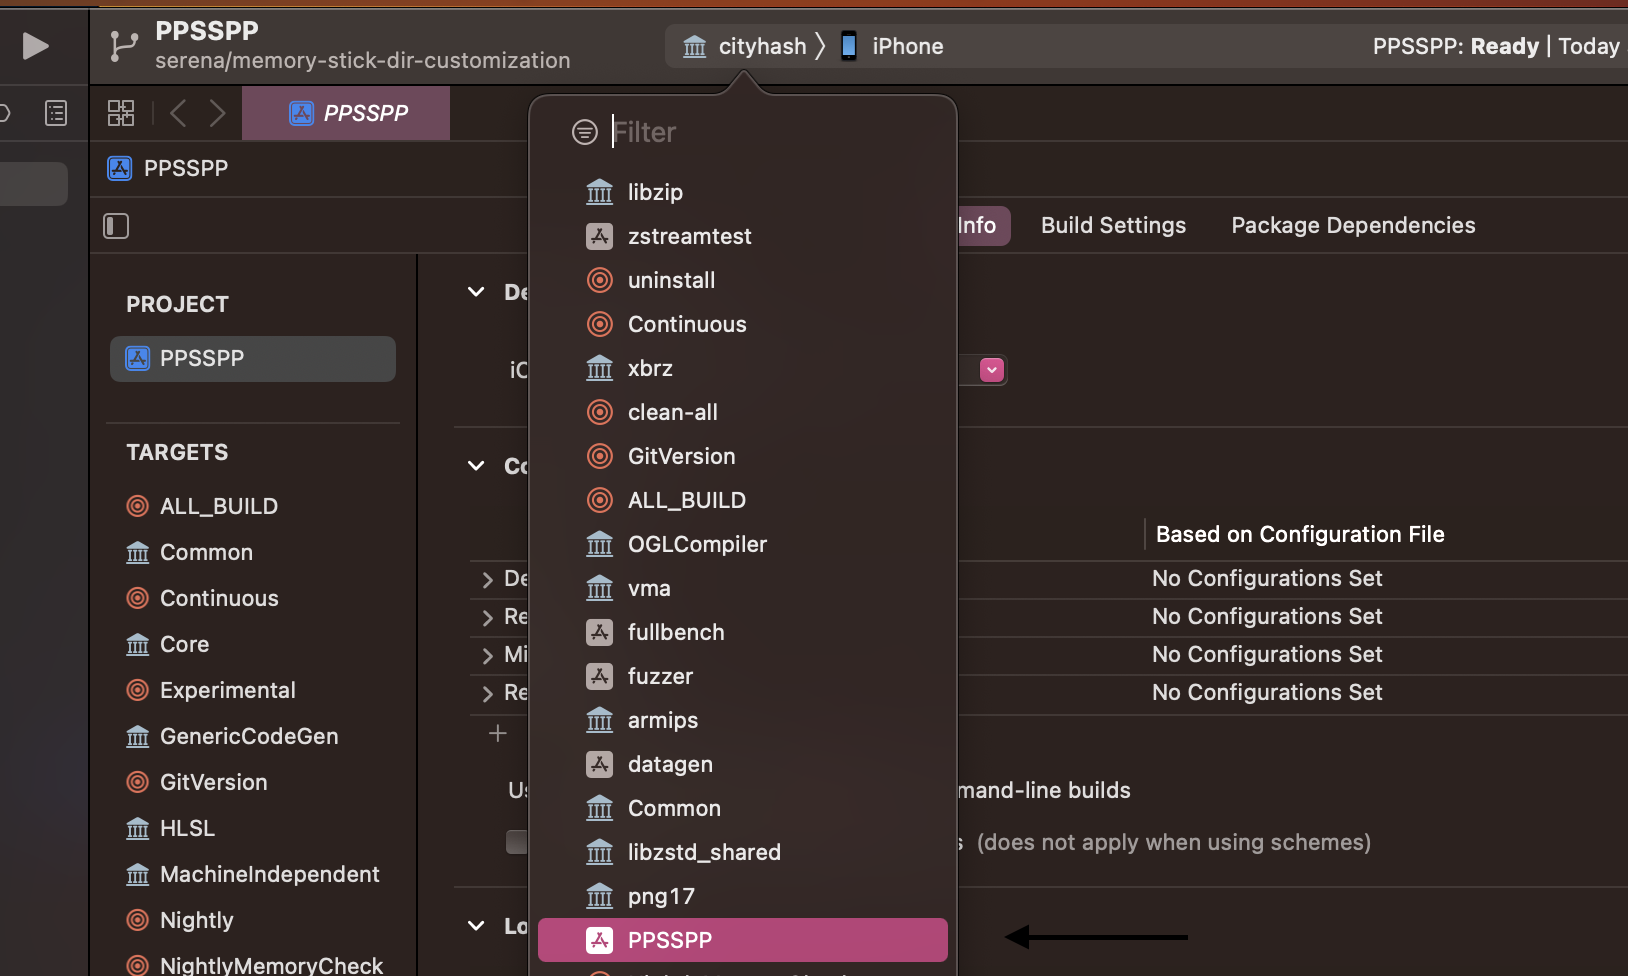
Open the Xcode project generated in build.ios/PPSSPP.xcodeproj, tap on the 'PPSSPP' in the corner next to the blue icon, search for the 'PPSSPP' target, and change the signing account to your own & change the bundle ID to something random, video demonstration here.
The final step is to actually build the app, to do this in the Xcode GUI, select the PPSSPP scheme from the top left (see image), then press cmd+b to build the app, or cmd+r to run the app and debug it if you're running in the simulator or have a real device.

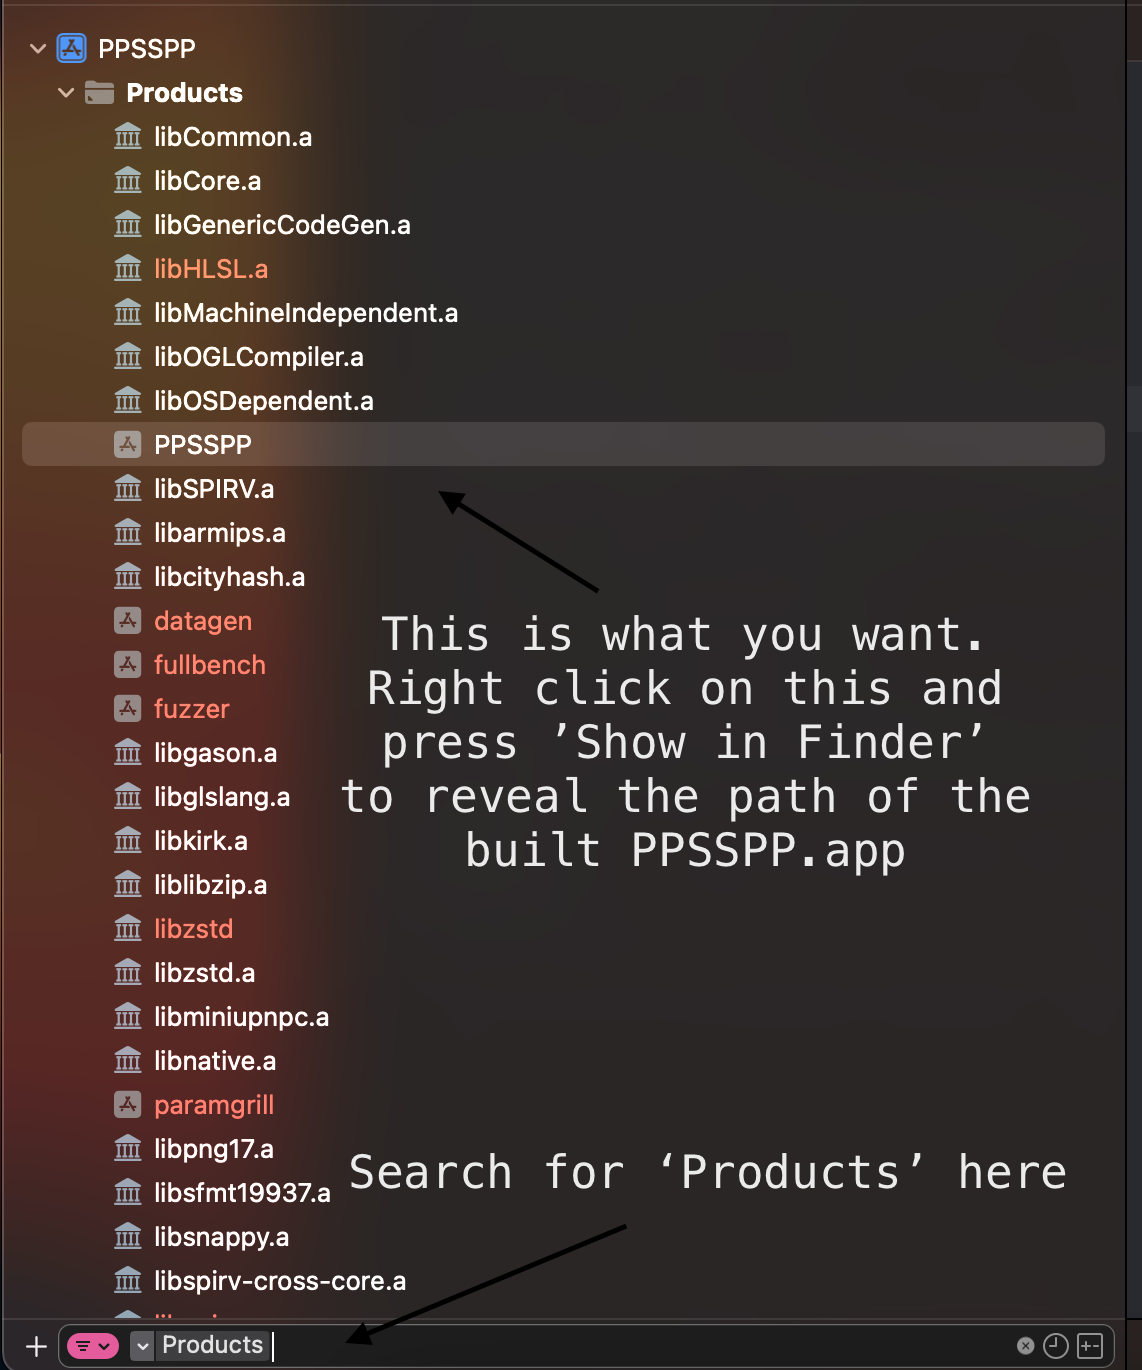
To get the actual .app built, look for the 'Products' Folder in the sidebar:

Run the script:
./b.sh --ios
This will build a .app located in build-ios/PPSSPP.app.
-
Install prerequisites:
sudo apt install clang cmake libgl1-mesa-dev libsdl2-dev libsdl2-ttf-dev libfontconfig1-dev libvulkan-dev -
Change the compiler from GCC to Clang
sudo update-alternatives --config ccandsudo update-alternatives --config c++ -
Compile using
./b.sh --rpi64
GCC is preinstalled, but you can use sudo update-alternatives --config cc and sudo update-alternatives --config c++ to switch to Clang.
Make sure to include -DCMAKE_TOOLCHAIN_FILE=cmake/Toolchains/raspberry.armv7.cmake when using cmake. For armv6 devices, you'll need to use -DCMAKE_TOOLCHAIN_FILE=cmake/Toolchains/raspberry.armv6.cmake. See also ./b.sh --rpi.
Note that echo 5 | sudo tee /sys/devices/system/cpu/cpufreq/ondemand/up_threshold will improve performance but increase temperatures. You may always want the legacy GL driver and to update firmware, as well as allocate more RAM to the GPU.
If you're using a windowing environment, remember to exit it (i.e. Ctrl-Alt-F1, Ctrl-Alt-F7 to get back) when starting PPSSPPSDL.
See https://github.com/hrydgard/ppsspp/issues/7479 for more information.
In order to build it under Clang environment, you will need clang-3.4 packages from the repository and install it. Then, you will need to run the command to locate where is bits/c++config.h:
locate bits/c++config.h
Usually, the c++config.h located at /usr/include/<arch>/c++/<version>/bits depending kinds of machine and installation. After located the c++config.h and other header file components, simply copy the c++config.h and other header files to /usr/include/c++/<version>/bits and placed it into the location in order to make Clang building the project without problems.
Clang works perfectly with Cmake build method, so you might need to do something before building it is run the command to set the Clang as the working compiler before building it via Cmake method:
export CC=clang
export CXX=clang++
You can also put these command into .bashrc file to make it as a default compiler.
For all platforms, the application is automatically packaged in to an installable file (.app for iOS and macOS, .exe for Windows and a standalone binary on Linux).