-
Notifications
You must be signed in to change notification settings - Fork 33
Setup Guide
- Installing Python
- Installing Trade-Dangerous ("TD")
- Installing TD with Docker
- Getting Started
At the time of writing, the current version of Python is 3.6.5.
Trade Dangerous should also work with versions of Python higher than 3.6.5, but the absolute minimum version is 3.4.2. Trade dangerous will not work with any version earlier than this.
The 64-bit version is recommended, don't be confused by the filename, the amd64 release is for all 64-bit processors. You can obtain the Python installer here: https://www.python.org/downloads/
You can install this a number of ways, but we recommend the following if possible
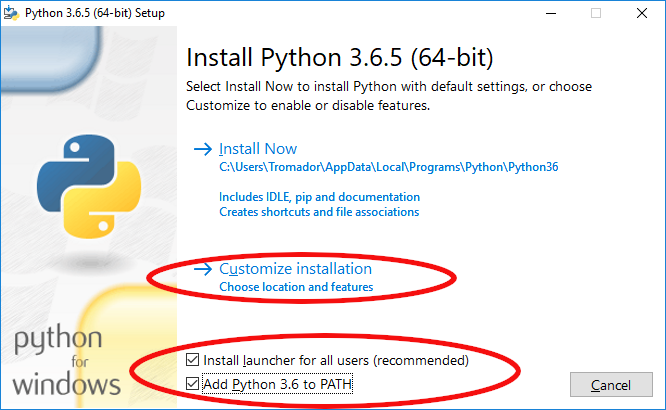
- Run the installer as administrator
- Use Customize installation
- Tick both boxes
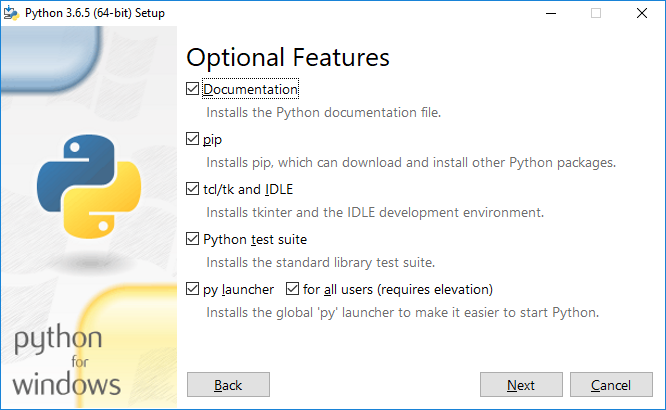
All boxes will likely be ticked on the next screen. In particular ensure pip is ticked.
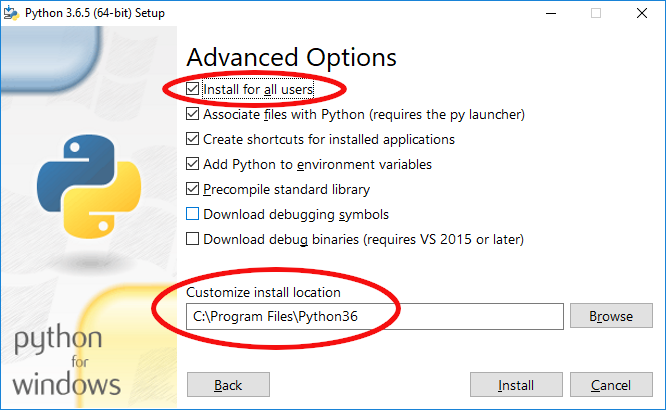
Finally, before pressing "Install" ensure that "Install for all users" is ticked. This will change the install location to a sensible location as in the image shown.
Once the installation is complete, open a Command Prompt window (If you've never done this before, press the Windows key and type 'cmd'), at the prompt, type python --version and verify that it reports a version number matching that which you just installed (e.g. 3.6.5 or higher).
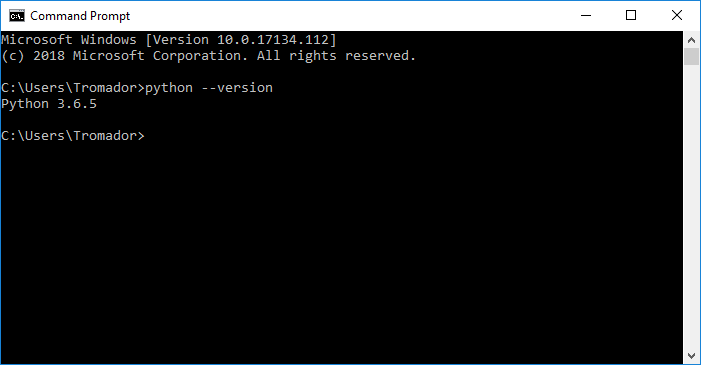 (Screenshot taken using Windows 10, so it may look a little different)
Mac OS and Python
As of 10.9, OS X ships with Python 2.7.6. DO NOT "upgrade" your system to the latest version (3.7 at the time of writing). Instead download the latest python installer for MacOs from https://www.python.org/downloads/.
Once it has downloaded run the installer by locating the downloaded file in the Filer and double-clicking the .pkg file or right-click on the file and choose 'Open'.
Click on the 'Continue' button and the 'Agree' button where necessary until the last screen is reached where you press the 'Install' button and python will be installed.
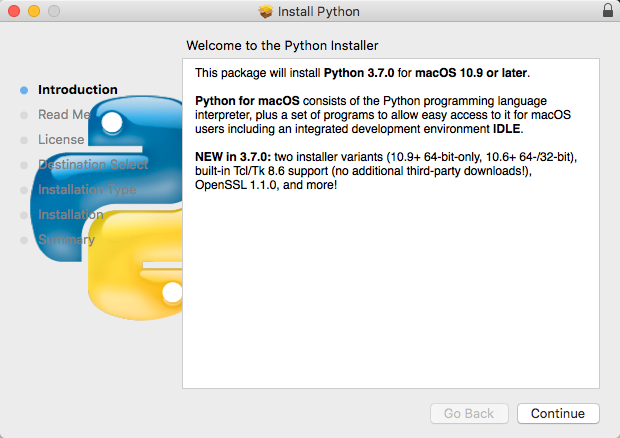
You will be asked to enter your admin password once the installation has started.
You're on Linux and should be able to figure it out for yourself. Your package manager probably has it in a repo.
As a note though, do be careful. Many distributions (still!) come by default with python 2 installed.
If you confuse your system into trying to use a new python install, many things can and will break, for example, on Redhat or Centos your package manager (yum) will die.
If you are at all unsure, install your own copy of Python as an unprivileged user.
Once Python3.* is installed, TD can be installed using 'pip':
pip install tradedangerous
'pip' can also upgrade existing installations when a new version is released:
pip install --upgrade tradedangerous
When installed in this manner, TD can be run while in any directory, and the directory it is being run from, also known as the current working directory ("CWD"), is assumed to be the place to store TD's data. Running TD from a different CWD will create a new database in the new CWD unless TD is specifically told otherwise using the command line arguments.
For pip installs,you use the command trade followed by the command line options desired.
A 'portable' installation can be obtained in either of two ways:
You can download the latest snapshot from here: https://github.com/eyeonus/Trade-Dangerous Click the "Clone or download" link and then "Download zip".
This will (no surprise!) download a .zip file, extract the contents to somewhere on your computer.
Alternatively you can use a git client to fetch the latest code. The repository is here: https://github.com/eyeonus/Trade-Dangerous For those who would like a graphical interface to git, we recommend Atlassian Sourcetree as an awesome front-end for GIT.
'Portable' installations can be installed onto a portable device and be run on any machine with access to that device and the ability to execute Python3 code.
TD has a gui mode trade.py gui that depends on the python module "appJar", and as such TD will crash if that module is not installed. When TD is installed using pip this dependency is automatically taken care of, but that is not the case with portable installations. Please keep this in mind. It is possible to put the appJar module into a portable TD installation so that it does not need to be installed via pip when running on a new machine, however, how to do this is beyond the scope of this document.
In order to run TD when installed in the 'portable' manner, the CWD must be the folder that contains the file 'trade.py'.
The command to run TD when installed in the 'portable' manner is trade.py, followed by the command line options desired.
If that command does not work, it may be python trade.py.
If even that does not work, it may also require the version number, such as python37 trade.py or python3.7 trade.py
For the sake of convenience, by convention all example commands will use trade.py. Your command may differ depending on how you installed TD and which OS you are using, as detailed above, e.g. trade rather than trade.py.
Open the command line window, using whichever you prefer of PowerShell, Command Prompt, Terminal, etc.
If using a 'portable' installation, navigate to the folder it is installed in, using cd <path to TD's installation folder>.
If using a 'pip' installation, navigate to the folder you desire to have TD build the database within.
In both cases this will be referred to as the "TD folder".
While in the "TD folder", run TD:
> trade.py
trade.py: TradeDangerous provides a set of trade database facilities for Elite: Dangerous.

Usage: trade.py <command>
...
The help text for TD should be printed in your command line window.
If you run into problems:
- Check your directory
- Check your python installation
Copy the following files to your computer:
Dockerfile:
FROM python:3.6
ENV DISPLAY=host.docker.internal:0 TD_DATA=/home/traded/data TD_TMP=/home/traded/tmp
RUN pip install --upgrade tradedangerous
RUN trade import -P eddblink -O skipvend
ENTRYPOINT [ "trade", "gui"]
docker-compose.yml
version: "2"
services:
  td:
    image: trade-dangerous:local
    build:
      context: .
    network_mode: host
    volumes:
      - $HOME/traded:/home/traded:rw
      - $HOME/.Xauthority:/root/.Xauthority:rw
      - /tmp/.X11-unix:/tmp/.X11-unix:rw
    environment:
      - DISPLAY=${HOSTNAME}:0
Open a terminal at the location you have the above files and run docker-compose up.
Once installation has finished, a TD GUI window will open.
TD data will be stored in your $HOME, under the 'traded' folder. You can change this to any location you like by changing the '$HOME/traded' part of the first 'volumes' entry to your desired location.
Keep in mind the files that are stored here are useful both in terms of not having to rebuild the database if using a new container, as well as making TD-generated files which are intended for the user to be able to access, able to be accessed outside of the container.
Note that this method has been tested as working on Linux and not working on Windows by eyeonus. On Windows it is possible to run the CLI version in interactive mode, but the GUI fails for reasons beyond the scope of this document. If you want to try to get the GUI working on a Windows Docker install, you're on your own, but do tell us how you succeeded if you manage to.
Reported as working on Mac as well by jonathan-irvin.
You can explore what TD can do just by invoking the command using the help system.
trade.py or trade.py --help
-- outputs general trade.py help
trade.py buy or trade.py buy --help
-- outputs help on the "buy" command
Before you can do anything useful with TradeDangerous, you'll need price data. Our recommended way of obtaining this is to use the included EDDBlink plugin.
The eddblink plugin has options to pull all available data into your local database.
It is recommended to pass no options when running the eddblink plugin. By default, eddblink imports the latest available listings data, updating the item, system, and station lists, if needed, as well. In all cases, if the data you have gathered yourself is newer than the data from the eddblink update server, your data will be kept.
$ trade.py import -P eddblink
It is recommended to include the 'skipvend' option (, as for example, '-O clean,skipvend',) on slower computers when doing any run, including the first run. The 'skipvend' option tells TD not to get the data for Ship Vendors and Upgrade Vendors, two very large tables that together are larger than the entire rest of the database.
$ trade.py import -P eddblink -O skipvend
When game changes have been made, such as ships, items, etc. being added or removed from the game, it is recommended to use the 'all' option, which will cause TD to update the database to reflect those changes.
$ trade.py import -P eddblink -O all

or

$ trade.py import -P eddblink -O all,skipvend
Other plugins are available and we include a number in the plugins directory, but they are legacy and unsupported. Feel free to try at your own risk.
You can also obtain price data by:
- Entering it yourself as you fly,
- Obtaining a ".prices" file from a friend.
- Downloading a crowd-sourced ".prices" file.
If you wish to use these methods you will need to create the base data framework, lists of ships, tradeable commodities and so forth. TD does not come with a pre-built database and will not work without first building one. To do this, run the following command, to ensure you have the latest available data.
$ trade.py import -P eddblink -O all,solo
The 'all' option downloads all the data that's needed for TD to work correctly, while the 'solo' option prevents the EDDBlink plugin from downloading any crowd-sourced market data. Refer to the EDDBLink documentation for more details on how to use EDDBlink.
Many Commanders prefer to build up their own price data as they explore. We believe the best way to do this is to use the excellent Elite: Dangerous Market Connector (EDMC).
https://github.com/Marginal/EDMarketConnector/wiki .
You will need to enable Trade Dangerous output as shown in the screenshot below.
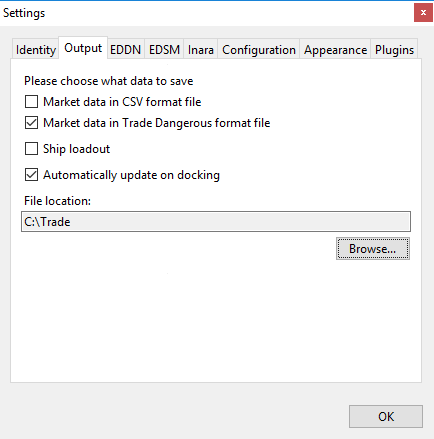
EDMC will then create .prices files as you fly, which can be imported with
$ trade.py import myfile.prices
.prices files can be imported in bulk, rather than only one at a time, with the EDMC_batch import plugin.
Some third party groups may maintain .prices files which you can download and import in the same way.
The import command will also accept a URL, if you know of a source of .prices information kept online, for example:
$ trade.py import http:///elite.tromador.com/files/TradeDangerous.prices
(This example prices file is semi static but will probably work unless a megaship has recently moved).
Alternatively you could use the built-in (and frankly, a bit crap) UI:
$ trade.py update -G star/station
e.g.
$ trade.py update -G mokosh/bethestation
If you want TD to appear in-front of the game UI all the time, you can add '-F':
$ trade.py update -G -F sol/abraham
or
$ trade.py update -GF sol/abraham
There are also several options that will let you use a text editor instead. See
$ trade.py update --help