Home
@EDITOR
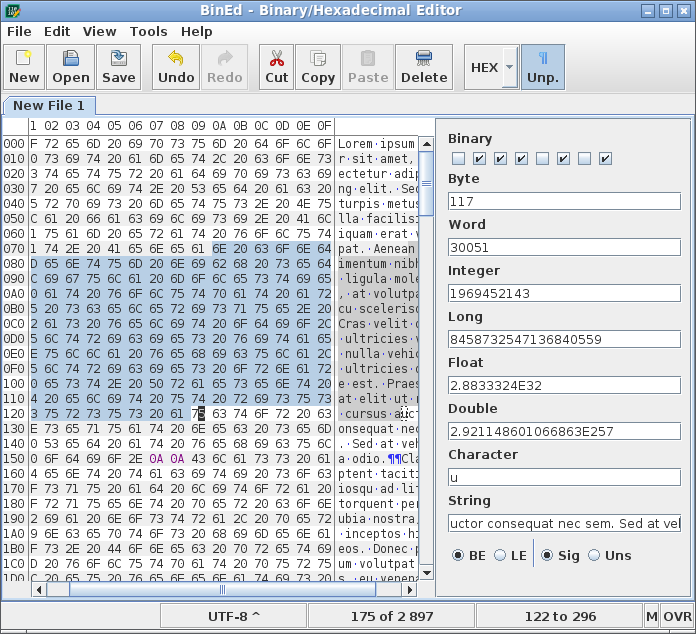
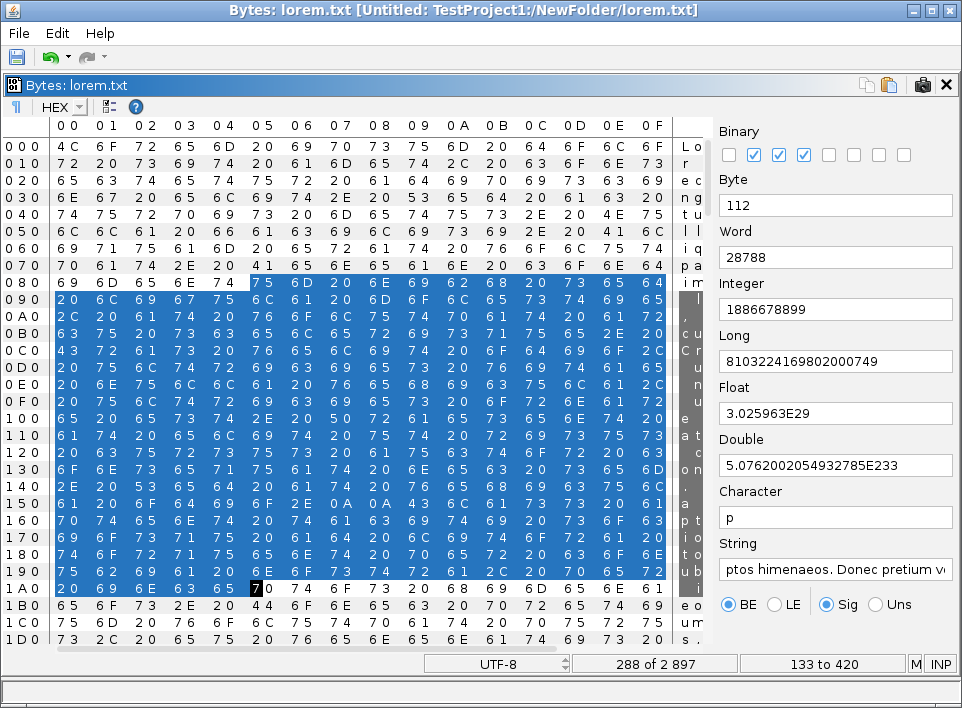
BinEd is free and open source stand-alone hex viewer/editor written in Java.
@NETBEANS-PLUGIN
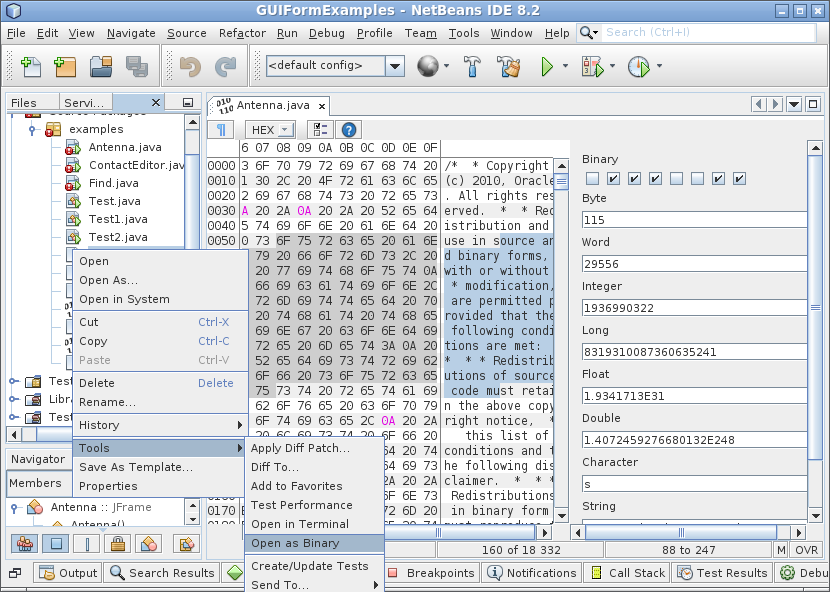
Binary/hex editor plugin for NetBeans IDE and NetBeans Platform written in Java.
@INTELLIJ-PLUGIN
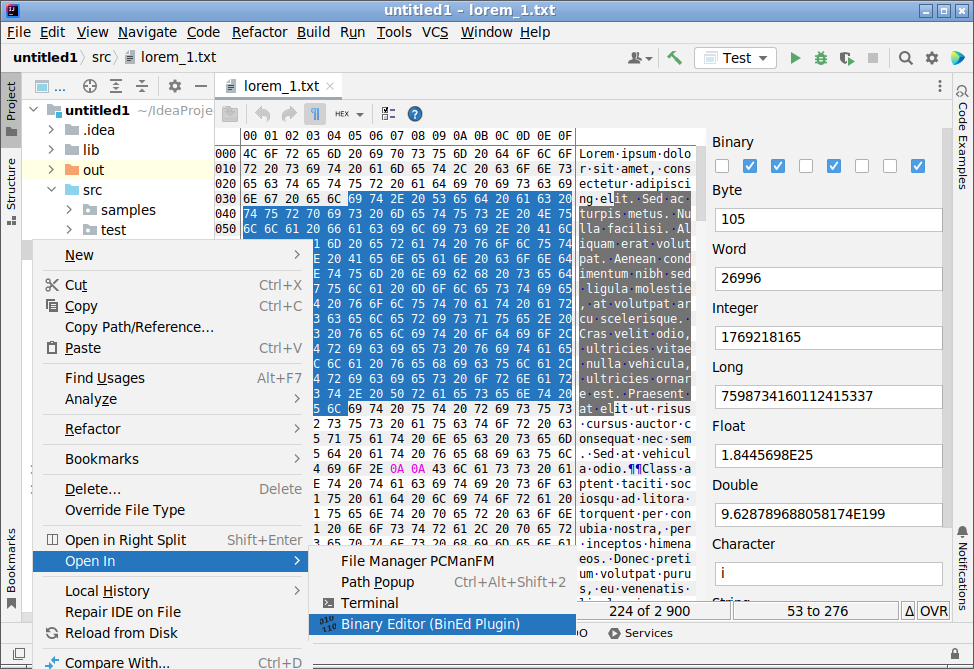
Binary/hex editor plugin for IntelliJ Idea IDE and other IDEs based on IntelliJ Platform from JetBrains written in Java.
@ECLIPSE-PLUGIN
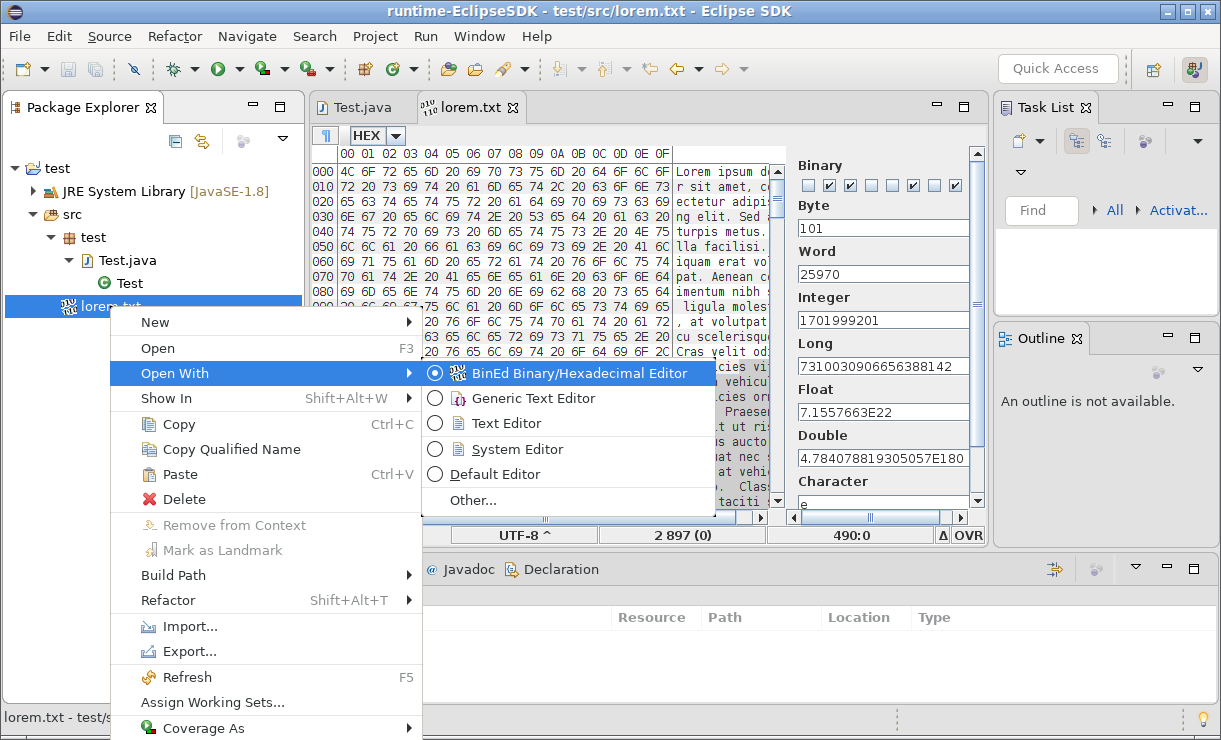
Binary/hex editor plugin for Eclipse IDE written in Java.
@JEDIT-PLUGIN
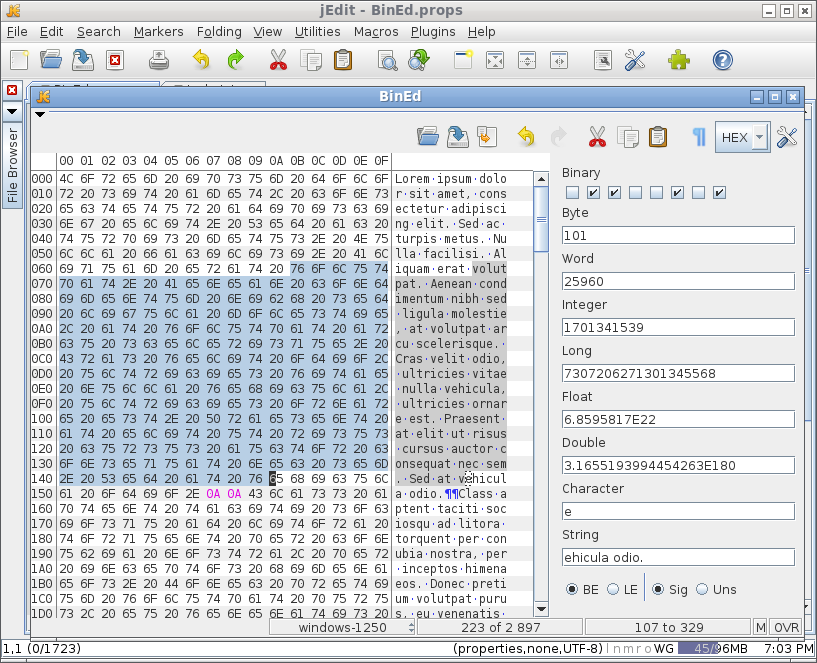
Binary/hex editor plugin for jEdit written in Java.
@AUTOPSY-PLUGIN
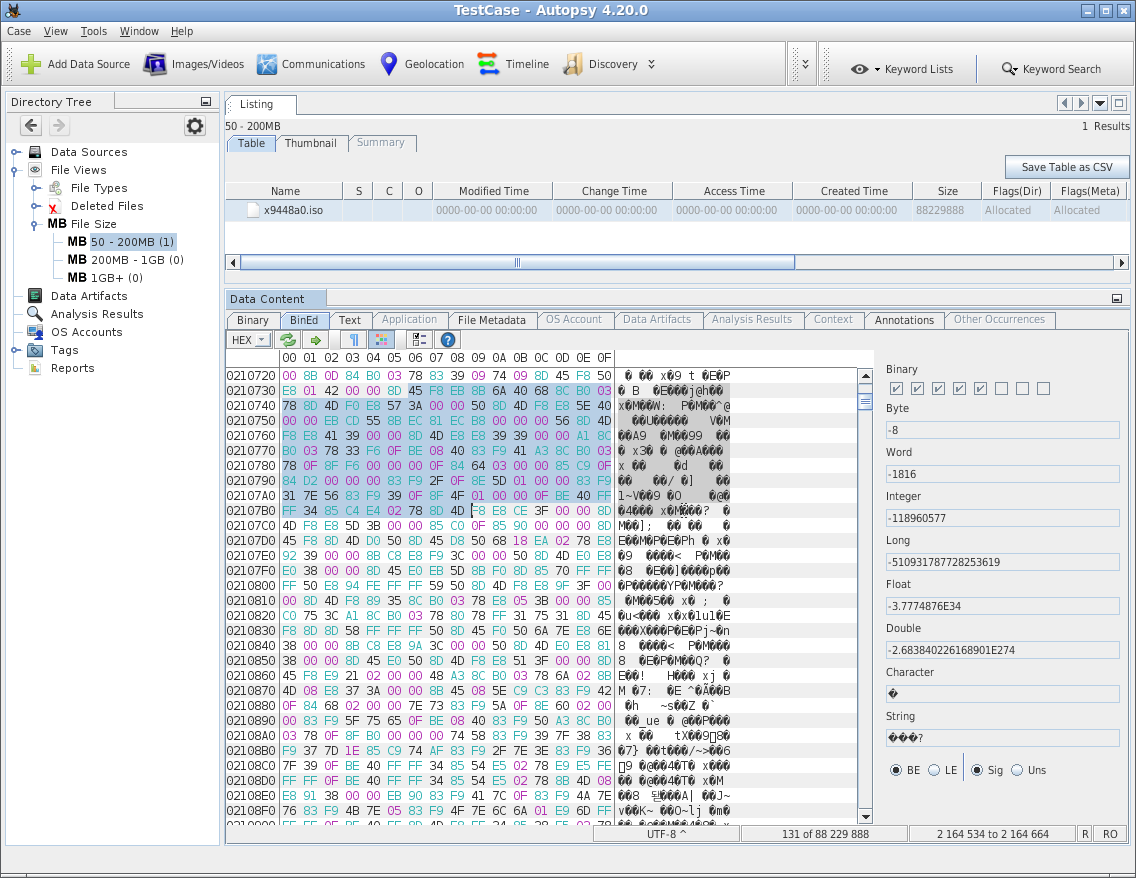
Binary/hex plugin for Autopsy digital forensics platform written in Java.
@GHIDRA-EXTENSION
Binary/hex plugin for Ghidra SRE written in Java.
@ALL
- Visualize data as numerical (hexadecimal) codes and text representation
- Codes can be also binary, octal or decimal
- Support for Unicode, UTF-8 and other charsets
- Insert and overwrite edit modes
- Searching for text / hexadecimal code with matching highlighting
- Support for undo/redo
- Support for files with size up to exabytes
Example look of the application's GUI:
@EDITOR
@NETBEANS-PLUGIN
@INTELLIJ-PLUGIN
@ECLIPSE-PLUGIN
@JEDIT-PLUGIN
@AUTOPSY-PLUGIN
@GHIDRA-EXTENSION
@ALL
For other variants please visit project's website:
Project uses Apache License 2.0, see:
https://www.apache.org/licenses/LICENSE-2.0
@EDITOR
Application can be executed on any platform supported by Java 8, including Microsoft Windows, macOS, variants of Linux or BSD and application should have the same minimum requirements as Java. It should be also ok to use any newer version of the Java.
For instruction on how to install Java on your operating system please search on Internet or visit:
@NETBEANS-PLUGIN
Plugin requires NetBeans Platform application, latest version requires platform version 11 or higher and Java 8.
Main aim is to support NetBeans IDE, but there is also variant for other applications using this NetBeans platform.
@INTELLIJ-PLUGIN
Plugin requires Jetbrains IntelliJ Platform application, latest version requires platform version 2022.2.1 or higher and Java 11.
Main aim is to support IntelliJ Platform IDEs, but other applications/IDEs using this platform should be also supported.
@ECLIPSE-PLUGIN
Plugin is implemented for wide range of Eclipse platform versions since around Eclipse Oxygen and requires Java 8.
Main aim is to support Eclipse Platform IDE, but other applications using this platform could be also supported.
Limitations:
- Using Swing GUI wrapping in SWT dialogs - it doesn't fit native look and feel and have various rendering issues depending on system / java version
- Poor integration
@JEDIT-PLUGIN
Plugin tested with jEdit 5.6.0.
@AUTOPSY-PLUGIN
Plugin requires SleuthKit Autopsy Platform to run.
Current stable version was tested with Autopsy 4.20.0.
@GHIDRA-EXTENSION
Extension requires Ghidra Software Reverse Engineering Suite 10.4 or newer to run.
Current stable version was tested with Ghidra 10.4.
@EDITOR
Application is available for download on the project's website:
https://bined.exbin.org/editor
To get the file scroll down to the Downloads section. Please use stable version if you want to have less problematic experience, as development version can contain unfinished/untested functionality.
For Windows there is currently only installer for x86 32-bit architecture available - after installation it can be used with either 32-bit or 64-bit Java.
For macOS there is installation file (dmg image) available.
For some Linux variants there are Debian and RPM packages available.
Alternatively, or for other operating systems, please use general ZIP variant / file. You'll need to extract content of the file into directory of your choice. This action is different on various operating systems - please search on the Internet for instructions on how to do this step on your operating system.
You can also run limited version in modern web browser using CheerpJ:
https://bined.exbin.org/editor/web
@EDITOR
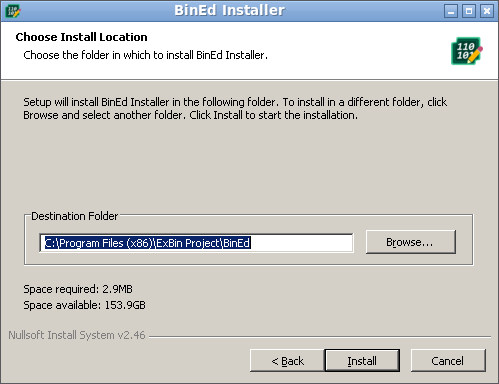
Installation package for Windows is typical wizard dialog (created with Nullsoft NSIS tool).
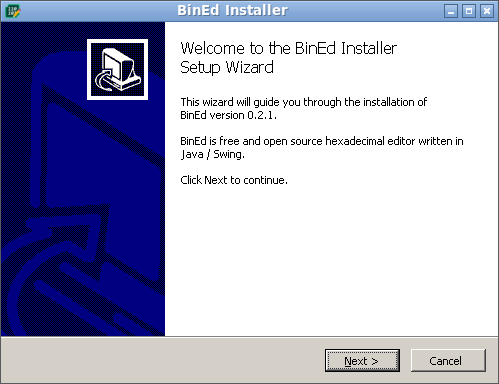
It will also create shortcuts in start menu in ExBin Project folder.

Specify in which directory you want to install the application or use default.
@EDITOR
Installation on macOS requires preexisting Java installation.
Download and open DMG file. Image should be mounted and installation process should start.

To proceed with installation, agree to application license terms.
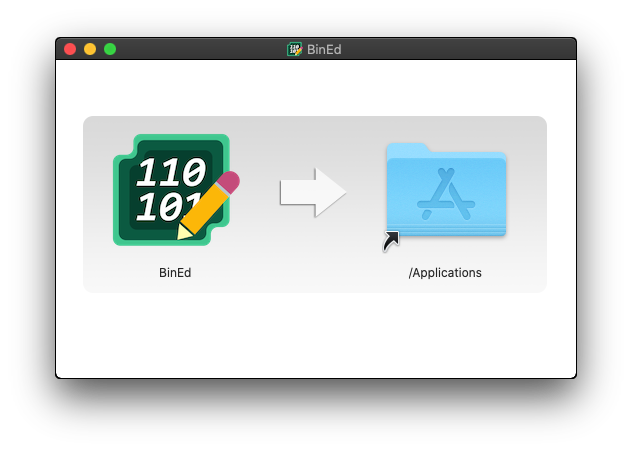
Drag&Drop BinEd to Applications (from left to right) to perform installation.
Depending on the version of your system, you will encounter error when trying to execute the application.
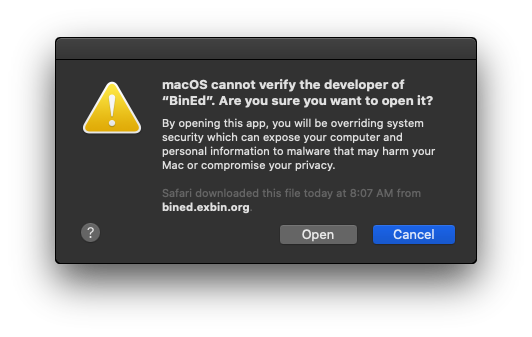
You'll need to add security exception in Mac System Settings / Privacy & Security as this application is not available via App Store.
Consult following page: MacHelp
@EDITOR
Installation on Linux depends on the variant of the system. Some systems allow to perform the installation with simple execution of the downloaded file.
Alternatively you might need to use shell commands:
For Debian-based systems command might be:
sudo dpkg -i bined_*.deb
For RPM-based systems command might be:
sudo rpm -i bined-*.rpm
@NETBEANS-PLUGIN
Choose one of the following options:
- In Tools/Plugins in Available Plugins tab search for "bined", check checkbox on the item and press install button
- In Downloaded tab "Add Plugins" if you want to install downloaded .nbm file
Plugin is available in NetBeans Plugin Portal:
https://plugins.netbeans.apache.org/catalogue/?id=59
Plugin is available for download on the project's website:
https://bined.exbin.org/netbeans-plugin
@INTELLIJ-PLUGIN
Choose one of the following options:
- In File/Settings/Plugins search for "bined" in Marketplace tab and press install button
- Use "Install plugin from disk" from additional actions menu (cog-gear icon) to install downloaded .zip file
- Unzip downloaded file into plugins directory to make it part of the IDE installation
Plugin is available in JetBrains Marketplace:
https://plugins.jetbrains.com/plugin/9339
Plugin is available for download on the project's website:
https://bined.exbin.org/intellij-plugin
@ECLIPSE-PLUGIN
Choose one of the following options:
- In Help/Eclipse Marketplace search for "bined" and press install button
- In Help/Install new software add plugin update site "https://bined.exbin.org/eclipse-plugin/update" and install content
- Copy downloaded jar file to eclipse/dropins directory
Plugin is available in Eclipse Marketplace:
https://marketplace.eclipse.org/content/bined-binaryhexadecimal-editor
Plugin is available for download on the project's website:
https://bined.exbin.org/eclipse-plugin
@JEDIT-PLUGIN
Unzip jar file from downloaded zip file into jars directory of your jEdit installation.
Plugin is available for download on the project's website:
https://bined.exbin.org/jedit-plugin
@AUTOPSY-PLUGIN
In Tools/Plugins in Downloaded tab "Add Plugins" if you want to install downloaded .nbm file.
@GHIDRA_EXTENSION
Use "File/Install Extensions" in project window or unzip jar file from downloaded zip file into Ghidra/Extensions directory of your Ghidra installation.
@EDITOR
To start the application directly, there are multiple options.
If you installed version for Windows via installer, you can start the application via Start menu in applications list.
Go to the directory where your application is installed.
You can start bined.exe on MS Windows systems or on systems with Windows emulation installed - for example using Wine.
bined.sh is a simple script which should work on Linux or macOS systems. It might be necessary to assign execution bit on the file (for example via chmod +x bined.sh command).
On some systems it might be also possible to execute bined.jar depending on how and which variant of the Java is installed.
Application can be also started via command line, but this might also depend on the operating system, Java version and whether are Java tool applications setup for direct execution.
java -jar bined.jar
Application also accepts few command line parameters, like for opening specific file on start.
Usage: bined <options> <file>
--help parameter to see available commands
-multi_file forces multi file / tab switching mode
-single_file forces single file mode
--fullscreen forces full screen mode
@NETBEANS-PLUGIN
In NetBeans IDE:
- Use "Open as Binary" action in main "File" menu or in project files Tools context menu
- Use "View as Binary" action in context menu in variables/debug window
- Open file with extension "bin" or use Open As/Binary File (BinEd plugin)
@INTELLIJ-PLUGIN
In IntelliJ-based IDE:
- Use "Open as Binary" action in toolbar of "File/Open" dialog or "Open In/Binary Editor" in project files context menu
- Use "View as Binary" action in context menu in variables/debug window
- Associate file extension with "Binary File" file type in Options/Editor/File Types
- Use "Byte-to-byte compare" in Compare files dialog
- Use "Edit as Binary" in column context menu in DB view
@ECLIPSE-PLUGIN
In Eclipse IDE:
- Use "Open With/BinEd Binary/Hex Editor" action in project explorer context menu
- Use "View as Binary" in Variables window
@JEDIT-PLUGIN
- Use Plugins/Bined/Edit File.
@AUTOPSY-PLUGIN
In Autopsy:
- New "BinEd" tab is available in Data Content Viewers section.
- Use "Open as Binary" action in main "Tools" menu.
@GHIDRA-EXTENSION
In Autopsy:
- Create new tool and select Bined Extension for it
- Show BinEd window using BinEd toolbar action
@ALL
@EDITOR
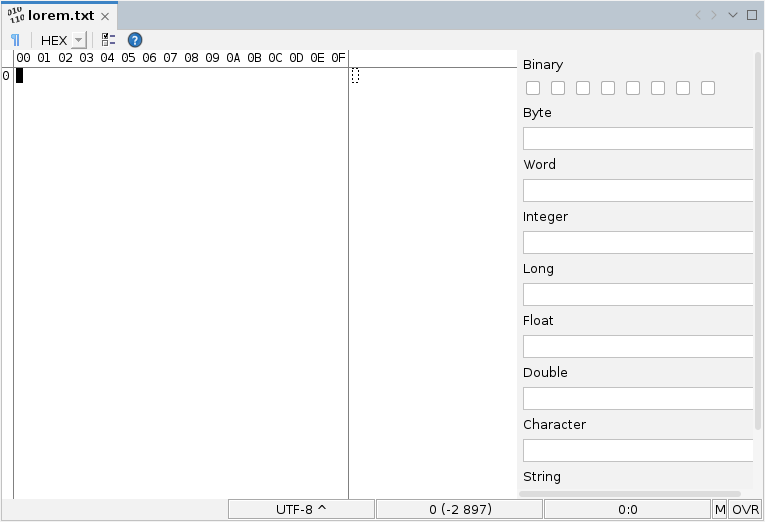
BinEd is desktop application with typical layout.

Application consists of (from top to bottom):
- Window header with icon, application name and optionally name of the currently opened file
- Main menu strip with menu items for working with file, data editing, view options, tools and application help
- Toolbar strip with quick action buttons, optionally with captions
- Optionally tab strip with currently opened files
- Main data area, optionally with content parsing panel on right side
- Optionally status bar showing currently selected encoding, cursor position and other states
@!EDITOR
Application consists of (from top to bottom):
- Toolbar strip with quick action buttons
- Main data area, optionally with content parsing panel on right side
- Optionally status bar showing currently selected encoding, cursor position and other states
@EDITOR
Main menu provides main access to available actions.
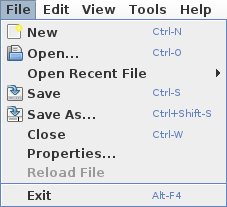
File menu contains actions to handle basic work with files:
- Opening, closing and saving files
- List of recently used files
- Save as action allows saving copy of the active document as a new file
-
Print action- see. print document - Properties action shows properties dialog - see. tools section
- Reload content of the file from source
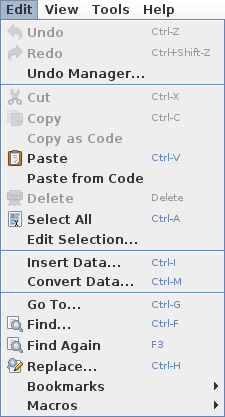
Edit menu contains actions related to document editing and navigation:
- Undo / redo actions
- Area selection and clipboard operations
- Find and replace actions
- Tools related to editing, navigation, bookmarking and macro support
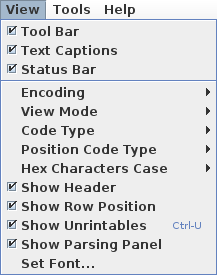
View menu allows adjusting various options related to displaying properties:
- Toggle visibility of the sections of the main window
- View options for code area - see. view options
Tools menu provides additional actions like file compare and clipboard/item dragging content tools.
Help menu provides information about application and access to help / manual content included with application or available online.
Toolbar provides access to some of typically used actions.
- You can toggle code type between binary, octal, decimal and hexadecimal
- You can toggle visibility of unprintable characters @!EDITOR
- Action to open options dialog
- Action to open online manual
In basic mode, data are shown as matrix of numeric codes and also as regular text at the same time.
Optionally there is header, which represents position offset for the particular code on the given column.
Row starts optionally by row position. Row position can be represented by numbers in octal, decimal or hexadecimal base independent on code base.
Popup menu is available with actions which depends on which section of the code area was clicked on.
Content parsing panel provides analysis of the data at the cursor position.
@EDITOR
Parsing panel can be shown/hidden with:
Menu / View / Show Parsing Panel
@ALL
Currently, only simple list of values is available. Values are updated when cursor in code area is moved.
It's possible to edit the values and overwrite content of the document on the cursor position with ENTER key.
Values panel supports options for big and little endian - this affects order of bytes for multibyte values. Support for signed and unsigned variants of some values - first bit is typically used for negativity sign.
Status bar is bottom section of the main window.

It has following 5 sections - from left to right:
Left click cycles throw set list of encodings.
Popup menu provides ability to select specific encoding from the list or to manage it.
Shows document size in specific code type and in brackets difference to size of the saved document.
If there is selection active in the document then it shows size of the selection to size of the document.
Tooltip shows document size in three numeral systems of base 8, 10 and 16.

Popup menu allows selecting code type or to copy the value.
Shows current position of the cursor in the document as position in the document and position in the code.
If there is selection active in the document then it shows start and end position of the selection.
Tooltip shows cursor position in three numeral systems of base 8, 10 and 16.
Popup menu allows selecting code type or to copy the value.
Shows currently used memory mode.
Modes are:
- Delta Memory Mode
- RAM Memory Mode @!EDITOR
- Native File Mode @ALL
Tooltip shows full name of the memory mode.
Popup menu allows switching memory mode. This will close the document and reopen it in selected mode.
Following edit modes are supported:
- RO - Document is in read-only mode and cannot be edited
- INS - In insert mode edit operation inserts data to current cursor position
- OVR - In overwrite mode edit operations replaces data at the current cursor position
It's possible to switch between insert and overwrite with single click on the status bar or with INSERT key
@EDITOR
To create new file use:
Menu / File / New
To edit existing file use:
Menu / File / Open
@ALL
File is show in code area as a sequence of codes and preview characters.
You can edit numerical codes, or you can edit preview characters via keyboard or using available actions.
You can select specific range of data with using mouse while holding left button or holding SHIFT button while moving in code area.
@EDITOR
When done with editing operations, save file:
Menu / File / Save
Two modes are supported:
- Insert mode
- Overwrite mode
In insert mode entering new codes or charaters inserts space at the current cursor position to insert new data. Inserting data from clipboard inserts this data at the current position (making additional space).
In overwrite mode data are replaced at the current cursor position. Inserting data from clipboards replaces data at the current position and only extends file if not enough space is available.
If changes you made to the file is not what you wanted to do, you can revert some number of last edit operations you performed.
- Undo action reverts one operation
- Redo action performs again previously reverted operation
Use this action to move cursor to specific position:
@EDITOR Menu / Edit / Go To @!EDITOR Context Menu / Go To
@ALL
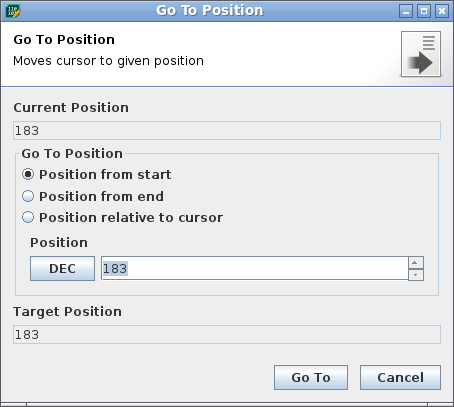
You can specify position relative to current position, start or end of the document. Position can be specified in octal, decimal or hexadecimal base.
Use this action to specify exact selection range:
@EDITOR Menu / Edit / Edit Selection @!EDITOR Context Menu / Edit Selection
@ALL
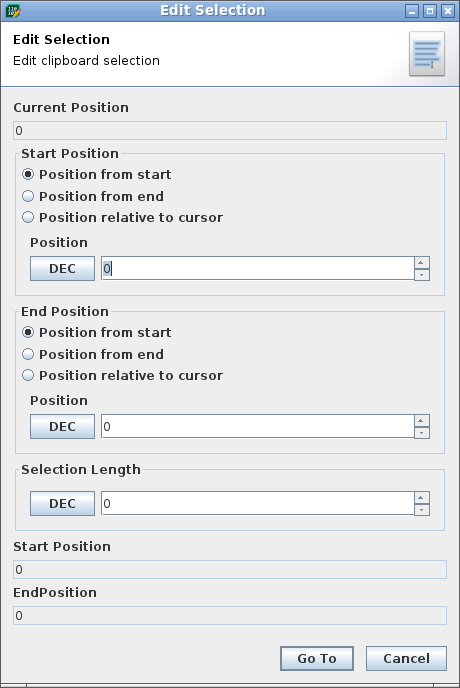
You can specify position relative to current position, start or end of the document. Position can be specified in octal, decimal or hexadecimal base.
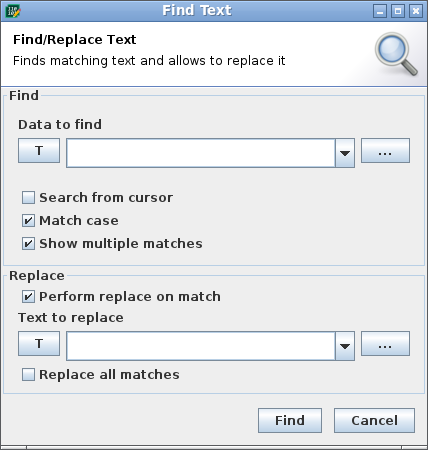
Use this action to find specific text or sequence of codes:
@EDITOR Menu / Edit / Find Menu / Edit / Replace @!EDITOR Context Menu / Find Context Menu / Replace
@ALL
This will open quick search bar:

You can enter searched text or data and toggle match case and highlighting mode buttons.
You can switch between multiple matches if found.
Options button opens dialog with additional options:
Use this action to insert data to current position:
@EDITOR
Menu / Edit / Insert Data
@!EDITOR
Context Menu / Insert Data
@ALL
Data will be inserted or will replace previous data depending on the current edit mode.
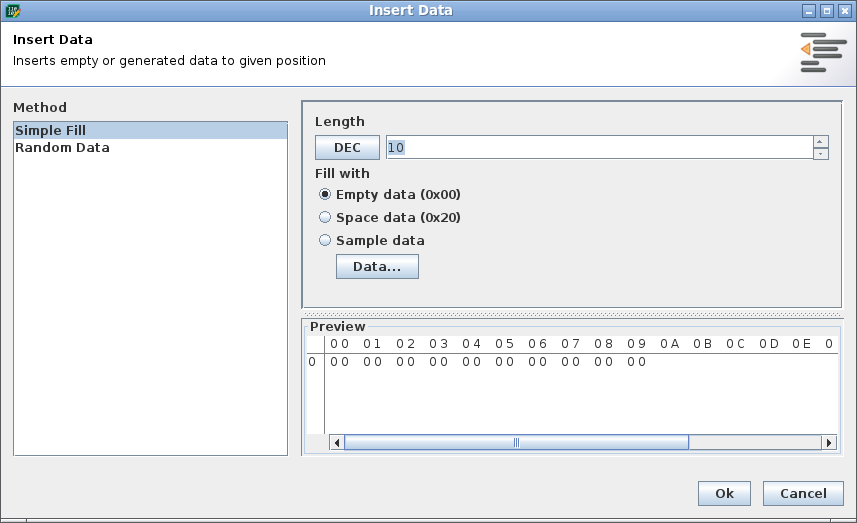
On left side there is list of available operations and on right side there are additional parameters and output preview.
Use this action to convert selected data or whole content into different form:
@EDITOR
Menu / Edit / Convert Data
@!EDITOR
Context Menu / Convert Data
@ALL
Data will be converted and replace previous data or into clipboard / new window.
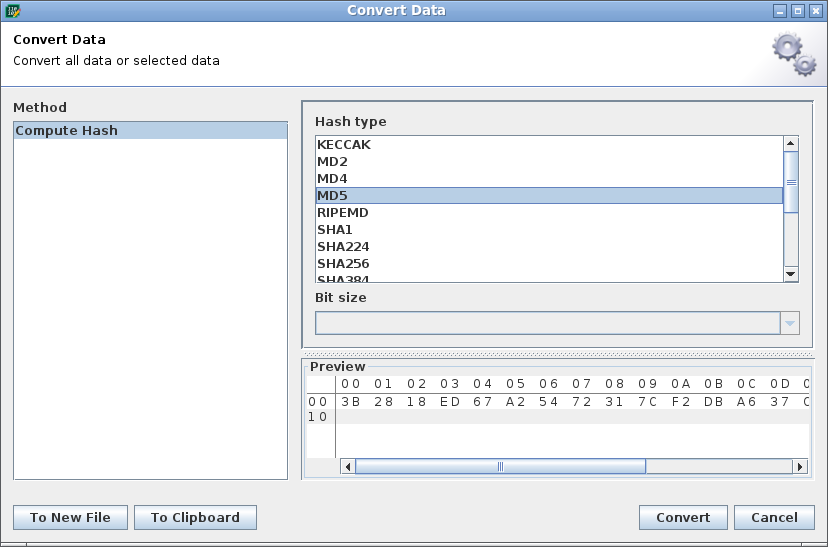
On left side there is list of available operations and on right side there are additional parameters and output preview.
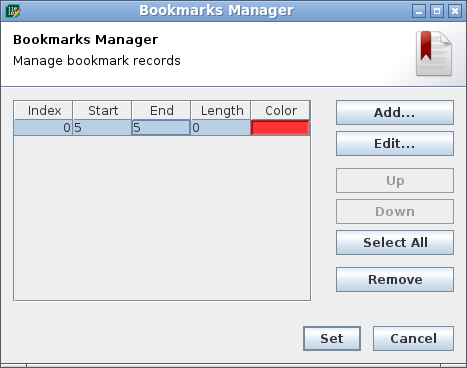
Bookmarks allow to save specific position / range and mark them with color.
Bookmark functionality is accessible in main edit menu and provides list of quick access bookmarks to jump to and access to bookmarks manager.
Menu / Edit / Bookmark
First 10 bookmark records are available for quick access, so that they can be set, cleared and jump to with keyboard shortcuts.
- Ctrl/Meta 0..9 - jump to bookmark's start position
- Ctrl/Meta+Alt 0..9 - replaces bookmark to current cursor position
- Ctrl/Meta+Alt+Shift 0..9 - clears bookmark
Bookmarks manager allows to edit all bookmark records:
- Set start/end position and length
- Assign color to highlight background for specific bookmark
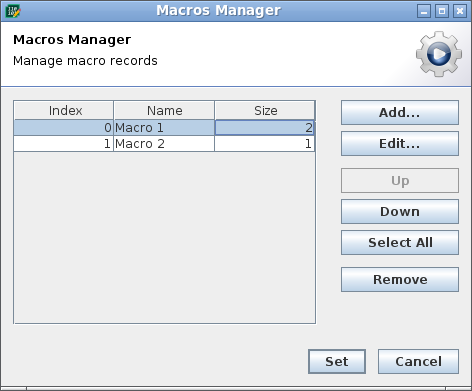
Support for macro operations allows to execute sequence of operations with single action.
Macro functionality is accessible in main edit menu and provides list of first 10 macro records, actions to control action sequence recording and macro manager.
Menu / Edit / Macro
Macro operation is sequence of steps available from fixed set of commands.
Syntax of command is: commandname(parameter1, .. parameterX)
Currently available commands are:
- key-press(T, oN), enter-key, backspace-key, delete-key
- caret-set, caret-move(D, oN)
- clipboard-cut, clipboard-copy, clipboard-copy-as-code, clipboard-paste, clipboard-paste-from-code, clipboard-delete
- selection-set, selection-update(D, oN), selection-select-all, selection-clear
- edit-operation-change
- search-find-text(T), search-find-again
Parameters can be number, text string or direction (UP, DOWN, LEFT, RIGHT, PAGE_UP, PAGE_DOWN, ROW_START, ROW_END, DOC_START, DOC_END, SWITCH_SECTION), some parameters are optional.
Macro manager allows to edit steps of macro records.
Use this action to compare content of two files:
@EDITOR
Menu / Tools / Compare Files
@!EDITOR
Context Menu / Tools / Compare Files
@ALL

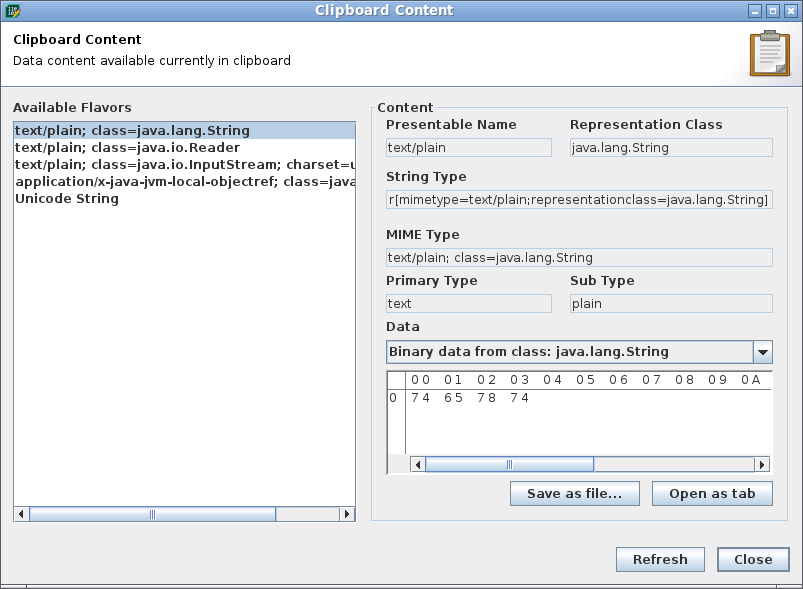
Tool to show available content currently stored in system clipboard.
It provides list of available data flavors (variants of data representation) and allows to show available information about content.
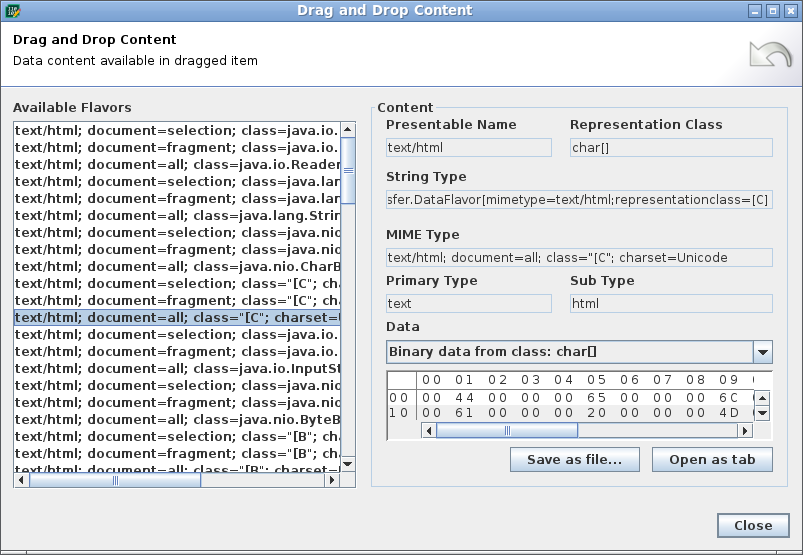
Tool to show available content transferred by drag & drop operation.
It provides list of available data flavors (variants of data representation) and allows to show available information about content.
Not available
@NETBEANS-PLUGIN
Use "View as Binary" action in context menu in variables/debug window.
Supported types are simple values and arrays of: boolean, byte, short, int, long, float, double, char
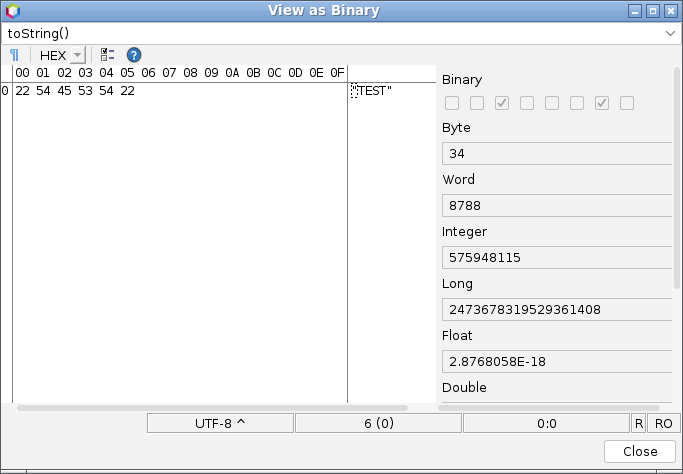
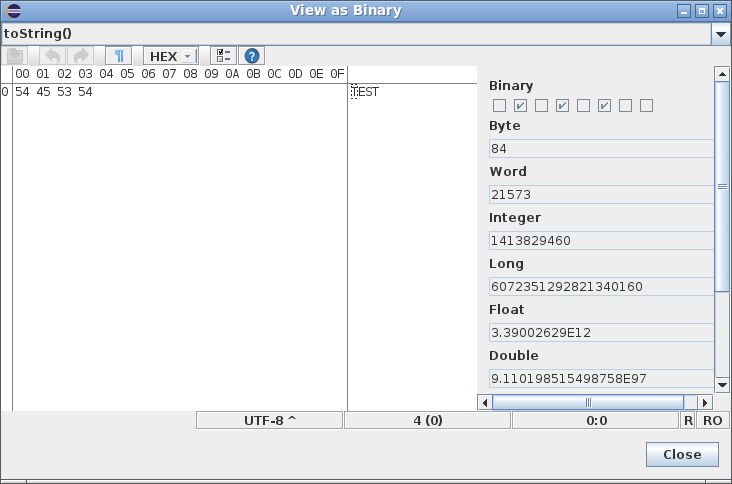
@INTELLIJ-PLUGIN
Use "View as Binary" action in context popup menu in variables view in debug window or inspect view.
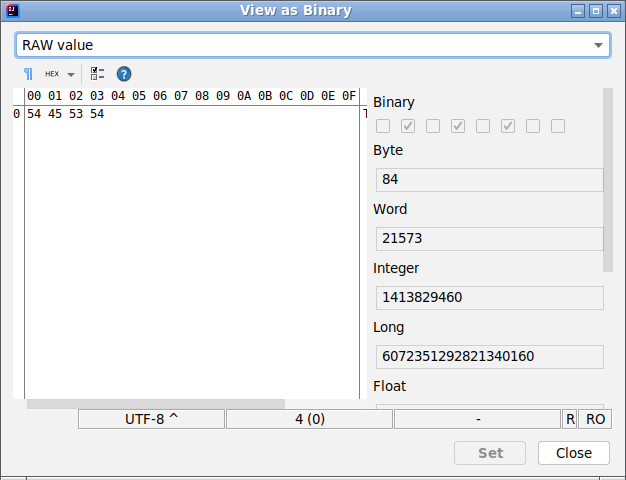
As the IntelliJ platform uses different handling depending on runtime environment, there are separate handlers for different values available switchable in dropdown on the top of the debug view window.
- RAW value method - Should support string types for all programming languages
- Direct access - When methods for the particular language are available
- toString - Public toString methods provides access to value in some cases - could be limited or restricted
- GUI extractor - Extracts data from GUI tree invoking method to load more nodes to tree in the debugger panel - slow and can only load data in linear fashion
JavaValue (Java)
- simple values: boolean, byte, short, int, long, float, double, char
- arrays of: boolean, byte, short, int, long, float, double, char
PyDebugValue (Python)
- bytearray, bytes (String extraction)
PhpNavigatableValue (PHP)
- array of byte range values only
Cidr (C/C++)
- array of char, short, int, long (GUI extractor)
DotNetNamedValue (.NET)
- array of bool, byte, short, int, long (GUI extractor)
DlvXValue (GO)
- array of bool, (u)int, (u)int(8,16,32,64) (GUI extractor)
VariableView (Javascript)
- (u)int(8,16,32,64)array (GUI extractor)
@ECLIPSE-PLUGIN
Use "View as Binary" in Variables window.
Supported types are simple values and arrays of: boolean, byte, short, int, long, float, double, char
Some display options for code area are accessible via View menu.
- Code Matrix - Show matrix of codes representing data of the file
- Text Preview - Show textual characters representing data using currently selected encoding
- Dual - Show both code matrix and text preview next to each other (default)
- Binary - shows data as numbers of the base 2. This mode is useful to show actual bits of the data. Values are in range 0 - 11111111
- Decimal - Shows each data byte as decimal value in the range 0 - 255 in typical form which most people are used to
- Octal - Each byte is represented as three values of the base 8, therefore in range 0 - 377. Each figure represents up to 3 bits
- Hexadecimal - Most commonly used form for technical purposes as each byte is represented as two figures of base 16. Value 10 to 15 are shown as alphabet letters A to F which can be optionally of lower or upper case. Each figure represent 4 bits of data
In left side of the code area there are shown position in the file. It's possible to choose code type for this position as octal, decimal or hexadecimal.
In hex code type codes above 10 are shown as characters A to F. You can choose if this codes will be upper or lower case.
Some characters don't have visual representation in the preview section. For example characters like:
- Space characters
- Tabulator character
- Carriage return / new line characters
This provides option to display substitute characters with different color instead to better visualize this particular characters.
This option provides ability to display some codes with different colors.
Currently, only single mode is available:
- Control codes: 00h to 1Fh
- Upper codes: 80h to FFh
You can change font used in code area.
@EDITOR
Menu / View / Set Font
@ALL
Options / Appearance / Text Font
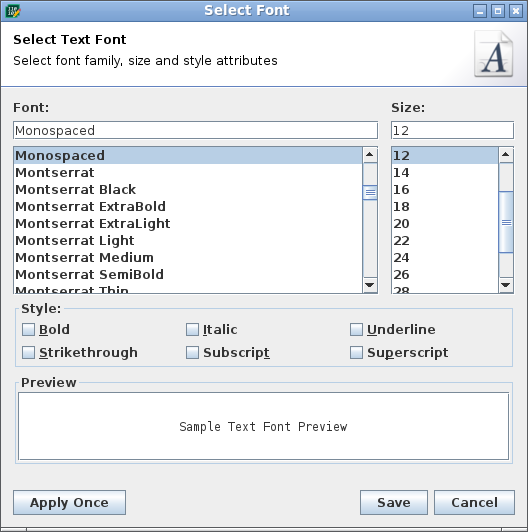
You can select specific family of the font, size in pixels, style parameters like bold and italic.
In preview section you can see how the selected font will look, or you can enter other text of your choice there.
Text preview section is showing data decoded to textual characters according to currently selected encoding. Method of conversion between RAW data and characters is described in so called encoding. Java supports universal UNICODE encodings as well as various ISO and platform specific encodings often tailored for specific country/language.
Encodings can be either fixed where single numeric code is represented as single character. Some encodings like for example UTF-8 uses codes with different length of codes to represent characters. Each character in textual preview section is decoded from particular position, therefore characters longer than single byte will overlap.
User can set list of encodings available for quick switching in encodings manager dialog.
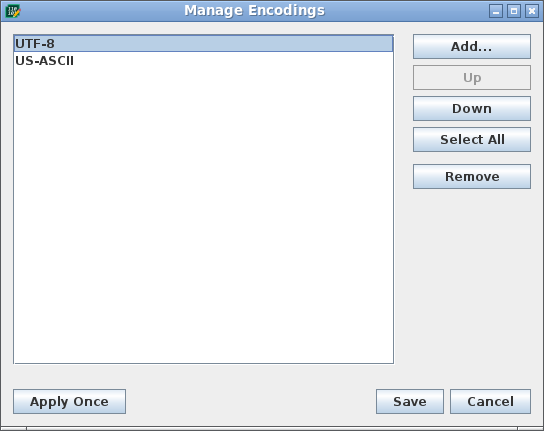
It's possible to move/reorder encodings in the list and add another encoding.
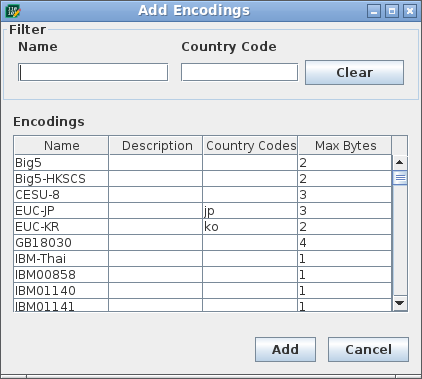
Encodings can be filtered by name and/or country code.
Active encoding can be either selected by popup menu or cycled through by single click in the status bar.
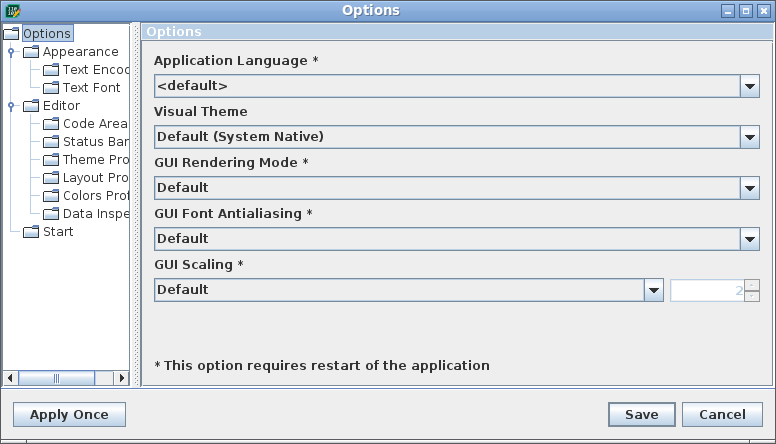
Main section provides options for overall look of the application. Application supports languages switching depending appropriate language plugin is available.
It's also possible to choose visual style of the application and tweak rendering options related to antialiasing and scaling.
Code area section allows setting various options related to code area.
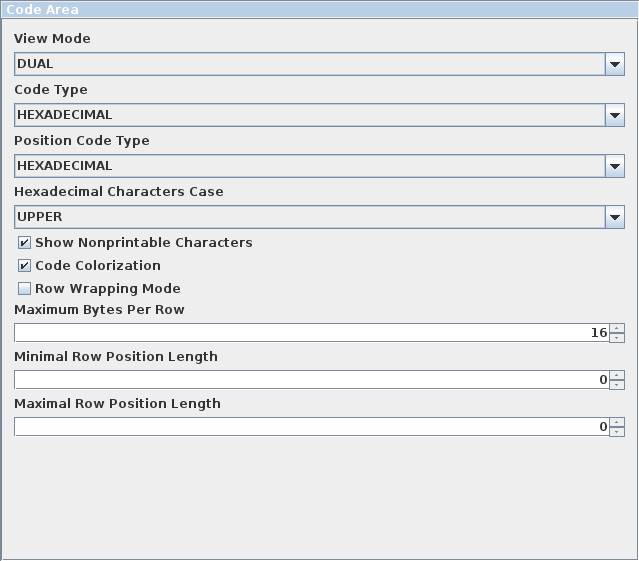
Maximum bytes per row allows setting how many codes / preview characters will be visible on the page.
In default mode (16) code area always shows 16 codes per row.
Alternative mode is to use (0) in which code area will fit as many codes per page to fit visible area.
Row position length parameters allows setting of behavior of row position codes.
In default mode (0, 0) row positions will have as many digits as needed for current size of the document.
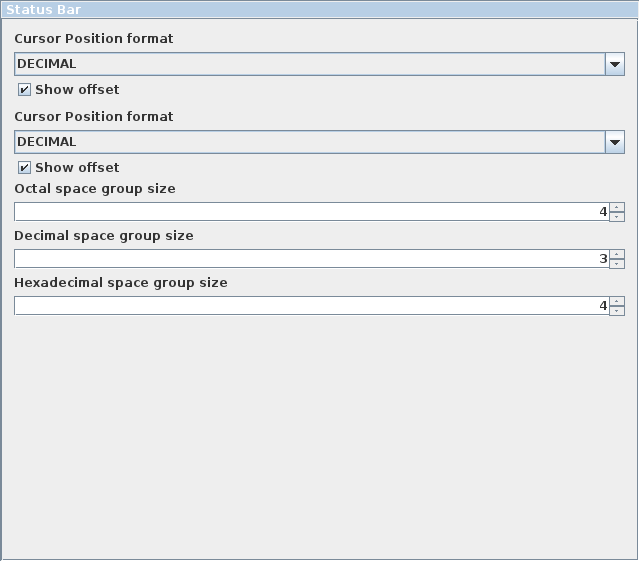
Section for status bar allows to set same options as available in popup menu actions in status bar.
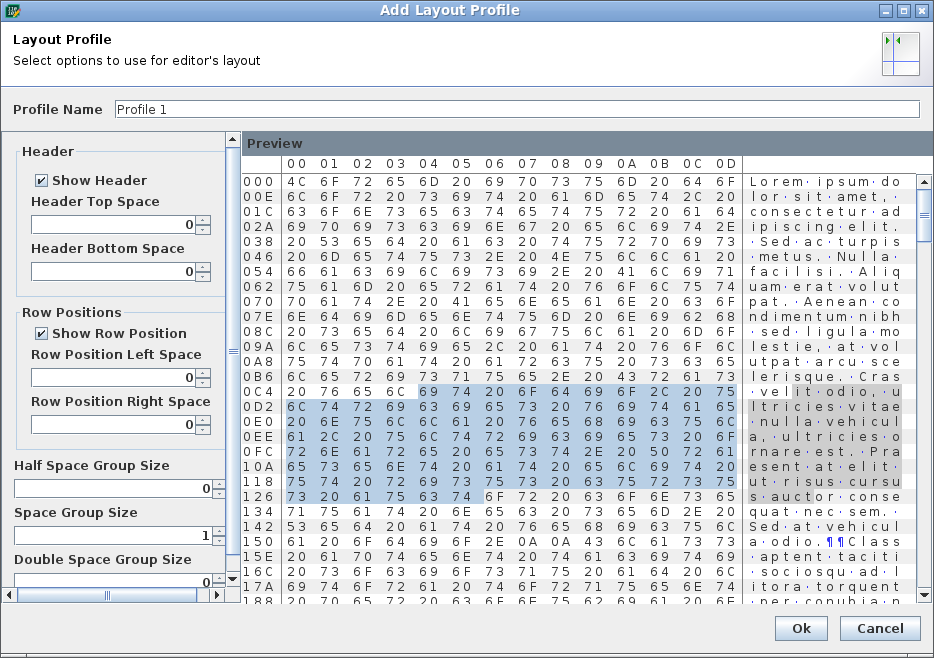
Multiple layout profiles are supported. You can define your own or use one from templates.

Layout options specify positions of the displayed data. Primary capability is to specify size and frequency of spacing between characters.
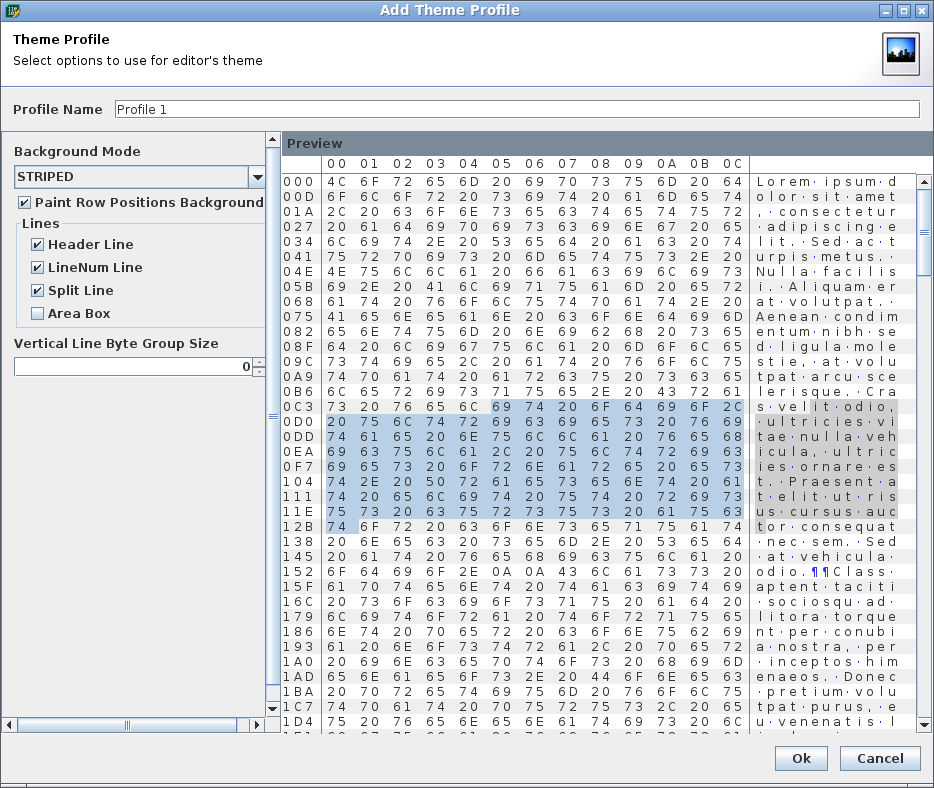
Multiple decoration profiles are supported. You can define your own or use one from templates.
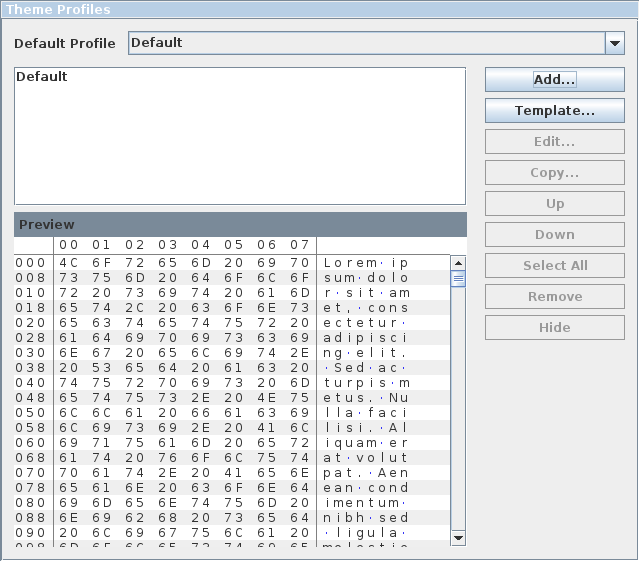
Decoration options allow specifying additional cosmetic entities, namely lines and shapes.
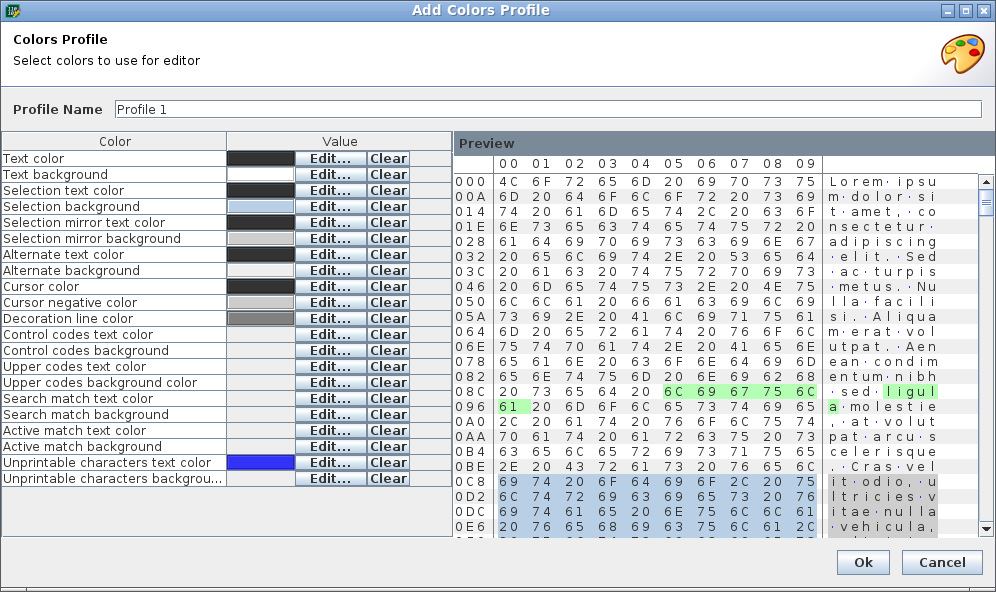
Multiple color profiles are supported. You can define your own or use one from templates.
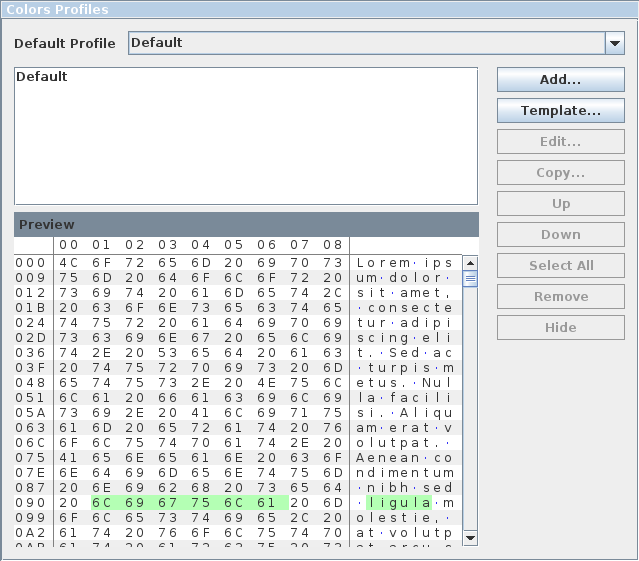
It is possible to specify colors of text, background, decorations and make it specific for areas like selection or found matches. If color is not specified, default color from current Look and Feel is used.
@EDITOR
Help for the application is available on the project's website and current version is also included with the application.
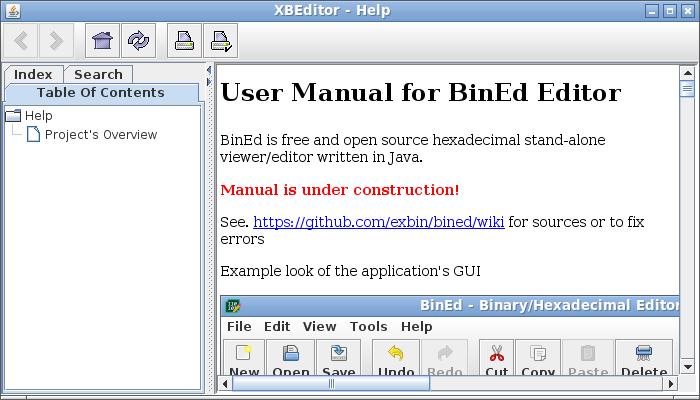
@!EDITOR
This online manual is available when clicking on Online Help in context menu or in toolbar.
@EDITOR
It's possible to check if newer version of the stable version of the application is available.
Menu / Help / Check for Update
Check is performed automatically at the start of the application unless disabled in options:
Options / Start : Check for available updates on application start
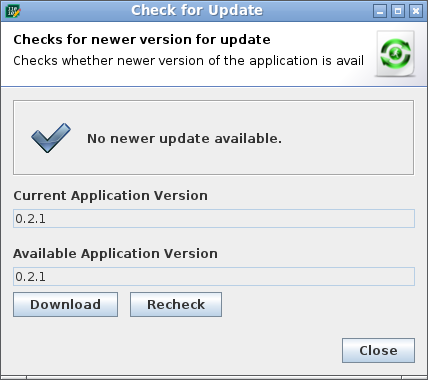
Press download button to be redirected to download page in the browser.
Automatic update is currently not supported.
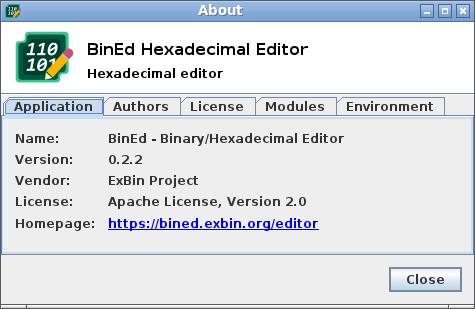
You can show basic information about application with:
@EDITOR
Menu / Help / About
@!EDITOR
Context Menu / About
@ALL
As the project is free and open source, you can participate in the development in many ways:
- Modify this manual / wiki page
- Report an issue or suggest a feature on GitHub
- Modify source codes of the editor and provide PR on GitHub
See. https://bined.exbin.org/?participate for more details.