RS is a Rather Simple programming language for kids. It targets at children above 9 and addresses the most essential of kids' needs – the overwhelming and never ending desire to … draw. RS is available in Russian and English and easily can be translated into other languages, obviating the necessity to memorize unknown words.
So let us get our hands dirty with it, but first we need to build it. Install Java 11+, Maven, clone the repository and execute the following commands:
mvn clean install -P en
mkdir ~/rs
cp ./target/rsvm-0.9-SNAPSHOT-package.zip ~/rs
cd ~/rs
unzip rsvm-0.9-SNAPSHOT-package.zip
(either «-P ru» or «-P en» are supported at the moment).
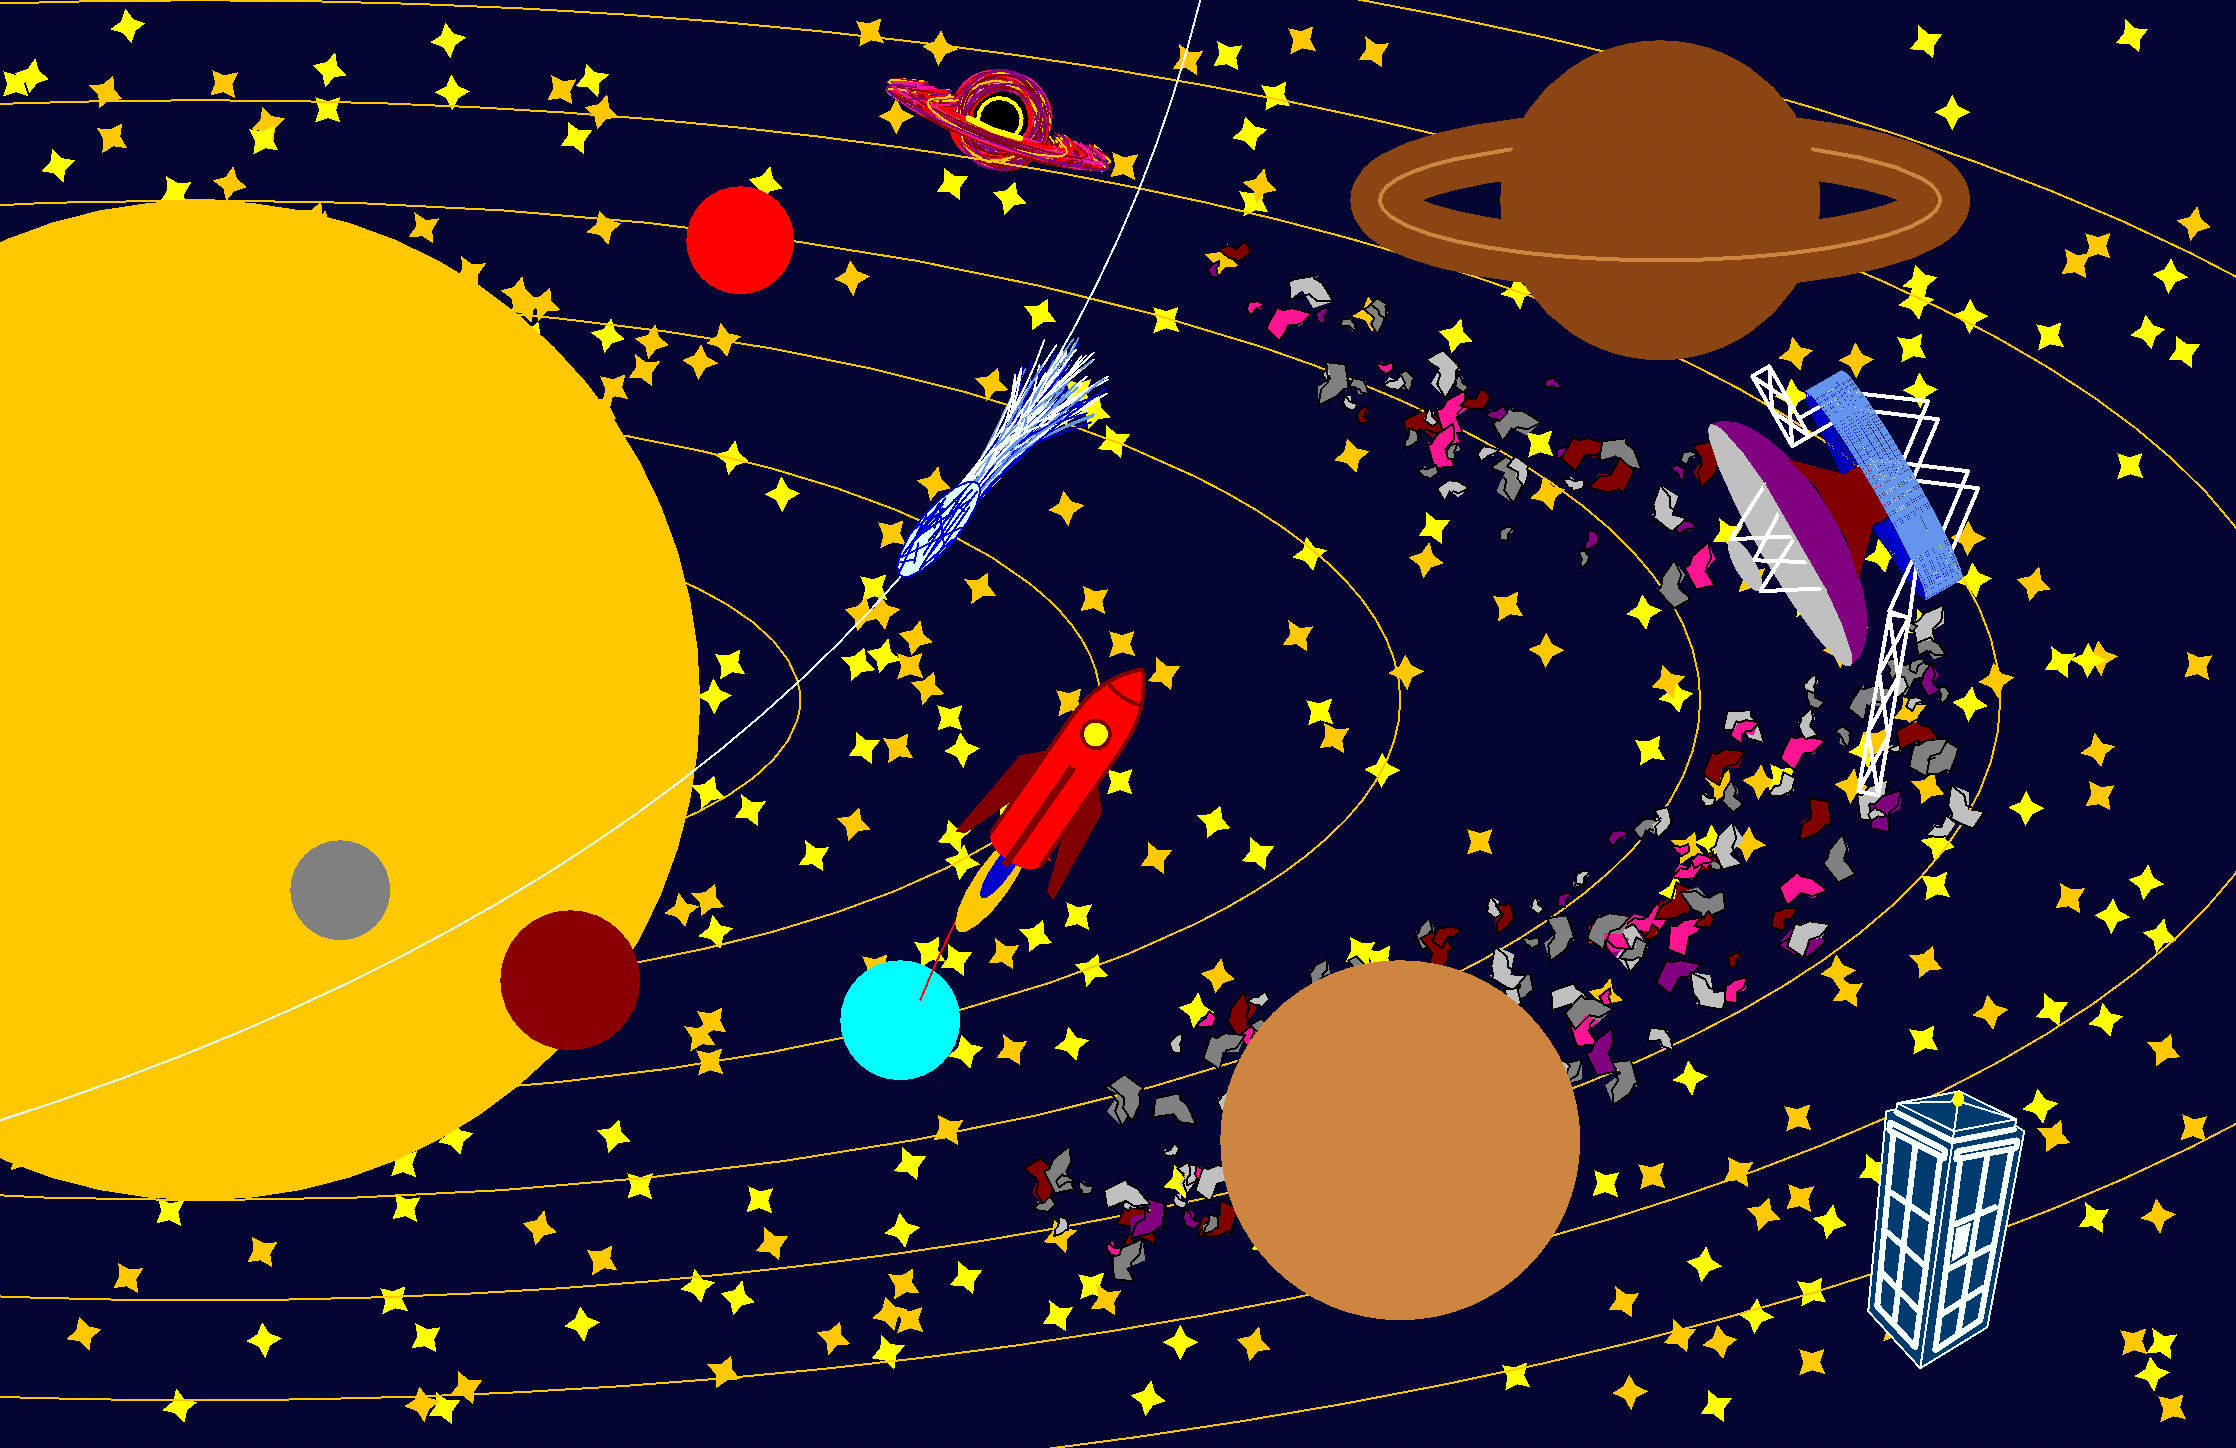
Now we may start. We won’t draw a house with a chimney pot – aims must be appealing and ambitious (mustn’t they?), hence we will draw the Solar System! The final result will look like this:
Ok here is the first hurdle – you are to convey to your small Bill Gates what the Cartesian Coordinates are – probably you’ll be better off putting your laptop aside for a while and just using a sheet of paper, but since you both are smart cookies it unlikely to be a significant setback. As soon as you’re done … Et erit lux!
; Coldness and darkness of space
draw (night) (
    lines (
        (0, 0)
        (2000, 0)
        (2000, 2000)
        (0, 2000)
    )
)

; The sun
draw (orange) (
    circles (
        ((100, 350) 250)
    )
)
By the way if we were intent on drawing a binary star we might have added another instruction into the «circles» block like this:
; Sirius
draw (orange) (
    circles (
        ((100, 350) 250)
        ((900, 90) 120)
    )
)
but we are drawing our solar system so let us stick to the first variant.
Ok. Now we need orbits and planets. To outline either a circle or oval or polygon you need to specify the line thickness in the «draw» instruction:
; Mercury's orbit
draw (orange, 1) (
    ovals (
        ((100, 350) 300 x 100)
    )
)
Great! There is a place for Mercury, but we need more. No-no please don’t tell you little prodigy about ^c-^v (they will hit on under their own steam later)! All in all programming must be fascinating and absorbing – not humdrum and tedious! Here is the time for loops to kick in. RS has 2 types and here we will employ the following one:
; Orbits
draw (orange, 1) (
    do (_orbit from 300 to 1200 step 150) (
        ovals (
            ((100, 350) _orbit x (_orbit / 3))
        )
    )
)
By the way it has brought us another glitch: the necessity of explanation what variables are, but we must persevere! I couldn't for the life of me to convey it until it dawned on me that the bad thing is that a variable is an intangible asset, therefore needs to be materialized first. A plastic cube and a marker pen could help by the way.
Ok. Stay tuned! The most interesting things are forthcoming!
Let us draw a rocket next. The problem with rockets is that rockets which take off straight don't appeal to children (unless your small Elon Musk is overly intense and uses a ruler to draw – in this case don't bother and scroll down). The good news is that RS allows drawing something straight (which is usually way simpler) and then rotate it! Here how it goes:
rotate area (35) (
    ; Flame
    draw (orange) ( ovals ( ((525, 450) 9 x 30) ) )
    draw (blue) ( ovals ( ((525, 440) 5 x 20) ) )

    ; Fuselage
    draw (red) (
        lines (
            (510, 360)
            (510, 430)
            (540, 430)
            (540, 360)
            (525, 320)
        )
        curves (
            (from (510, 360) to (525, 320) towards (510, 335))
            (from (540, 360) to (525, 320) towards (540, 335))
        )
        ovals (
            ( (525, 430), size 15 x 7, sector from 180 size 180 )
        )
    )

    ; Tailplane
    draw (claret) (
        lines (
            (510, 380)
            (500, 390)
            (495, 440)
            (500, 438)
            (510, 410)
        )
        lines (
            (540, 380)
            (550, 390)
            (555, 440)
            (550, 438)
            (540, 410)
        )
        lines (
            (523, 380)
            (527, 380)
            (527, 440)
            (523, 440)
        )
    )

    ; Viewport
    draw (yellow) (
        circles (
            ((525, 360) 7)
        )
    )

    ; Outline
    draw (claret, 2) (
        lines (
            (510, 360)
            (510, 430)
        )
        lines (
            (540, 360)
            (540, 430)
        )
        ovals (
            ( (525, 330), size 15 x 7, sector from 230 size 80 )
        )
        curves (
            (from (510, 360) to (525, 320) towards (510, 335))
            (from (540, 360) to (525, 320) towards (540, 335))
        )
        circles (
            ((525, 360) 7)
        )
    )
)
So you just need to surround a block of code with a «rotate area (35) ( … )» instruction – and here, by the way, a new brilliant piece of knowledge has rocked up («angle» I mean).
We are almost done, and it's time for the icing on the cake! What might it be you are wondering. Well, everything looks good, but our space is definitely lacking something – where are the stars!? You come up with a brilliant idea: «We could use loops to draw them …», and here the first architectural holy war breaks out: «No we couldn't! It's outrageous! Stars in a fixed grid?! It's a dystopia or what!? You can make me pick up all my toys in my room, but I won't pick up stars in my space!!». Put your little Dr. Who at ease – RS handles this elegantly. Almost everything can be randomized: a single integer value from either a range or a set, a color from a set, or a coordinate from a defined area or even handful of them. So, yes, we will use a loop, but another one and differently. First let us draw the stars:
; Yellow and orange stars
do (350 times) (
    with randoms ( _starX in range (0..1100), _starY in range (0..700) ) (
        draw (random (in set (yellow, orange))) (
            lines (
                (_starX, _starY)
                (_starX - 3, _starY + 6)
                (_starX - 9, _starY + 9)
                (_starX - 3, _starY + 12)
                (_starX, _starY + 18)
                (_starX + 3, _starY + 12)
                (_starX + 9, _starY + 9)
                (_starX + 3, _starY + 6)
                (_starX, _starY)
                rotate random (in range (0..180))
            )
        )
    )
)
What do we see here? The instruction «with randoms ( _starX in range (0..1100), _starY in range (0..700) ) ( … )» defines two variables. Every invocation of the «with randoms» block assigns new random values to _starX and _starY. «lines» inside is a closure (don't think your kids should know this word) which uses them. «with randoms» is the first way to assign a random value to a variable the second is to use inline declarations as in «draw (random (in set (yellow, orange)))» or «rotate random (in range (0..180))» here. The latter approach tends to produce a cumbersome code sometimes.
Ok. We were able to fill a rectangular box (sorry – outer space) with stars, but _starX and _starY are just scalars – what should we do if we need to draw an asteroid belt? A coordinate of every asteroid is to be picked from an arbitrary polygon or even union of them, and we have no idea how to set about drawing it. Actually nothing special is to be done – RS handles this task in the same way. Have a look at «with randoms ((_x, _y) in union ( … ) … ) ( … )» in the following example:
do (215 times) (
    draw (random (in set(gray, gray, silver, silver, claret, violet, bright-pink))) (
        with randoms (
            (_x, _y) in union (
                lines (
                    (580, 110)
                    (700, 150)
                    (850, 230)
                    (860, 300)
                    (730, 260)
                )
                lines (
                    (900, 330)
                    (960, 300)
                    (980, 400)
                    (830, 530)
                    (560, 630)
                    (500, 600)
                    (530, 570)
                    (600, 500)
                    (770, 440)
                )
            ),
            _scale in set (2, 2, 2, 2, 2, 3, 3, 4, 4, 4, 5, 5, 5),
            _fluctuation in range (0..8),
            _rotate in range (0..360)
        ) (
            ; Fill
            lines (
                (_x, _y)
                (_x + 10 / _scale, _y - 18 / _scale)
                (_x + (19 + _fluctuation) / _scale, _y - 5 / _scale)
                (_x + 16 / _scale, _y + (7 + _fluctuation) / _scale)
                (_x + 30 / _scale, _y + 20 / _scale)
                (_x + 15 / _scale, _y + 30 / _scale)
                (_x - 5 / _scale, _y + (15 -_fluctuation) / _scale)
                (_x, _y + 10 / _scale)
                rotate _rotate
            )

            ; Outline
            draw (black, 1) (
                lines (
                    (_x, _y)
                    (_x + 10 / _scale, _y - 18 / _scale)
                    (_x + (19 + _fluctuation) / _scale, _y - 5 / _scale)
                    (_x + 16 / _scale, _y + (7 + _fluctuation) / _scale)
                    (_x + 30 / _scale, _y + 20 / _scale)
                    (_x + 15 / _scale, _y + 30 / _scale)
                    (_x - 5 / _scale, _y + (15 -_fluctuation) / _scale)
                    (_x, _y + 10 / _scale)
                    rotate _rotate
                )
            )
        )
    )
)
The «with randoms» block here defines four random variables (actually five, but we treat (_x, _y) as one) and (_x, _y) is picked from a union of two polygons (we might have used circles and ovals as well). That's all about randomization. The key takeaway – everything in RS can be randomized and must be randomized – it makes the things real.
We're done with RS in its current state. Hope your child will write a new «unicorn» in it … well fat chance of that frankly, but it definitely can be the first step towards, and what will happen for sure they will experience that magic filling when words and figures change into fancy cars and robots, stars, planets and rockets or whatever else you and your kids keen on.
So this intro covers all of RS's features available by now. As you might notice syntax may vary, notably it is possible to write the same instructions with or without some keywords and tradeoff either clarity or conciseness. Poke around the grammar to convey it to your child, however «monkey see monkey do» approach will also work – just speed through «examples» directory for this.
Meaningful contributions (whatever they are: either a test, or a new feature, or just a color support) are welcomed!
Have fun!