| 🌟 Features | 🤔 Why x.infer? | 🚀 Quickstart | 📦 Installation |
| 🛠️ Usage | 🤖 Models | 🤝 Contributing |
|
✅ Run inference with >1000+ models in 3 lines of code.
✅ List and search models interactively.
✅ Launch a Gradio interface to interact with a model.
✅ Serve model as a REST API endpoint with Ray Serve and FastAPI.
✅ OpenAI chat completions API compatible.
✅ Customize and add your own models with minimal code changes.
Tasks supported:
So, a new computer vision model just dropped last night. It's called GPT-54o-mini-vision-pro-max-xxxl. It's a super cool model, open-source, open-weights, open-data, all the good stuff.
You're excited. You want to try it out.
But it's written in a new framework, TyPorch that you know nothing about.
You don't want to spend a weekend learning TyPorch just to find out the model is not what you expected.
This is where x.infer comes in.
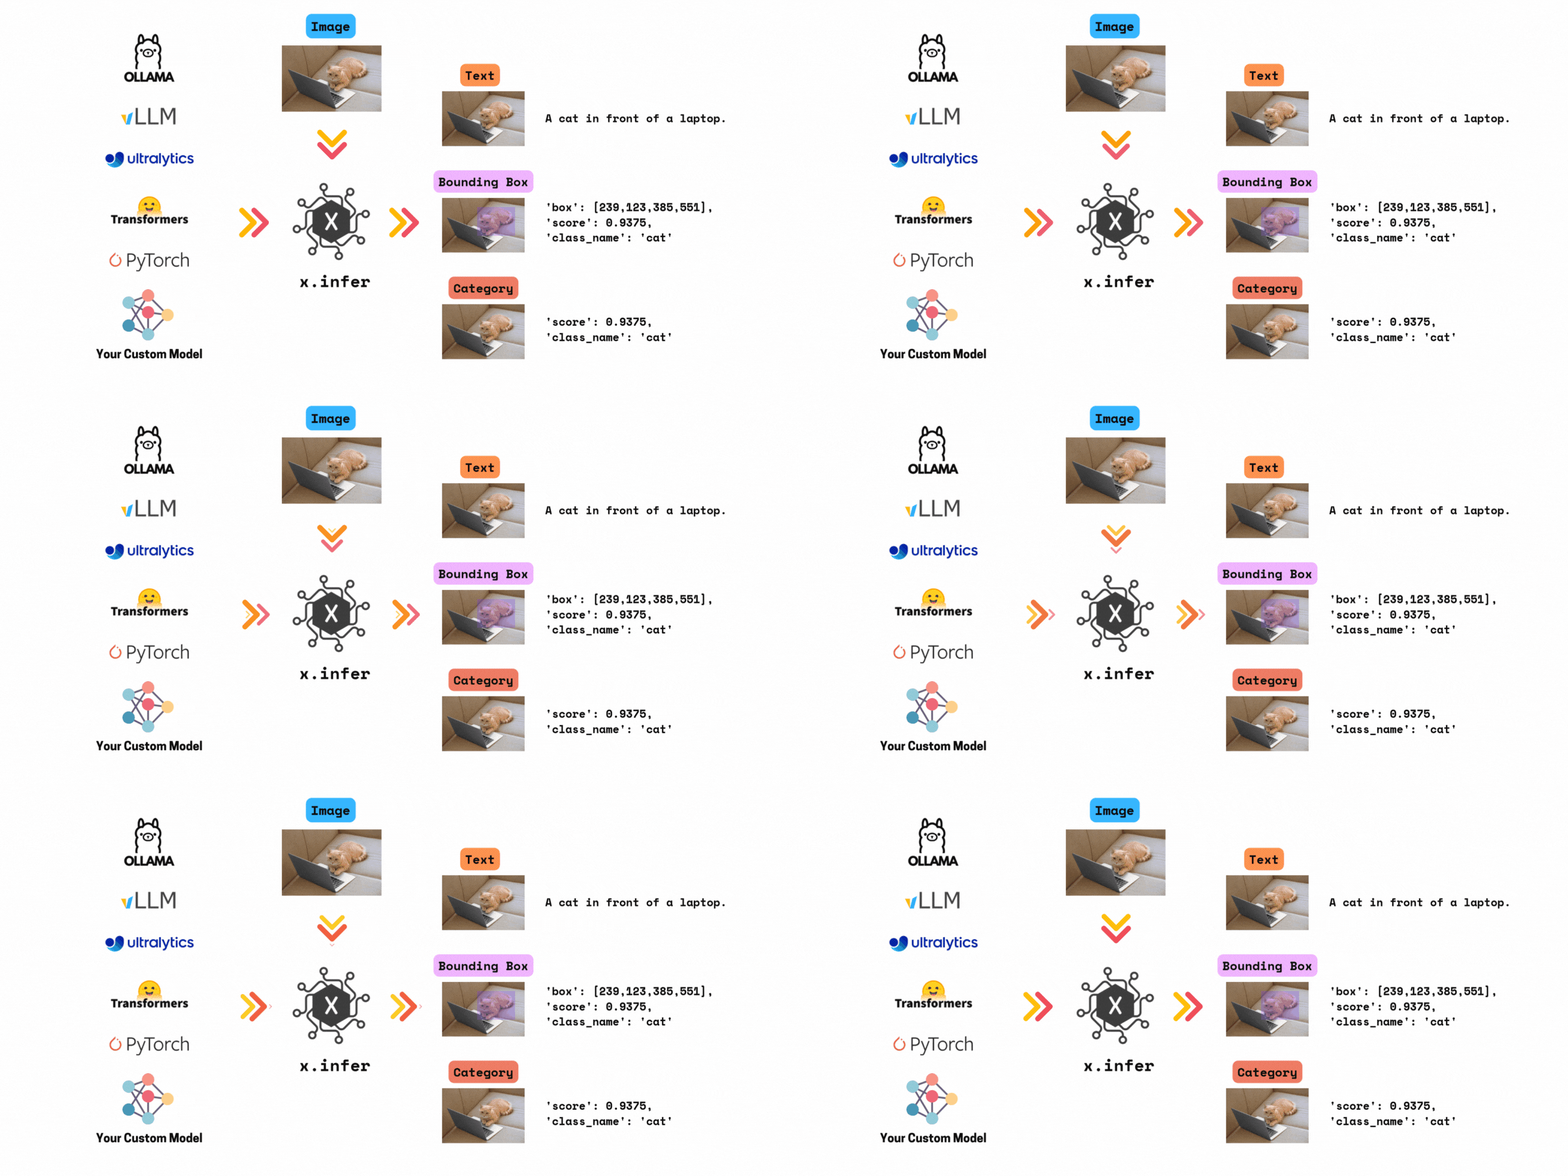
x.infer is a simple wrapper that allows you to run inference with any computer vision model in just a few lines of code. All in Python.
Out of the box, x.infer supports the following frameworks:
Combined, x.infer supports over 1000+ models from all the above frameworks.
Run any supported model using the following 4 lines of code:
import xinfer

model = xinfer.create_model("vikhyatk/moondream2")
model.infer(image, prompt)         # Run single inference
model.infer_batch(images, prompts) # Run batch inference
model.launch_gradio()              # Launch Gradio interface
Have a custom model? Create a class that implements the BaseXInferModel interface and register it with x.infer. See Add Your Own Model for more details.
Here's a quick example demonstrating how to use x.infer with a Transformers model:
import xinfer

model = xinfer.create_model("vikhyatk/moondream2")

image = "https://raw.githubusercontent.com/dnth/x.infer/main/assets/demo/00aa2580828a9009.jpg"
prompt = "Describe this image. "

model.infer(image, prompt)

>>> 'A parade with a marching band and a flag-bearing figure passes through a town, with spectators lining the street and a church steeple visible in the background.'Important
You must have PyTorch installed to use x.infer.
To install the barebones x.infer (without any optional dependencies), run:
pip install xinferx.infer can be used with multiple optional dependencies. You'll just need to install one or more of the following:
pip install "xinfer[transformers]"
pip install "xinfer[ultralytics]"
pip install "xinfer[timm]"
pip install "xinfer[vllm]"
pip install "xinfer[ollama]"
To install all optional dependencies, run:
pip install "xinfer[all]"To install from a local directory, run:
git clone https://github.com/dnth/x.infer.git
cd x.infer
pip install -e .xinfer.list_models() Available Models
┏━━━━━━━━━━━━━━━━┳━━━━━━━━━━━━━━━━━━━━━━━━━━━━━━━━━━━━━━━━━━━━━━━━━━━━━━━┳━━━━━━━━━━━━━━━━━━━━━━┓
┃ Implementation ┃ Model ID ┃ Input --> Output ┃
┡━━━━━━━━━━━━━━━━╇━━━━━━━━━━━━━━━━━━━━━━━━━━━━━━━━━━━━━━━━━━━━━━━━━━━━━━━╇━━━━━━━━━━━━━━━━━━━━━━┩
│ timm │ timm/eva02_large_patch14_448.mim_m38m_ft_in22k_in1k │ image --> categories │
│ timm │ timm/eva02_large_patch14_448.mim_m38m_ft_in1k │ image --> categories │
│ timm │ timm/eva02_large_patch14_448.mim_in22k_ft_in22k_in1k │ image --> categories │
│ timm │ timm/eva02_large_patch14_448.mim_in22k_ft_in1k │ image --> categories │
│ timm │ timm/eva02_base_patch14_448.mim_in22k_ft_in22k_in1k │ image --> categories │
│ timm │ timm/eva02_base_patch14_448.mim_in22k_ft_in1k │ image --> categories │
│ timm │ timm/eva02_small_patch14_336.mim_in22k_ft_in1k │ image --> categories │
│ timm │ timm/eva02_tiny_patch14_336.mim_in22k_ft_in1k │ image --> categories │
│ transformers │ Salesforce/blip2-opt-6.7b-coco │ image-text --> text │
│ transformers │ Salesforce/blip2-flan-t5-xxl │ image-text --> text │
│ transformers │ Salesforce/blip2-opt-6.7b │ image-text --> text │
│ transformers │ Salesforce/blip2-opt-2.7b │ image-text --> text │
│ transformers │ fancyfeast/llama-joycaption-alpha-two-hf-llava │ image-text --> text │
│ transformers │ vikhyatk/moondream2 │ image-text --> text │
│ transformers │ sashakunitsyn/vlrm-blip2-opt-2.7b │ image-text --> text │
│ ultralytics │ ultralytics/yolov8x │ image --> boxes │
│ ultralytics │ ultralytics/yolov8m │ image --> boxes │
│ ultralytics │ ultralytics/yolov8l │ image --> boxes │
│ ultralytics │ ultralytics/yolov8s │ image --> boxes │
│ ultralytics │ ultralytics/yolov8n │ image --> boxes │
│ ultralytics │ ultralytics/yolov8n-seg │ image --> masks │
│ ultralytics │ ultralytics/yolov8n-pose │ image --> poses │
│ ... │ ... │ ... │
│ ... │ ... │ ... │
└────────────────┴───────────────────────────────────────────────────────┴──────────────────────┘
If you're running in a Juypter Notebook environment, you can specify interactive=True to list and search supported models interactively.
xinfer_list_models_interactive.mp4
For all supported models, you can launch a Gradio interface to interact with the model. This is useful for quickly testing the model and visualizing the results.
Once the model is created, you can launch the Gradio interface with the following line of code:
model.launch_gradio()xinfer_launch_gradio.mp4
If you'd like to launch a Gradio interface with all models available in a dropdown, you can use the following line of code:
xinfer.launch_gradio_demo()xinfer_launch_gradio_demo.mp4
See Gradio Demo for more details.
If you're happy with your model, you can serve it with x.infer.
xinfer.serve_model("vikhyatk/moondream2")This will start a FastAPI server at http://localhost:8000 powered by Ray Serve, allowing you to interact with your model through a REST API.
xinfer_serve_model.mp4
You can also specify deployment options such as the number of replicas and GPU requirements and host/port.
xinfer.serve_model(
    "vikhyatk/moondream2",
    device="cuda",
    dtype="float16",
    host="0.0.0.0",
    port=8000,
    deployment_kwargs={
        "num_replicas": 1,
        "ray_actor_options": {"num_gpus": 1}
    }
)You can now query the endpoint with an image and prompt.
curl -X 'POST' \
  'http://127.0.0.1:8000/infer' \
  -H 'accept: application/json' \
  -H 'Content-Type: application/json' \
  -d '{
  "image": "https://raw.githubusercontent.com/dnth/x.infer/main/assets/demo/00aa2580828a9009.jpg",
  "infer_kwargs": {"text": "Caption this image"}
}'
Or in Python:
import requests

url = "http://127.0.0.1:8000/infer"
headers = {
    "accept": "application/json",
    "Content-Type": "application/json"
}
payload = {
    "image": "https://raw.githubusercontent.com/dnth/x.infer/main/assets/demo/00aa2580828a9009.jpg",
    "infer_kwargs": {
        "text": "Caption this image"
    }
}

response = requests.post(url, headers=headers, json=payload)
print(response.json())x.infer endpoint is also compatible with the OpenAI chat completions API format.
You'll have to install the openai package to use this feature.
pip install openaifrom openai import OpenAI
client = OpenAI(
api_key="dummy",
base_url="http://127.0.0.1:8000/v1"
)
response = client.chat.completions.create(
model="vikhyatk/moondream2",
messages=[
{
"role": "user",
"content": [
{
"type": "image_url",
"image_url": "https://raw.githubusercontent.com/dnth/x.infer/main/assets/demo/00aa2580828a9009.jpg"
},
{
"type": "text",
"text": "Caption this image"
}
]
}
]
)
print(response.choices[0].message.content)-
Step 1: Create a new model class that implements the
BaseXInferModelinterface. -
Step 2: Implement the required abstract methods
load_model,infer, andinfer_batch. -
Step 3: Decorate your class with the
register_modeldecorator, specifying the model ID, implementation, and input/output.
For example:
@register_model("my-model", "custom", ModelInputOutput.IMAGE_TEXT_TO_TEXT)
class MyModel(BaseXInferModel):
    def load_model(self):
        # Load your model here
        pass

    def infer(self, image, prompt):
        # Run single inference
        pass

    def infer_batch(self, images, prompts):
        # Run batch inference here
        pass
See an example implementation of the Molmo model here.
Transformers
| Model | Usage |
|---|---|
| BLIP2 Series | xinfer.create_model("Salesforce/blip2-opt-2.7b") |
| Moondream2 | xinfer.create_model("vikhyatk/moondream2") |
| VLRM-BLIP2 | xinfer.create_model("sashakunitsyn/vlrm-blip2-opt-2.7b") |
| JoyCaption | xinfer.create_model("fancyfeast/llama-joycaption-alpha-two-hf-llava") |
| Llama-3.2 Vision Series | xinfer.create_model("meta-llama/Llama-3.2-11B-Vision-Instruct") |
| Florence-2 Series | xinfer.create_model("microsoft/Florence-2-base-ft") |
| Qwen2-VL Series | xinfer.create_model("Qwen/Qwen2-VL-2B-Instruct") |
You can also load any AutoModelForVision2Seq model
from Transformers by using the Vision2SeqModel class.
from xinfer.transformers import Vision2SeqModel

model = Vision2SeqModel("facebook/chameleon-7b")
model = xinfer.create_model(model)
TIMM
All models from TIMM fine-tuned for ImageNet 1k are supported.
For example load a resnet18.a1_in1k model:
xinfer.create_model("timm/resnet18.a1_in1k")You can also load any model (or a custom timm model) by using the TIMMModel class.
from xinfer.timm import TimmModel

model = TimmModel("resnet18")
model = xinfer.create_model(model)
Ultralytics
| Model | Usage |
|---|---|
| YOLOv8 Detection Series | xinfer.create_model("ultralytics/yolov8n") |
| YOLOv10 Detection Series | xinfer.create_model("ultralytics/yolov10x") |
| YOLOv11 Detection Series | xinfer.create_model("ultralytics/yolov11s") |
| YOLOv8 Classification Series | xinfer.create_model("ultralytics/yolov8n-cls") |
| YOLOv11 Classification Series | xinfer.create_model("ultralytics/yolov11s-cls") |
| YOLOv8 Segmentation Series | xinfer.create_model("ultralytics/yolov8n-seg") |
| YOLOv8 Pose Series | xinfer.create_model("ultralytics/yolov8n-pose") |
You can also load any model from Ultralytics by using the UltralyticsModel class.
from xinfer.ultralytics import UltralyticsModel

model = UltralyticsModel("yolov5n6u")
model = xinfer.create_model(model)
vLLM
| Model | Usage |
|---|---|
| Molmo-72B | xinfer.create_model("vllm/allenai/Molmo-72B-0924") |
| Molmo-7B-D | xinfer.create_model("vllm/allenai/Molmo-7B-D-0924") |
| Molmo-7B-O | xinfer.create_model("vllm/allenai/Molmo-7B-O-0924") |
| Phi-3.5-vision-instruct | xinfer.create_model("vllm/microsoft/Phi-3.5-vision-instruct") |
| Phi-3-vision-128k-instruct | xinfer.create_model("vllm/microsoft/Phi-3-vision-128k-instruct") |
Ollama
To use Ollama models, you'll need to install the Ollama on your machine. See Ollama Installation Guide for more details.
| Model | Usage |
|---|---|
| LLaVA Phi3 | xinfer.create_model("ollama/llava-phi3") |
If you'd like to contribute, here are some ways you can help:
-
Add new models: Implement new model classes following the steps in the Adding New Models section.
-
Improve documentation: Help us enhance our documentation, including this README, inline code comments, and the official docs.
-
Report bugs: If you find a bug, please open an issue with a clear description and steps to reproduce.
-
Suggest enhancements: Have ideas for new features? Open a feature request.
-
Financial support: Please consider sponsoring the project to support continued development.
Please also see the code of conduct here. Thank you for helping make x.infer better!
x.infer is not affiliated with any of the libraries it supports. It is a simple wrapper that allows you to run inference with any of the supported models.
Although x.infer is Apache 2.0 licensed, the models it supports may have their own licenses. Please check the individual model repositories for more details.


