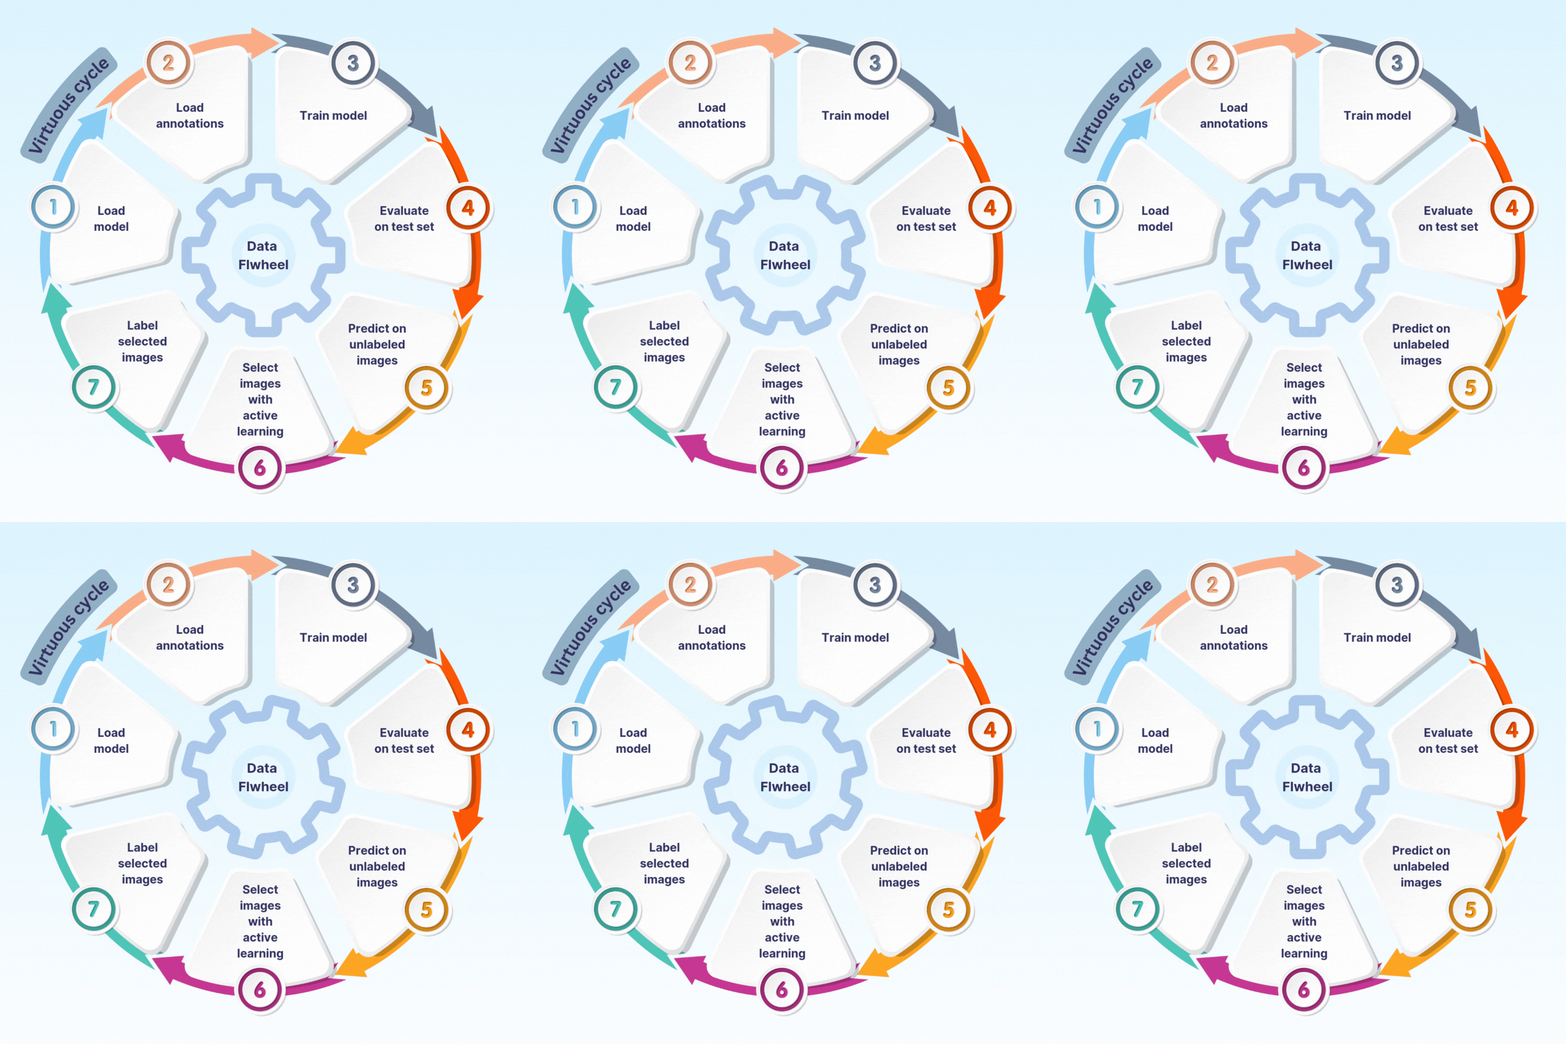
The goal of this project is to create a framework for the active learning loop for computer vision. The diagram below shows a general workflow of how the active learning loop works.
- Image classification
- Object detection
- Segmentation
- Fastai models
- Torchvision models
- Timm models
- Hugging Face models
Uncertainty Sampling:
- Least confidence
- Margin of confidence
- Ratio of confidence
- Entropy
Diverse Sampling:
- Random sampling
- Model-based outlier
- Cluster-based
- Representative
Get a release from PyPI
pip install active-visionInstall from source
git clone https://github.com/dnth/active-vision.git
cd active-vision
pip install -e .
I recommend using uv to set up a virtual environment and install the package. You can also use other virtual env of your choice.
If you're using uv:
uv venv
uv sync
Once the virtual environment is created, you can install the package using pip.
Tip
If you're using uv add a uv before the pip install command to install into your virtual environment. Eg:
uv pip install active-visionSee the notebook for a complete example.
Be sure to prepared 3 subsets of the dataset:
- Initial samples: A dataframe of a labeled images to train an initial model. If you don't have any labeled data, you can label some images yourself.
- Unlabeled samples: A dataframe of unlabeled images. We will continuously sample from this set using active learning strategies.
- Evaluation samples: A dataframe of labeled images. We will use this set to evaluate the performance of the model. This is the test set, DO NOT use it for active learning. Split this out in the beginning.
As a toy example I created the above 3 datasets from the imagenette dataset.
from active_vision import ActiveLearner
import pandas as pd

# Create an active learner instance with a model
al = ActiveLearner("resnet18")

# Load dataset
train_df = pd.read_parquet("training_samples.parquet")
al.load_dataset(df, filepath_col="filepath", label_col="label")

# Train model
al.train(epochs=3, lr=1e-3)

# Evaluate the model on a *labeled* evaluation set
accuracy = al.evaluate(eval_df, filepath_col="filepath", label_col="label")

# Get predictions from an *unlabeled* set
pred_df = al.predict(filepaths)

# Sample low confidence predictions from unlabeled set
uncertain_df = al.sample_uncertain(pred_df, num_samples=10)

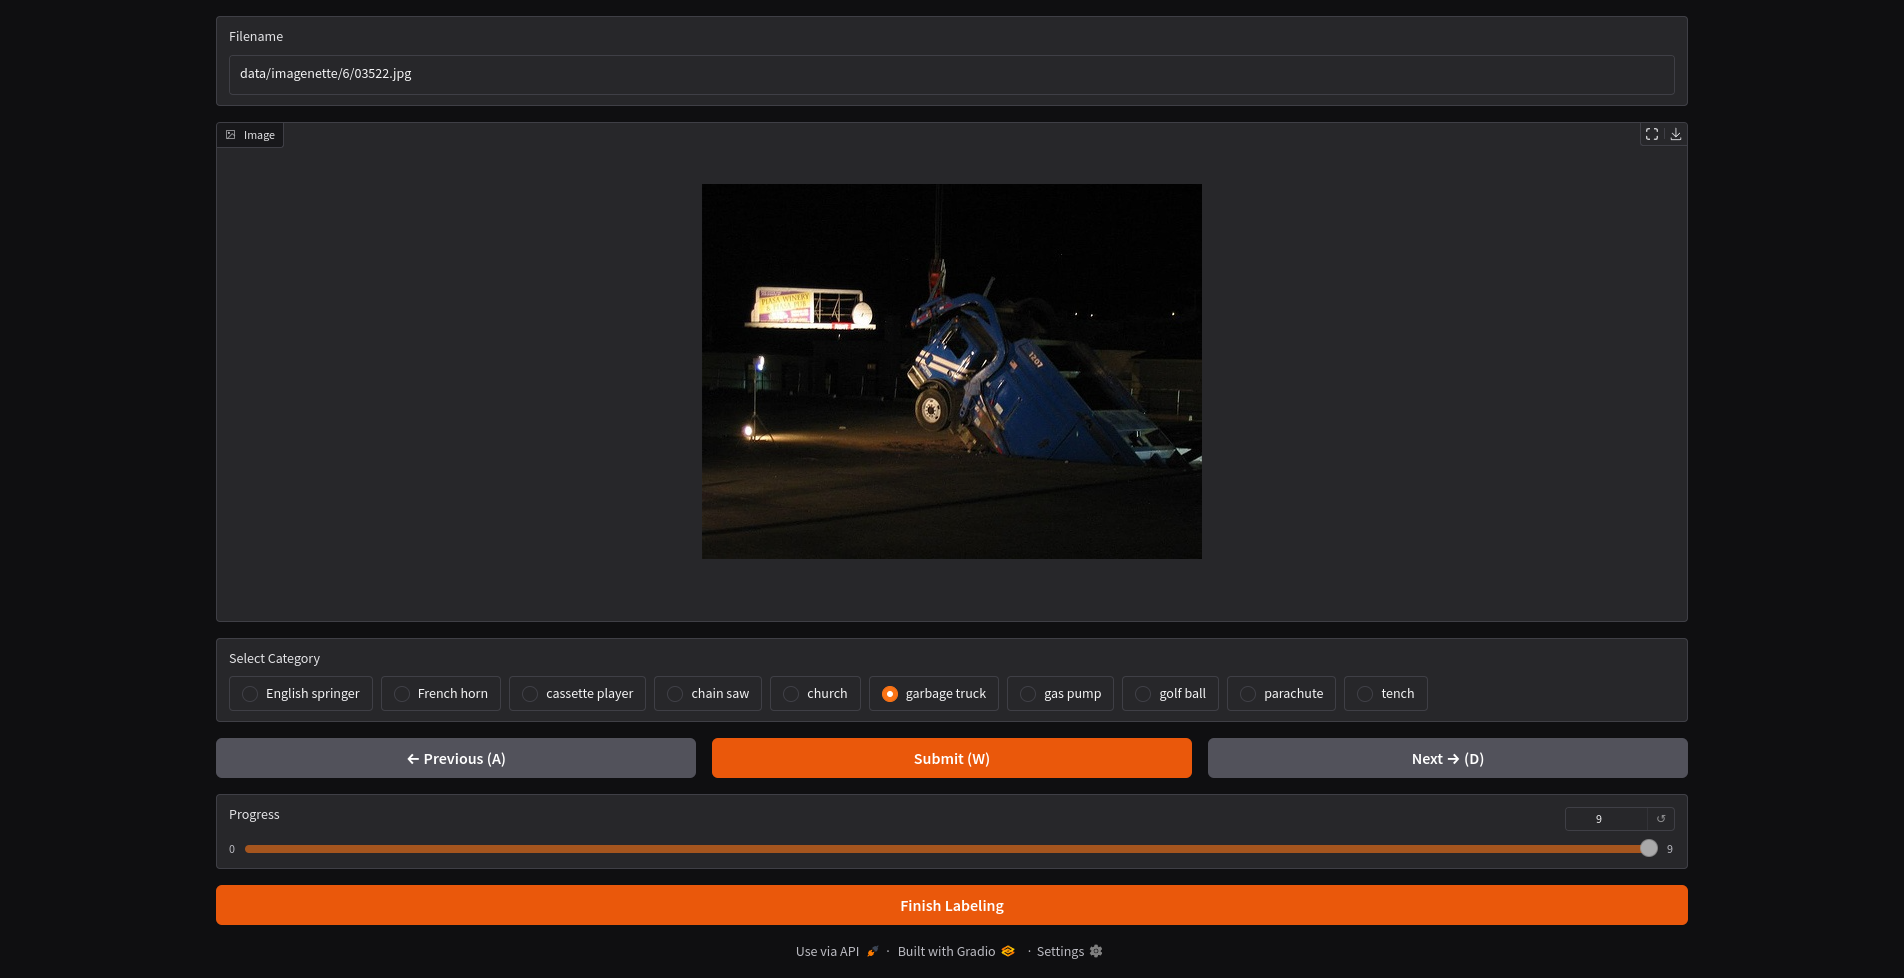
# Launch a Gradio UI to label the low confidence samples
al.label(uncertain_df, output_filename="uncertain")
Once complete, the labeled samples will be save into a new df. We can now add the newly labeled data to the training set.
# Add newly labeled data to training set and save as a new file active_labeled
al.add_to_train_set(labeled_df, output_filename="active_labeled")
Repeat the process until the model is good enough. Use the dataset to train a larger model and deploy.
Tip
For the toy dataset, I got to about 93% accuracy on the evaluation set with 200+ labeled images. The best performing model on the leaderboard got 95.11% accuracy training on all 9469 labeled images.
This took me about 6 iterations of relabeling. Each iteration took about 5 minutes to complete including labeling and model training (resnet18). See the notebook for more details.
But using the dataset of 200+ images, I trained a more capable model (convnext_small_in22k) and got 99.3% accuracy on the evaluation set. See the notebook for more details.
This section contains the benchmarks I ran using the active learning loop on various datasets.
Column description:
#Labeled Images: The number of labeled images used to train the model.Evaluation Accuracy: The accuracy of the model on the evaluation set.Train Epochs: The number of epochs used to train the model.Model: The model used to train.Active Learning: Whether active learning was used to train the model.Source: The source of the results.
- num classes: 10
- num images: 9469
To start the active learning loop, I labeled 100 images (10 images from each class) and iteratively relabeled the most informative images until I hit 275 labeled images.
The active learning loop is a iterative process and can keep going until you hit a stopping point. You can decide your own stopping point based on your use case. It could be:
- You ran out of data to label.
- You hit a performance goal.
- You hit a budget.
- Other criteria.
For this dataset,I decided to stop the active learning loop at 275 labeled images because the performance on the evaluation set is close to the top performing model on the leaderboard.
| #Labeled Images | Evaluation Accuracy | Train Epochs | Model | Active Learning | Source |
|---|---|---|---|---|---|
| 9469 | 94.90% | 80 | xse_resnext50 | ❌ | Link |
| 9469 | 95.11% | 200 | xse_resnext50 | ❌ | Link |
| 275 | 99.33% | 6 | convnext_small_in22k | ✓ | Link |
| 275 | 93.40% | 4 | resnet18 | ✓ | Link |
- num classes: 2
- num images: 2100
To start the active learning loop, I labeled 20 images (10 images from each class) and iteratively relabeled the most informative images until I hit 160 labeled images.
I decided to stop the active learning loop at 160 labeled images because the performance on the evaluation set is close to the top performing model on the leaderboard. You can decide your own stopping point based on your use case.
| #Labeled Images | Evaluation Accuracy | Train Epochs | Model | Active Learning | Source |
|---|---|---|---|---|---|
| 2100 | 99.70% | ? | vit-base-patch16-224 | ❌ | Link |
| 160 | 100.00% | 6 | convnext_small_in22k | ✓ | Link |
| 160 | 97.60% | 4 | resnet18 | ✓ | Link |
- num classes: 37
- num images: 3680
To start the active learning loop, I labeled 370 images (10 images from each class) and iteratively relabeled the most informative images until I hit 612 labeled images.
I decided to stop the active learning loop at 612 labeled images because the performance on the evaluation set is close to the top performing model on the leaderboard. You can decide your own stopping point based on your use case.
| #Labeled Images | Evaluation Accuracy | Train Epochs | Model | Active Learning | Source |
|---|---|---|---|---|---|
| 3680 | 95.40% | 5 | vit-base-patch16-224 | ❌ | Link |
| 612 | 90.26% | 11 | convnext_small_in22k | ✓ | Link |
| 612 | 91.38% | 11 | vit-base-patch16-224 | ✓ | Link |
This section describes a more detailed workflow for active learning. There are two workflows for active learning that we can use depending on the availability of labeled data.
If we have no labeled data, the goal of the active learning loop is to build a resonably good labeled dataset to train a larger model.
Steps:
- Load a small proxy model.
- Label an initial dataset. If there is none, you'll have to label some images.
- Train the proxy model on the labeled dataset.
- Run inference on the unlabeled dataset.
- Evaluate the performance of the proxy model.
- Is model good enough?
- Yes: Save the proxy model and the dataset.
- No: Select the most informative images to label using active learning.
- Label the most informative images and add them to the dataset.
- Repeat steps 3-6.
- Save the proxy model and the dataset.
- Train a larger model on the saved dataset.
graph TD
    A[Load a small proxy model] --> B[Label an initial dataset]
    B --> C[Train proxy model on labeled dataset]
    C --> D[Run inference on unlabeled dataset]
    D --> E[Evaluate proxy model performance]
    E --> F{Model good enough?}
    F -->|Yes| G[Save proxy model and dataset]
    G --> H[Train and deploy a larger model]
    F -->|No| I[Select informative images using active learning]
    I --> J[Label selected images]
    J --> C
If we already have a labeled dataset, the goal of the active learning loop is to iteratively improve the dataset and the model by fixing the most important label errors.
Steps:
- Load a small proxy model.
- Train the proxy model on the labeled dataset.
- Run inference on the entire labeled dataset.
- Get the most impactful label errors with active learning.
- Fix the label errors.
- Repeat steps 2-5 until the dataset is good enough.
- Save the labeled dataset.
- Train a larger model on the saved labeled dataset.
graph TD
    A[Load a small proxy model] --> B[Train proxy model on labeled dataset]
    B --> C[Run inference on labeled dataset]
    C --> D[Get label errors using active learning]
    D --> E[Fix label errors]
    E --> F{Dataset good enough?}
    F -->|No| B
    F -->|Yes| G[Save cleaned dataset]
    G --> H[Train and deploy larger model]


