-
Notifications
You must be signed in to change notification settings - Fork 18
3. Notifications
In order to complete this step, follow the Firebase Get started guide.
At the end of it, also add the following dependency to your module (app-level) build.gradle file.
dependencies {
  implementation 'com.google.firebase:firebase-messaging'
}- Go to your Firebase Project settings,
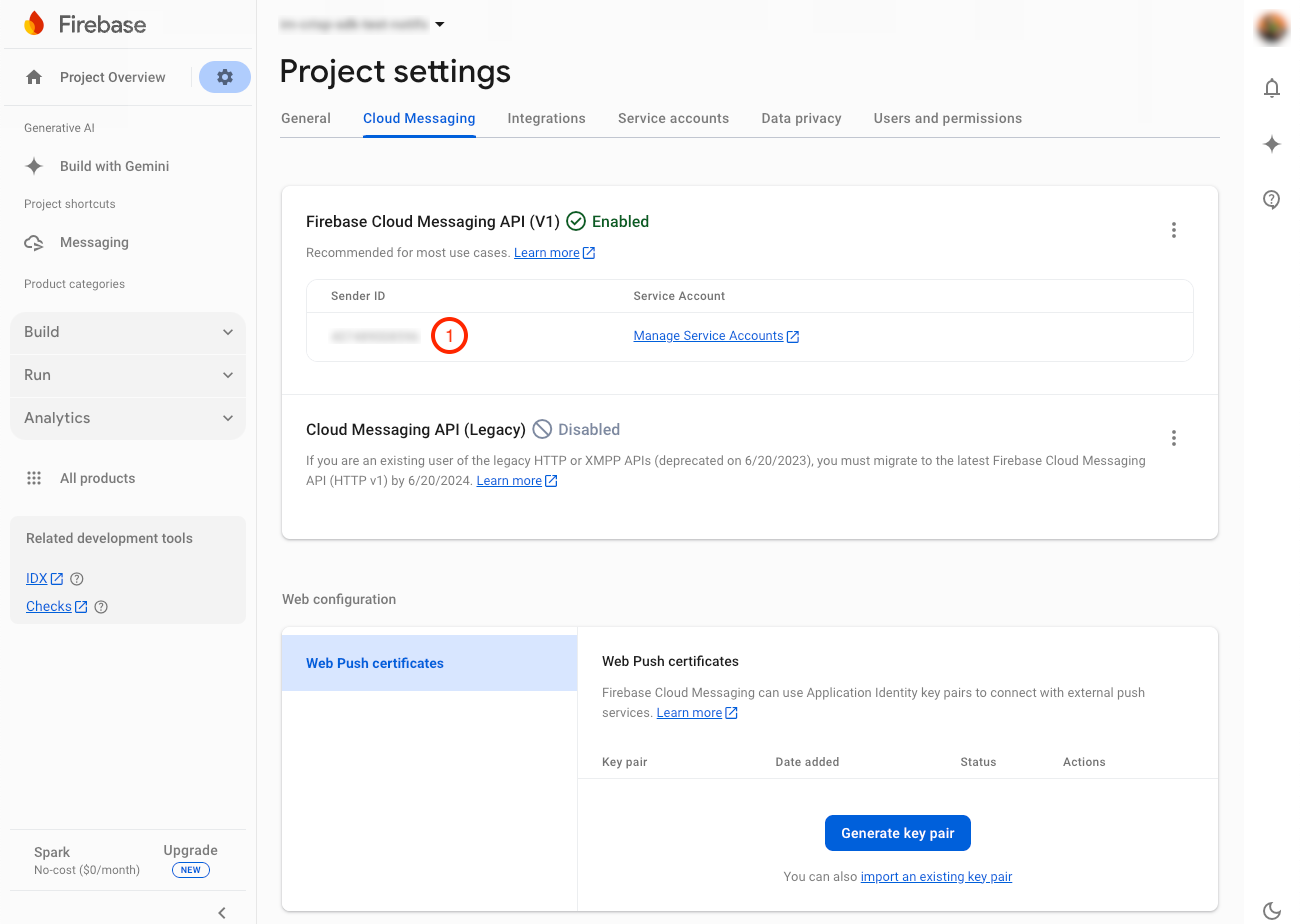
- Go to the Cloud Messaging tab,
- In the Firebase Cloud Messaging API (V1) section, copy your Sender ID (1), you will need it later.

- Go to the Service accounts tab,
- In the Firebase Admin SDK section, click on the Generate new private key (2) button and save it for later.

- Go to your Crisp Dashboard,
- Select your Workspace,
- Go to Settings > Chatbox Settings > Push Notifications,
- Under the Firebase Cloud Messaging section :
- Enable the Notify users using Android (3) option,
- Paste the Sender ID you have copied previously into the Project ID (4) field,
- Select or drag your Firebase Admin private key file you have downloaded earlier in the Certificate (5) box,
- Click on the Verify Credentials (6) button.

- Crisp will notify you that it is checking FCM Credentials in order to send notifications to your users.

- Finally, if FCM Credentials are valid, Crisp will update the Push Notifications status to live.

We tried to satisfy every user so we provide you 2 ways of handling notifications:
- the minimalist one where you just have to open the chatbox when your user taps the notification,
- the complete one where you can also handle your own notifications.
But first of all, you need to enable notifications for your website by calling Crisp.enableNotifications just after calling one of the Crisp.configure methods and before starting the ChatActivity.
Context context = getApplicationContext();
Crisp.configure(context, "7598bf86-9ebb-46bc-8c61-be8929bbf93d");

Crisp.enableNotifications(context, true);

Intent crispIntent = new Intent(this, ChatActivity.class);
startActivity(crispIntent);
You can then proceed to one of the following steps depending of how you want to handle notifications.
note: in the steps below, MainActivity will refer to the Activity class declared in your AndroidManifest.xml as the main entry point of your app (i.e. the one with the android.intent.action.MAIN action as an intent-filter tag).
We have made it the most straightforward as possible for you to notify your users.
You just have to declare our CrispNotificationService in the application tag of your AndroidManifest.xml.
<application>
  <service
    android:name="im.crisp.client.external.notification.CrispNotificationService"
    android:exported="false">
    <intent-filter>
      <action android:name="com.google.firebase.MESSAGING_EVENT" />
    </intent-filter>
  </service>
</application>
Notifications will be handled by our CrispNotificationService and a tap on it will launch your MainActivity and open our ChatActivity with the corresponding session.
If you want to modify this behavior, you can jump to the next step.
As above, you can declare or have already declared your own service class extending the FirebaseMessagingService in your AndroidManifest.xml.
In order for Crisp to display its own notifications, you have to make a few adjustments to it.
  @Override
  public void onMessageReceived(@NonNull RemoteMessage message)
  {
    // Filters incoming notification messages and forward the handling if it is a Crisp one
    if (CrispNotificationClient.isCrispNotification(message))
    {
      CrispNotificationClient.handleNotification(this, message);
    }
    // Else, handle your own notifications
    else
    {

    }
  }

  @Override
  public void onNewToken(@NonNull String token)
  {
    // Forwards the FCM Token to Crisp to register the device to receive notifications
    CrispNotificationClient.sendTokenToCrisp(this, token);
  }
We have made available several CrispNotificationClient.handleNotification methods for you to customize how your app will handle them:
-
CrispNotificationClient.handleNotification(Context context, RemoteMessage message): will launch yourMainActivityand open ourChatActivitywith the corresponding session, it is the default behavior as described in the previous step, -
CrispNotificationClient.handleNotification(Context context, RemoteMessage message, boolean openChatbox): like the one above but letting you choose either or not launch ourChatActivityautomatically, -
CrispNotificationClient.handleNotification(Context context, RemoteMessage message, @Nullable TaskStackBuilder backStack): will launch thebackStackyou provide us and open ourChatActivitywith the corresponding session, -
CrispNotificationClient.handleNotification(Context context, RemoteMessage message, @Nullable TaskStackBuilder backStack, boolean openChatbox): like the one above but letting you choose either or not launch ourChatActivityautomatically.
If you have decided to not open our ChatActivity automatically, you can proceed with the next step to handle the tap on a notification.
When user taps a notification and you have chosen to not open our ChatActivity automatically, the notification Intent is dispatched to the Activity you have selected, either your MainActivity or the latest one in the BackStack you have provided. You can add this minimalist code to open the chatbox from it.
  @Override
  protected void onCreate(@Nullable Bundle savedInstanceState)
  {
    super.onCreate(savedInstanceState);

    reloadFromIntent(getIntent());
  }

  @Override
  protected void onNewIntent(Intent intent)
  {
    super.onNewIntent(intent);

    reloadFromIntent(intent);
  }

  private void reloadFromIntent(Intent intent)
  {
    // Tries to open the Crisp chatbox from the intent, returning true if it succeeds, false otherwise.
    if (! CrispNotificationClient.openChatbox(this, intent))
    {
      // If it fails, it means that:
      //   - intent is not a Crisp notification,
      //   - corresponding session does not exist in cache.
      // If so, you can proceed with your own app logic.
    }
}We have made Push notifications customizable in 3 ways: color, icon and sound.
For the first two, you can update them from your AndroidManifest.xml as you would do with Firebase.
  <application>
    <meta-data
      android:name="com.google.firebase.messaging.default_notification_icon"
      android:resource="@drawable/my_notification_icon" />
    <meta-data
      android:name="com.google.firebase.messaging.default_notification_color"
      android:resource="@color/my_notification_color" />
  </application>
For the sound, you can add a raw resource named crisp_chat_message_receive to your app which will be played upon notification receipt.