-
Notifications
You must be signed in to change notification settings - Fork 413
Monetization
Codename One tries to make the lives of software developers easier by integrating several forms of built-in monetization solutions such as ad network support, in-app-purchase etc.
A lot of the monetization options are available as 3rd party cn1lib’s that you can install thru the Codename One website.
The most effective network is the simplest banner ad support. To enable mobile ads just create an ad unit in Admob’s website, you should end up with the key similar to this:
ca-app-pub-8610616152754010/3413603324
To enable this for Android just define the android.googleAdUnitId=ca-app-pub-8610616152754010/3413603324 in the build arguments and for iOS use the same as in ios.googleAdUnitId. The rest is seamless, the right ad will be created for you at the bottom of the screen and the form should automatically shrink to fit the ad. This shrinking is implemented differently between iOS and Android due to some constraints but the result should be similar and this should work reasonably well with device rotation as well.
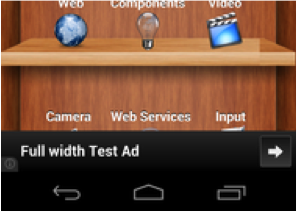
There’s a special ad unit id to use for test ads. If you specify ca-app-pub-3940256099942544/6300978111, you’ll get test ads for your development phase. This is important because you’re not allowed to click on your own ads. When it’s time to create a production release, you should replace this with the real value you generated in adMob.
In-app purchase is a helpful tool for making app development profitable. Codename One supports in-app purchases of consumable/non-consumable products on Android & iOS. It also features support for subscriptions. For such a seemingly simple task, in-app purchase involves a lot of moving parts - especially when it comes to subscriptions.
In-app purchase support centers around your set of SKUs that you want to sell. Each product that you sell, whether it be a 1-month subscription, an upgrade to the "Pro" version, "10 disco credits", will have a SKU (stock-keeping-unit). Ideally you will be able to use the same SKU across all the stores that you sell your app in.
There are generally 4 classifications for products:
-
Non-consumable Product - This is a product that the user purchases once to "own". They cannot re-purchase it. One example is a product that upgrades your app to a "Pro" version.
-
Consumable Product - This is a product that the user can buy more than once. E.g. You might have a product for "10 Credits" that allows the user to buy items in a game.
-
Non-Renewable Subscription - A subscription that you buy once, and will not be "auto-renewed" by the app store. These are almost identical to consumable products, except that subscriptions need to be transferable across all the user’s devices. This means that non-renewable subscriptions require that you have a server that keeps track of the subscriptions.
-
Renewable Subscriptions - A subscription that the app store manages. The user will be automatically billed when the subscription period ends, and the subscription will renew.
|
Note
|
These subscription categories may not be explicitly supported by a given store, or they may carry a different name. You can integrate each product type in a cross platform way using Codename One. E.g. In Google Play there is no distinction between consumable products and non-renewable subscriptions, but in iTunes there is a distinction. |
Let’s start with a simple example of an app that sells "Worlds". The first thing we do is pick the SKU for our product. I’ll choose "com.codename1.world" for the SKU.
public static final String SKU_WORLD = "com.codename1.world";|
Tip
|
While we chose to use the package name convention for an SKU you can use any name you want e.g UA8879
|
Next, our app’s main class needs to implement the PurchaseCallback interface
public class HelloWorldIAP implements PurchaseCallback {
    ....

    @Override
    public void itemPurchased(String sku) {
        ...
    }

    @Override
    public void itemPurchaseError(String sku, String errorMessage) {
        ...
    }

    @Override
    public void itemRefunded(String sku) {
        ...
    }

    @Override
    public void subscriptionStarted(String sku) {
        ...
    }

    @Override
    public void subscriptionCanceled(String sku) {
        ...
    }

    @Override
    public void paymentFailed(String paymentCode, String failureReason) {
       ...
    }

    @Override
    public void paymentSucceeded(String paymentCode, double amount, String currency) {
        ...
    }

}
Using these callbacks, we’ll be notified whenever something changes in our purchases. For our simple app we’re only interested in itemPurchased() and itemPurchaseError().
Now in the start method, we’ll add a button that allows the user to buy the world:
    public void start() {
        if(current != null){
            current.show();
            return;
        }
        Form hi = new Form("Hi World");
        Button buyWorld = new Button("Buy World");
        buyWorld.addActionListener(e->{
            if (Purchase.getInAppPurchase().wasPurchased(SKU_WORLD)) {
                Dialog.show("Can't Buy It", "You already Own It", "OK", null);
            } else {
                Purchase.getInAppPurchase().purchase(SKU_WORLD);
            }
        });

        hi.addComponent(buyWorld);
        hi.show();
    }
At this point, we already have a functional app that will track the sale of the world. To make it more interesting, let’s add some feedback with the ToastBar to show when the purchase completes.
    @Override
    public void itemPurchased(String sku) {
        ToastBar.showMessage("Thanks.  You now own the world", FontImage.MATERIAL_THUMB_UP);
    }

    @Override
    public void itemPurchaseError(String sku, String errorMessage) {
        ToastBar.showErrorMessage("Failure occurred: "+errorMessage);
}|
Note
|
You can test out this code in the simulator without doing any additional setup and it will work. If you want the code to work properly on Android and iOS, you’ll need to set up the app and in-app purchase settings in the Google Play and iTunes stores respectively as explained below |
When the app first opens we see our button:
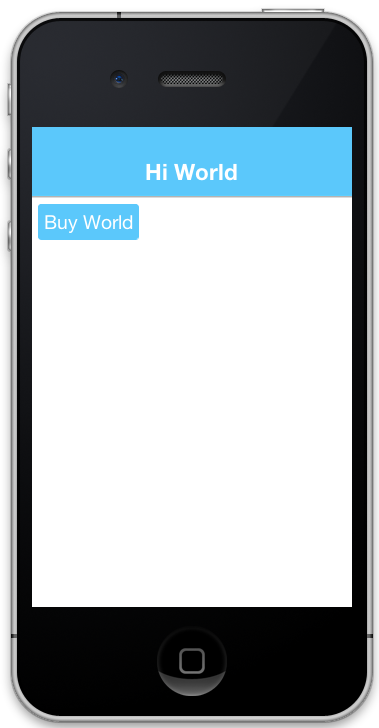
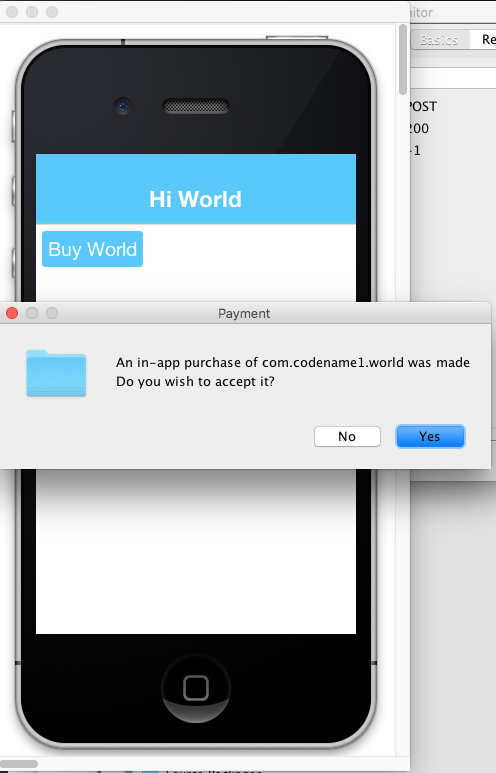
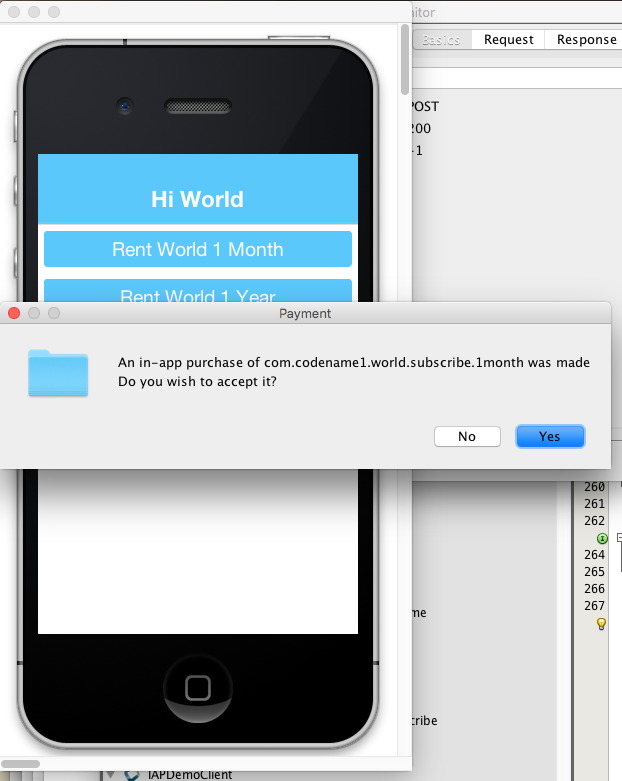
In the simulator, clicking on the "Buy World" button will bring up a prompt to ask you if you want to approve the purchase.
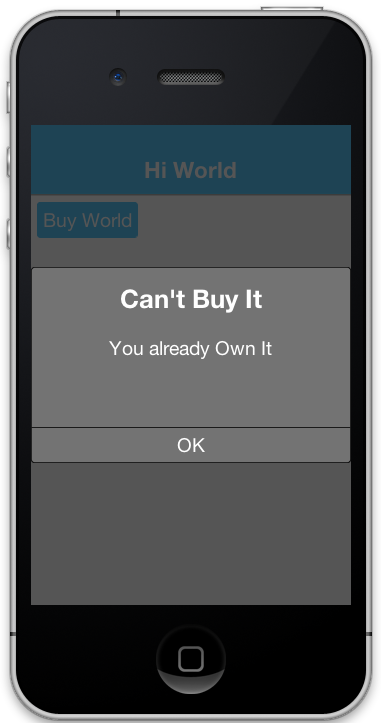
Now if I try to buy the product again, it pops up the dialog to let me know that I already own it.
In the "Buy World" example above, the "world" product was non-consumable, since we could only buy the world once. We could change it to a consumable product by disregarding whether it was purchased before & keeping track of how many times it had been purchased.
We’ll use storage to keep track of the number of worlds that the user purchased. We need two methods to manage this count. One method gets the number of worlds that we own, and another adds a world to this count.
private static final String NUM_WORLDS_KEY = "NUM_WORLDS.dat";
public int getNumWorlds() {
    synchronized (NUM_WORLDS_KEY) {
        Storage s = Storage.getInstance();
        if (s.exists(NUM_WORLDS_KEY)) {
            return (Integer)s.readObject(NUM_WORLDS_KEY);
        } else {
            return 0;
        }
    }
}

public void addWorld() {
    synchronized (NUM_WORLDS_KEY) {
        Storage s = Storage.getInstance();
        int count = 0;
        if (s.exists(NUM_WORLDS_KEY)) {
            count = (Integer)s.readObject(NUM_WORLDS_KEY);
        }
        count++;
        s.writeObject(NUM_WORLDS_KEY, new Integer(count));
    }
}
Now we’ll change our purchase code as follows:
buyWorld.addActionListener(e->{
    if (Dialog.show("Confirm", "You own "+getNumWorlds()+
           " worlds.  Do you want to buy another one?", "Yes", "No")) {
        Purchase.getInAppPurchase().purchase(SKU_WORLD);
    }
});
And our itemPurchased() callback will need to add a world:
@Override
public void itemPurchased(String sku) {
    addWorld();
    ToastBar.showMessage("Thanks.  You now own "+getNumWorlds()+" worlds", FontImage.MATERIAL_THUMB_UP);
}|
Note
|
When we set up the products in the iTunes store we will need to mark the product as a consumable product or iTunes will prevent us from purchasing it more than once |
As we discussed before, there are two types of subscriptions:
-
Non-renewable
-
Auto-renewable
Non-renewable subscriptions are the same as consumable products, except that they are shareable across devices. Auto-renewable subscriptions will continue as long as the user doesn’t cancel the subscription. They will be re-billed automatically by the appropriate app-store when the chosen period expires, and the app-store handles the management details itself.
|
Note
|
The concept of an "Non-renewable" subscription is unique to iTunes. Google Play has no formal similar option. In order to create a non-renewable subscription SKU that behaves the same in your iOS and Android apps you would create it as a regular product in Google play, and a Non-renewable subscription in the iTunes store. We’ll learn more about that in a later post when we go into the specifics of app store setup. |
|
Important
|
The Purchase class includes both a purchase() method and a subscribe() method. On some platforms it makes no difference which one you use, but on Android it matters. If the product is set up as a subscription in Google Play, then you must use subscribe() to purchase the product. If it is set up as a regular product, then you must use purchase(). Since we enter "Non-renewable" subscriptions as regular products in the play store, we would use the purchase() method.
|
Since a subscription purchased on one user device needs to be available across the user’s devices (Apple’s rules for non-renewable subscriptions), our app will need to have a server-component. In this section, we’ll gloss over that & "mock" the server interface. We’ll go into the specifics of the server-side below.
Subscriptions, in Codename One use the "Receipts" API. It’s up to you to register a receipt store with the In-App purchase instance, which allows Codename one to load receipts (from your server), and submit new receipts to your server. A Receipt includes information such as:
-
Store code (since you may be dealing with receipts from itunes, google play & Microsoft)
-
SKU
-
Transaction ID (store specific)
-
Expiry Date
-
Cancellation date
-
Purchase date
-
Order Data (that you can use on the server-side to verify the receipt and load receipt details directly from the store it originated from).
The Purchase provides a set of methods for interacting with the receipt store, such as:
-
isSubscribed([skus])- Checks to see if the user is currently subscribed to any of the provided skus. -
getExpiryDate([skus])- Checks the expiry date for a set of skus. -
synchronizeReceipts()- Synchronizes the receipts with the receipt store. This will attempt to submit any pending purchase receipts to the receipt store, and the reload receipts from the receipt store.
In order for any of this to work, you must implement the ReceiptStore interface, and register it with the Purchase instance. Your receipt store must implement two methods:
-
fetchReceipts(SuccessCallback<Receipt[]> callback)- Loads all of the receipts from your receipt store for the current user. -
submitReceipt(Receipt receipt, SuccessCallback<Boolean> callback)- Submits a receipt to your receipt store. This gives you an opportunity to add details to the receipt such as an expiry date.
We’ll expand on the theme of "Buying" the world for this app, except, this time we will "Rent" the world for a period of time. We’ll have two products:
-
A 1 month subscription
-
A 1 year subscription
public static final String SKU_WORLD_1_MONTH = "com.codename1.world.subscribe.1month";
public static final String SKU_WORLD_1_YEAR = "com.codename1.world.subscribe.1year";

public static final String[] PRODUCTS = {
    SKU_WORLD_1_MONTH,
    SKU_WORLD_1_YEAR
};
Notice that we create two separate SKUs for the 1 month and 1 year subscription. Each subscription period must have its own SKU. I have created an array (PRODUCTS) that contains both of the SKUs. This is handy, as you’ll see in the examples ahead, because the APIs for checking status and expiry date of a subscription take the SKUs in a "subscription group" as input.
|
Note
|
Different SKUs that sell the same service/product but for different periods form a "subscription group". Conceptually, customers are not subscribing to a particular SKU, they are subscribing to the subscription group of which that SKU is a member. As an example, if a user purchases a 1 month subscription to "the world", they are actually subscribing to "the world" subscription group. |
It’s up to you to know the grouping of your SKUs. Any methods in the Purchase class that check subscription status or expiry date of a SKU should be passed all SKUs of that subscription group. E.g. If you want to know if the user is subscribed to the SKU_WORLD_1_MONTH subscription, it would not be sufficient to call iap.isSubscribed(SKU_WORLD_1_MONTH), because that wouldn’t take into account if the user had purchased a 1 year subscription. The correct way is to always call iap.isSubscribed(SKU_WORLD_1_MONTH, SKU_WORLD_1_YEAR), or simply iap.isSubscribed(PRODUCTS) since we have placed both SKUs into our PRODUCTS array.
|
Note
|
The receipt store is intended to interface with a server so that the subscriptions can be synced with multiple devices, as required by Apple’s guidelines. For this post we’ll just store our receipts on device using internal storage. Moving the logic to a server is a simple matter that we will cover in a future post when we cover the server-side. |

A basic receipt store needs to implement just two methods:
-
fetchReceipts -
submitReceipt
Generally we’ll register it in our app’s init() method so that it’s always available.
public void init(Object context) {
    ...

    Purchase.getInAppPurchase().setReceiptStore(new ReceiptStore() {

        @Override
        public void fetchReceipts(SuccessCallback<Receipt[]> callback) {
            // Fetch receipts from storage and pass them to the callback
        }

        @Override
        public void submitReceipt(Receipt receipt, SuccessCallback<Boolean> callback) {
            // Save a receipt to storage.  Make sure to call callback when done.
        }
    });
}
These methods are designed to be asynchronous since real-world apps will always be connecting to some sort of network service. Therefore, instead of returning a value, both of these methods are passed instances of the SuccessCallback class. It’s important to make sure to call callback.onSuccess() ALWAYS when the methods have completed, even if there is an error, or the Purchase class will just assume that you’re taking a long time to complete the task, and will continue to wait for you to finish.
Once implemented, our fetchReceipts() method will look like:
// static declarations used by receipt store

// Storage key where list of receipts are stored
private static final String RECEIPTS_KEY = "RECEIPTS.dat";

@Override
public void fetchReceipts(SuccessCallback<Receipt[]> callback) {
    Storage s = Storage.getInstance();
    Receipt[] found;
    synchronized(RECEIPTS_KEY) {
        if (s.exists(RECEIPTS_KEY)) {
            List<Receipt> receipts = (List<Receipt>)s.readObject(RECEIPTS_KEY);
            found = receipts.toArray(new Receipt[receipts.size()]);
        } else {
            found = new Receipt[0];
        }
    }
    // Make sure this is outside the synchronized block
    callback.onSucess(found);
}
This is fairly straight forward. We’re checking to see if we already have a list of receipts stored. If so we return that list to the callback. If not we return an empty array of receipts.
|
Note
|
Receipt implements Externalizable so you are able to write instances directly to Storage.
|
The submitReceipt() method is a little more complex, as it needs to calculate the new expiry date for our subscription.
@Override
public void submitReceipt(Receipt receipt, SuccessCallback<Boolean> callback) {
    Storage s = Storage.getInstance();
    synchronized(RECEIPTS_KEY) {
        List<Receipt> receipts;
        if (s.exists(RECEIPTS_KEY)) {
            receipts = (List<Receipt>)s.readObject(RECEIPTS_KEY);
        } else {
            receipts = new ArrayList<Receipt>();
        }
        // Check to see if this receipt already exists
        // This probably won't ever happen (that we'll be asked to submit an
        // existing receipt, but better safe than sorry
        for (Receipt r : receipts) {
            if (r.getStoreCode().equals(receipt.getStoreCode()) &&
                    r.getTransactionId().equals(receipt.getTransactionId())) {
                // If we've already got this receipt, we'll just this submission.
                return;
            }
        }

        // Now try to find the current expiry date
        Date currExpiry = new Date();
        List<String> lProducts = Arrays.asList(PRODUCTS);
        for (Receipt r : receipts) {
            if (!lProducts.contains(receipt.getSku())) {
                continue;
            }
            if (r.getCancellationDate() != null) {
                continue;
            }
            if (r.getExpiryDate() == null) {
                continue;
            }
            if (r.getExpiryDate().getTime() > currExpiry.getTime()) {
                currExpiry = r.getExpiryDate();
            }
        }

        // Now set the appropriate expiry date by adding time onto
        // the end of the current expiry date
        Calendar cal = Calendar.getInstance();
        cal.setTime(currExpiry);
        switch (receipt.getSku()) {
            case SKU_WORLD_1_MONTH:
                cal.add(Calendar.MONTH, 1);
                break;
            case SKU_WORLD_1_YEAR:
                cal.add(Calendar.YEAR, 1);
        }
        Date newExpiry = cal.getTime();

        receipt.setExpiryDate(newExpiry);
        receipts.add(receipt);
        s.writeObject(RECEIPTS_KEY, receipts);

    }
    // Make sure this is outside the synchronized block
    callback.onSucess(Boolean.TRUE);
}
The main logic of this method involves iterating through all of the existing receipts to find the latest current expiry date, so that when the user purchases a subscription, it’s added onto the end of the current subscription (if one exists) rather than going from today’s date. This enables users to safely renew their subscription before the subscription has expired.
In the real-world, we would implement this logic on the server-side.
|
Note
|
The iTunes store and Play store have no knowledge of your subscription durations. This is why it’s up to you to set the expiry date in the submitReceipt method. Non-renewable subscriptions are essentially no different than regular consumable products. It’s up to you to manage the subscription logic - and Apple, in particular, requires you to do so using a server.
|
In order for your app to provide you with current data about the user’s subscriptions and expiry dates, you need to synchronize the receipts with your receipt store. Purchase provides a set of methods for doing this. Generally I’ll call one of them inside the start() method, and I may resynchronize at other strategic times if I suspect that the information may have changed.
The following methods can be used for synchronization:
-
synchronizeReceipts()- Asynchronously synchronizes receipts in the background. You won’t be notified when it’s complete. -
synchronizeReceiptsSync()- Synchronously synchronizes receipts, and blocks until it’s complete. This is safe to use on the EDT as it employsinvokeAndBlockunder the covers. -
synchronizeReceipts(final long ifOlderThanMs, final SuccessCallback<Boolean> callback)- Asynchronously synchronizes receipts, but only if they haven’t been synchronized in the specified time period. E.g. In your start() method you might decide that you only want to synchronize receipts once per day. This also includes a callback that will be called when synchronization is complete. -
synchronizeReceiptsSync(long ifOlderThanMs)- A synchronous version that will only refetch if data is older than given time.
In our hello world app we synchronize the subscriptions in a few places.
At the end of the start() method:
public void start() {

   ...

    // Now synchronize the receipts
    iap.synchronizeReceipts(0, res->{
        // Update the UI as necessary to reflect

    });
}
And we also provide a button to allow the user to manually synchronize the receipts.
Button syncReceipts = new Button("Synchronize Receipts");

syncReceipts.addActionListener(e->{

    iap.synchronizeReceipts(0, res->{
        // Update the UI
    });
});Now that we have a receipt store registered, and we have synchronized our receipts, we can query the Purchase instance to see if a SKU or set of SKUs is currently subscribed. There are three useful methods in this realm:
-
boolean isSubscribed(String… skus)- Checks to see if the user is currently subscribed to any of the provided SKUs. -
Date getExpiryDate(String… skus)- Gets the latest expiry date of a set of SKUs. -
Receipt getFirstReceiptExpiringAfter(Date dt, String… skus)- This method will return the earliest receipt with an expiry date after the given date. This is needed in cases where you need to decide if the user should have access to some content based on its publication date. E.g. If you published an issue of your e-zine on March 1, and the user purchased a subscription on March 15th, then they should get access to the March 1st issue even though it doesn’t necessarily fall in the subscription period. Being able to easily fetch the first receipt after a given date makes it easier to determine if a particular issue should be covered by a subscription.
If you need to know more information about subscriptions, you can always just call getReceipts() to obtain a list of all of the current receipts and determine for yourself what the user should have access to.
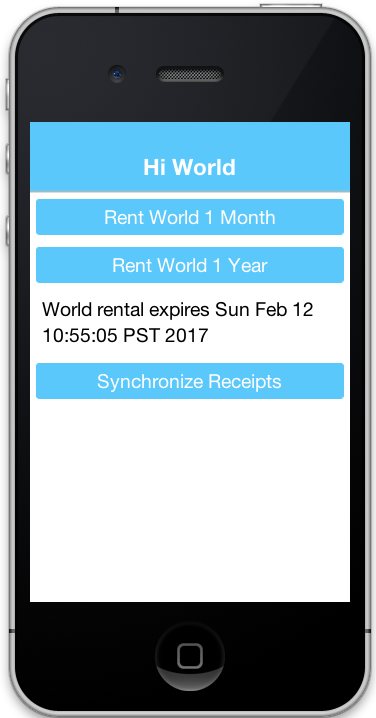
In the hello world app we’ll use this information in a few different places. On our main form we’ll include a label to show the current expiry date, and we allow the user to press a button to synchronize receipts manually if they think the value is out of date.
// ...

SpanLabel rentalStatus = new SpanLabel("Loading rental details...");
Button syncReceipts = new Button("Synchronize Receipts");

syncReceipts.addActionListener(e->{

    iap.synchronizeReceipts(0, res->{
        if (iap.isSubscribed(PRODUCTS)) {
            rentalStatus.setText("World rental expires "+iap.getExpiryDate(PRODUCTS));
        } else {
            rentalStatus.setText("You don't currently have a subscription to the world");
        }
        hi.revalidate();
    });
});You should now have all of the background required to implement the Hello World Subscription app. So we’ll return to the code and see how the user purchases a subscription.
In the main form, we want two buttons to subscribe to the "World", for one month and one year respectively. They look like:
Purchase iap = Purchase.getInAppPurchase();
// ...
Button rentWorld1M = new Button("Rent World 1 Month");
rentWorld1M.addActionListener(e->{
    String msg = null;
    if (iap.isSubscribed(PRODUCTS)) {  // (1)
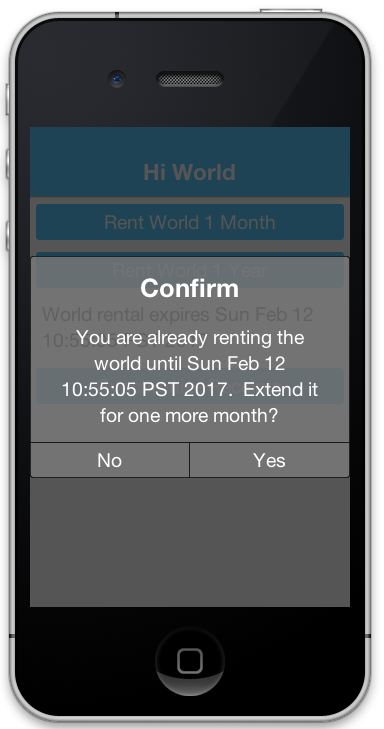
        msg = "You are already renting the world until "
             +iap.getExpiryDate(PRODUCTS)  // (2)
             +".  Extend it for one more month?";
    } else {
        msg = "Rent the world for 1 month?";
    }
    if (Dialog.show("Confirm", msg, "Yes", "No")) {
        Purchase.getInAppPurchase().purchase(SKU_WORLD_1_MONTH); // (3)
        // Note: since this is a non-renewable subscription it is just a regular
        // product in the play store - therefore we use the purchase() method.
        // If it were a "subscription" product in the play store, then we
        // would use subscribe() instead.
    }
});

Button rentWorld1Y = new Button("Rent World 1 Year");
rentWorld1Y.addActionListener(e->{
    String msg = null;
    if (iap.isSubscribed(PRODUCTS)) {
        msg = "You are already renting the world until "+
               iap.getExpiryDate(PRODUCTS)+
              ".  Extend it for one more year?";
    } else {
        msg = "Rent the world for 1 year?";
    }
    if (Dialog.show("Confirm", msg, "Yes", "No")) {
        Purchase.getInAppPurchase().purchase(SKU_WORLD_1_YEAR);
        // Note: since this is a non-renewable subscription it is just a regular
        // product in the play store - therefore we use the purchase() method.
        // If it were a "subscription" product in the play store, then we
        // would use subscribe() instead.
    }
});-
In the event handler we check if the user is subscribed by calling
isSubscribed(PRODUCTS). Notice that we check it against the array of both the one month and one year subscription SKUs. -
We are able to tell the user when the current expiry date is so that they can gauge whether to proceed.
-
Since this is a non-renewable subscription, we use the
Purchase.purchase()method. See following note aboutsubscribe()vspurchase()
The Purchase class includes two methods for initiating a purchase:
-
purchase(sku) -
subscribe(sku)
Which one you use depends on the type of product that is being purchased. If your product is set up as a subscription in the Google Play store, then you should use subscribe(sku). Otherwise, you should use purchase(sku).
The purchase callbacks are very similar to the ones that we implemented in the regular in-app purchase examples:
@Override
public void itemPurchased(String sku) {
    Purchase iap = Purchase.getInAppPurchase();

    // Force us to reload the receipts from the store.
    iap.synchronizeReceiptsSync(0);
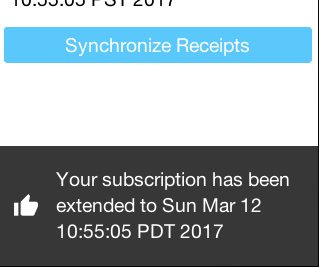
    ToastBar.showMessage("Your subscription has been extended to "+iap.getExpiryDate(PRODUCTS), FontImage.MATERIAL_THUMB_UP);
}

@Override
public void itemPurchaseError(String sku, String errorMessage) {
    ToastBar.showErrorMessage("Failure occurred: "+errorMessage);
}
Notice that, in itemPurchased() we don’t need to explicitly create any receipts or submit anything to the receipt store. This is handled for you automatically. We do make a call to synchronizeReceiptsSync() but this is just to ensure that our toast message has the new expiry date loaded already.
This section demonstrated how to set up an app to use non-renewable subscriptions using in-app purchase. Non-renewable subscriptions are the same as regular consumable products except for the fact that they are shared by all of the user’s devices, and thus, require a server component. The app store has no knowledge of the duration of your non-renewable subscriptions. It’s up to you to specify the expiry date of purchased subscriptions on their receipts when they are submitted. Google play doesn’t formally have a "non-renewable" subscription product type. To implement them in Google play, you would just set up a regular product. It’s how you handle it internally that makes it a subscription, and not just a regular product.
Codename One uses the Receipt class as the foundation for its subscriptions infrastructure. You, as the developer, are responsible for implementing the ReceiptStore interface to provide the receipts. The Purchase instance will load receipts from your ReceiptStore, and use them to determine whether the user is currently subscribed to a subscription, and when the subscription expires.
Auto-renewable subscriptions provide, arguably, an easier path to recurring revenue than non-renewable subscriptions because all of the subscription stuff is handled by the app store. You defer almost entirely to the app store (iTunes for iOS, and Play for Android) for billing and management.
If there is a down-side, it would be that you are also subject to the rules of each app store - and they take their cut of the revenue.
-
For more information about Apple’s auto-renewable subscription features and rules see this document.
-
For more information about subscriptions in Google play, see this document.
When deciding between auto-renewable and non-renewable subscriptions, as always, the answer will depend on your needs and preferences. Auto-renewables are nice because it takes the process completely out of your hands. You just get paid. On the other hand, there are valid reasons to want to use non-renewables. E.g. You can’t cancel an auto-renewable subscription for a user. They have to do that themselves. You may also want more control over the subscription and renewal process, in which case a non-renewable might make more sense.
|
Note
|
There are some developers that are opposed to auto-renewable subscriptions, we don’t have enough information to make a solid recommendation on this matter |
On a practical level, if you are using auto-renewable subscriptions (and therefore subscription products in the Google play store) you must use the Purchase.subscribe(sku) method for initiating the purchase workflow. For non-renewable subscriptions (and therefore regular products in the Google play store), you must use the Purchase.purchase(sku) method.
In this section we’ll describe the general workflow of subscription management on the server. We also demonstrate how use Apple’s and Google’s web services to validate receipts and stay informed of important events (such as when users cancel or renew their subscriptions).
To aid in this process, we’ve created a fully-functional in-app purchase demo project that includes both a client app and a server app.
-
Create a new Codename One project in Netbeans, and choose the "Bare-bones Hello World Template". You should make your package name something unique so that you are able to create real corresponding apps in both Google Play and iTunes connect.
-
Once the project is created, copy this source file contents into your main class file. Then change the package name, and class name in the file to match your project settings. E.g. change
package ca.weblite.iapdemo;topackage <your.package.name.here>;andclass IAPDemo implements PurchaseCallbacktoclass YourClassName implements PurchaseCallback. -
Add the Generic Web Service Client library to your project by going to "Codename Settings" > "Extensions", finding that library, and click "Download". Then "Refresh CN1 libs" as it suggests.
-
Change the
localHostproperty to point to your local machine’s network address. Using "http://localhost" is not going to cut it here because when the app is running on a phone, it needs to be able to connect to your web server over the network. This address will be your local network address (e.g. 192.168.0.9, or something like that).private static final String localHost = "http://10.0.1.32";
-
Add the
ios.plistInjectbuild hint to your project with the value "<key>NSAppTransportSecurity</key> <dict> <key>NSAllowsArbitraryLoads</key> <true/> </dict>". This is so that we can use http urls in iOS. Since we don’t intend to fully publish this app, we can cut corners like this. If you were creating a real app, you would use proper secure URLs.
Download the CN1-IAP-Server demo project from Github, and run its "install-deps" ANT task in order to download and install its dependencies to your local Maven repo.
|
Note
|
For the following commands to work, make sure you have "ant", "mvn", and "git" in your environment PATH. |
$ git clone https://github.com/shannah/cn1-iap-demo-server
$ cd cn1-iap-demo-server
$ ant install-deps
Open the project in Netbeans
-
Create a new database in your preferred DBMS. Call it anything you like.
-
Create a new table named "RECEIPTS" in this database with the following structure:
create TABLE RECEIPTS
(
	TRANSACTION_ID VARCHAR(128) not null,
	USERNAME VARCHAR(64) not null,
	SKU VARCHAR(128) not null,
	ORDER_DATA VARCHAR(32000),
	PURCHASE_DATE BIGINT,
	EXPIRY_DATE BIGINT,
	CANCELLATION_DATE BIGINT,
	LAST_VALIDATED BIGINT,
	STORE_CODE VARCHAR(20) default '' not null,
	primary key (TRANSACTION_ID, STORE_CODE)
)
-
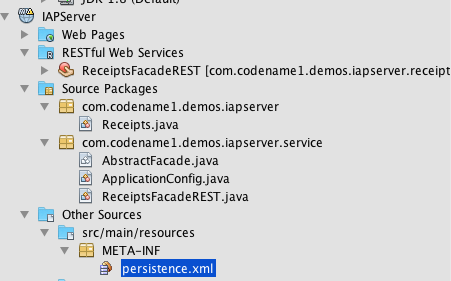
Open the "persistence.xml" file in the server netbeans project.
-
Change the data source to the database you just created.

If you’re not sure how to create a data source, see my previous tutorial on connecting to a MySQL database.
At this point we should be able to test out the project in the Codename One simulator to make sure it’s working.
-
Build and Run the server project in Netbeans. You may need to tell it which application server you wish to run it on. I am running it on the Glassfish 4.1 that comes bundled with Netbeans.
-
Build and run the client project in Netbeans. This should open the Codename One simulator.
When the app first opens you’ll see a screen as follows:
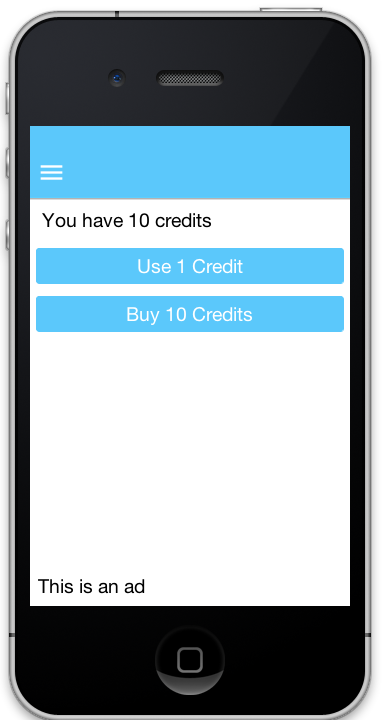
This screen is for testing consumable products, so we won’t be making use of this right now.
Open the hamburger menu and select "Subscriptions". You should see something like this:
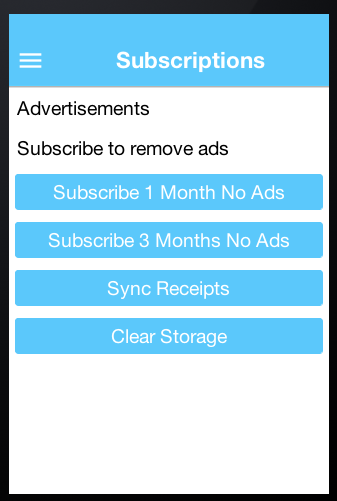
Click on the "Subscribe 1 Month No Ads" button. You will be prompted to accept the purchase:
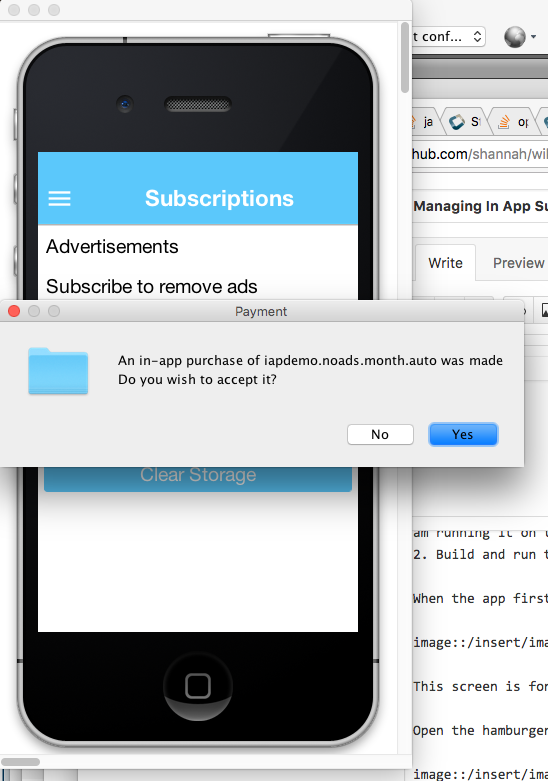
Upon completion, the app will submit the purchase to your server, and if all went well, it will retrieve the updated list of receipts from your server also, and update the label on this form to say "No Ads. Expires <some date>":
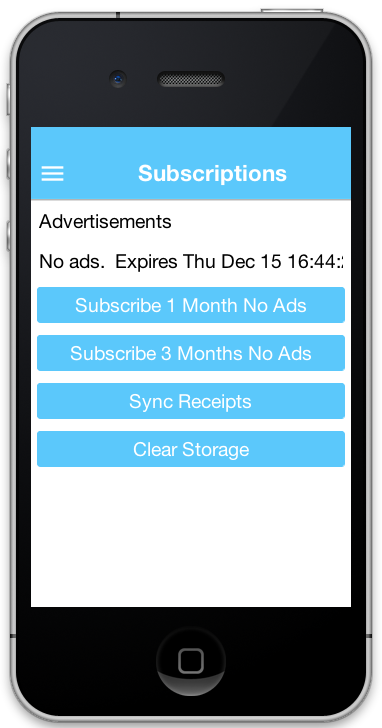
|
Note
|
This project is set up to use an expedited expiry date schedule for purchases from the simulator. 1 month = 5 minutes. 3 months = 15 minutes. This helps for testing. That is why your expiry date may be different than expected. |
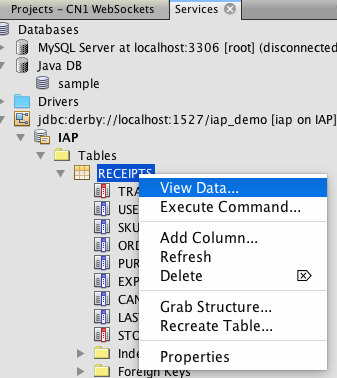
Just to verify that the receipt was inserted correctly, you should check the contents of your "RECEIPTS" table in your database. In Netbeans, I can do this easily from the "Services" pane. Expand the database connection down to the RECEIPTS table, right click "RECEIPTS" and select "View Data". This will open a data table similar the the following:
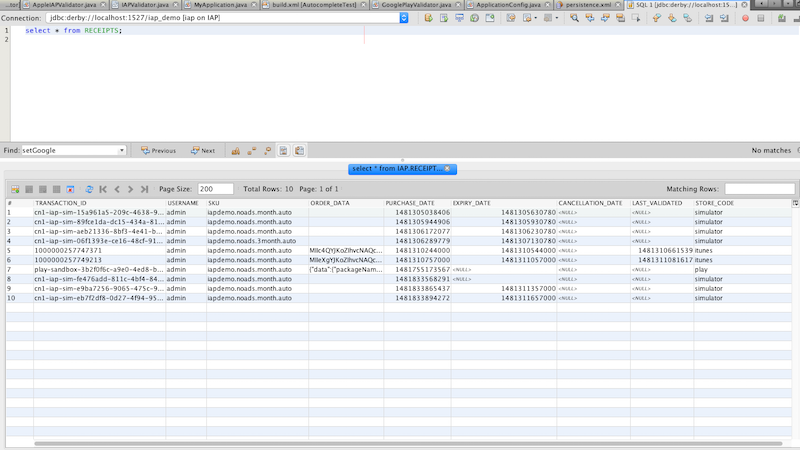
A few things to mention here:
-
The "username" was provided by the client. It’s hard-coded to "admin", but the idea is that you would have the user log in and you would have access to their real username.
-
All dates are stored as unix timestamps in milliseconds.
If you delete the receipt from your database, then press the "Synchronize Receipts" button in your app, the app will again say "No subscriptions." Similarly if you wait 5 minutes and hit "Synchronize receipts" the app will say no subscriptions found, and the "ads" will be back.
Let’s not pretend that everything worked for you on the first try. There’s a lot that could go wrong here. If you make a purchase and nothing appears to happen, the first thing you should do is check the Network Monitor in the simulator ("Simulate" > "Network" > "Network Monitor"). You should see a list of network requests. Some will be GET requests and there will be at least one POST request. Check the response of these requests to see if they succeeded.
Also check the Glassfish server log to see if there is an exception.
Common problems would be that the URL you have set in the client app for endpointURL is incorrect, or that there is a database connection problem.
Now that we’ve set up and built the app, let’s take a look at the source code so you can see how it all works.
I use the Generic Webservice Client Library from inside my ReceiptStore implementation to load receipts from the web service, and insert new receipts to the database.
The source for my ReceiptStore is as follows:
private ReceiptStore createReceiptStore() {
    return new ReceiptStore() {

        RESTfulWebServiceClient client = createRESTClient(receiptsEndpoint);

        @Override
        public void fetchReceipts(SuccessCallback<Receipt[]> callback) {
            RESTfulWebServiceClient.Query query = new RESTfulWebServiceClient.Query() {

                @Override
                protected void setupConnectionRequest(RESTfulWebServiceClient client, ConnectionRequest req) {
                    super.setupConnectionRequest(client, req);
                    req.setUrl(receiptsEndpoint);
                }

            };
            client.find(query, rowset->{
                List<Receipt> out = new ArrayList<Receipt>();
                for (Map m : rowset) {
                    Result res = Result.fromContent(m);
                    Receipt r = new Receipt();
                    r.setTransactionId(res.getAsString("transactionId"));
                    r.setPurchaseDate(new Date(res.getAsLong("purchaseDate")));
                    r.setQuantity(1);
                    r.setStoreCode(m.getAsString("storeCode"));
                    r.setSku(res.getAsString("sku"));

                    if (m.containsKey("cancellationDate") && m.get("cancellationDate") != null) {
                        r.setCancellationDate(new Date(res.getAsLong("cancellationDate")));
                    }
                    if (m.containsKey("expiryDate") && m.get("expiryDate") != null) {
                        r.setExpiryDate(new Date(res.getAsLong("expiryDate")));
                    }
                    out.add(r);

                }
                callback.onSucess(out.toArray(new Receipt[out.size()]));
            });
        }

        @Override
        public void submitReceipt(Receipt r, SuccessCallback<Boolean> callback) {
            Map m = new HashMap();
            m.put("transactionId", r.getTransactionId());
            m.put("sku", r.getSku());
            m.put("purchaseDate", r.getPurchaseDate().getTime());
            m.put("orderData", r.getOrderData());
            m.put("storeCode", r.getStoreCode());
            client.create(m, callback);
        }

    };
}
Notice that we are not doing any calculation of expiry dates in our client app, as we did in the previous post (on non-renewable receipts). Since we are using a server now, it makes sense to move all of that logic over to the server.
The createRESTClient() method shown there simply creates a RESTfulWebServiceClient and configuring it to use basic authentication with a username and password. The idea is that your user would have logged into your app at some point, and you would have a username and password on hand to pass back to the web service with the receipt data so that you can connect the subscription to a user account. The source of that method is listed here:
/**
 * Creates a REST client to connect to a particular endpoint.  The REST client
 * generated here will automatically add the Authorization header
 * which tells the service what platform we are on.
 * @param url The url of the endpoint.
 * @return
 */
private RESTfulWebServiceClient createRESTClient(String url) {
    return new RESTfulWebServiceClient(url) {

        @Override
        protected void setupConnectionRequest(ConnectionRequest req) {
            try {
                req.addRequestHeader("Authorization", "Basic " + Base64.encode((getUsername()+":"+getPassword()).getBytes("UTF-8")));
            } catch (Exception ex) {}
        }

    };
}On the server-side, our REST controller is a standard JAX-RS REST interface. I used Netbeans web service wizard to generate it and then modified it to suit my purposes. The methods of the ReceiptsFacadeREST class pertaining to the REST API are shown here:
@Stateless
@Path("com.codename1.demos.iapserver.receipts")
public class ReceiptsFacadeREST extends AbstractFacade<Receipts> {

    // ...

    @POST
    @Consumes({"application/xml", "application/json"})
    public void create(Receipts entity) {

        String username = credentialsWithBasicAuthentication(request).getName();
        entity.setUsername(username);

        // Save the receipt first in case something goes wrong in the validation stage
        super.create(entity);

        // Let's validate the receipt
        validateAndSaveReceipt(entity);
            // validates the receipt against appropriate web service
            // and updates database if expiry date has changed.
    }

    // ...
    @GET
    @Override
    @Produces({"application/xml", "application/json"})
    public List<Receipts> findAll() {
        String username = credentialsWithBasicAuthentication(request).getName();
        return getEntityManager()
                .createNamedQuery("Receipts.findByUsername")
                .setParameter("username", username)
                .getResultList();
    }
}
The magic happens inside that validateAndSaveReceipt() method, which I’ll cover in detail soon.
It’s important to note that you will not be notified by apple or google when changes are made to subscriptions. It’s up to you to periodically "poll" their web service to find if any changes have been made. Changes we would be interested in are primarily renewals and cancellations. In order to deal with this, set up a method to run periodically (once-per day might be enough). For testing, I actually set it up to run once per minute as shown below:
private static final long ONE_DAY = 24 * 60 * 60 * 1000;
private static final long ONE_DAY_SANDBOX = 10 * 1000;
@Schedule(hour="*", minute="*")
public void validateSubscriptionsCron() {
    System.out.println("----------- DOING TIMED TASK ---------");
    List<Receipts> res = null;
    final Set<String> completedTransactionIds = new HashSet<String>();
    for (String storeCode : new String[]{Receipt.STORE_CODE_ITUNES, Receipt.STORE_CODE_PLAY}) {
        while (!(res = getEntityManager().createNamedQuery("Receipts.findNextToValidate")
                .setParameter("threshold", System.currentTimeMillis() - ONE_DAY_SANDBOX)
                .setParameter("storeCode", storeCode)
                .setMaxResults(1)
                .getResultList()).isEmpty() &&
                !completedTransactionIds.contains(res.get(0).getTransactionId())) {

            final Receipts curr = res.get(0);
            completedTransactionIds.add(curr.getTransactionId());
            Receipts[] validatedReceipts =  validateAndSaveReceipt(curr);
            em.flush();
            for (Receipts r : validatedReceipts) {
                completedTransactionIds.add(r.getTransactionId());
            }

        }
    }
}
That method simply finds all of the receipts in the database that haven’t been validated in some period of time, and validates it. Again, the magic happens inside the validateAndSaveReceipt() method which we cover later.
|
Note
|
In this example we only validate receipts from the iTunes and Play stores because those are the only ones that we currently support auto-renewing subscriptions on. |
For the purpose of this tutorial, I created a library to handle receipt validation in a way that hides as much of the complexity as possible. It supports both Google Play receipts and iTunes receipts.
The general usage is as follows:
IAPValidator validator = IAPValidator.getValidatorForPlatform(receipt.getStoreCode());
if (validator == null) {
   // no validators were found for this store
   // Do custom validation
} else {
    validator.setAppleSecret(APPLE_SECRET);
    validator.setGoogleClientId(GOOGLE_DEVELOPER_API_CLIENT_ID);
    validator.setGooglePrivateKey(GOOGLE_DEVELOPER_PRIVATE_KEY);
    Receipt[] result = validator.validate(receipt);
    ...
}
As you can see from this snippet, the complexity of receipt validation has been reduced to entering three configuration strings:
-
APPLE_SECRET- This is a "secret" string that you will get from iTunes connect when you set up your in-app products. -
GOOGLE_DEVELOPER_API_CLIENT_ID- A client ID that you’ll get from the google developer API console when you set up your API service credentials. -
GOOGLE_DEVELOPER_PRIVATE_KEY- A PKCS8 encoded string with an RSA private key that you’ll receive at the same time as theGOOGLE_DEVELOPER_API_CLIENT_ID.
I will go through the steps to obtain these values soon.
You are now ready to see the full magic of the validateAndSaveReceipt() method in all its glory:
/**
 * Validates a given receipt, updating the expiry date,
 * @param receipt The receipt to be validated
 * @param forInsert If true, then an expiry date will be calculated even if there is no validator.
 */
private Receipts[] validateAndSaveReceipt(Receipts receipt) {
    EntityManager em = getEntityManager();
    Receipts managedReceipt = getManagedReceipt(receipt);
        // managedReceipt == receipt if receipt is in database or null otherwise

    if (Receipt.STORE_CODE_SIMULATOR.equals(receipt.getStoreCode())) { // (1)
        if (receipt.getExpiryDate() == null && managedReceipt == null) {
            //Not inserted yet and no expiry date set yet
            Date dt = calculateExpiryDate(receipt.getSku(), true);
            if (dt != null) {
                receipt.setExpiryDate(dt.getTime());
            }
        }
        if (managedReceipt == null) {
            // Receipt is not in the database yet.  Add it
            em.persist(receipt);
            return new Receipts[]{receipt};
        } else {
            // The receipt is already in the database.  Update it.
            em.merge(managedReceipt);
            return new Receipts[]{managedReceipt};
        }
    } else {
        // It's not a simulator receipt
        IAPValidator validator = IAPValidator.getValidatorForPlatform(receipt.getStoreCode());
        if (validator == null) {
            // Receipt must have come from a platform other than iTunes or Play
            // Because there is no validator

            if (receipt.getExpiryDate() == null && managedReceipt == null) {
                // No expiry date.
                // Generate one.
                Date dt = calculateExpiryDate(receipt.getSku(), false);
                if (dt != null) {
                    receipt.setExpiryDate(dt.getTime());
                }

            }
            if (managedReceipt == null) {
                em.persist(receipt);
                return new Receipts[]{receipt};
            } else {
                em.merge(managedReceipt);
                return new Receipts[]{managedReceipt};
            }

        }

        // Set credentials for the validator
        validator.setAppleSecret(APPLE_SECRET);
        validator.setGoogleClientId(GOOGLE_DEVELOPER_API_CLIENT_ID);
        validator.setGooglePrivateKey(GOOGLE_DEVELOPER_PRIVATE_KEY);

        // Create a dummy receipt with only transaction ID and order data to pass
        // to the validator.  Really all it needs is order data to be able to validate
        Receipt r2 = Receipt();
        r2.setTransactionId(receipt.getTransactionId());
        r2.setOrderData(receipt.getOrderData());
        try {
            Receipt[] result = validator.validate(r2);
            // Depending on the platform, result may contain many receipts or a single receipt
            // matching our receipt.  In the case of iTunes, none of the receipt transaction IDs
            // might match the original receipt's transactionId because the validator
            // will set the transaction ID to the *original* receipt's transaction ID.
            // If none match, then we should remove our receipt, and update each of the returned
            // receipts in the database.
             Receipt matchingValidatedReceipt = null;
            for (Receipt r3 : result) {
                if (r3.getTransactionId().equals(receipt.getTransactionId())) {
                    matchingValidatedReceipt = r3;
                    break;
                }
            }

            if (matchingValidatedReceipt == null) {
                // Since the validator didn't find our receipt,
                // we should remove the receipt.  The equivalent
                // is stored under the original receipt's transaction ID
                if (managedReceipt != null) {
                    em.remove(managedReceipt);
                    managedReceipt = null;
                }
            }
            List<Receipts> out = new ArrayList<Receipts>();
            // Now go through and
            for (Receipt r3 : result) {
                if (r3.getOrderData() == null) {
                    // No order data found in receipt.  Setting it to the original order data
                    r3.setOrderData(receipt.getOrderData());
                }
                Receipts eReceipt = new Receipts();
                eReceipt.setTransactionId(r3.getTransactionId());
                eReceipt.setStoreCode(receipt.getStoreCode());
                Receipts eManagedReceipt = getManagedReceipt(eReceipt);
                if (eManagedReceipt == null) {
                    copy(eReceipt, r3);
                    eReceipt.setUsername(receipt.getUsername());
                    eReceipt.setLastValidated(System.currentTimeMillis());
                    em.persist(eReceipt);
                    out.add(eReceipt);
                } else {

                    copy(eManagedReceipt, r3);
                    eManagedReceipt.setUsername(receipt.getUsername());
                    eManagedReceipt.setLastValidated(System.currentTimeMillis());
                    em.merge(eManagedReceipt);
                    out.add(eManagedReceipt);
                }
            }

            return out.toArray(new Receipts[out.size()]);

        } catch (Exception ex) {
            // We should probably store some info about the failure in the
            // database to make it easier to find receipts that aren't validating,
            // but for now we'll just log it.
            Log.p("Failed to validate receipt "+r2);
            Log.p("Reason: "+ex.getMessage());
            Log.e(ex);
            return new Receipts[]{receipt};

        }
    }
}-
We need to handle the case where the app is being used in the CN1 simulator. We’ll treat this as a non-renewable receipt, and we’ll calculate the expiry date using an "accelerated" clock to assist in testing.
|
Note
|
In many of the code snippets for the Server-side code, you’ll see references to both a Receipts class and a Receipt class. I know this is slightly confusing. The Receipts class is a JPA entity the encapsulates a row from the "receipts" table of our SQL database. The Receipt class is com.codename1.payment.Receipt. It’s used to interface with the IAP validation library.
|
In order to test out in-app purchase on an Android device, you’ll need to create an app the Google Play Developer Console. I won’t describe the process in this section, but there is plenty of information around the internet on how to do this. Some useful references for this include:
-
Getting Started With Publishing - If you don’t already have an account with Google to publish your apps.
You are required to upload some screenshots and feature graphics. Don’t waste time making these perfect. For the screenshots, you can just use the "Screenshot" option in the simulator. (Use the Nexus 5 skin). For the feature graphics, I used this site that will generate the graphics in the correct dimensions for Google Play. You can also just leave the icon as the default Codename One icon.
|
Important
|
You cannot purchase in-app products from your app using your publisher account. You need to set up at least one test account for the purpose of testing the app. |
In order to test your app, you need to set up a test account. A test account must be associated with a real gmail email address. If you have a domain that is managed by Google apps, then you can also use an address from that domain.
The full process for testing in-app billing can be found in this google document. However, I personally found this documentation difficult to follow.
For your purposes, you’ll need to set up a tester list in Google Play. Choose "Settings" > "Tester Lists". Then create a list with all of the email address that you want to have treated as test accounts. Any purchases made by these email addresses will be treated as "Sandbox" purchases, and won’t require real money to change hands.
In order to test in-app purchase on Android, you must first publish your app. You can’t just build and install your app manually. The app needs to be published on the Play store, and it must be installed through the play store for in-app purchase to work. Luckily you can publish to an Alpha channel so that your app won’t be publicly available.
For more information about setting up alpha testing on Google play see this Google support document on the subject.
Once you have set your app up for alpha testing, you can send an invite link to your test accounts. You can find the link in the Google Play console under the APK section, under the "Alpha" tab (and assuming you’ve enabled alpha testing.
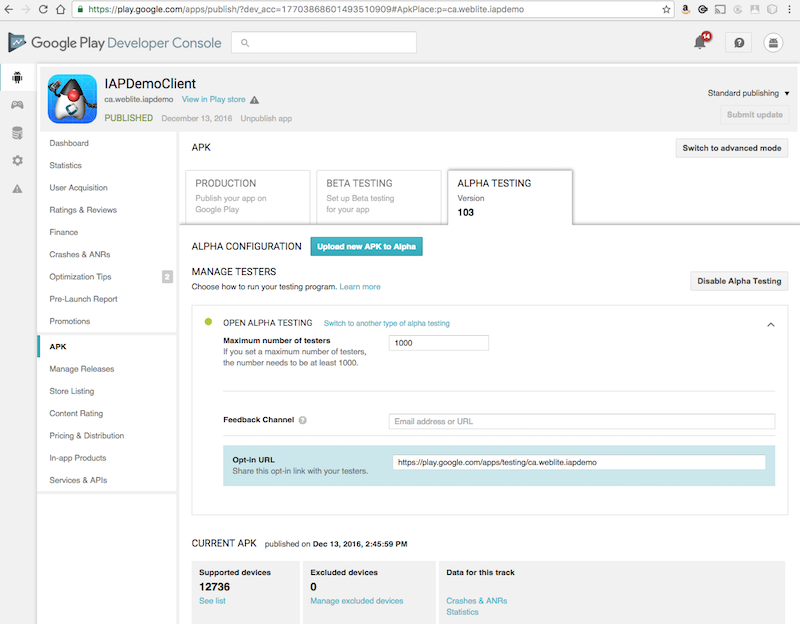
The format of the link is https://play.google.com/apps/testing/your-app-id in case you can’t find it. You can email this to your alpha testers. Make sure that you have added all testers to your tester lists so that their purchases will be made in the sandbox environment.
Also, before proceeding with testing in-app purchases, you need to add the in-app products in Google Play.
After you have published your APK to the alpha channel, you can create the products. For the purposes of this tutorial, we’ll just add two products:
-
iapdemo.noads.month.auto - The 1 month subscription.
-
iapdemo.noads.3month.auto - The 3 month subscription.
|
Important
|
Since we will be adding products as "Subscriptions" in the pay store, your app must use the Purchase.subscribe(sku) method for initiating a purchase on these products, and not the Purchase.purchase(sku) method. If you accidentally use purchase() to purchase a subscription on Android, the payment will go through, but your purchase callback will receive an error.
|
Adding 1 month Subscription
-
Open Google Play Developer Console, and navigate to your app.
-
Click on "In-app Products" in the menu. Then click the "Add New Product" button.
-
Select "Subscription", and enter "iapdemo.noads.month.auto" for the Product ID. Then click "Continue"
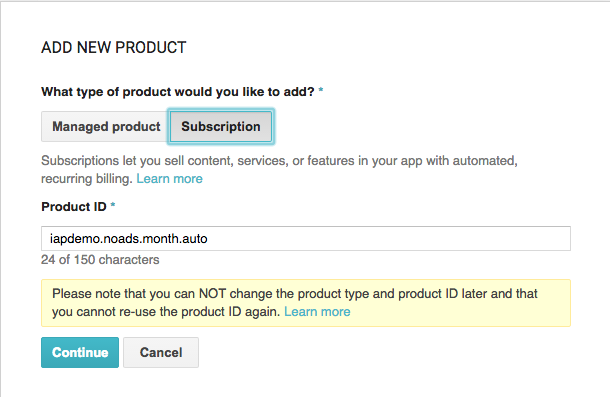
Now fill in the form. You can choose your own price and name for the product. The following is a screenshot of the options I chose.
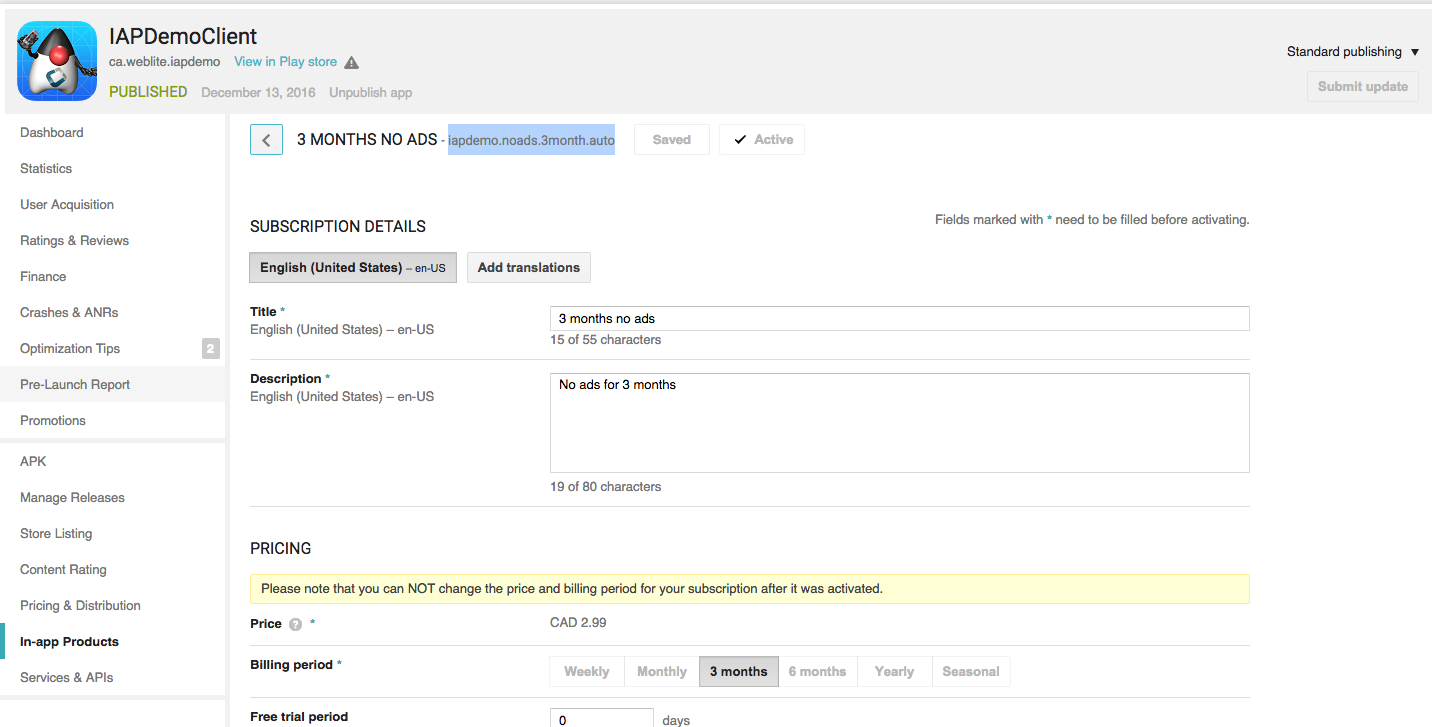
Adding 3 month Subscription
Follow the same process as for the 1 month subscription except use "iapdemo.noads.3month.auto" for the product ID, and select "3 months" for the billing period instead of "Monthly".
At this point we should be ready to test our app. Assuming you’ve installed the app using the invite link you sent yourself from Google play, as a test account that is listed on your testers list, you should be good to go.
Open the app, click on "Subscriptions", and try to purchase a 1-month subscription. If all goes well, it should insert the subscription into your database. But with no expiry date, since we haven’t yet implemented receipt validation yet. We’ll do that next.
Google play receipt validation is accomplished via the android-publisher Purchases: get API. The CN1-IAP-Validation library shields you from most of the complexities of using this API, but you still need to obtain a "private key" and a "client id" to access this API. Both of these are provided when you set up an OAuth2 Service Account for your app.
|
Note
|
The following steps assume that you have already created your app in Google play and have published it to at least the alpha channel. See my previous post on this topic here (Link to be provided). |
Steps:
-
Open the Google API Developer Console, and select your App from the the menu.
-
Click on the "Library" menu item in the left menu, and then click the "Google Play Developer API" link.
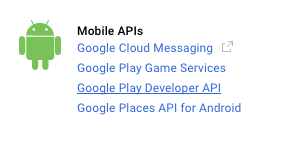 Figure 19. Google Play Developer API Link
 -
Click on the button that says "Enable". (If you already have it enabled, then just proceed to the next step).
 Figure 20. Enable API button
 -
Click on the "Credentials" menu item in the left menu.
-
In the "Credentials" drop-down menu, select the "Service Account Key" option.
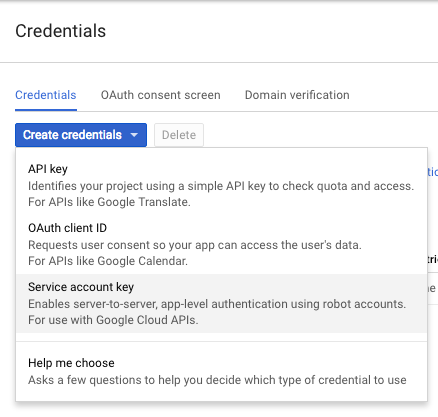 Figure 21. Credentials dropdown
 -
You will be presented with a new form. In the "Service Account" drop-down, select "New Service Account". This will give you some additional options.
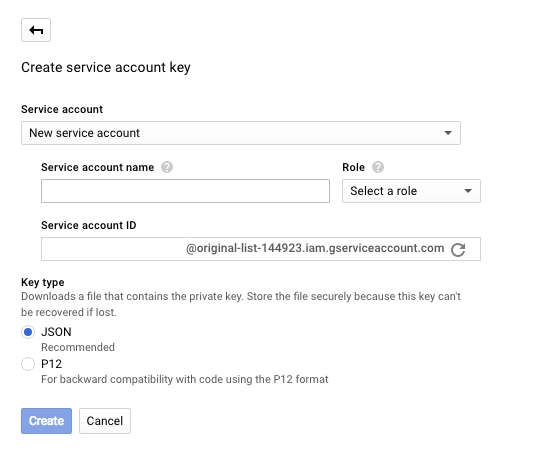 Figure 22. Create service account key
 -
Enter anything you like for the "Service account name". For the role, we’ll select "Project" > "Owner" for now just so we don’t run into permissions issues. You’ll probably want to investigate further to fine a more limited role that only allows receipt verification, but for now, I don’t want any unnecessary road blocks for getting this to work. We’re probably going to run into "permission denied" errors at first anyways, so the fewer reasons for this, the better.
-
It will auto-generate an account ID for you.
-
Finally, for the "Key type", select "JSON". Then click the "Create" button.
This should prompt the download of a JSON file that will have contents similar to the following:
{
  "type": "service_account",
  "project_id": "iapdemo-152500",
  "private_key_id": "1b1d39f2bc083026b164b10a444ff7d839826b8a",
  "private_key": "-----BEGIN PRIVATE KEY----- ... some private key string -----END PRIVATE KEY-----\n",
  "client_email": "[email protected]",
  "client_id": "117601572633333082772",
  "auth_uri": "https://accounts.google.com/o/oauth2/auth",
  "token_uri": "https://accounts.google.com/o/oauth2/token",
  "auth_provider_x509_cert_url": "https://www.googleapis.com/oauth2/v1/certs",
  "client_x509_cert_url": "https://www.googleapis.com/robot/v1/metadata/x509/iapdemo%40iapdemo-152500.iam.gserviceaccount.com"
}
This is where we get the information we’re looking for. The "client_email" is what we’ll use for your googleClientId, and the "private_key" is what we’ll use for the googlePrivateKey.
|
Warning
|
Use the "client_email" value as our client ID, not the "client_id" value as you might be tempted to do. |
We’ll set these in our constants:
public static final String GOOGLE_DEVELOPER_API_CLIENT_ID="[email protected]";
public static final String GOOGLE_DEVELOPER_PRIVATE_KEY="-----BEGIN PRIVATE KEY----- ... -----END PRIVATE KEY-----\n";

...

validator.setGoogleClientId(GOOGLE_DEVELOPER_API_CLIENT_ID);
validator.setGooglePrivateKey(GOOGLE_DEVELOPER_PRIVATE_KEY);
NOT DONE YET
Before we can use these credentials to verify receipts for our app, we need to link our app to this new service account from within Google Play.
Steps:
-
Open the Google Play Developer Console, then click on "Settings" > "API Access".
-
You should see your app listed on this page. Click the "Link" button next to your app.
 Figure 23. Link to API
 -
This should reveal some more options on the page. You should see a "Service Accounts" section with a list of all of the service accounts that you have created. Find the one we just created, and click the "Grant Access" button in its row.
 Figure 24. Grant access
 -
This will open a dialog titled "Add New User". Leave everything default, except change the "Role" to "Administrator". This provides "ALL" permissions to this account, which probably isn’t a good idea for production. Later on, after everything is working, you can circle back and try to refine permissions. For the purpose of this tutorial, I just want to pull out all of the potential road blocks.
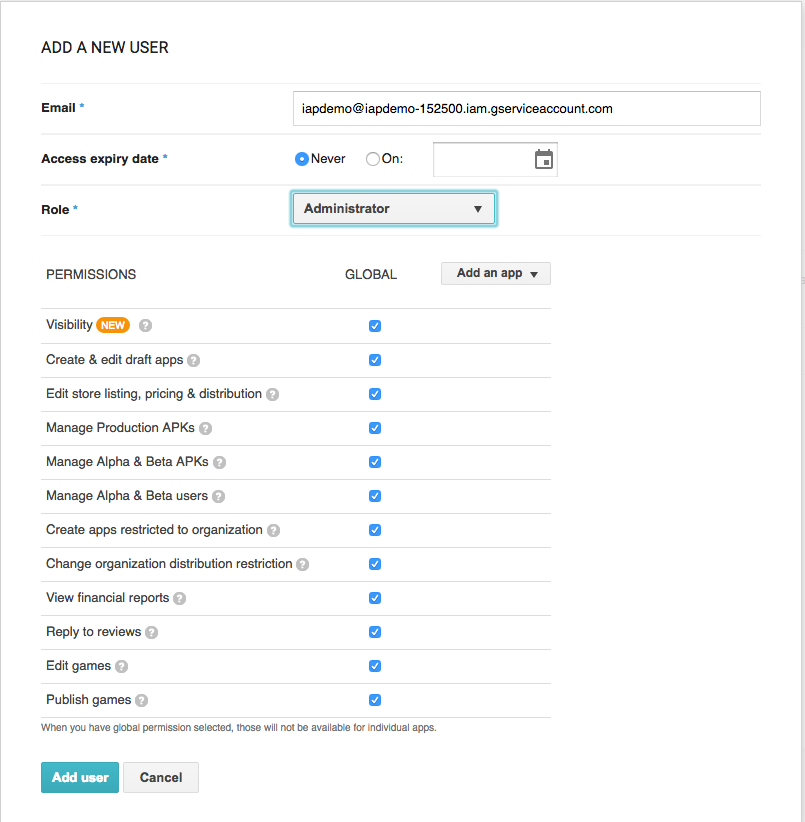 Figure 25. New User
 -
Press the "Add User" button.
At this point, the service account should be active so we can try to validate receipts.
The ReceiptsFacadeREST class includes a flag to enable/disable play store validation. By default it’s disabled. Let’s enable it:
public static final boolean DISABLE_PLAY_STORE_VALIDATION=true;Change this to false.
Then build and run the server app. The validateSubscriptionsCron() method is set to run once per minute, so we just need to wait for the timer to come up and it should try to validate all of the play store receipts.
|
Note
|
I’m assuming you’ve already added a receipt in the previous test that we did. If necessary, you should purchase the subscription again in your app. |
After a minute or so, you should see "----------- VALIDATING RECEIPTS ---------" written in the Glassfish log, and it will validate your receipts. If it works, your receipt’s expiry date will get populated in the database, and you can press "Synchronize Receipts" in your app to see this reflected. If it fails, there will like be a big ugly stack trace and exception readout with some clues about what went wrong.
Realistically, your first attempt will fail for some reason. Use the error codes and stack traces to help lead you to the problem. And feel free to post questions here.
The process for setting up and testing your app on iOS is much simpler than on Android (IMHO). It took me a couple hours to get the iTunes version working, vs a couple days on the Google Play side of things. One notable difference that makes things simpler is that you don’t need to actually upload your app to the store to test in-app purchase. You can just use your debug build on your device. It’s also much easier to roll a bunch of test accounts than on Google Play. You don’t need to set up an alpha program, you just create a few "test accounts" (and this is easy to do) in your iTunes connect account, and then make sure to use one of these accounts when making a purchase. You can easily switch accounts on your device from the "Settings" app, where you can just log out of the iTunes store - which will cause you to be prompted in your app the next time you make a purchase.
The process to add products in iTunes connect is outlined in this apple developer document. We’ll add our two SKUs:
-
iapdemo.noads.month.auto - The 1 month subscription.
-
iapdemo.noads.3month.auto - The 3 month subscription.
Just make sure you add them as auto-renewable subscriptions, and that you specify the appropriate renewal periods. Use the SKU as the product ID. Both of these products will be added to the same subscription group. Call the group whatever you like.
In order to test purchases, you need to create some test accounts. See this apple document for details on how to create these test accounts. Don’t worry, the process is much simpler than for Android. It should take you under 5 minutes.
Once you have the test accounts created, you should be set to test the app.
-
Make sure your server is running.
-
Log out from the app store. The process is described here.
-
Open your app.
-
Try to purchase a 1-month subscription
If all went well, you should see the receipt listed in the RECEIPTS table of your database. But the expiry date will be null. We need to set up receipt verification in order for this to work.
In order for receipt verification to work we simply need to generate a shared secret in iTunes connect. The process is described here.
Once you have a shared secret, update the ReceiptsFacadeREST class with the value:
public static final String APPLE_SECRET = "your-shared-secret-here";And enable iTunes store validation:
public static final boolean DISABLE_ITUNES_STORE_VALIDATION=true;Change this to false.
If you rebuild and run the server project, and wait for the validateSubscriptionsCron() method to run, it should validate the receipt. After about a minute (or less), you’ll see the text "----------- VALIDATING RECEIPTS ---------" written to the Glassfish log file, followed by some output from connecting to the iTunes validation service. If all went well, you should see your receipt expiration date updated in the database. If not, you’ll likely see some exception stack traces in the Glassfish log.
|
Note
|
Sandbox receipts in the iTunes store are set to run on an accelerated schedule. A 1 month subscription is actually 5 minutes, 3 months is 15 minutes etc… Also sandbox subscriptions don’t seem to persist in perpetuity until the user has cancelled it. I have found that they usually renew only 4 or 5 times before they are allowed to lapse by Apple. |
About This Guide
Introduction
Basics: Themes, Styles, Components & Layouts
Theme Basics
Advanced Theming
Working With The GUI Builder
The Components Of Codename One
Using ComponentSelector
Animations & Transitions
The EDT - Event Dispatch Thread
Monetization
Graphics, Drawing, Images & Fonts
Events
File-System,-Storage,-Network-&-Parsing
Miscellaneous Features
Performance, Size & Debugging
Advanced Topics/Under The Hood
Signing, Certificates & Provisioning
Appendix: Working With iOS
Appendix: Working with Mac OS X
Appendix: Working With Javascript
Appendix: Working With UWP
Security
cn1libs
Appendix: Casual Game Programming