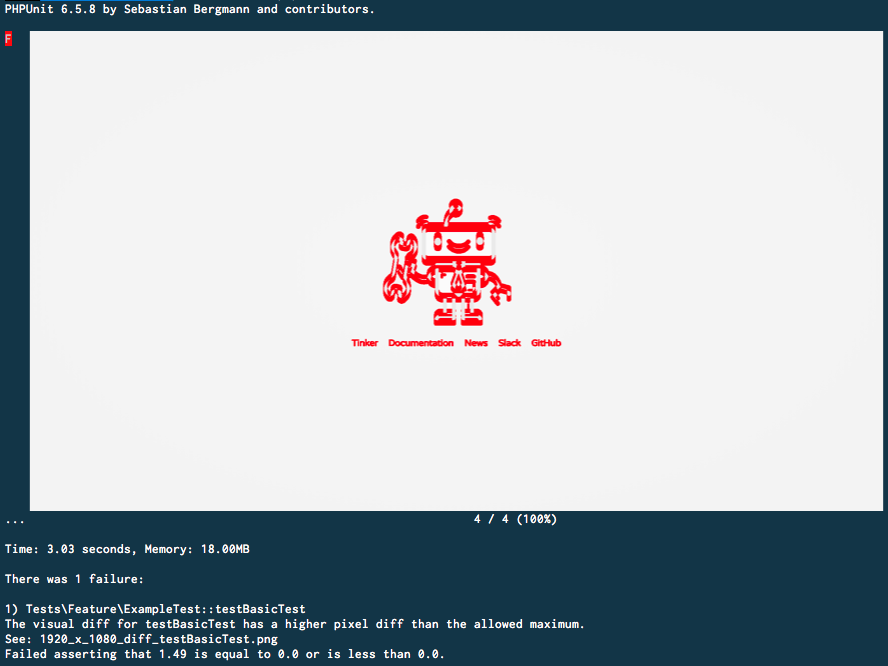
This package can create a visual diff of two screenshots of your Laravel application. It works for both - regular HTTP tests, as well as tests using Laravel Dusk. Behind the scenes, it uses Pixelmatch to diff the two images.
Here are two basic examples of how the package works:
Using Laravel Dusk:
class ExampleTest extends DuskTestCase
{
    /**
     * A basic browser test example.
     *
     * @return void
     */
    public function testBasicExample()
    {
        $this->browse(function (Browser $browser) {
            $browser->visit('/')
                    ->visualDiff();
        });
    }
}
Using Laravel HTTP Testing:
class ExampleTest extends TestCase
{
    /**
     * A basic test example.
     *
     * @return void
     */
    public function testBasicExample()
    {
        $this->get('/')
             ->visualDiff();
    }
}This package requires node 7.6.0 or higher and the Pixelmatch Node library.
You can install the Pixelmatch on MacOS via NPM:
npm install pixelmatchOr you could install it globally
npm install pixelmatch --globalDepending on your setup, node or npm might be not directly available to VisualDiff.
If you need to manually set these binary paths, you can do this by setting the npm_binary and node_binary config settings in the visualdiff.php configuration file.
This package can be installed through Composer.
composer require beyondcode/laravel-visual-diffThe package will automatically register the VisualDiffServiceProvider with your Laravel application.
The package adds a new method to either the TestResponse or the Browser class which is called visualDiff.
Depending on how you want to create visual diffs, follow the usage guidelines for the Laravel Dusk integration or the HTTP testing integration.
The visualDiff method accepts a name, that will be used for the screenshot generation. If you do not provide a name, the package will try and guess the test name. If this does not work for you, please provide a name manually instead.
Just call the visualDiff() method on the Laravel Dusk Browser instance that you use for testing:
$this->browse(function (Browser $browser) {
    $browser->visit('/')
            ->visualDiff();
});
This will automatically create a screenshot in all provided resolutions and create a diff, if a previous screenshot is available.
Just call the visualDiff() method on the TestResponse instance that you use for testing:
$this->get('/')
     ->visualDiff();
This will automatically create a screenshot in all provided resolutions and create a diff, if a previous screenshot is available.
When VisualDiff detects differences in the new screenshot compared to the previous successfully created screenshot, the PHPUnit test will fail. It will tell you which test caused the visual difference as well as giving you the filename of the screenshot diff.
Now you need to handle with this visual diff, just as you would with a code-diff. Review the changes and either approve the visual difference, or revert the UI state back to the successful state.
You can approve the new screenshots by adding a -d --update-screenshots flag to the phpunit command.
> ./vendor/bin/phpunit -d --update-screenshots

OK (1 test, 1 assertion)Creating diffs for multiple resolutions can be very useful - especially if you want to test responsive websites and applications.
You can define all possible resolutions in your visualdiff.php configuration file:
/**
 * Define all different resolutions that you want to use when performing
 * the regression tests.
 */
'resolutions' => [
    [
        'width' => 1920,
        'height'=> 1080
    ]
]
Alternatively, you may want to only create one specific diff in multiple resolutions.
You can do this using the visualDiffForResolutions method and provide an array with the resolutions to test.
$this->get('/')
     ->visualDiffForResolutions([
        [
            'width' => 1920,
            'height' => 1080
        ],
        [
            'width' => 640,
            'height' => 480
        ],
]);If you use iTerm2 as your terminal of choice, you will see an image representation of the diff when you run your tests.
Please see CHANGELOG for more information on what has changed recently.
Please see CONTRIBUTING for details.
If you discover any security related issues, please email [email protected] instead of using the issue tracker.
The MIT License (MIT). Please see License File for more information.


