This repository has been archived by the owner on Nov 17, 2023. It is now read-only.
[MXNET-422] Distributed training tutorial #10955
There are no files selected for viewing
This file contains bidirectional Unicode text that may be interpreted or compiled differently than what appears below. To review, open the file in an editor that reveals hidden Unicode characters.
Learn more about bidirectional Unicode characters
This file contains bidirectional Unicode text that may be interpreted or compiled differently than what appears below. To review, open the file in an editor that reveals hidden Unicode characters.
Learn more about bidirectional Unicode characters
| Original file line number | Diff line number | Diff line change |
|---|---|---|
| @@ -0,0 +1,255 @@ | ||
| # Distributed Training using Gluon | ||
|
|
||
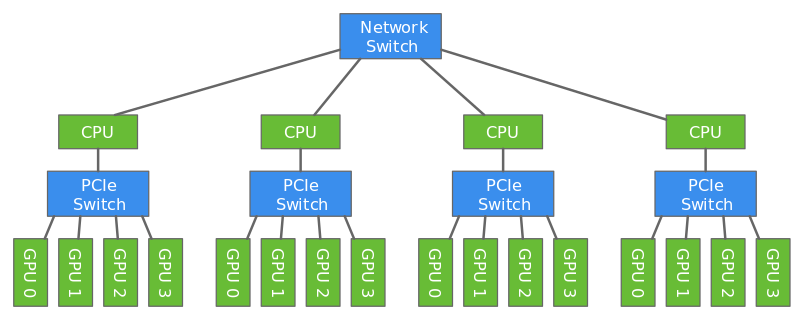
| Deep learning models are usually trained using GPUs because GPUs can do a lot more computations in parallel that CPUs. But even with the modern GPUs, it could take several days to train big models. Training can be done faster by using multiple GPUs like described in [this](https://gluon.mxnet.io/chapter07_distributed-learning/multiple-gpus-gluon.html) tutorial. However only a certain number of GPUs can be attached to one host (typically 8 or 16). To make the training even faster, we can use multiple GPUs attached to multiple hosts. | ||
|
|
||
|
|
||
| In this tutorial, we will show how to train a model faster using multi-host distributed training. | ||
|
|
||
|  | ||
|
|
||
| We will use data parallelism to distribute the training which involves splitting the training data across GPUs attached to multiple hosts. Since the hosts are working with different subset of the training data in parallel, the training completes a lot faster. | ||
|
|
||
| In this tutorial, we will train a ResNet18 network using CIFAR-10 dataset using two hosts each having four GPUs. | ||
|
|
||
| ## Distributed Training Architecture: | ||
|
|
||
| Multihost distributed training involves working with three different types of processes - worker, parameter server and scheduler. | ||
|
|
||
| 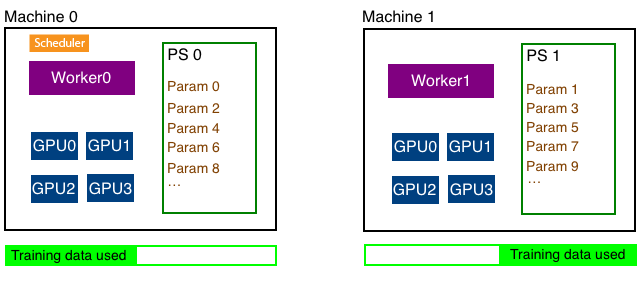 | ||
|
|
||
| ### Parameter Server: | ||
| The parameters of the model needs to be shared with all hosts since multiple hosts are working together to train one model. To make this sharing efficient, the parameters are split across multiple hosts. A parameter server in each host stores a subset of parameters. In the figure above, parameters are split evenly between the two hosts. At the end of every iteration, each host communicates with every other host to update all parameters of the model. | ||
|
|
||
| ### Worker: | ||
| Each host has a worker process which in each iteration fetches a batch of data, runs forward and backward pass on all GPUs in the host, computes the parameter updates and sends those updates to the parameter servers in each host. Since we have multiple workers to train the model, each worker only needs to process 1/N part of the training data where N is the number of workers. | ||
|
|
||
| ### Scheduler: | ||
| Scheduler is responsible for scheduling the workers and parameter servers. There is only one scheduler in the entire cluster. | ||
|
|
||
| ## Moving to distributed training: | ||
|
|
||
| [cifar10_dist.py](cifar10_dist.py) contains code that trains a ResNet18 network using distributed training. In this section we'll walk through parts of that file that are unique to distributed training. | ||
|
|
||
| ### Step 1: Use a distributed key-value store: | ||
|
|
||
| Like mentioned above, in distributed training, parameters are split into N parts and distributed across N hosts. This is done automatically by the [distributed key-value store](https://mxnet.incubator.apache.org/tutorials/python/kvstore.html). User only needs to create the distributed kv store and ask the `Trainer` to use the created store. | ||
|
|
||
| ```python | ||
| store = mxnet.kv.create('dist') | ||
| ``` | ||
|
|
||
| It is the job of the trainer to take the gradients computed in the backward pass and update the parameters of the model. We'll tell the trainer to store and update the parameters in the distributed kv store we just created instead of doing it in GPU of CPU memory. For example, | ||
|
|
||
| ```python | ||
| trainer = gluon.Trainer(net.collect_params(), | ||
| 'adam', {'learning_rate': .001}, | ||
| kvstore=store) | ||
| ``` | ||
|
|
||
| ## Step 2: Split the training data: | ||
|
|
||
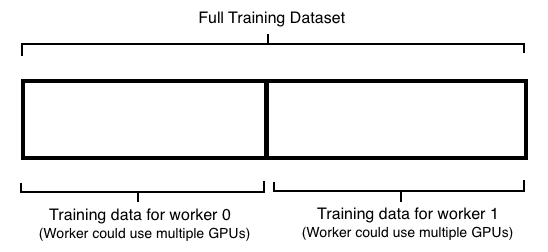
| In distributed training (using data parallelism), training data is split into equal parts across all workers and each worker uses its subset of the training data for training. For example, if we had two machines, each running a worker, each worker managing four GPUs we'll split the data like shown below. Note that we don't split the data depending on the number of GPUs but split it depending on the number of workers. | ||
|
|
||
|  | ||
|
|
||
| Each worker can find out the total number of workers in the cluster and its own rank which is an integer between 0 and N-1 where N is the number of workers. | ||
|
|
||
| ```python | ||
| store = kv.create('dist') | ||
| print("Total number of workers: %d" % store.num_workers) | ||
| print("This worker's rank: %d" % store.rank) | ||
|
There was a problem hiding this comment. it would be nice to have an example of the output of these functions in the |
||
| ``` | ||
|
|
||
| ``` | ||
| Total number of workers: 2 | ||
| This worker's rank: 0 | ||
| ``` | ||
|
|
||
| Knowing the number of workers and a particular worker's rank, it is easy to split the dataset into partitions and pick one partition to train depending on the rank of the worker. Here is a sampler that does exactly that. | ||
|
|
||
| ```python | ||
| class SplitSampler(gluon.data.sampler.Sampler): | ||
| """ Split the dataset into `num_parts` parts and sample from the part with index `part_index` | ||
| Parameters | ||
| ---------- | ||
| length: int | ||
| Number of examples in the dataset | ||
| num_parts: int | ||
| Partition the data into multiple parts | ||
| part_index: int | ||
| The index of the part to read from | ||
| """ | ||
| def __init__(self, length, num_parts=1, part_index=0): | ||
| # Compute the length of each partition | ||
| self.part_len = length // num_parts | ||
| # Compute the start index for this partition | ||
| self.start = self.part_len * part_index | ||
| # Compute the end index for this partition | ||
| self.end = self.start + self.part_len | ||
|
|
||
| def __iter__(self): | ||
| # Extract examples between `start` and `end`, shuffle and return them. | ||
| indices = list(range(self.start, self.end)) | ||
| random.shuffle(indices) | ||
| return iter(indices) | ||
|
|
||
| def __len__(self): | ||
| return self.part_len | ||
| ``` | ||
|
|
||
| We can then create a `DataLoader` using the `SplitSampler` like shown below: | ||
|
|
||
| ```python | ||
| # Load the training data | ||
| train_data = gluon.data.DataLoader(gluon.data.vision.CIFAR10(train=True, transform=transform), | ||
| batch_size, | ||
| sampler=SplitSampler(50000, store.num_workers, store.rank)) | ||
| ``` | ||
|
|
||
| ## Step 3: Training with multiple GPUs | ||
|
|
||
| Note that we didn't split the dataset by the number of GPUs. We split it by the number of workers which usually translates to number of machines. It is the worker's responsibility to split the partition it has across multiple GPUs it might have and run the training in parallel across multiple GPUs. | ||
|
|
||
| To train with multiple GPUs, we first need to specify the list of GPUs we want to use for training: | ||
|
|
||
| ```python | ||
| ctx = [mx.gpu(i) for i in range(gpus_per_machine)] | ||
| ``` | ||
|
|
||
| We can then train a batch like shown below: | ||
|
|
||
| ```python | ||
| # Train a batch using multiple GPUs | ||
| def train_batch(batch, ctx, net, trainer): | ||
|
|
||
| # Split and load data into multiple GPUs | ||
| data = batch[0] | ||
| data = gluon.utils.split_and_load(data, ctx) | ||
|
|
||
| # Split and load label into multiple GPUs | ||
| label = batch[1] | ||
| label = gluon.utils.split_and_load(label, ctx) | ||
|
|
||
| # Run the forward and backward pass | ||
| forward_backward(net, data, label) | ||
|
|
||
| # Update the parameters | ||
| this_batch_size = batch[0].shape[0] | ||
| trainer.step(this_batch_size) | ||
| ``` | ||
|
|
||
| Here is the code that runs the forward (computing loss) and backward (computing gradients) pass on multiple GPUs: | ||
|
|
||
| ```python | ||
| # We'll use cross entropy loss since we are doing multiclass classification | ||
| loss = gluon.loss.SoftmaxCrossEntropyLoss() | ||
|
|
||
| # Run one forward and backward pass on multiple GPUs | ||
| def forward_backward(net, data, label): | ||
|
|
||
| # Ask autograd to remember the forward pass | ||
| with autograd.record(): | ||
| # Compute the loss on all GPUs | ||
| losses = [loss(net(X), Y) for X, Y in zip(data, label)] | ||
|
|
||
| # Run the backward pass (calculate gradients) on all GPUs | ||
| for l in losses: | ||
| l.backward() | ||
| ``` | ||
|
|
||
| Given `train_batch`, training an epoch is simple: | ||
|
|
||
| ```python | ||
| for batch in train_data: | ||
| # Train the batch using multiple GPUs | ||
| train_batch(batch, ctx, net, trainer) | ||
| ``` | ||
|
|
||
| ## Final Step: Launching the distributed training | ||
|
|
||
| Note that there are several processes that needs to be launched on multiple machines to do distributed training. One worker and one parameter server needs to be launched on each host. Scheduler needs to be launched on one of the hosts. While this can be done manually, MXNet provides the [`launch.py`](https://github.com/apache/incubator-mxnet/blob/master/tools/launch.py) tool to make this easy. | ||
|
|
||
| For example, the following command launches distributed training on two machines: | ||
|
|
||
| ``` | ||
| python ~/mxnet/tools/launch.py -n 2 -s 2 -H hosts \ | ||
| --sync-dst-dir /home/ubuntu/cifar10_dist \ | ||
| --launcher ssh \ | ||
| "python /home/ubuntu/cifar10_dist/cifar10_dist.py" | ||
| ``` | ||
|
|
||
| - `-n 2` specifies the number of workers that must be launched | ||
| - `-s 2` specifies the number of parameter servers that must be launched. | ||
| - `--sync-dst-dir` specifies a destination location where the contents of the current directory will be rsync'd | ||
| - `--launcher ssh` tells `launch.py` to use ssh to login on each machine in the cluster and launch processes. | ||
| - `"python /home/ubuntu/dist/dist.py"` is the command that will get executed in each of the launched processes. | ||
| - Finally, `-H hosts` specifies the list of hosts in the cluster to be used for distributed training. | ||
|
|
||
| Let's take a look at the `hosts` file. | ||
|
|
||
| ``` | ||
| ~/dist$ cat hosts | ||
| d1 | ||
| d2 | ||
| ``` | ||
|
|
||
| 'd1' and 'd2' are the hostnames of the hosts we want to run distributed training using. `launch.py` should be able to ssh into these hosts by providing just the hostname on the command line. For example: | ||
|
|
||
| ``` | ||
| ~/dist$ ssh d1 | ||
| Welcome to Ubuntu 16.04.3 LTS (GNU/Linux 4.4.0-1049-aws x86_64) | ||
|
|
||
| * Documentation: https://help.ubuntu.com | ||
| * Management: https://landscape.canonical.com | ||
| * Support: https://ubuntu.com/advantage | ||
|
|
||
| Get cloud support with Ubuntu Advantage Cloud Guest: | ||
| http://www.ubuntu.com/business/services/cloud | ||
|
|
||
| 0 packages can be updated. | ||
| 0 updates are security updates. | ||
|
|
||
|
|
||
| Last login: Wed Jan 31 18:06:45 2018 from 72.21.198.67 | ||
| ``` | ||
|
|
||
| Note that no authentication information was provided to login to the host. This can be done using multiple methods. One easy way is to specify the ssh certificates in `~/.ssh/config`. Example: | ||
|
|
||
| ``` | ||
| ~$ cat ~/.ssh/config | ||
| Host d1 | ||
| HostName ec2-34-201-108-233.compute-1.amazonaws.com | ||
| port 22 | ||
| user ubuntu | ||
| IdentityFile /home/ubuntu/my_key.pem | ||
| IdentitiesOnly yes | ||
|
|
||
| Host d2 | ||
| HostName ec2-34-238-232-97.compute-1.amazonaws.com | ||
| port 22 | ||
| user ubuntu | ||
| IdentityFile /home/ubuntu/my_key.pem | ||
| IdentitiesOnly yes | ||
| ``` | ||
|
|
||
| A better way is to use ssh agent forwarding. Check [this](https://aws.amazon.com/blogs/security/securely-connect-to-linux-instances-running-in-a-private-amazon-vpc/) article for more details. | ||
|
|
||
| Here is a sample output from running distributed training: | ||
|
|
||
| ``` | ||
| $ python ~/mxnet/tools/launch.py -n 2 -s 2 -H hosts --sync-dst-dir /home/ubuntu/cifar10_dist --launcher ssh "python /home/ubuntu/cifar10_dist/cifar10_dist.py" | ||
| 2018-06-03 05:30:05,609 INFO rsync /home/ubuntu/cifar10_dist/ -> a1:/home/ubuntu/cifar10_dist | ||
| 2018-06-03 05:30:05,879 INFO rsync /home/ubuntu/cifar10_dist/ -> a2:/home/ubuntu/cifar10_dist | ||
| Epoch 0: Test_acc 0.467400 | ||
| Epoch 0: Test_acc 0.466800 | ||
| Epoch 1: Test_acc 0.568500 | ||
| Epoch 1: Test_acc 0.571300 | ||
| Epoch 2: Test_acc 0.586300 | ||
| Epoch 2: Test_acc 0.594000 | ||
| Epoch 3: Test_acc 0.659200 | ||
| Epoch 3: Test_acc 0.653300 | ||
| Epoch 4: Test_acc 0.681200 | ||
| Epoch 4: Test_acc 0.687900 | ||
| ``` | ||
|
|
||
| Note that the output from all hosts are merged and printed to the console. | ||
|
|
||
Oops, something went wrong.
Add this suggestion to a batch that can be applied as a single commit.
This suggestion is invalid because no changes were made to the code.
Suggestions cannot be applied while the pull request is closed.
Suggestions cannot be applied while viewing a subset of changes.
Only one suggestion per line can be applied in a batch.
Add this suggestion to a batch that can be applied as a single commit.
Applying suggestions on deleted lines is not supported.
You must change the existing code in this line in order to create a valid suggestion.
Outdated suggestions cannot be applied.
This suggestion has been applied or marked resolved.
Suggestions cannot be applied from pending reviews.
Suggestions cannot be applied on multi-line comments.
Suggestions cannot be applied while the pull request is queued to merge.
Suggestion cannot be applied right now. Please check back later.
There was a problem hiding this comment.
Choose a reason for hiding this comment
The reason will be displayed to describe this comment to others. Learn more.
Please move this to
docs/tutorialsand change thisREADME.mdto refer this file insteadThere was a problem hiding this comment.
Choose a reason for hiding this comment
The reason will be displayed to describe this comment to others. Learn more.
If I move this to
docs/tutorials, I can't make it pass the tutorials tests without putting most of the code under "```" instead of "```python". This will remove syntax highlighting and result is bad user experience. If there is a way to whitelist this tutorial from the automated tests, please let me know.There was a problem hiding this comment.
Choose a reason for hiding this comment
The reason will be displayed to describe this comment to others. Learn more.
I only see this block not being able to run in a notebook?
There was a problem hiding this comment.
Choose a reason for hiding this comment
The reason will be displayed to describe this comment to others. Learn more.
Few more blocks:
store = mxnet.kv.create('dist’)won’t work without a bunch of environment variables being defined. launch.py defines these variables.
trainer = gluon.Trainer(net.collect_params(),won’t work because net is not defined
print("Total number of workers: %d" % store.num_workers)won’t work because store cannot be created. See above.
There was a problem hiding this comment.
Choose a reason for hiding this comment
The reason will be displayed to describe this comment to others. Learn more.
I see, I just don't like the idea of pointing to a github readme for a tutorial from a UI and UX perspective and also have no test coverage on it. I'll let others weight on it, but if that's the only solution... I'm just not happy with it, considering what happened with the tutorial on the straight dope etc. I wonder if we could work out a specific test case where we run a distributed training in a bunch of docker containers.
There was a problem hiding this comment.
Choose a reason for hiding this comment
The reason will be displayed to describe this comment to others. Learn more.
If the concern is about test coverage, can we add distributed_training/cifar10_dist.py to nightly test suite, with some assertion of accuracy on validation set?