english
- Goal
- Timer
- Download/Install software
- Setup the virtual-host
- Build infrastructure servers
- Create database server
- Install Grid and Oracle yourself
- Internet access for database server
- LICENSE
Build infrastructure to quickly setup Oracle databases, and other type of VM.
The main server is named K2, its role :
- manage DNS.
- manage DHCP, principally to integrate clients VM into the network.
- manage rpm repository for updates.
- the gateway.
No knowledge required to manage the SAN or the DNS, all actions are scripted.
Don't work if the virtual-host is windows, you must use linux. Script are tested only on openSUSE (LEAP).
Glossary :
-
virtual-host : machine that run VirtualBox.
-
virtual-guest : virtual machine (server).
if your hardware have a HPET timer check if it enable on your OS.
-
Check available timers :
$ cat /sys/devices/system/clocksource/clocksource0/available_clocksource tsc hpet acpi_pm -
Current timer :
 $ cat /sys/devices/system/clocksource/clocksource0/current_clocksource
 hpet
With HPET timer performances are betters.
-
VirtualBox :
zypper install [...]oryum install [...]orapt-get install [...] -
Oracle Database 12c & Grid Infrastructure 12c. Releases 12.1, 12.2 or both
-
Repository
plescriptsmust be cloned in your$HOME:$ cd $HOME $ git clone https://github.com/PhilippeLeroux/plescripts.gitAdd
~/plescripts/shellto variablePATH, update your.bash_profile:$ echo "export PATH=\$PATH:\$HOME/plescripts/shell" >> ~/.bash_profileor execute :
echo "[ -f ~/plescripts/myconfig/bashrc_extensions ] && . ~/plescripts/myconfig/bashrc_extensions || true" >> ~/.bashrc -
To refresh an existing repository :
$ cd ~/plescripts $ git fetch ; git pull -
Oracle Linux 7.5 :
-
Download only the ISO V975367-01.iso
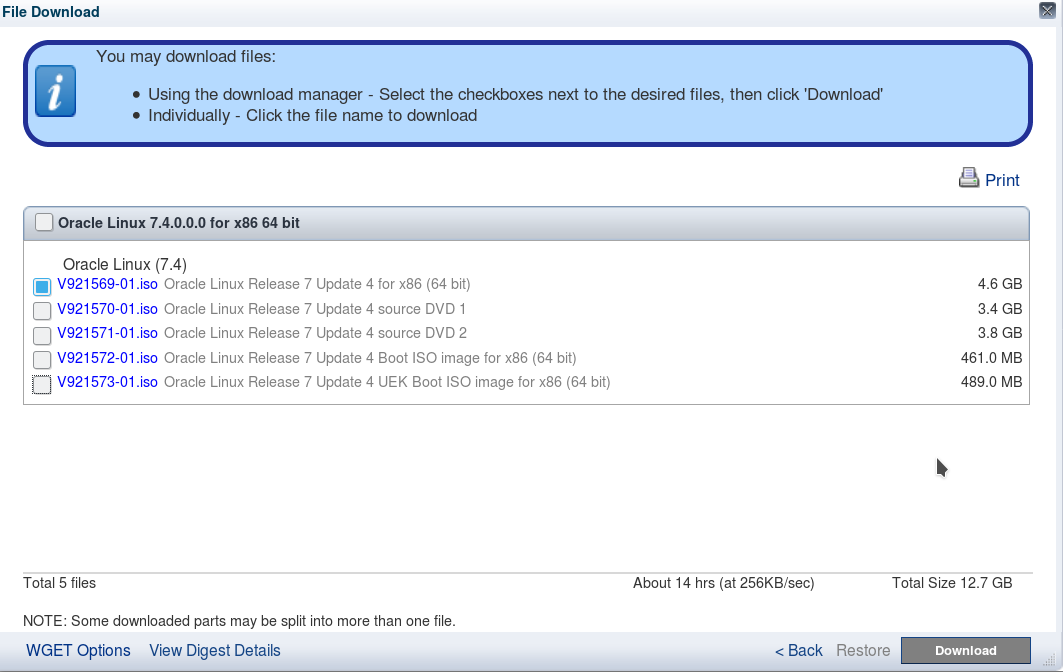
And move ISO to directory :
~/ISO/oracle_linux_7/ -
Or use script
wget_ol74_iso.sh:$ cd ~/plescripts $ ./wget_ol74_iso.sh SSO User Name:[email protected] SSO Password: [...]And move ISO :
 $ mkdir -p ~/ISO/oracle_linux_7
 $ mv V921569-01.iso ~/ISO/oracle_linux_7/
-
Default release is 12.2.
If you want 12.1 do :
$ cd ~/plescripts
$ ./update_local_cfg.sh ORACLE_RELEASE=12.1.0.2
You can skip instructions for Oracle 12.1 if 12.2 is enable, and you can skip instructions for 12.2 if 12.1 is enable.
If you want 18.0 do :
$ cd ~/plescripts
$ ./update_local_cfg.sh ORACLE_RELEASE=18.0.0.0
-
Extract zips for Oracle 12.1
Copy files to
~/oracle_install/12.1/- linuxamd64_12102_database_1of2.zip
- linuxamd64_12102_database_2of2.zip
and extract them
unzip linuxamd64_12102_database_1of2.zipunzip linuxamd64_12102_database_2of2.zip
Directory content after extraction :
$ ls -1 ~/oracle_install/12.1/database install response rpm runInstaller sshsetup stage welcome.html -
Extract zips for Grid 12.1
Copy files to
~/oracle_install/12.1/gridzips :- linuxamd64_12102_grid_1of2.zip
- linuxamd64_12102_grid_2of2.zip
And extract them
unzip linuxamd64_12102_grid_1of2.zipunzip linuxamd64_12102_grid_2of2.zip
Directory content after extraction :
$ ls -1 ~/oracle_install/12.1/grid/ install response rpm runcluvfy.sh runInstaller sshsetup stage welcome.html -
For Oracle 12cR2 copy and extract
linuxx64_12201_database.zipto~/oracle_install/12.2/Directory content after extraction :
$ ls -1 ~/oracle_install/12.2/database install response rpm runInstaller sshsetup stage welcome.html -
For Oracle Grid 12cR2 : copy
linuxx64_12201_grid_home.zipto directory~/oracle_install/12.2/griddon't unzip it.Directory content :
$ ls -1 ~/oracle_install/12.2/grid linuxx64_12201_grid_home.zip -
For Oracle 18c
- Database 18c copy
LINUX.X64_180000_db_home.zipto directory~/oracle_install/18.0/database - Grid 18c copy
LINUX.X64_180000_grid_home.zipto directory~/oracle_install/18.0/grid
Directory content :
$ ls -1 ~/oracle_install/18.0/database LINUX.X64_180000_db_home.zip $ ls -1 ~/oracle_install/18.0/grid LINUX.X64_180000_grid_home.zip - Database 18c copy
- VirtualBox
- nc (from the netcat-openbsd package)
- ssh
- git (optional)
- tmux (optional)
Add a second nameserver 192.250.240.3 and search domain orcl
-
Name of you network interface
$ ip link show|grep "state UP" 2: eth0: <BROADCAST,MULTICAST,UP,LOWER_UP> mtu 1500 qdisc pfifo_fast state UP mode DEFAULT group default qlen 1000eth0is the name of my network interface. -
Connection name for your NIC :
 $ nmcli connection show| grep eth0
 Wired connection 1  b8c5a724-d5ed-4cb1-aa9c-faad8e42c2dd  802-3-ethernet   eth0
For me it's
Wired connection 1. -
Read your passerelle IP :
 $ nmcli device show eth0 | grep -i passerelle
 IP4.PASSERELLE:                         192.168.1.1
 IP6.PASSERELLE:
For me it's
192.168.1.1. -
Read your domain name :
 $ nmcli connection show Wired\ connection\ 1 | grep search
  ipv4.dns-search:                        home
My current domain is
home -
Update configuration
Replace
192.168.X.Xby your passerelle IP andHHHHby your current domain name.Keep IPs and domain names orders.
 $ nmcli connection modify Wired\ connection\ 1 ipv4.dns "192.250.240.3 192.168.X.X"
 $ nmcli connection modify Wired\ connection\ 1 ipv4.dns-search "orcl HHHH"
 $ systemctl restart network
 $ nmcli connection modify Wired\ connection\ 1 ipv4.ignore-auto-dns true
 $ cat /etc/resolv.conf
 # Generated by NetworkManager
 search orcl home
 nameserver 192.250.240.3
 nameserver 192.168.1.1
Before line
search orcl homeaddoptions timeout:1 attempts:1.$ cat /etc/resolv.conf options timeout:1 attempts:1 search orcl home nameserver 192.250.240.3 nameserver 192.168.1.1
-
Firewall : put iface
vboxnet1in a trusted zone.To create NIC
vboxnet1:$ cd ~/plescripts/virtualbox $ ./create_iface.sh -force_iface_name=vboxnet1Configuration for ubuntu, I didn't test it myself :
$ sudo nmcli connection modify vboxnet1 connection.zone trusted $ sudo firewall-cmd --get-active-zones public interfaces: enp0s3 trusted interfaces: vboxnet1 -
Install packages
rcpbind&nfs-server -
Enable NFS server :
 sudo systemctl enable rpcbind
 sudo systemctl start rpcbind
 sudo systemctl enable nfs-server
 sudo systemctl start nfs-server
Export directories :
-
~/plescriptsread write. -
~/oracle_install/12.1read only (If you have downloaded the 12.1). -
~/oracle_install/12.2read only (If you have downloaded the 12.2).
Update /etc/exports :
$ sudo sh -c "echo '$HOME/plescripts 192.250.240.0/24(rw,sync,subtree_check,no_root_squash)' >> /etc/exports"
$ sudo sh -c "echo '$HOME/oracle_install/12.1 192.250.240.0/24(ro,subtree_check)' >> /etc/exports"
$ sudo sh -c "echo '$HOME/oracle_install/12.2 192.250.240.0/24(ro,subtree_check)' >> /etc/exports"
And execute : sudo exportfs -au and sudo exportfs -a
If default value it's ok press return key or enter appropriate value.
On a computer with low power choose vbox.
Grid Infra 12cR1 don't work on DVD R3 or R4 (ok with DVD R2), the rpm repository need to be updated from Oracle repository. Grid Infra 12cR2 work fine with DVD R3 or R4.
Execute script configure_global.cfg.sh, output sample :
$ cd ~/plescripts
$ ./configure_global.cfg.sh
# VMs folder :
# Press <enter> to select : $HOME/VirtualBox VMs
# Or new value :
# Exists $HOME/VirtualBox VMs : [ok]

# Oracle Linux release : 7.2, 7.3, 7.4 :
# Press <enter> to select : 7.5
# Or new value :

# Exists $HOME/ISO/oracle_linux_7/V100082-01.iso : [ok]

# Gateway IP (Box address) :
# Press <enter> to select : 192.168.1.1
# Or new value :
# Ping 192.168.1.1 [ok]

# Disks managed by san or vbox (vbox = VirtualBox) :
# Press <enter> to select : vbox
# Or new value :

# Use virtual disk (enter vdi) or physical disk (enter full device name) :
# Press <enter> to select : vdi
# Or new value :

# Network interfaces
12h28> ip link show | grep -vE "(lo|vboxnet)" | grep "state UP"
2: eth0: <BROADCAST,MULTICAST,UP,LOWER_UP> mtu 1500 qdisc pfifo_fast state UP mode DEFAULT group default qlen 1000

# Network interface to used for internet access.
# Press <enter> to select : eth0
# Or new value :

# =======================================================================================================
12h28> sed -i 's/gateway=.*$/gateway=192.168.1.1/g' ~/plescripts/global.cfg

12h28> sed -i 's/hostvm=.*$/hostvm=linux_virtualbox/g' ~/plescripts/global.cfg

12h28> sed -i 's/client_hostname=.*/client_hostname=kangs/g' ~/plescripts/global.cfg

12h28> sed -i 's/common_user_name=.*/common_user_name=kangs/g' ~/plescripts/global.cfg
12h28> sed -i 's/common_uid=.*/common_uid=1000/g' ~/plescripts/global.cfg

12h28> sed -i 's/if_net_bridgeadapter=.*/if_net_bridgeadapter=eth0/g' ~/plescripts/global.cfg

12h28> sed -i 's~disks_hosted_by=.*$~disks_hosted_by=${DISKS_HOSTED_BY:-vbox}~g' ~/plescripts/global.cfg
12h28> sed -i 's~san_disk=.*$~san_disk=${SAN_DISK_TYPE:-vdi}~g' ~/plescripts/global.cfg

# Configure Oracle Linux 7 release
12h28> echo "OL7_LABEL=7.2" >> $HOME/plescripts/local.cfg

# Configure repository OL7
12h28> echo "INFRA_YUM_REPOSITORY_RELEASE=DVD_R2" >> ~/plescripts/local.cfg
12h28> echo "ORCL_YUM_REPOSITORY_RELEASE=DVD_R2" >> ~/plescripts/local.cfg
Execute script validate_config.sh, output sample :
$ cd ~/plescripts
$ ./validate_config.sh
# =======================================================================================================
# Directory exists $HOME/plescripts [ok]

# =======================================================================================================
# Oracle 12.1 extracted :
# Exist $HOME/oracle_install/12.1/database/runInstaller [ok]

# Grid 12.1 extracted :
# Exist $HOME/oracle_install/12.1/grid/runInstaller [ok]

# =======================================================================================================
# Validate NFS exports from kangs on network 192.250.240.0 :
#   - $HOME/plescripts [ok]
#   - $HOME/oracle_install/12.1 [ok]

# =======================================================================================================
# ISO Oracle Linux 7.4 exists $HOME/ISO/oracle_linux_7/V921569-01.iso [ok]

# =======================================================================================================
# Validate gateway 192.168.1.1 [ok]

# =======================================================================================================
# Validate resolv.conf
#  - Test : search orcl [ok]
#  - Test : nameserver 192.250.240.3 [ok]

# =======================================================================================================
# $PATH contains $HOME/plescripts/shell [ok]

# Installed :
#   VBoxManage [ok]
#   nc         [ok]
#   ssh        [ok]
#   git        [ok]
#   tmux       [ok]

# =======================================================================================================
# ~/plescripts/configure_global.cfg.sh executed [ok]

# =======================================================================================================
09h48> ~/plescripts/shell/set_plescripts_acl.sh
# Positionne les acls sur ~/plescripts
09h48> setfacl -R -d -m u:kangs:rwx,g:users:rwx,o::r-x $HOME/plescripts/

# =======================================================================================================
# Configuration [ok]
If there are errors, correct them, do not continue.
- orclmaster used to build database servers.
- K2 server :
- DNS
- NTP
- GATEWAY
- SAN (iSCSI with target)
-
Create kiclstart file.
Execute script :
./00_create_install_iso.shSettings are loaded from your OS, you must confirm them.
If there are errors, you can override parameters :
 $ cd ~/plescripts/setup_first_vms/vbox_scripts
 $ ./00_create_install_iso.sh -h
 # Usage :
 		[-keymap=detect]   Keyboard mapping.
 		[-locale=detect]   Locale.
 		[-timezone=detect] Timezone.
Ex :
./00_create_install_iso.sh -keymap=us -locale=us_US.UTF-8The script run : ~10mn.
-
Install Oracle Linux 7.5
Execute script :
./01_create_vm_and_install_ol7.shThe script run ~10mn, wait the reboot to continue.
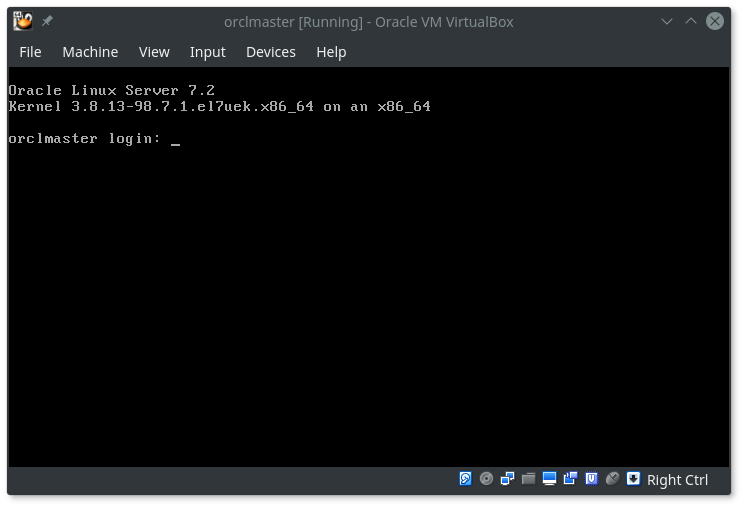
Wait this screen.
Execute script : ./02_install_vm_infra.sh
The script run : ~1h.
Server K2 is ready.
Execute script : ./03_install_vm_master.sh
The script run : ~10mn.
Server orclmaster is ready.
-
To change memory or cpu for VM, update variables like
VM_MEMORY_MB_FOR_SINGLE_DB_xxxorVM_NR_CPUS_FOR_SINGLE_DB_xxxsee help :$ cd ~/plescripts $ ./update_local_cfg.sh -h [ output skipped ]To give 6Gb of memory for a RAC :
$ cd ~/plescripts $ ./update_local_cfg.sh VM_MEMORY_MB_FOR_RAC_DB_122=$((6*1024)) -
Create server
First script to call is
./define_new_server.sh.All scripts write there logs into directory :
~/plescripts/log
From the virtual-host execute :
$ cd ~/plescripts/database_servers
$ ./define_new_server.sh -db=foo -rel=12.2

# ======================================================================
08h26> mkdir $HOME/plescripts/database_servers/foo

# Configuration for foo exist : [ok]

# Oracle Release : 12.2.0.1

# LUNs hosted by : K2 protocol iSCSI
# ORACLE_HOME FS : xfs

# Node #1 standalone :
#       Server name     srvfoo01       : 192.250.240.106
#       Interco iSCSI   srvfoo01-iscsi : 66.60.60.106

# DG DATA :
#       S1DISKFOO01  4Gb
#       S1DISKFOO02  4Gb
#       S1DISKFOO03  4Gb
#       S1DISKFOO04  4Gb
#           4 disks 16Gb

# DG FRA :
#       S1DISKFOO05  4Gb
#       S1DISKFOO06  4Gb
#       S1DISKFOO07  4Gb
#       S1DISKFOO08  4Gb
#           4 disks 16Gb

08h26> $HOME/plescripts/virtualbox/validate_vm_parameter.sh -type=single -nodes=1 -cpus=2 -memory=2512
# Hypervisor : kangs
#     Memory : 7 936 Mb, available for VMs 6 032 Mb (76%).
#     cpu    : #4

# VM type SINGLE #1 VMs
#     VM memory 2 512 Mb, for #1 VMs 2 512 Mb, 41% of 6 032 Mb : [ok]
<     Warning Oracle prereq : 8 192Mb/VMs

#     cpu #2 : [ok]

# Execute : ./clone_master.sh -db=foo
The last line give the next script to execute, all scripts give the next script to execute.
Instead of script clone_master.sh, you can execute ./install_all.sh -db=foo,
all scripts will be executed. Instructions to create the database will be printed
at the end.
Options :
- -db=id : id 8 characters maximum.
- -storage=FS : Grid Infra not installed.
- -rel=12.1|12.2 : Oracle version to install.
From the virtual-host execute :
$ cd ~/plescripts/database_servers
$ ./define_new_server.sh -db=bar -rel=12.2 -dataguard

# ======================================================================
08h31> mkdir $HOME/plescripts/database_servers/bar

# Configuration for bar exist : [ok]

# Oracle Release : 12.2.0.1

# LUNs hosted by : K2 protocol iSCSI
# ORACLE_HOME FS : xfs

# Dataguard 2 members.

# Node #1 standalone :
#       Server name     srvbar01       : 192.250.240.105
#       Interco iSCSI   srvbar01-iscsi : 66.60.60.105

# Node #2 standalone :
#       Server name     srvbar02       : 192.250.240.106
#       Interco iSCSI   srvbar02-iscsi : 66.60.60.106

# DG DATA :
#       S1DISKBAR01  4Gb
#       S1DISKBAR02  4Gb
#       S1DISKBAR03  4Gb
#       S1DISKBAR04  4Gb
#           4 disks 16Gb

# DG FRA :
#       S1DISKBAR05  4Gb
#       S1DISKBAR06  4Gb
#       S1DISKBAR07  4Gb
#       S1DISKBAR08  4Gb
#           4 disks 16Gb

08h31> $HOME/plescripts/virtualbox/validate_vm_parameter.sh -type=dataguard -nodes=2 -cpus=2 -memory=2512
# Hypervisor : kangs
#     Memory : 7 936 Mb, available for VMs 6 032 Mb (76%).
#     cpu    : #4

# VM type DATAGUARD #2 VMs
#     VM memory 2 512 Mb, for #2 VMs 5 024 Mb, 83% of 6 032 Mb : [ok]
<     Warning Oracle prereq : 8 192Mb/VMs

#     cpu #2 : [ok]

# Execute : ./create_database_servers.sh -db=bar
The last line give the next script to execute, all scripts give the next script to execute.
Instead of script create_database_servers.sh, you can execute ./install_all.sh -db=bar,
all scripts will be executed. Instructions to create the database will be printed
at the end.
Options :
- -db=id : id 6 characters maximum.
- -storage=FS : Grid Infra not installed.
- -rel=12.1|12.2 : Oracle version to install.
From the virtual-host execute :
$ cd ~/plescripts/database_servers
$ ./define_new_server.sh -db=orion -rel=12.2 -max_nodes=2

# ======================================================================
08h34> mkdir $HOME/plescripts/database_servers/orion

# Configuration for orion exist : [ok]

# Oracle Release : 12.2.0.1
# Master : orclmaster

# LUNs hosted by : K2 protocol iSCSI
# ORACLE_HOME FS : ocfs2 : heartbeat on eth1/66.60.60.126

# Node #1 RAC :
#     Server name     srvorion01       : 192.250.240.126
#     VIP             srvorion01-vip   : 192.250.240.127
#     Interco RAC     srvorion01-rac   : 66.60.20.126
#     Interco iSCSI   srvorion01-iscsi : 66.60.60.126

# Node #2 RAC :
#     Server name     srvorion02       : 192.250.240.128
#     VIP             srvorion02-vip   : 192.250.240.129
#     Interco RAC     srvorion02-rac   : 66.60.20.128
#     Interco iSCSI   srvorion02-iscsi : 66.60.60.128

# scan : orion-scan
#        192.250.240.130
#        192.250.240.131
#        192.250.240.132

# DG CRS :
#     S1DISKORION01  4Gb
#     S1DISKORION02  4Gb
#     S1DISKORION03  4Gb
#     S1DISKORION04  4Gb
#     S1DISKORION05  4Gb
#     S1DISKORION06  4Gb
#     S1DISKORION07  4Gb
#     S1DISKORION08  4Gb
#     S1DISKORION09  4Gb
#     S1DISKORION10  4Gb
#          10 disks 40Gb

# DG DATA :
#     S1DISKORION11  4Gb
#     S1DISKORION12  4Gb
#     S1DISKORION13  4Gb
#     S1DISKORION14  4Gb
#           4 disks 16Gb

# DG FRA :
#     S1DISKORION15  4Gb
#     S1DISKORION16  4Gb
#     S1DISKORION17  4Gb
#     S1DISKORION18  4Gb
#     S1DISKORION19  4Gb
#     S1DISKORION20  4Gb
#     S1DISKORION21  4Gb
#     S1DISKORION22  4Gb
#     S1DISKORION23  4Gb
#     S1DISKORION24  4Gb
#     S1DISKORION25  4Gb
#     S1DISKORION26  4Gb
#          12 disks 48Gb

08h34> $HOME/plescripts/virtualbox/validate_vm_parameter.sh -type=RAC -nodes=2 -cpus=2 -memory=2512
# Hypervisor : kangs
#     Memory : 7 936 Mb, available for VMs 6 032 Mb (76%).
#     cpu    : #4

# VM type RAC #2 VMs
#     VM memory 2 512 Mb, for #2 VMs 5 024 Mb, 83% of 6 032 Mb : [ok]
<     Warning Oracle prereq : 8 192Mb/VMs

#     cpu #2 : [ok]

# Execute : ./create_database_servers.sh -db=orion
The last line give the next script to execute, all scripts give the next script to execute.
Instead of script create_database_servers.sh, you can execute ./install_all.sh -db=orion,
all scripts will be executed. Instructions to create the database will be printed
at the end. Be careful script run between 3h and 4h.
Options :
- -db=id : id 8 characters maximum.
- -max_nodes=2 : number nodes, scripts don't work for more than 2 nodes.
- -rel=12.1|12.2 : Oracle version to install.
- -dataguard : not supported with RAC.
With Oracle Linux 7.2 add parameter -OH_FS=xfs, ocfs2 not work.
Execute from the virtual-hosts :
-
stop_vm orionstop all VM srvorion01 & srvorion01 -
start_vm orionstart all VM srvorion01 & srvorion01, VM K2 is started if needed.
This commands start or stop all VM for a RAC or a Dataguard.
From the virtual-host to remove servers orion execute :
$ cd ~/plescripts
$ ./cleanup_infra.sh -db=orion
DNS, SAN and ssh configuration will be updated.
If you want to connect from the virtual-host to a database the script tnssqldev.sh
can create the tnsnames.ora.
Ex create alias for CDB :
$ tnssqldev.sh -db=foo
Ex create alias for PDB :
$ tnssqldev.sh -db=foo -pdb=pdb01
If variable TNS_ADMIN is not defined, the file tnsnames.ora is created to : ~/plescripts/tnsadmin.
The script sqld is a wrapper for sqldevelopper.sh, if TNS_ADMIN is
not defined the script export the variable with value ~/plescripts/tnsadmin before
to launch sqldevelopper.sh.
For more information : sqld -h.
For RAC database check if scan address work fine :
$ cd ~/plescripts
$ ./test_scan.sh orion-scan
Run the script at least 3 times, if always ping the same ip execute :
$ cd ~/plescripts
$ ./update_local_cfg.sh -nocheck DISABLE_DNS_CACHE=yes
Script sqld will disable cache before launch sqldevelopper and enable it when finished.
Don't execute scripts install_all.sh or install_grid12cR2.sh and install_oracle.sh,
only scripts clone_master.sh or create_database_servers.sh.
Step by step :
-
With root :
ssh root@srvfoo01 mount /mnt/oracle_install -
To install grid software :
$ ssh -Y grid@srvfoo01 $ cd /mnt/oracle_install/grid ... -
To install Oracle software :
 $ ssh -Y oracle@srvfoo01
 $ cd /mnt/oracle_install/database
 ...
To obtain information on the configuration execute the script show_info_server
from your virtual-host.
During the cloning (clone_master.sh) all IPs are registered into the DNS, disks are created on the SAN and LUNs are exported and registered on the servers.
You can show information directly on the server (with root) :
- To show all IPs :
cat /etc/hosts - To show all disks.
- Oracle 12.1 :
$ ssh root@srvfoo01 $ oracleasm listdisks - Oracle 12.2 or without Grid Infra :
you can used all disks marked
$ ssh root@srvfoo01 $ cd plescripts/disk $ ./check_disks_type.shunused
- Oracle 12.1 :
Be careful the firewall is disabled.
There are 3 NICs per server :
[root@srvsaturne01 ~]# ping google.com
connect: Network is unreachable
ip link show
1: lo: <LOOPBACK,UP,LOWER_UP> mtu 65536 qdisc noqueue state UNKNOWN mode DEFAULT
	link/loopback 00:00:00:00:00:00 brd 00:00:00:00:00:00
2: eth0: <BROADCAST,MULTICAST,UP,LOWER_UP> mtu 1500 qdisc pfifo_fast state UP mode DEFAULT qlen 1000
	link/ether 08:00:27:d4:c8:5c brd ff:ff:ff:ff:ff:ff
3: eth1: <BROADCAST,MULTICAST,UP,LOWER_UP> mtu 9000 qdisc pfifo_fast state UP mode DEFAULT qlen 1000
	link/ether 08:00:27:a1:56:ee brd ff:ff:ff:ff:ff:ff
4: eth2: <BROADCAST,MULTICAST,UP,LOWER_UP> mtu 9000 qdisc pfifo_fast state UP mode DEFAULT qlen 1000
	link/ether 08:00:27:35:04:62 brd ff:ff:ff:ff:ff:ff
- Public network :
eth0 - SAN network :
eth1 - RAC network :
eth2(not configured for a standalone server likesrvsaturne01)
The gateway is K2 :
[root@srvsaturne01 ~]# host K2
K2.orcl has address 192.250.240.3
Add IP 192.250.240.3 to iface eth0 and restart network :
[root@srvsaturne01 ~]# nmcli connection modify eth0 ipv4.gateway 192.250.240.3
[root@srvsaturne01 ~]# systemctl restart network
[root@srvsaturne01 ~]# ping -c 1 google.com
PING google.com (216.58.205.14) 56(84) bytes of data.
64 bytes from par21s07-in-f14.1e100.net (216.58.205.14): icmp_seq=1 ttl=53 time=21.0 ms

--- google.com ping statistics ---
1 packets transmitted, 1 received, 0% packet loss, time 0ms
rtt min/avg/max/mdev = 21.087/21.087/21.087/0.000 ms
To close internet access : nmcli connection modify eth0 ipv4.gateway ""
Copyright © 2016,2017,2018 Philippe Leroux [email protected]
This program is free software: you can redistribute it and/or modify it under the terms of the GNU General Public License as published by the Free Software Foundation, either version 3 of the License, or (at your option) any later version.
This program is distributed in the hope that it will be useful, but WITHOUT ANY WARRANTY; without even the implied warranty of MERCHANTABILITY or FITNESS FOR A PARTICULAR PURPOSE. See the GNU General Public License for more details.