-
Notifications
You must be signed in to change notification settings - Fork 19
Annotation Schema
MedTator supports customized annotation schema for different tasks. Users could define an annotation schema by creating a text file. To create an annotation schema easier, we present a schema editor that is built within MedTator.
You can use any text editor or code editor to create an annotation schema, such as Sublime Text and Visual Studio Code. To help to create an annotation schema without writing code, we developed a lightweight schema editor and integrated it into the MedTator.
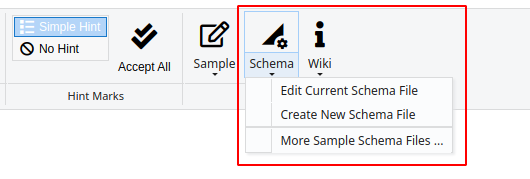
The Schema Editor button is in the ribbon menu of the annotation tab, just next to the Sample button.
You can click the Schema icon to open this tool (or select other options from the dropdown list to start the editor with the current schema or a blank new schema, then the UI will be different):

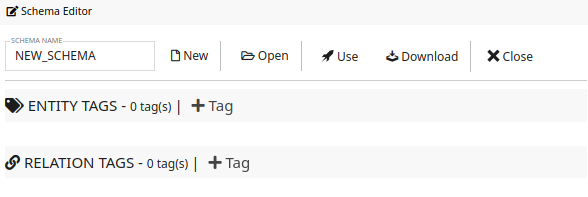
Then the UI of the schema editor will show as follows:

By clicking the drop down list, sample schemas will be listed. We will add more sample schema to MedTator, so the actual list may be different from the figure below.

After selecting the sample schema, you can click the Load buton to load the selected sample in the schema editor. Attention, loading a sample schema will cause losing the current schema in editor (it will NOT affect the schema in Annotation).
The sample schemas include:
- 1.1 Minimal Task: a very simple annotation task for COVID-19 symptoms, which contains only one entity tag with two attributes to annotate.
- 1.2 Two Entities and One Relation: a simple annotation task for COVID-19 vaccine adverse event and severity.
- 1.3 Nine Entities and One Relation: this annotation task is designed for COVID-19 vaccine adverse events which contain more typical sympton names.
- 1.4 Eleven Entities for Document-Level Annotation: this annotation task is for document-level annotation task.
By clicking the New button in the schema editor, a blank schema with NEW_SCHEMA as the schema name.
The schema name will be used as the XML root tag for annotation file, so the schema name can only contain numbers, alphabets, and underscore symbol "_".
As shown in the following figure, there are no tags in this blank schema.

You can click the + Tag button to add new tag (i.e., concept name to be annotated).
For example, when a new tag is added, the tool will make a new name.
You can modify this name, and the name can only contain numbers, alphabets, and underscore symbol "_".
For entity tag, the tag is span-based by default.
You can change to DOCUMENT + SPAN to support document-level annotation.

As shown in the following figure, you can click the + Attr button to add new attribute to the corresponding tag
The tool will create a new attribute with new_attr_N as the attribute name.
The attribute type is TEXT by default, which can be used to added text content to an annotation, such as comments or details.

You can also select LIST type and then define a value list for this attribute.
By clicking the ITEMS input box, the tool will ask for the values as shown in the following figure.
The value list MUST be seperated by the pipe symbol "|".
Once your inputed the values, you can also specify the default value from the list.

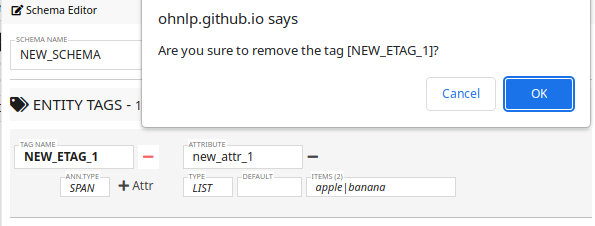
By clicking the minus symbol - button, you can delete an attribute or a tag.
As shown in the following figure, the tool will ask for confirmation.

For relation tag, the editing process is similar.
But you can specify a different type of attribute for an relation tag, which is the LINK type.
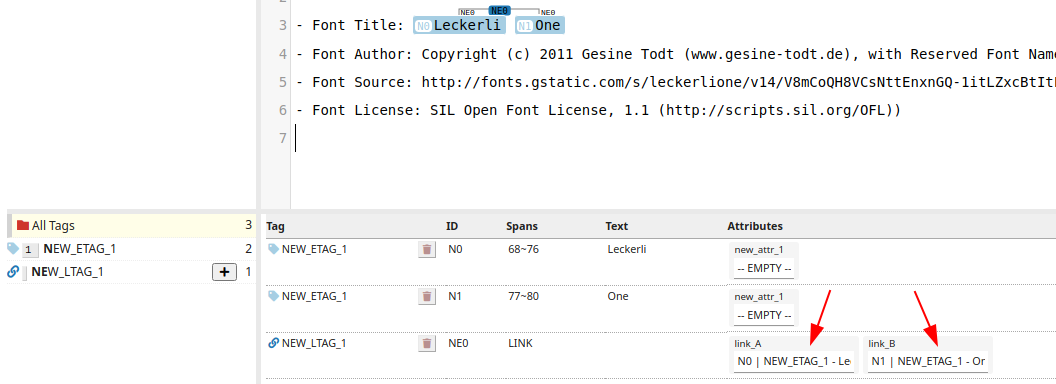
This type can be used for annotating relations between annotated entities.

For example, as shown in the following figure, you can specify two entities have a relationship with the above schema.

Once you finished editing schema, you can download it as a .yaml file, or .json or .dtd for future use.
Or you can use it directly in the annotation tab to test it.
Thanks @glacierck and @varna9000 for their suggestions #7, we added the YAML / JSON format for creating annotation schema. You can use the Schema Editor to create/edit schema and save the schema as a .yaml file by default (the .json and .dtd are supported as well).
Here we present a simple sample schema file for the COVID-19 vaccine adverse event annotation task, which is as same as the schema described in the DTD format. However, as using the YAML format, the structure of the schema file is different than before.
# A sample YAML format schema
name: COVID_VAX_AE

meta:
  sentencize_exceptions:
    - Pos.
    - Neg.
    - Psb.

etags:
- name: AE
  attrs:
  - name: certainty
    vtype: list
    values:
    - positive
    - negated
    - possible
    default_value: positive
  - name: comment
    vtype: text
    default_value: NA

- name: SVRT
  attrs:
  - name: severity
    vtype: list
    values:
    - mild
    - moderate
    - severe
    - NA
    default_value: NA
  - name: comment
    vtype: text
    default_value: NA

rtags:
- name: LK_AE_SVRT
  attrs:
  - name: LK_AE_SVRT
    vtype: idref
  - name: link_SVRT
    vtype: idref
  - name: comment
    vtype: text
    default_value: NA
There are four parts defined in the schema:
- Task name: the name of this schema, which is used as the task identification
- Metadata of the annotation project: we can define metadata for a project. As shown in the example, you can customize the
sentencize_exceptionsfor the sentencizer to add special cases in your annotation project. - Entity concepts: the entity concept to be tagged in this task, and the attribute of the concept that describes certain aspects
- Relation concepts: the relation concepts to be tagged, which link serveral entities tagged.
As the JSON format is very similar to the YAML format, the above schema can also be defined in the following JSON format (the comments can NOT be used in JSON). You can use any YAML<->JSON converter to change the format.
{
  "name": "COVID_VAX_AE",
  "meta": {
    "sentencize_exceptions": [
      "Pos.",
      "Neg.",
      "Psb."
    ]
  },
  "etags": [
    {
      "name": "AE",
      "attrs": [
        {
          "name": "certainty",
          "vtype": "list",
          "values": [
            "positive",
            "negated",
            "possible"
          ],
          "default_value": "positive"
        },
        {
          "name": "comment",
          "vtype": "text",
          "default_value": "NA"
        }
      ]
    },
    {
      "name": "SVRT",
      "attrs": [
        {
          "name": "severity",
          "vtype": "list",
          "values": [
            "mild",
            "moderate",
            "severe",
            "NA"
          ],
          "default_value": "NA"
        },
        {
          "name": "comment",
          "vtype": "text",
          "default_value": "NA"
        }
      ]
    }
  ],
  "rtags": [
    {
      "name": "LK_AE_SVRT",
      "attrs": [
        {
          "name": "LK_AE_SVRT",
          "vtype": "idref"
        },
        {
          "name": "link_SVRT",
          "vtype": "idref"
        },
        {
          "name": "comment",
          "vtype": "text",
          "default_value": "NA"
        }
      ]
    }
  ]
}
We adopt the same DTD (Document Type Definitions) file format used by MAE (Stubbs, 2011; Rim, Kyeongmin, 2016) as our schema file definition, which includes the following three parts:
- Task name: the name of this schema, which is used as the task identification
- Concept name: the concept to be tagged in this task
- Concept attribute: the attribute of the concept that describes certain aspects
The schema file is a plain text file with a .dtd extension, and it follows the basic specification for DTD declaration. We only implemented the necessary specifications required by defining our annotation task, so it doesn’t support full functionality of DTD declarations. The schema file could be created and edited in any text editor or code editor, such as Vim, GNU Emacs, Visual Studio Code, Sublime Text, or any other editor.
Before annotation begins, you need to create a schema file for annotators. To demonstrate how to define an annotation schema file for MedTator, here we present a simple sample schema file for the COVID-19 vaccine adverse event annotation task.
<!ENTITY name "COVID_VAX_AE">

<!-- #PCDATA makes an entity concept -->
<!ELEMENT AE ( #PCDATA ) >
<!ATTLIST AE certainty ( positive | negated | possible ) #IMPLIED "positive" >
<!ATTLIST AE comment CDATA "NA" >

<!ELEMENT SVRT ( #PCDATA ) >
<!ATTLIST SVRT severity ( mild | moderate | severe | NA ) #IMPLIED "NA" >
<!ATTLIST SVRT comment CDATA "NA" >

<!-- No #PCDATA makes a relation concept -->
<!ELEMENT LK_AE_SVRT EMPTY >
<!ATTLIST LK_AE_SVRT arg0 IDREF prefix="link_AE" #IMPLIED>
<!ATTLIST LK_AE_SVRT arg1 IDREF prefix="link_SVRT" #IMPLIED>
<!ATTLIST LK_AE_SVRT comment CDATA "NA" >
In addition, we also present more sample schema files in our repository. You can design you own schema file based on the existing files.
To better faciliate schema design, we provide the following sample schemas for test. You can also use the schema sample as a start to customize your annotation task.
- MINIMAL_TASK: a minimal annotation task for basic function demonstration. There is only one entity tag in this task.
- COVID_VAX_AE: a small annotation task for entity and relation annotation, which is shown as above.
Those sample schemas and annotated files are available in our MedTator repository in the sample/ folder.
As shown in the first line of the above sample, the task name "COVID_VAXAE" is defined with the !ENTITY tag and the name of the task is in double quotes.
<!ENTITY name "COVID_VAX_AE">
The task name will be used as the root tag element in the annotation XML file in the following annotation process. Therefore, if the task name is modified in the future, the old annotation files will NOT be opened by the new schema file due to the task name difference.
The concept name is defined with the !ELEMENT tag. As shown in our sample schema, we defined three concepts of two types in this annotation task.
We define two entity tags by indicating the ( #PCDATA ). The first concept name AE is for the adverse event:
<!ELEMENT AE ( #PCDATA ) >
And the second concept SVRT is for the severity:
<!ELEMENT SVRT ( #PCDATA ) >
In addition, we define one relation concept LK_AE_SVRT for the relation of adverse event and severity by indicating the EMPTY in the schema.
<!ELEMENT LK_AE_SVRT EMPTY >
The concept name will be used in the annotation file as the XML tag name for annotations. So, the concept name could NOT be repeated in one annotation schema.
Concept attribute is used to extend additional information for the annotated tags. You could add as many attributes as you need for the concept defined for a concept. For example, as shown in the sample schema, we defined two attributes (i.e., certainty and comment) for the AE concept:
<!ATTLIST AE certainty ( positive | negated | possible ) #IMPLIED "positive" >
<!ATTLIST AE comment CDATA "" >
The concept attribute is defined with the !ATTLIST tag, followed by the concept name, then the attribute name.
There are four types of attributes: ID, IDREF, CDATA, and value set.
-
IDtype is used for the id attribute only. For each concept, there is one, and only oneIDtype attribute. Since MedTator will automatically assign anidattribute to a concept, you don't need to specify it. More details aboutidattribute will be discussed in the following section "id attribute". -
IDREFtype is used for link tag, it indicates an attribute is linked to another entity tag. This type is used in theargNattribute only. More details aboutargNattribute will be discussed in the following section "argN attribute". -
CDATAtype is used for text value, which indicate an attribute is just text content. You could put any text content in this type of attributes. - Value set type is used to specify a fixed list of values for an attribute. Users could select a value from the pre-defined list instead of input text manually. As shown in our sample schema, the values are defined in parentheses and delimited by | symbol. For example, in the certainty attribute for the
AEconcept, we defined a value set with three values,( positive | negated | possible ). And in the severity attribute of theSRVTconcept, we defined four values,( mild | moderate | severe | NA ).
When annotating a document, an id is needed as an identifier for each tag. So MedTator will create an id when annotators create a tag. To make the id easy for users to understand and compatible with MAE, MedTator creates an id by combining the first letter of the concept name and an incremental integer number.
For example, when annotating the adverse event concept AE, the tags will have the ids A1, A2, A3, etc. When annotating the severity concept SVRT, the tags will have the ids S1, S2, S3, etc. When annotating the link entity LK_AE_SVRT, the tags will have the ids L1, L2, L3, etc.
You could also specify prefix to a concept by define the id attribute with prefix field. For example, you can use AD as the id prefix for the AE concept.
<!ATTLIST AE id ID prefix="AD" #REQUIRED >
Then, when annotating the AE entities, the tags will have the ids AE1, AE2, AE3, etc.
We highly recommend you choosing an easy-to-identify concept name, so that the annotated id would be easier to read when annotating. For most of time, you don't need to define the id attribute by yourself as shown in our sample, MedTator will automatically process the id prefix. Moreover, if there are multiple concepts with same prefix, MedTator will automatically find a suitable prefix for each concept.
When annotating a document, a spans attribute will be created to indicate the tag's character offset indices, i.e., where the tag starts and where the tag ends in the document. For example, we annotate two tags in a short document "Mild arm soreness at injection":

As shown in the above figure, the index number is character-based which means any character, such as alphabet, comma, semi-comma, and quote, will all be counted. The SRVT tag "Mild" starts from index 0 and ends at 3, so the spans attribute is "03". The AE tag "arm soreness" starts from index 5 and ends at 16, so the spans attribute is "516".
Like MAE, the spans attribute could also be used for document-level annotation. By setting the spans attribute to “#IMPLIED”, MedTator will make this concept support “non-consuming” annotation, i.e., the annotated tag is applied to the whole document instead of a text fragment. For example:
<!ATTLIST AE spans #IMPLIED >
If you add the above line to the schema, the AE concept will support “non-consuming” annotation. Then, when annotating a document, the spans attribute will be set to -1~-1 to indicate this is a document-level tag. For more examples, you could check our sample datasets and the in-app sample Document-Level Annotation.
When annotating a link tag, the argN attribute will be created to indicate the entity tag related in this link. You could define as many argN attributes as needed in one link concept. As shown in the sample schema, we defined two argN attributes, namely arg0 and arg1.
<!ATTLIST LK_AE_SVRT arg0 IDREF prefix="link_AE" #IMPLIED>
<!ATTLIST LK_AE_SVRT arg1 IDREF prefix="link_SVRT" #IMPLIED>
The argN attribute must be an IDREF type attribute. It would be clearer to specify the prefix for annotators to understand what kind of tag this attribute should link to. In our sample schema, the prefix of the arg0 indicates this attribute is for an AE tag, and the arg1 is for a SVRT tag. Then, while annotating a document, the prefix will be used to generate the fields in the annotation XML file. More details will be discussed in the "Annotation data file" section.
The prefix filed is optional, so you could also define these two attributes as follows:
<!ATTLIST LK_AE_SVRT arg0 IDREF #IMPLIED>
<!ATTLIST LK_AE_SVRT arg1 IDREF #IMPLIED>
In addition, the argN attribute is also optional for a link concept. MedTator will create two argN attributes with prefix field from and to for a link concept without any argN attribute.
Although MedTator has this ability, it’s recommended that defining the attributes clearly for the convenience of future update and maintenance.
While defining attributes, you could set default value for an attribute. The default value is placed in quotes at the end of an attribute. For example, in our sample schema, we set the default value "positive" for the certainty attribute, and "NA" for the comment attribute.
<!ATTLIST AE certainty ( positive | negated | possible ) #IMPLIED "positive" >
<!ATTLIST AE comment CDATA "NA" >
For the default value for the value set (e.g., the certainty), it must be included in the value set. Otherwise, the value couldn’t be set correctly. We recommended that set a proper default value for most of attribute to save the annotation time, especially when you are sure about how the values are in your own annotation task.
The attribute value could be mandatory or optional by specifying the #REQUIRED or #IMPLIED in the attribute definition. If an attribute is set #REQUIRED, MedTator will show an asterisk and to indicate it is required.
Although sometimes some attributes may be necessary, considering the actual situation of the data may not meet expectations, some flexibility should be considered when designing the schema.
Stubbs,A. (2011) MAE and MAI: Lightweight Annotation and Adjudication Tools. In, Proceedings of the 5th Linguistic Annotation Workshop. Association for Computational Linguistics, Portland, Oregon, USA, pp. 129–133.
Rim, Kyeongmin (2016) MAE2: Portable Annotation Tool for General Natural Language Use. In, Proceedings of the 12th Joint ACL-ISO Workshop on Interoperable Semantic Annotation. Portorož, Slovenia.
MedTator 2021-2023