Skip to content
New issue

Have a question about this project? Sign up for a free GitHub account to open an issue and contact its maintainers and the community.

By clicking “Sign up for GitHub”, you agree to our terms of service and privacy statement. We’ll occasionally send you account related emails.

Already on GitHub? Sign in to your account

React 简易模板搭建日志 #26

Open
NARUTOne opened this issue Sep 20, 2018 · 3 comments
Open

React 简易模板搭建日志 #26

NARUTOne opened this issue Sep 20, 2018 · 3 comments
Labels

Comments

@NARUTOne
Copy link
Owner

NARUTOne commented Sep 20, 2018

react-scaffold

搭建日志

写在前面

开始时间2018-09-04
本日志仅为FireLeaf-React 2.x搭建过程.
node下载最新版

部分技术选择

  • React
  • React-router
  • Redux
  • axios
  • webpack ^4.17.2

UI:

  • antd
  • less

规范

  • eslint
  • stylelint

init

# 创建项目
mkdir project-name && cd project-name

# init
npm init

创建项目需要文件夹

# build-tools
mkdir build

# products-config
mkdir config

# script
mkdir script

# main-src

mkdir src

# static

mkdir static

webpack

https://www.webpackjs.com/ 4.x

# npm install --save-dev webpack@<version>
npm install --save-dev webpack
npm install --save-dev webpack-cli
# merge
npm install --save-dev webpack-merge

webpack 配置build/

  • webpack.base.config.js: 基础配置
  • webpack.dev.config.js: dev模式配置
  • webpack.prod.config.js: prod模式配置

webpack优化

Babel

Babel 是一个 JavaScript 编译器, 进行语法转换,可按需加载插件。

babel 中文
Babel 入门教程

开始

npm i babel-loader@7 babel-core --save-dev
  • babel-loader: 这个包允许使用babel和webpack来转换JavaScript文件。
  • babel-core: 如果某些代码需要调用Babel的API进行转码,就要使用babel-core模块。
npm install babel-preset-env babel-preset-stage-0 babel-preset-react --save-dev
  • babel-preset-react 用于解析 JSX

  • babel-preset-stage-0 用于解析 ES7 提案

  • babel-preset-env: babel常用的转义器:相当于 es2015 ,es2016 ,es2017 及最新版本。

  • stage-x:

    • Stage 0 - 稻草人: 只是一个想法,可能是 babel 插件。
    • Stage 1 - 提案: 初步尝试。
    • Stage 2 - 初稿: 完成初步规范。
    • Stage 3 - 候选: 完成规范和浏览器初步实现。
    • Stage 4 - 完成: 将被添加到下一年度发布。
npm install babel-plugin-transform-runtime --save-dev
  • babel-plugin-transform-runtime: 类babel-polyfill, 按需polyfill

.babelrc 配置

{
  "presets": [
  ["env", {
      "modules": false,
      "targets": {
        "browsers": ["> 1%", "last 2 versions", "not ie <= 8"]
      }
    }],
    "es2015",
    "react",
    "stage-0"
  ],
  "plugins": [
    "transform-runtime"
  ]
}

资源处理

img、fonts、media

npm i url-loader file-loader --save-dev

url-loader
file-loader

编译css

npm install css-loader style-loader --save-dev

css-loader使你能够使用类似@import 和 url(...)的方法实现 require()的功能;

style-loader将所有的计算后的样式加入页面中; 二者组合在一起使你能够把样式表嵌入webpack打包后的JS文件中。

使用less

这里使用less, 其他预编译样式配置类似

npm i less less-loader --save-dev

样式兼容

npm i autoprefixer postcss-loader --save-dev

配置 postcss.config.js

module.exports = {
  plugins: [
    require('autoprefixer')({
      browsers: [
        '>1%',
        'last 4 versions',
        'Firefox ESR',
        'not ie < 9', // React doesn't support IE8 anyway
      ],
      flexbox: 'no-2009',
    })
  ]
};

样式文件拆分

npm install --save-dev mini-css-extract-plugin

webpack.base.config.js配置

{
  test: /\.css$/,
  exclude: /node_modules/,
  use: [
    MiniCssExtractPlugin.loader,
    'css-loader',
    'postcss-loader'
  ]
},
{
  test: /\.less$/,
  use: [
    MiniCssExtractPlugin.loader,
    'css-loader',
    'postcss-loader',
    'less-loader'
  ]
}
...
plugins: [
  new MiniCssExtractPlugin({
    // Options similar to the same options in webpackOptions.output
    // both options are optional
    filename: "[name].css",
    chunkFilename: "[id].css"
  })
]

webpack-config

webpack-dev

dev模式下webpack配置

npm i --save-dev html-webpack-plugin open-browser-webpack-plugin

webpack-prod

prod模式下webpack配置

npm i --save-dev optimize-css-assets-webpack-plugin

webpack-server

webpack 开发下的 server配置, 主要有下面两种方式

webpack-dev-server

https://www.webpackjs.com/guides/development/#%E4%BD%BF%E7%94%A8-webpack-dev-server

npm i --save-dev webpack-dev-server

express + + webpack-dev-middleware

express 服务(node)+ webpack-dev-middleware + webpack-hot-middleware

npm i --save-dev webpack-dev-middleware webpack-hot-middleware eventsource-polyfill express

# server log
npm i --save-dev rimraf

webpack-build-prod

# 终端 spinner
npm i --save-dev ora rimraf chalk

webpack 其他配置

1、copy静态资源 static

npm i --save-dev copy-webpack-plugin

2、压缩打包文件

npm i --save-dev zip-webpack-plugin

规范

代码、样式编码规范,代码简洁易读,提升项目开发效率。:blush:

npm install babel-eslint eslint-plugin-react eslint stylelint stylelint-config-standard --save-dev

vscode + eslint

自动检测排查,补全修复

"eslint.autoFixOnSave": true,
    "eslint.validate": [
        // "javascript",
        // "javascriptreact",
        // "html",
        // "vue"
        {
            "language": "javascript",
            "autoFix": true
        },
        {
            "language": "javascriptreact",
            "autoFix": true
        },
        {
            "language": "vue",
            "autoFix": true
        },
        {
            "language": "jsx",
            "autoFix": true
        },
        {
            "language": "html",
            "autoFix": true
        }
    ],

stylelint autofix

样式自动修复

npm install stylelint-webpack-plugin --save-dev

webpack-config

new StyleLintPlugin({
  // 正则匹配想要lint监测的文件
  files: ['src/**/*.l?(e|c)ss'],
  cache: true,
  fix: true
})

running

package.json 配置 script命令

"scripts": {
  "test": "echo \"Error: no test specified\" && exit 1",
  "lint": "eslint --ext .js src script config test && npm run lint:style",
  "lint:fix": "eslint --fix --ext .js src script config test && npm run lint:style",
  "lint-staged": "lint-staged",
  "lint-staged:js": "eslint --ext .js",
  "lint:style": "stylelint \"src/**/*.less\" --syntax less",
  "start": "node script/server.js", // express server
  "dev": "node script/dev-server.js", // webpack dev  server
  "build": "node script/prod.js" // webpack build prod
}

☝ 注意 写进package.json中不能带有注释

持续集成服务 Travis CI

绑定 Github 上面的项目,只要有新的代码,就会自动抓取。然后,提供一个运行环境,执行测试,完成构建,还能部署到服务器。

React

集成React

npm i --save react react-dom prop-types

react-router

升级 4.x https://zhuanlan.zhihu.com/p/27433116

npm i --save react-router-dom

# 导入 history
npm i --save history

react-router history跳转

redux

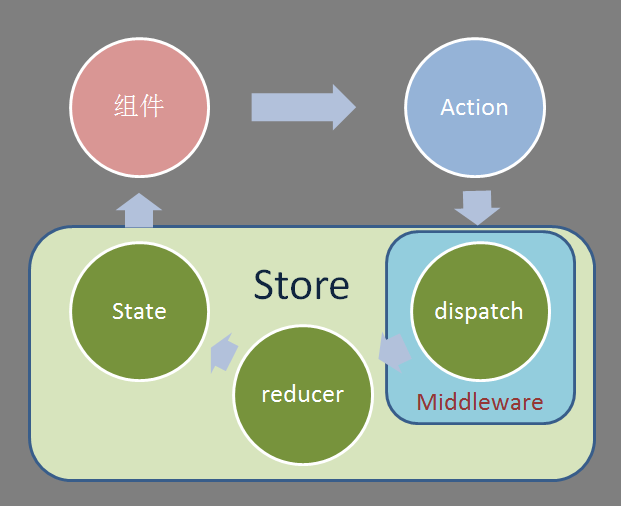
redux数据处理 https://cn.redux.js.org/

npm i --save redux react-redux

react-router-redux
这个包的正式版4.x不支持react-router v4。你需要用 alpha 版 的react-router-redux。在package.json 里加入react-router-redux~5.0.0或者用yarn:

redux 异步

react应用热更新

gaearon/react-hot-loader#511 (comment)

npm i --save-dev react-hot-loader
import React from 'react';
import { render, unmountComponentAtNode } from 'react-dom';
import { Provider } from 'react-redux';
import { AppContainer } from 'react-hot-loader';  
import thunk from 'redux-thunk';
// 引入路由配置模块
import RouterList from './router/';
import { createStore, applyMiddleware } from 'redux';
import reducer from './reducer/';

// redux 注入操作
const middleware = [thunk];
const store = createStore(reducer, applyMiddleware(...middleware));
// console.log(store.getState());

const mountNode = document.getElementById('app'); // 设置要挂在的点

const hotRender = Component => render(
  <AppContainer>
    <Provider store={store}>
      <Component />
    </Provider>
  </AppContainer>
, mountNode);

hotRender(RouterList);

if(process.env.NODE_ENV === 'development') {
  if(module.hot) {
    module.hot.accept('./router/', (err) => {
      if (err) {
        console.log(err);
      }
      const RouterList = require('./router/').default;
      unmountComponentAtNode(mountNode);
      hotRender(RouterList);
    });
  }
}

异步import, code split

异步导入组件,代码拆分

npm i --save-dev babel-plugin-syntax-dynamic-import

npm i --save react-loadable

配置使用
解决异步loadable引入导致react-hot-loader失效

{
  "presets": [
    "react"
  ],
  "plugins": [
    "syntax-dynamic-import"
  ]
}

import Loadable from 'react-loadable';
import Loading from './Loading';

const LoadableComponent = Loadable({
  loader: () => import('./Dashboard'),
  loading: Loading,
})

export default class LoadableDashboard extends React.Component {
  render() {
    return <LoadableComponent />;
  }
}

Antd

Ant Design 的 React 实现, 蚂蚁UI组件库 ant-design

# install
npm i antd --save
# 按需加载
npm i babel-plugin-import --save-dev

babel-config:

["import", { "libraryName": "antd", "libraryDirectory": "es", "style": true }]

定制主题

config/theme.js:

/**
 * antd theme config
 */

const defaultColor = '#4285f4';

module.exports = () => {
  return {
    'primary-color': defaultColor,
    'link-color': defaultColor,
    'border-radius-base': '3px',
    'menu-collapsed-width': '70px',
  };
};

// const fs = require('fs')
// const path = require('path')
// const lessToJs = require('less-vars-to-js')

// module.exports = () => {
//   const themePath = path.join(__dirname, './src/utiles/style/theme.less')
//   return lessToJs(fs.readFileSync(themePath, 'utf8'))
// }

package.json:

"theme": "./config/theme.js",

webpack.base.config.js:

// 获取theme
const fs = require('fs');
const pkgPath = path.resolve(__dirname, './package.json');
const pkg = fs.existsSync(pkgPath) ? require(pkgPath) : {};
let theme = {};
if (pkg.theme && typeof pkg.theme === 'string') {
  let cfgPath = pkg.theme;
  if (cfgPath.charAt(0) === '.') {
    cfgPath = path.resolve(__dirname, cfgPath);
  }
  const getThemeConfig = require(cfgPath);
  theme = getThemeConfig();
} else if (pkg.theme && typeof pkg.theme === 'object') {
  theme = pkg.theme;
}

...

{
  test: /\.less$/,
  use: [
    MiniCssExtractPlugin.loader,
    'css-loader',
    'postcss-loader',
    {
      loader: 'less-loader',
      options: {
        "sourceMap": true,
        "modules": false,
        "modifyVars": theme,
        'javascriptEnabled': true
      }
    }
  ]
}
@NARUTOne NARUTOne added react Antd ant-design labels Sep 20, 2018
@NARUTOne
Copy link
Owner Author

NARUTOne commented Sep 21, 2018

react-router v4 使用 history 控制路由跳转

参考

背景

当我们使用react-router v3的时候,我们想跳转路由,我们一般这样处理

我们从react-router导出browserHistory
我们使用browserHistory.push()等等方法操作路由跳转。
类似下面这样

import browserHistory from 'react-router';

export function addProduct(props) {
  return dispatch =>
    axios.post(`xxx`, props, config)
      .then(response => {
        browserHistory.push('/cart');  // 这里
      });
}

but!! 🐛 问题来了,在react-router v4中,不提供browserHistory等的导出~~

解决方案

使用 withRouter

withRouter高阶组件,提供了history让你使用~

import React from "react";
import {withRouter} from "react-router-dom";

class MyComponent extends React.Component {
  ...
  myFunction() {
    this.props.history.push("/some/Path");
  }
  ...
}
export default withRouter(MyComponent);

这是官方推荐做法哦。但是这种方法用起来有点难受,比如我们想在redux里面使用路由的时候,我们只能在组件把history传递过去。

就像问题章节的代码那种场景使用,我们就必须从组件中传一个history参数过去。。。

使用 Context

react-router v4 Router 组件中通过Contex暴露了一个router对象~

在子组件中使用Context,我们可以获得router对象,如下面例子~

import React from "react";
import PropTypes from "prop-types";

class MyComponent extends React.Component {
  static contextTypes = {
    router: PropTypes.object
  }
  constructor(props, context) {
     super(props, context);
  }
  ...
  myFunction() {
    this.context.router.history.push("/some/Path");
  }
  ...
}

当然,这种方法慎用~尽量不用。因为react不推荐使用contex哦。在未来版本中有可能被抛弃哦。

hack

其实分析问题所在,就是v3中把我们传递给Router组件的history又暴露出来,让我们调用了~~

react-router v4 的组件BrowserRouter自己创建了history
并且不暴露出来,不让我们引用了。尴尬~

我们可以不使用推荐的BrowserRouter,依旧使用Router组件。我们自己创建history,其他地方调用自己创建的history。看代码~

我们自己创建一个history

// src/history.js

import createHistory from 'history/createBrowserHistory';

export default createHistory();

我们使用Router组件

// src/index.js

import { Router, Link, Route } from 'react-router-dom';
import history from './history';

ReactDOM.render(
  <Provider store={store}>
    <Router history={history}>
      ...
    </Router>
  </Provider>,
  document.getElementById('root'),
);

其他地方我们就可以这样用了

import history from './history';

export function addProduct(props) {
  return dispatch =>
    axios.post(`xxx`, props, config)
      .then(response => {
        history.push('/cart'); //这里
      });
}

非要用BrowserRouter

确实,react-router v4推荐使用BrowserRouter组件,而在第三个解决方案中,我们抛弃了这个组件,又回退使用了Router组件。

怎么办。 你去看看BrowserRouter的源码,我觉得你就豁然开朗了。

源码非常简单,没什么东西。我们完全自己写一个BrowserRouter组件,然后替换第三种解决方法中的Router组件。嘿嘿 😃 。

@NARUTOne
Copy link
Owner Author

NARUTOne commented Sep 27, 2018

react-redux 异步

redux 中间件处理 异步副作用
Redux

  • redux-thunk
  • redux-promise
  • redux-saga
  • redux-observable

本项目采用 redux-saga, 其他方案,可以见Redux 异步数据流方案对比

redux-saga

saga中间层

参考

Redux 异步数据流方案对比
redux-saga-cn

@NARUTOne
Copy link
Owner Author

NARUTOne commented Oct 7, 2018

@NARUTOne NARUTOne changed the title React 简易脚手架搭建日志 React 简易模板搭建日志 Jan 4, 2019
Sign up for free to join this conversation on GitHub. Already have an account? Sign in to comment
Labels
Projects
None yet
Development

No branches or pull requests

1 participant