"Don't leave from VSCode, Stay with it - For Rest API testing. 😎
Fetch Client is Visual Studio Code extension which is used to test the Rest API.
- Open Source
- Lightweight
- UI Customization and support VSCode Themes.
- Test Rest API request with GET, POST, PUT, PATCH, DELETE, HEAD and OPTIONS methods.
- Run curl requests.
- Various authorization mechanisms such as Basic Auth, Bearer Token, API Key and AWS Signature.
- Various post body which are Form, Form-Encoded, Raw (Json, Plain Text, XML), Binary File and GraphQL.
- Syntax highlight for Response data.
- Tree view for JSON and XML responses and HTML preview for HTML responses.
- History, Collection,
EncryptedEnvironment Variable is supported. - Test the API request and response data without any scripts/code.
- Generate code snippet for various languages.
- Save response and test results as File.
- Bulk Export/Import the Fetch Client/Postman/Thunder Client's collections and environment variables.
- Add documentation/feedback for each request.
- Set the environment variable data from the response.
- Manage the Cookies.
- Pre-requests in request level as well as collection/folder level.
- Run all the requests in the collection using single click.
- Save all request data in the custom/workspace folder (Team collaboration).
- Supports system variables
- View request and response logs.
- Install via VSCode Extensions
- Open VSCode Extensions panel using
Ctrl+Shift+Xshortcut. - Type
Fetch Clientin Search bar. - Select the
Fetch Clientand install the extension.
- Open VSCode Extensions panel using

- Click the
Fetch Clienticon on the activity bar (left side of the VSCode) or use theCtl+Alt+Nshortcut. - On the Fetch Client
Quick Accessbar, click theNew Requestbutton to test the Rest API. - Select the
Http methodand enter theURLand other parameters such as query parameters, headers, auth details, request body (if required) and click theSendbutton. - The response data will be displayed in the
Responsesection. We can view the response data in the Tree view format forJSONandXMLresponses and HTML preview forHTMLresponses. - All existing requests are available in the
Historysection in the Quick Access Bar.

Fetch Client v1.0.0
- UI Customization
- HTTP Methods
- Query Parameter
- Authorization
- Headers
- Request Body
- Test
- Set Environment Variable
- Response Data
- Test Results
- Pre-requests
- Notes
- Code Snippet
- Request Cancel
- Quick Access
- Run All requests
- Manage Cookies
- Run/Import Curl Request
- System variables
- Logs
We can customize the UI in different modes.
- Horizontal mode
- Accordion View
- Split View
- Vertical mode
- Split View
Horizontal mode - Accordion View

Horizontal mode - Split View

Vertical mode - Split View
Fetch client supports to test the Rest API request with various HTTP methods such as GET, POST, PUT, PATCH, DELETE, HEAD and OPTIONS.
Fetch client supports to test the Rest API request with query parameter.
Fetch client supports below authorization methods for Rest API testing.
- Basic Auth
- Bearer Token
- API Key
- AWS Signature
- OAuth 2.0
We can add the headers for API testing. Fetch Client gives the suggestion on various headers and corresponding values in the header section.


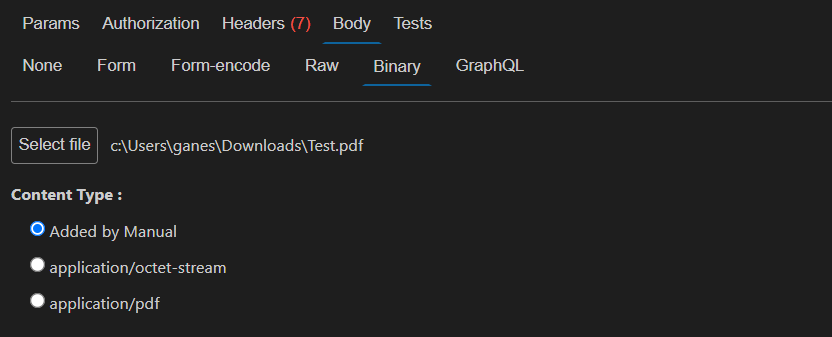
- Fetch client supports below request body.
- Form
- Form-Encoded
- Raw ( JSON, Plain Text, XML )
- Binary File
- GraphQL
Content-Typeheader will be automatically added based on binary file type.
- We can test the API request and response data without any scripts/code in the Fetch client.
- It supports to test the below data,
- Response Code
- Response Body
- Response Time
- Content-Type
- Content-Length
- Content-Encoding
- Specific Response Header value
- Specific JSON property value in the JSON response


Fetch Client - Test Case/Test Results
- Fetch client supports the set the environment variable data from the response, headers and cookies.

- Fetch client supports Syntax highlight for Response data.
- Copy the response data using
Copybutton. - It supports Tree view for JSON and XML responses and HTML preview for HTML responses.
- Download the response data as file.
- View the status code, response time and size of the response data.
- View response headers.

- Once request is processed, Fetch client executes the test cases and display the test result with expected value and actual value.
- We can download the test results as JSON file.

- Add list of pre-requests at request, folder and collection level.
- Run pre-requests with/without the conditions.
- We can configure the dependency between main request with pre-requests in the
Fetch Clientsettings.

Notes section is used to add the notes or documentation regarding the request. Fetch client has simple editor to add the documentation.

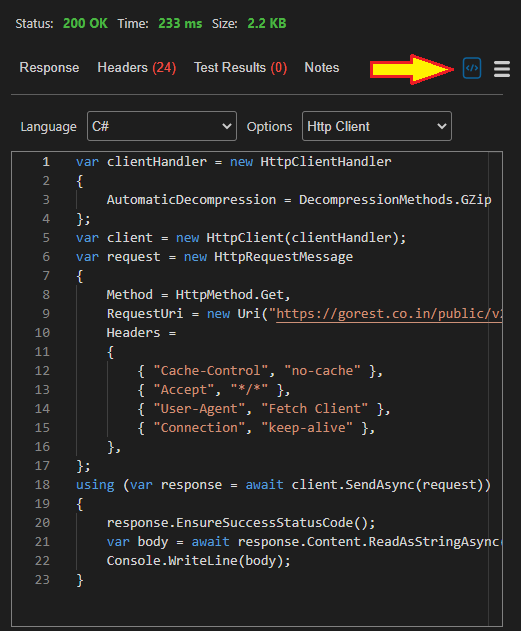
Fetch client supports code snippet generation for various languages. Generate code snippets to send request from another application. Open request view and click icon (right side of the response section) for code snippet generation. The code snippet generation is available for following languages.
- C
- C#
- Go
- Java
- JavaScript
- Node
- PHP
- Python
- Shell
Fetch client provides the feature for cancel the request. If you want to cancel the processing request then click then "Cancel Request" button in the response section.
Fetch client provides the quick access of History, collection and Environment variables in the side bar.
-
- Automatic saving of requests in History.
- Save the history item to the collections.
- Delete all history items or specific history item.
-
-
Save requests to a collection.
-
Organize the request using the collections.
-
Run all the requests in the collection using
Run Alloptions and download the results as file. -
Attach the Environment variable to collections.
-
Exportthe collections as JSON file. -
Importthe Fetch Client collections from above exported JSON file. (It is used to share the collections between team members.) -
Duplicate the collection items.

-

- Select the
Collectiontab from the sidebar - Click Menu icon and Select
Importoption. - Now select
Fetch Client/Postman(v2.1)/ThunderClient(v1.2)collection file. - Supports settings in each collection
-
Authorization
-
Headers
-
Pre-requests

-

-
- Create and set variables at multiple scopes
- Global Level
- Collection level
- Request level
- It is simple key value pair combination.
- Use environment variables in URL, Query Param, Authorization, Header, Request Body (Form and Form-Encoded), Test sections.
Exportvariables as JSON file.Importthe Fetch Client variables from above exported JSON file.- In the input, enter a variable name in the
{{variableName}}format.
- Create and set variables at multiple scopes
- Select the
Variabletab from the sidebar - Click Menu icon and Select
Importoption. - Now select
Fetch Client/Postman(v2.1)/ThunderClient(v1.2)variable file.

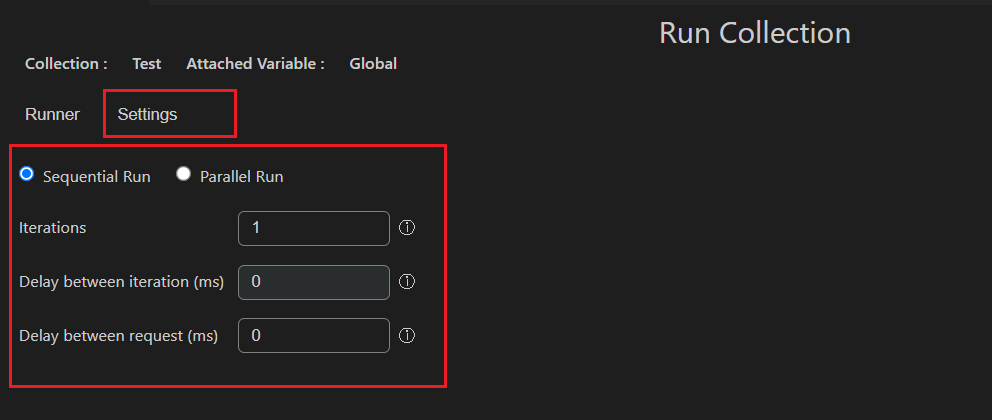
- Run all the requests in the collection using "Run All" options and download the results as file.
- Change the execution order of the requests in the 'Run All' section.
- Execute the request either in a sequential or parallel manner.
- Once completed the all request, export the test result as
JSONorCSV. - If you click the particular request from the table, it will open the corresponding request view.


- View/Delete the cookies in the Manage Cookies Page.
- Cookie header will automatically added if cookies are available for that request.
- You can modify the cookies using the
cookieheader.


Import Curl Request

Run Curl Request
- System variable is used to generate dynamic data and use query parameters and request body (formdata, formurlencoded) .
- Below are supported system variables.
- {{#num}} - Generate random number between 1 to 999999
- {{#num, min, max}} - Generate random number between given min and max value
- {{#str}} - Generate random string(only alphabets) with max length of 15
- {{#strspl}} - Generate random string(alphabets and special characters) with max length of 15
- {{#strnum}} - Generate random string(alphabets and numbers) with max length of 15
- {{#char}} - Generate random character
- {{#rdate}} - Generate random date between 01/01/1900 to 01/01/2100
- {{#date}} - Generate current date
- {{#dateISO}} - Generate current date with ISO format
- {{#date, 'format'}} - Generate current date with given format
- {{#email}} - Generate email with random characters
- {{#guid}} - Generate random guid
- {{#bool}} - Generate random boolean value (true/false)

- Click
View Logbutton in the sidebar to view the logs. - View the logs in the Output Window (Choose
Fetch Clientoption in the dropdown). - Customize the logs in the Fetch Client settings. By Default
request detailswill be logged. If the setting is enabled, bothrequest and responsedetails will be logged.


- Save all requests data into the current workspace path.
Fetch Clientwill createfetch-clientfolder in the root of the workspace and all the request files are saved into this folder.- Enable this option using the below
Fetch Clientsetting.

DO NOT ENTER/EDIT MANUALLY in the below settings. Configuration will be done automatically. Manual editing may lead to data loss.

Ctl+Shift+P(Open Command Palette)- Fetch Client - New Request
Ctl+Alt+N- OpenFetch ClientViewEnteron URL text box to send requestCmd/Ctrl + s- Save Request without run
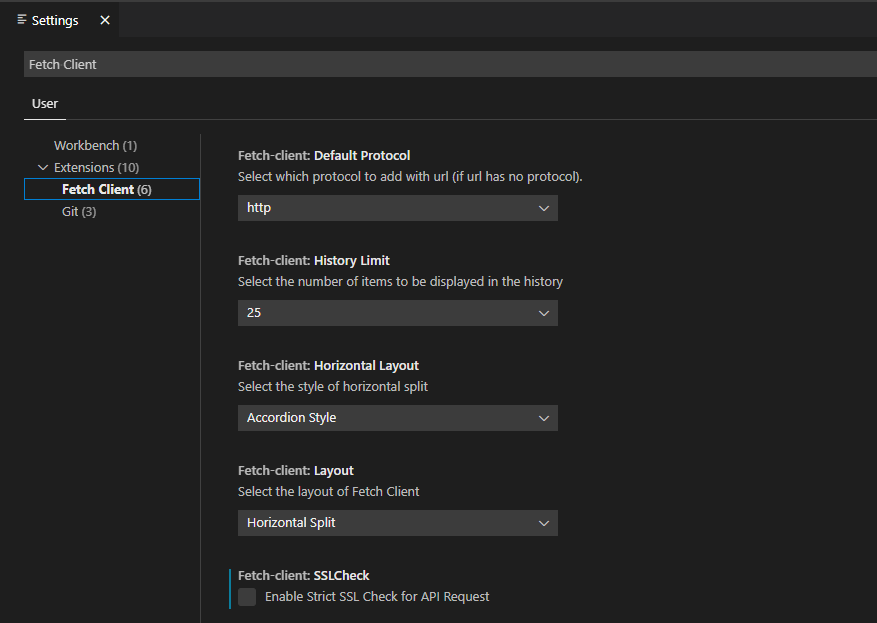
- Open VSCode settings View, then search for
Fetch Clientor clickFetch Client Settingsin the menu item.

- Fetch Client has below configurations.
| Name | Setting | Default | Description |
|---|---|---|---|
| Layout | fetch-client.layout | Horizontal Split | Layout of Fetch Client |
| Horizontal Layout | fetch-client.horizontalLayout | Accordion Style | Style of Horizontal Split Mode |
| SSL Check | fetch-client.SSLCheck | true | Enable Strict SSL Check for API Request |
| History Limit | fetch-client.historyLimit | 25 | Number of items to be displayed in the History |
| Time Out | fetch-client.timeOut | 5 min | Request Timeout |
| Default Protocol | fetch-client.defaultProtocol | http | Which protocol to add with URL (if URL has no protocol) |
Fetch Client is created with below tech stacks.
- Extension : VS Code Extension API
- UI : React JS, TypeScript, JavaScript, CSS
- Editor : Monaco Editor
- Local DB : LokiJS
- Code Snippet Generation : httpsnippet
- Clone the vscode-fetch-client repo.
- Run
npm installcommand to install dependencies. - Press
F5to open an extension development window withfetch-clientextension loaded.
- Fetch client
DOES NOTcollect any your personal or request data. - Fetch client has no back-end storage and all your data are stored
LOCALLYon your computer.
See the release notes for the full set of changes.
See the license details.
Feel free to submit a pull request if you find any bugs or new feature (To see a list of active issues/feature request, visit the Issues section). Please make sure all commits are properly documented.