Mímir is a Nifti files viewer, capable of processing those files in differents manners (creating masks, adding colormaps, saving slices in PNG format). It is composed of a GUI and a CLI.
- Python 3.4 and up
# Clone this repository
$ git clone https://github.com/Darnagof/Mimir.git

# Go into the repository
$ cd Mimir

# Install dependencies
$ pip install -r ./requirement.txt
If you are on Linux (Ubuntu), you need to enter these additional commands
$ apt-get install python3-pyqt5
$ apt-get install python3-tk
- Open and navigate in 3D and 4D NIfTI files.
- Add masks and interests points on top of the files.
- Save masks and points informations in a .mim file.
- Load masks and points informations from a .mim file.
- Create new NIfTI files from the masks.
- Change the colormap and the contrast of the images.
- Save differents slices from the NIfTI file to PNG.
- 1 - Open and close a NIfTI file in Mímir with the corresponding .mim file
- 2 - Save the corresponding slice to a PNG file (here the Axial view)
- 3 - Axial view
- 4 - Sagittal view
- 5 - Coronal view
- 6 - Navigate through the 4th dimension (time)
- 7 - Change the colormap
- 8 - Set the minimum contrast (in percentage of intensity)
- 9 - Set the maximum contrast (in percentage of intensity)
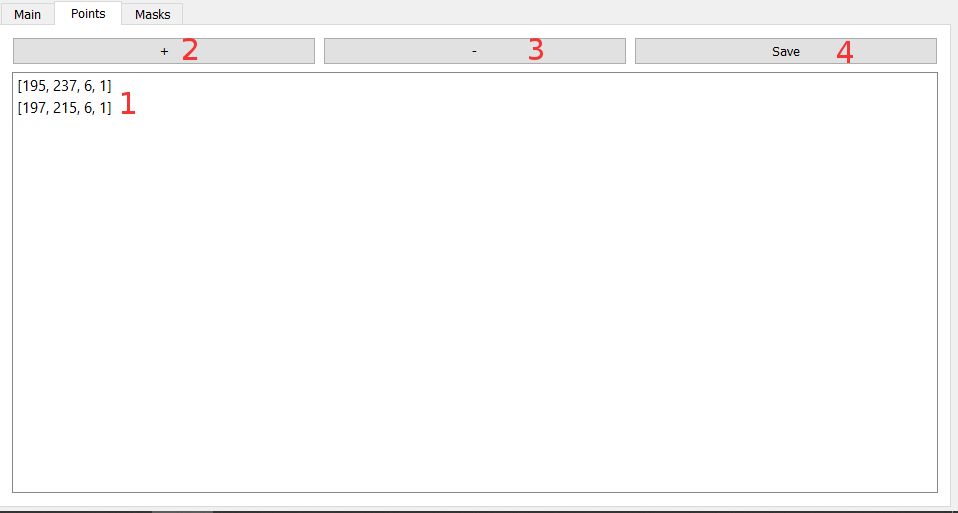
- 1 - List of points (You can select them)
- 2 - Add a new point where the cursor is (You can also press space)
- 3 - Delete the selected point
- 4 - Save the masks and points to a .mim file
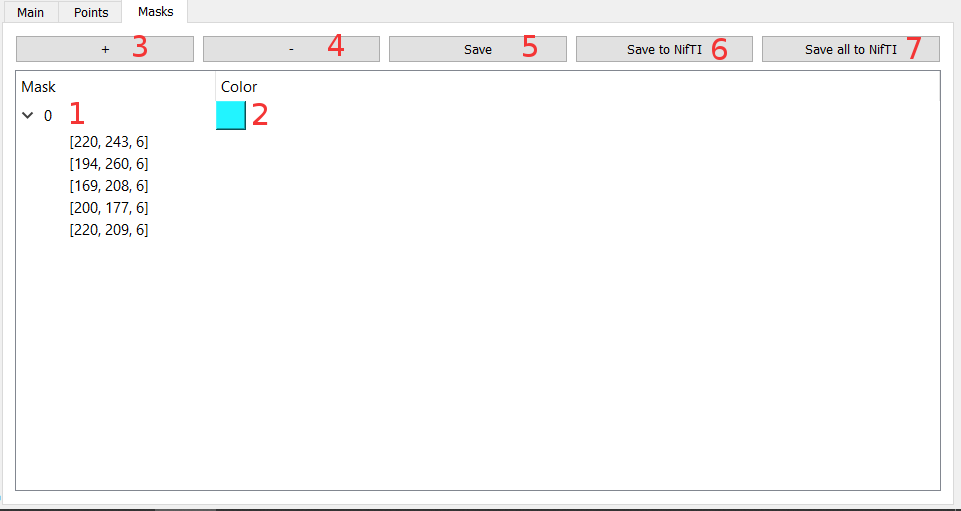
- 1 - List of masks and vertex of masks (You can select them)
- 2 - Change the color and transparency of the mask
- 3 - Enter a mask's creation mode, press space to create a new vertex where the cursor is, press escape to quit creation mode
- 4 - Delete the selected point or mask
- 5 - Save the masks and points to a .mim file
- 6 - Save the selected mask to a NIfTI file
- 7 - Save every masks to NIfTI files
$ Mimir_cli.py -h
usage: Mimir_cli.py [-h] [-o PATH_OUT] [-t IMG_NB] [-p {SAG,0,COR,1,AXI,2}]
                    [-s SLICE_NB] [-c CMAP] [-m CONTRAST_MIN]
                    [-M CONTRAST_MAX] [--all] [-l LINK] [-e]
                    path_in

Process 2D, 3D or 4D images.

positional arguments:
  path_in               Path of image to be processed

optional arguments:
  -h, --help            show this help message and exit
  -o PATH_OUT           Output file
  -t IMG_NB, --img_nb IMG_NB
                        In case of a 4D image, select the time of the image to
                        process
  -p {SAG,0,COR,1,AXI,2}, --plane {SAG,0,COR,1,AXI,2}
                        View of image to be processed
  -s SLICE_NB, --slice_nb SLICE_NB
                        Number of the slice to process
  -c CMAP, --cmap CMAP, --colormap CMAP
                        Add a colormap to the processed image
  -m CONTRAST_MIN, --contrast-min CONTRAST_MIN
                        Adjust the minimum contrast in % (0-100)
  -M CONTRAST_MAX, --contrast-max CONTRAST_MAX
                        Adjust the maximum contrast in % (0-100)
  --all                 Process every slice possible with the options given
  -l LINK, --link LINK  Link a .mim file to print points and masks stored in
                        it
  -e, --edit            Edit points and masks in the specified slices (if no
                        other options, all slices are accessible)
$ Mimir_cli.py ./nifti_file.nii -p SAG -s 125 -o ./sagittal_view_125.png
This will save the slice 125 from the sagittal view of the file ./nifti_file.nii to a PNG file named ./sagittal_view_125.png
$ Mimir_cli.py ./nifti_file.nii -p COR --all ./coronal_slices/
This will save every coronal slices from the file ./nifti_file.nii to files named ./coronal_slices/nifti_file/[time_nb]/COR/[slice_nb].png
--all can be used alone to save every slices possible from the NIfTI file.
It can also be used with multiple arguments and will save every slices possible with those arguments.
--all -s 250 will save every slice 250 from all the planes and times.
--all -p AXI -t 2 will save every slice from the axial plane of the time number 2.
$ Mimir_cli.py ./nifti_file.nii -p SAG -t 1 --all -m 20 -M 80 --cmap hot
This will save to a png file every slices from the sagittal plane at the time number 1 with a minimum contrast of 20% and a maximum contrast of 80% and the colormap hot.
To add masks and points to the saved files in the CLI you need to link a .mim file with informations on the masks and points you want to add.
$ Mimir_cli.py ./nifti_file.nii -p 0 -s 150 -l ./nifti_file.mim
This will save the slice 150 of the sagittal plane with the masks and points of the file ./nifti_file.mim
To modify a .mim file, you need to enter the edit mode.
$ Mimir_cli.py ./nifti_file.nii -e -l ./nifti_file.mim -o ./nifti_file.mim
point>
point> help
  save :
                Save the mim file to the output file provided or to the default
output file (./nifti_file.mim).
  nifti index|all:
                Save the mask at the index (or all masks if "all" is specified) to a nifti file.
  m|mask|masks [index] :
                Edit new mask or specific mask if index provided.
  p|point|points :
                Edit points.
  d|del|delete [mask] index :
                Delete point at index (from data if in point mode, from mask if in mask mode)
or mask if specified "mask".
  c|col|color [index] R G B A :
                Set point at index to color (R,G,B,A) if in point mode, set mask to color if in mask mode.
  data :
                Print all masks and points.
  ?|h|help :
                Print this help.
  SAG COR AXI [T] [R G B A] :
                Add point (4D) and color to data if in point mode, add point (3D) if in mask mode.
  exit :
                Exit (Be careful, it won't save automatically)
Add a point (points have 4 dimensions, [SAG, COR, AXI, TIME])
point> 12 125 208 1
point [12, 125, 208, 1] added
Change the color of a point ([R G B A])
point> col 0 128 15 255 128
Point 0 set to color [128, 15, 255, 128]
Add a mask
point> mask
mask 0>
Modify a specific mask
mask 0> mask 2
mask 2>
Add a vertex to a mask (vertex have 3 dimensions, [SAG, COR, AXI])
mask 2> 15 203 14
point [15, 203, 14] added
Change the color of a mask ([R G B A])
mask 2> col 50 128 255 55
Mask set to color [50, 128, 255, 55]
Print all masks and points
mask 2> data
Points :
         0 [12, 125, 208, 1] color :  [128, 15, 255, 128]
________
Masks:
         0
         1
         2
                 0 [15, 203, 14]
                 1 [15, 305, 18]
                 2 [15, 105, 26]
Delete a point from a mask
mask 2> del 1
Point 1 deleted
Delete a point
mask 2> point
point> del 0
Point 0 deleted
Delete a mask
point> del mask 0
Mask 0 deleted
Save a mask to a NIfTI file named ./nifti_file_mask_0.nii
point> nifti 0
Save all masks to NIfTI files named ./nifti_file_mask_[index].nii
point> nifti all
Save the .mim file
point> save
Masks and points saved in ./nifti_file.mim


