Collect documentation to update README #13
Comments
|
@prashanthr05 Thanks for sharing! I've started to (slowly) work on my fork to think about how to handle the documentation related to Vicon Nexus. https://aikolina.github.io/yarp-vicon-bridge/vicon/2020/06/15/vicon-workflow.html |
|
Wow, that's great @aikolina ! Thank you for the link. I will keep an eye. |
|
Yesterday I found also these new links: |
Sign up for free
to join this conversation on GitHub.
Already have an account?
Sign in to comment
We can maintain this issue to collect relevant documentation in order to update the README. For starters, I started documenting some things, which can be reviewed/modified/augmented by @aikolina @kouroshD @Nicogene.
Preliminaries
Open Nexus 2.x version software
Ensure the cameras are all running and are in Live mode. In the 3D perspective view, one must see all the cameras connected. (without a structure, if not calibrated)
Select all the cameras and choose Camera view to identify any unwanted flickering in the absence of markers in the field of view. If there are flickers, then select Mask Cameras from the System Preparation tools pane
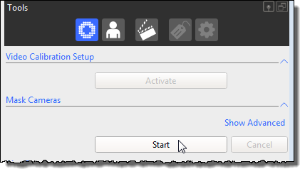
Then we calibrate the cameras using Calibrate Cameras. Wave the active wand within the volume until the calibration procedure is complete. A triangle at the right bottom of each camera sub-window must turn from red to green and disappear. This will mark a successful calibration. The calibration error in mm is shown in the Camera Calibration Feedback section.
We then set the Volume origin. Lay the active wand on the floor (for IIT CRIS users, in a way that the supplementary metal fits in the edge where the Vicon Force plates are laid.)
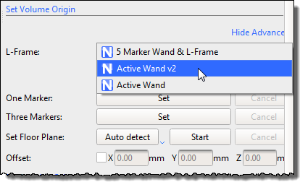
(Verify if you're using an Active Wand or Active Wand v2.)
Alternately we could also use 3 markers to set the volume origin. (Details here, https://docs.vicon.com/display/Nexus25/Set+the+volume+origin)
Set the ground plane (https://docs.vicon.com/display/Nexus25/Calibrate+the+floor+plane)
Data management
In order to store our experiment data, we create a new database.
Data Managementtab in the bottom toolbar.In order to start doing an experiment, we need to start a new session. For this purpose,
Session experiment (building a segment)
Once a session is created, we can proceed to create a subject and start running trials.
Create an empty subject using the Resources pane. (https://docs.vicon.com/display/Nexus25/Create+a+subject+node+and+prepare+a+subject#:~:text=After%20you%20have%20created%20a,Create%20a%20Blank%20Subject%20button%20.)
Under the subject preparation tab, run the Subject Capture for a few frames by keeping the base mount within the volume origin. Then reconstruct the markers.

(https://docs.vicon.com/display/Nexus25/Capture+and+reconstruct+the+marker+set)
We then create the segment using Labeling Template Builder section. (https://docs.vicon.com/display/Nexus25/Create+segments). We select the origin marker, a marker for primary axis (z-axis), and a marker for the secondary axis (the secondary axis together with the primary axis defines the YZ plane). Then we select additional markers.
Make sure the subject is checked on the Subjects pane. Now, when we bring the mount within the volume origin, it is tracked as a single segment.
The text was updated successfully, but these errors were encountered: