#Bottle-Racket and Test-Capture
DISCLAIMER: These scripts are not meant to be run directly by the user. Use the Main GUI to run these applications.
##Table of Contents
This portion of Racket-QA deals with two components:
Bottle-Racketis just a converter. It converts a Bottlenose Perl test file from the OPL course into Racket test cases. This is intended to be used on Problem Sets 1, 2, 3, and 5 which are provided in the testing directory. For our purposes this is all we need for test suites.Test-Capturetakes a specified test suite file and is able to run the test suite with the option of also sending an email of the test results. This is a nice, simple tool to check that the specified test suite file was written in the standardized format.
I've split up this README into four parts:
- The Structure of a Test Suite File
- Video Demonstration of using both components
- Text and Picture Demonstration of using
Bottle-Racket - Text and Picture Demonstration of using
Test-Capture
###The Structure of a Test Suite File
Please keep in mind at the end of the source file used in the test suite file you need to do a (provide (all-defined-out)) or you will get unbound identifier errors. In addition, Bottle-Racket was only meant to handle ps1, ps2a/ps2b, ps3a/ps3b, and ps5a/ps5b.
The test suites to run with this application are meant to be minimalistic and easy to follow. Test Suites in this context contain the following:
- Top:
requirestatements for RackUnit, along with the necessary source files with procedure definitions for testing - Body: test suite bodies composed of test cases, made with
define-test-suite - Bottom:
test-list, a list containing the test suites to run
For an example, the following is a test suite generated from ps1.
#lang racket

(require rackunit)
(require racket/include)
(require rackunit/text-ui)
(require rackunit/gui)
(require "ps1.rkt")

;;;;;;;;;;;;;;;;;;;;;;;;;;;;;;
(define-test-suite ps1
  #:before (lambda () (display "Starting Test Suite 'ps1'\n"))
  #:after (lambda () (display "Finished Test Suite 'ps1'\n"))
  (test-case "(square 3)" (check-equal? (square 3) 9))
  (test-case "(square 1)" (check-equal? (square 1) 1))
  ...
  (test-case "(smallest-tripled 30 20 10)" (check-equal? (smallest-tripled 30 20 10) 30))
)
;;;;;;;;;;;;;;;;;;;;;;;;;;;;;;

(define test-list (list
  ps1
))

(provide (all-defined-out))
###Video Demonstration
Video Demonstration. Note that the main GUI is used here.
###Bottle-Racket GUI
File: bottle-racket.rkt
As stated previously, Bottle-Racket is just a converter. It does not actually run any tests. For our project we will use the assignment test files in the course as the basis of our test suites. Run Bottle-Racket first to generate the test suite files.
This is the window you will start with when you run the script.
- The first two text fields will be populated based on the file you select with the
Browse...button. - The option for either GUI or textual interface has been removed. The only relevant part of RackUnit for our purposes is the textual interface as it displays important textual output of the test results.
- When the
Convertbutton is clicked, the bottom text field will be populated with the location of the generated test suite file for the assignment source file and test file selected.

This is what the window will look like when you click the Convert button after specifying the source assignment file and the test file associated with it. You now have a test suite file for that assignment, so we're ready to move on to Test-Capture.

###Test-Capture GUI
File: test-capture.rkt
Now that we have the test suite file generated from Bottle-Racket, we can run the test suite and send the results to an email list.
This is the window you will start with when you run the script.
- The
Test Suites Filetext field is populated by using theBrowse...button to find a test suite file. - The
Tofield is populated when the email list is configured. Do not manually populate this field. - The
Subjectfield is the subject of the email that will be sent when the test script is run.

We can run the test suite without configuring any email by clicking Run Script. You can go ahead and try this; the directory of the test suite file will have a test results file and the email file associated with it, but no emails will be sent.

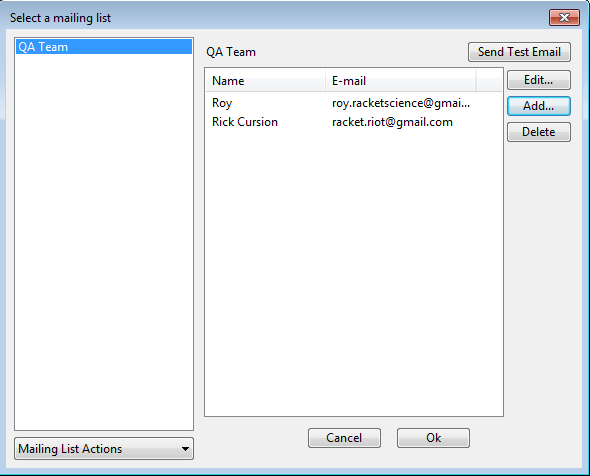
For the third button we need to configure the email list to send the test results out to. Click Configure Emails to get a new dialog window. Initially this window might be empty, so I'm dealing with that case here. Email lists are stored in a database on the local computer, so next time you won't have to configure this email list.

On the bottom left in the drop down menu, select Add Mailing List... to enter in a new mailing list with a name. Then select this name and on the right there should be a list of names, initially empty. Click the Add button on the right to put entries into this mailing list. If you feel like you are done with the mailing list, select that mailing list and click Ok to return to the main Test-Capture window. You should see the To field change.

Now that we have the mailing list to send results to, it's time to run the test suite. Click the Run Script and Send Email button at the bottom to run the tests. This may take a little while to run, so be patient. When the test suite is done running, an email will be sent out to the mailing list that was specified.
