-
Notifications
You must be signed in to change notification settings - Fork 359
Test Explorer
🎵Note: This documentation is outdated at this point, especially when using the Node tools in Visual Studio 2017. We're working on update docs, and will redirect you to those when they're ready.
Unit tests are short sections of code that test small pieces of functionality belonging to a larger program. By demonstrating that each piece of a program is correct, it is easier to infer that the entire program is correct.
Node.js uses unit tests extensively to validate scenarios while designing a program. Node.js Tools for Visual Studio includes support for discovering and executing unit tests. This allows you to author your tests and run them without having to switch to a command prompt.
To ensure your mocha test(s) can be found and run, follow these rules:
-
Install mocha locally. NTVS will not use a global mocha installation.
-
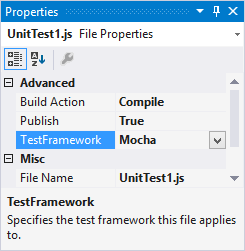
Set the Test Framework property for the JavaScript or TypeScript file to "Mocha".
-
Define your test functions using
describeandit.
Blank tests that follow these rules can be added by selecting Project, Add New Item (CTRL+SHIFT+A) and choosing "JavaScript Mocha UnitTest file".

This will add a new file containing a mocha unit test.
var assert = require('assert');

describe('Test Suite 1', function() {
    it('Test 1', function() {
        assert.ok(true, "This shouldn't fail");
    })

    it('Test 2', function() {
        assert.ok(1 === 1, "This shouldn't fail");
        assert.ok(false, "This should fail");
    })
})
The Test Framework property is automatically set to "Mocha".
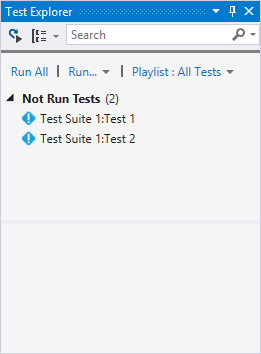
Open the Test Explorer window on Test menu, then Windows and Test Explorer. Hit Build (CTRL+SHIFT+B), and the tests will be discovered and displayed in the Test Explorer.
To ensure your exported test(s) can be found and run, follow these rules:
-
Set the Test Framework property for the JavaScript or TypeScript file to "ExportRunner".
-
Export your test functions
Blank tests that follow these rules can be added by selecting Project, Add New Item (CTRL+SHIFT+A) and choosing "JavaScript UnitTest file".
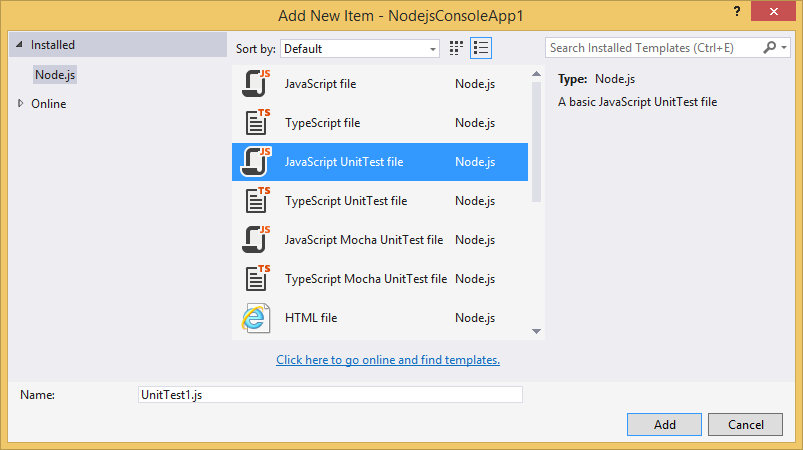
This will add a new file containing a basic unit test.
var assert = require('assert');

exports['Test 1'] = function (test) {
    assert.ok(true, "This shouldn't fail");
}

exports['Test 2'] = function (test) {
    assert.ok(1 === 1, "This shouldn't fail");
    assert.ok(false, "This should fail");
}
The Test Framework property is automatically set to "ExportRunner".

Open the Test Explorer window on Test menu, then Windows and Test Explorer. Hit Build (CTRL+SHIFT+B), and the tests will be discovered and displayed in the Test Explorer.

As you add more tests to your project, you may prefer to group or filter the tests that are displayed. The "Group By" menu on the toolbar will allow you to collect your tests into different groups, and the search toolbox will filter by matching names. Double-clicking a test will open the source file containing the test implementation.

Tests can be run by clicking "Run All" in the Test Explorer window, or by selecting one or more tests or groups, right-clicking and selecting "Run Selected Tests". Tests will be run in the background and the display will be updated to show the results.
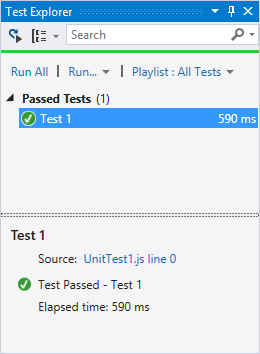
Tests that pass are shown with a green tick. The amount of time taken to run the test is also displayed.
Tests that fail are shown with a red cross.

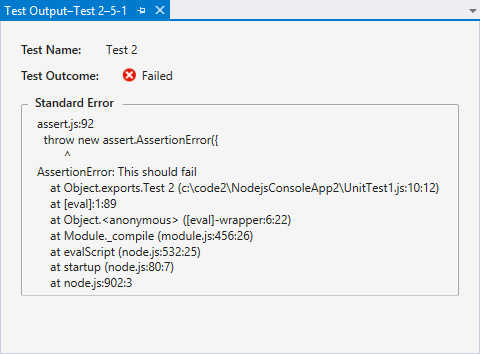
The "Output" link can be clicked to display the text that was printed to the console during the test, including the standard unittest output.
Note: If a config file is not provided, Mocha will run with a sensible set of defaults.
We've added the ability to configure your mocha options by adding a config file to the project located at $(ProjectDirectory)\test\mocha.json. Adding the mocha.json file will result in the mocha tests running with the options specified. An example of a valid mocha.json file is:
{
    "ui": "tdd",
    "timeout": 300000,
    "reporter": "xunit",
    "path": "optional path to where mocha is installed"
}
If you're used to running Mocha on the command line you'll notice we aren't using mocha.opts. Although this means a little extra setup if you don't want to use the set NTVS defaults, it means you can retain your existing command line options and independently tailor your Visual Studio test settings to your needs.
For further general guidance on Mocha configuration and usage, see https://mochajs.org/
Mocha and other Node.js tests can run under Visual Studio Team Services with Visual Studio Test build task on a hosted and on-premise agent. You can follow steps below to enable Visual Studio Test on your Build and Release Definitions.
- Make sure NTVS is installed on your local dev box
- Commit NTVS binaries to your repository
- Copy installed NTVS binaries from
C:\Program Files (x86)\Microsoft Visual Studio 14.0\Common7\IDE\Extensions\Microsoft\Node.js Tools for Visual Studio\1.1to your repository recursively, e.g./bin/ntvs/, then commit
- Copy installed NTVS binaries from
- Under your Build or Release Definitions, add a Visual Studio Test build task
- Set Test Assembly to location of your
*.njsprojproject file, or a glob, e.g.**\*.njsproj - Under Advanced Execution Options
- Set Path to Custom Test Adaptors to
$(Build.SourcesDirectory)\bin\ntvs - Or alternatively, set Other console options to
/TestAdapterPath:bin\ntvs
- Set Path to Custom Test Adaptors to
- Set Test Assembly to location of your

Currently, when running tests under vstest.console.exe, MSBuild property <VisualStudioVersion> is hardcoded to 11.0. It leads to missing target imports for <Import Project="$(VSToolsPath)\Node.js Tools\Microsoft.NodejsTools.targets" />.
If NTVS is installed under 14.0 or 15.0, you can force it to 14.0 by adding <VisualStudioVersion>14.0</VisualStudioVersion> to the top of your njsproj project file.
VSTS run tests with vstest.console.exe, you can try it on your box by running the following in Command Prompt.
"C:\Program Files (x86)\Microsoft Visual Studio 14.0\Common7\IDE\CommonExtensions\Microsoft\TestWindow\vstest.console.exe" mytests\mytests.njsproj /TestAdapterPath:bin\ntvs
It should show the output below.
Microsoft (R) Test Execution Command Line Tool Version 14.0.25123.0
Copyright (c) Microsoft Corporation.  All rights reserved.

Starting test execution, please wait...
Information: Processing: C:\Users\JohnDoe\Source\Repos\mytests\test\basic-test.js

Information:   Creating TestCase:C:\Users\JohnDoe\Source\Repos\mytests\test\basic-test.js::Basic test should run::Mocha

Information: Processing finished for framework of Mocha

Passed   Basic test should run

Total tests: 1. Passed: 1. Failed: 0. Skipped: 0.
Test Run Successful.
Test execution time: 2.7491 Seconds
If any errors occurred, it will show up in the console log.
To test the compatibility between Visual Studio Test and NTVS Test Adapter, you can run vstest.console.exe without actually running the test.
"C:\Program Files (x86)\Microsoft Visual Studio 14.0\Common7\IDE\CommonExtensions\Microsoft\TestWindow\vstest.console.exe" /ListTests:mytests\mytests.njsproj /TestAdapterPath:bin\ntvs
It should show the output below.
Microsoft (R) Test Execution Command Line Tool Version 14.0.25123.0
Copyright (c) Microsoft Corporation.  All rights reserved.

The following Tests are available:
Information: Processing: C:\Users\JohnDoe\Source\Repos\mytests\test\basic-test.js


Information:   Creating TestCase:C:\Users\JohnDoe\Source\Repos\mytests\test\basic-test.js
::Basic test should run::Mocha

Information: Processing finished for framework of Mocha

    Basic test should run
Node.js version installed on your build agent could be different than the one running on your local dev box. Some newer ES6/ES7 syntax may fail when running on the build agent. The logic of selecting Node.js version can be found at Nodejs/Product/Nodejs/Nodejs.cs.
NTVS can be extended to support additional test frameworks by implementing the discovery and execution logic. See Test Framework Extensibility for details.