###分析webpack中的Compiler/Compilation/Stats对象及构建顺序
- Compiler instance of watch method
 Compiler.prototype.watch = function(watchOptions, handler) {
  this.fileTimestamps = {};
  this.contextTimestamps = {};
  var watching = new Watching(this, watchOptions, handler);
  return watching;
};
注意:watch的时候,我们会给我们的Compiler实例对象添加一个fileTimestamps和contextTimestamps对象。而且可以清楚的知道这里返回的是我们通过watchOptions实例化的一个Watching实例对象 我们可以使用下面这种方式调用,例如在atool-build中调用:
if (args.watch) {
    compiler.watch(args.watch || 200, doneHandler);
  } else {
    compiler.run(doneHandler);
  }
2.compiler实例化的时候同时实例化一个Parser对象
function Compiler() {
  Tapable.call(this);
  this.parser = {
    plugin: function(hook, fn) {
      this.plugin("compilation", function(compilation, data) {
        data.normalModuleFactory.plugin("parser", function(parser) {
          parser.plugin(hook, fn);
        });
      });
    }.bind(this),
    apply: function() {
      this.plugin("compilation", function(compilation, data) {
        data.normalModuleFactory.plugin("parser", function(parser) {
          parser.apply.apply(parser, args);
        });
      });
    }.bind(this)
  };

  this.options = {};
}
我们的Compiler会先继承了Tapable;在parser.plugin中注入的回调函数。具体parser的使用,请见文末参考文献。
compiler.parser.plugin("var rewire", function (expr) {
    //if you original module has 'var rewire'
    //you now have a handle on the expresssion object
    return true;
});
3.调用compiler.run方法会分别执行'before-run','run',继而调用compiler的compile方法
Compiler.prototype.run = function(callback) {
  var self = this;
  var startTime = new Date().getTime();
   //before run
  self.applyPluginsAsync("before-run", self, function(err) {
    if(err) return callback(err);
        //run
    self.applyPluginsAsync("run", self, function(err) {
      if(err) return callback(err);
      self.readRecords(function(err) {
        if(err) return callback(err);
         //compile函数被调用,我们传入run函数的回调函数会在compile回调函数中调用
        //也就是在compiler的'done'之后回调
        self.compile(function onCompiled(err, compilation) {
          if(err) return callback(err);
          if(self.applyPluginsBailResult("should-emit", compilation) === false) {
            var stats = compilation.getStats();
            stats.startTime = startTime;
            stats.endTime = new Date().getTime();
            self.applyPlugins("done", stats);
            return callback(null, stats);
          }
          self.emitAssets(compilation, function(err) {
            if(err) return callback(err);
            if(compilation.applyPluginsBailResult("need-additional-pass")) {
              compilation.needAdditionalPass = true;
              var stats = compilation.getStats();
              stats.startTime = startTime;
              stats.endTime = new Date().getTime();
              self.applyPlugins("done", stats);
              self.applyPluginsAsync("additional-pass", function(err) {
                if(err) return callback(err);
                self.compile(onCompiled);
              });
              return;
            }
            self.emitRecords(function(err) {
              if(err) return callback(err);
              var stats = compilation.getStats();
              stats.startTime = startTime;
              stats.endTime = new Date().getTime();
              self.applyPlugins("done", stats);
              return callback(null, stats);//调用'done'
            });
          });
        });
      });
    });
  });
};
注意: (1)我们compiler.compile方法运行结束后会进行相应的回调,其中回调函数就是我们通过compile.run调用时候传入的函数
(2)其中我们要注意我们传入的callback会被传入一个参数,这个参数是通过如下方式来获取到的:
   var stats = compilation.getStats();
     stats.startTime = startTime;
     stats.endTime = new Date().getTime();
那么getStats到底得到的是什么呢?
getStats() {
    return new Stats(this);
  }
也就是说我们得到的是一个Stats对象,具体用法看参考文献。那么我们给出一个例子:
function doneHandler(err, stats) {
    if (args.json) {
      const filename = typeof args.json === 'boolean' ? 'build-bundle.json' : args.json;
      const jsonPath = join(fileOutputPath, filename);
      writeFileSync(jsonPath, JSON.stringify(stats.toJson()), 'utf-8');
      console.log(`Generate Json File: ${jsonPath}`);
    }
    //如果出错,那么退出码是1
    const { errors } = stats.toJson();
    if (errors && errors.length) {
      process.on('exit', () => {
        process.exit(1);
      });
    }
    // if watch enabled only stats.hasErrors would log info
    // otherwise  would always log info
    if (!args.watch || stats.hasErrors()) {
      const buildInfo = stats.toString({
        colors: true,
        children: true,
        chunks: !!args.verbose,
        modules: !!args.verbose,
        chunkModules: !!args.verbose,
        hash: !!args.verbose,
        version: !!args.verbose,
      });
      if (stats.hasErrors()) {
        console.error(buildInfo);
      } else {
        console.log(buildInfo);
      }
    }
    if (err) {
      process.on('exit', () => {
        process.exit(1);
      });
      console.error(err);
    }
    if (callback) {
      callback(err);
    }
  }
主要的代码就是调用stats.toJson方法,内容就是获取本次编译的主要信息。同时参考文献中也给出了一个输出的例子,可以自己查看。
(3)我们自己的回调函数是在compiler的'done'回调以后触发的,而且和compiler的'done'回调一样,我们也是也是给我们的函数传入err和Stats对象!
然后我们看看compile中的内容:
Compiler.prototype.compile = function(callback) {
  self.applyPluginsAsync("before-compile", params, function(err) {
    self.applyPlugins("compile", params);
    var compilation = self.newCompilation(params);
    //调用compiler的compile方法,我们才会构建出一个Compilation实例对象,在
    //'make'钩子里面我们就可以获取到compilation对象了
    self.applyPluginsParallel("make", compilation, function(err) {
      compilation.finish();
      compilation.seal(function(err) {
        self.applyPluginsAsync("after-compile", compilation, function(err) {
          //在compilation.seal方法调用以后我们才会执行'after-compile'
        });
      });
    });
  });
};
我们再来看看compilation的finish方法:
  finish() {
      this.applyPlugins1("finish-modules", this.modules);
      this.modules.forEach(m => this.reportDependencyErrorsAndWarnings(m, [m]));
    }
我们再来看看compilation.seal方法:
seal(callback) {
  self.applyPlugins0("seal");
  self.applyPlugins0("optimize");
  while(self.applyPluginsBailResult1("optimize-modules-basic", self.modules) ||
    self.applyPluginsBailResult1("optimize-modules", self.modules) ||
    self.applyPluginsBailResult1("optimize-modules-advanced", self.modules));
  self.applyPlugins1("after-optimize-modules", self.modules);
  //这里是optimize module
  while(self.applyPluginsBailResult1("optimize-chunks-basic", self.chunks) ||
    self.applyPluginsBailResult1("optimize-chunks", self.chunks) ||
    self.applyPluginsBailResult1("optimize-chunks-advanced", self.chunks));
    //这里是optimize chunk
  self.applyPlugins1("after-optimize-chunks", self.chunks);
  //这里是optimize tree
  self.applyPluginsAsyncSeries("optimize-tree", self.chunks, self.modules, function sealPart2(err) {
    self.applyPlugins2("after-optimize-tree", self.chunks, self.modules);
    const shouldRecord = self.applyPluginsBailResult("should-record") !== false;
    self.applyPlugins2("revive-modules", self.modules, self.records);
    self.applyPlugins1("optimize-module-order", self.modules);
    self.applyPlugins1("advanced-optimize-module-order", self.modules);
    self.applyPlugins1("before-module-ids", self.modules);
    self.applyPlugins1("module-ids", self.modules);
    self.applyModuleIds();
    self.applyPlugins1("optimize-module-ids", self.modules);
    self.applyPlugins1("after-optimize-module-ids", self.modules);
    self.sortItemsWithModuleIds();
    self.applyPlugins2("revive-chunks", self.chunks, self.records);
    self.applyPlugins1("optimize-chunk-order", self.chunks);
    self.applyPlugins1("before-chunk-ids", self.chunks);
    self.applyChunkIds();
    self.applyPlugins1("optimize-chunk-ids", self.chunks);
    self.applyPlugins1("after-optimize-chunk-ids", self.chunks);
    self.sortItemsWithChunkIds();
    if(shouldRecord)
      self.applyPlugins2("record-modules", self.modules, self.records);
    if(shouldRecord)
      self.applyPlugins2("record-chunks", self.chunks, self.records);
    self.applyPlugins0("before-hash");
    self.createHash();
    self.applyPlugins0("after-hash");
    if(shouldRecord)
      self.applyPlugins1("record-hash", self.records);
    self.applyPlugins0("before-module-assets");
    self.createModuleAssets();
    if(self.applyPluginsBailResult("should-generate-chunk-assets") !== false) {
      self.applyPlugins0("before-chunk-assets");
      self.createChunkAssets();
    }
    self.applyPlugins1("additional-chunk-assets", self.chunks);
    self.summarizeDependencies();
    if(shouldRecord)
      self.applyPlugins2("record", self, self.records);

    self.applyPluginsAsync("additional-assets", err => {
      if(err) {
        return callback(err);
      }
      self.applyPluginsAsync("optimize-chunk-assets", self.chunks, err => {
        if(err) {
          return callback(err);
        }
        self.applyPlugins1("after-optimize-chunk-assets", self.chunks);
        self.applyPluginsAsync("optimize-assets", self.assets, err => {
          if(err) {
            return callback(err);
          }
          self.applyPlugins1("after-optimize-assets", self.assets);
          if(self.applyPluginsBailResult("need-additional-seal")) {
            self.unseal();
            return self.seal(callback);
          }
          return self.applyPluginsAsync("after-seal", callback);
        });
      });
    });
  });
}
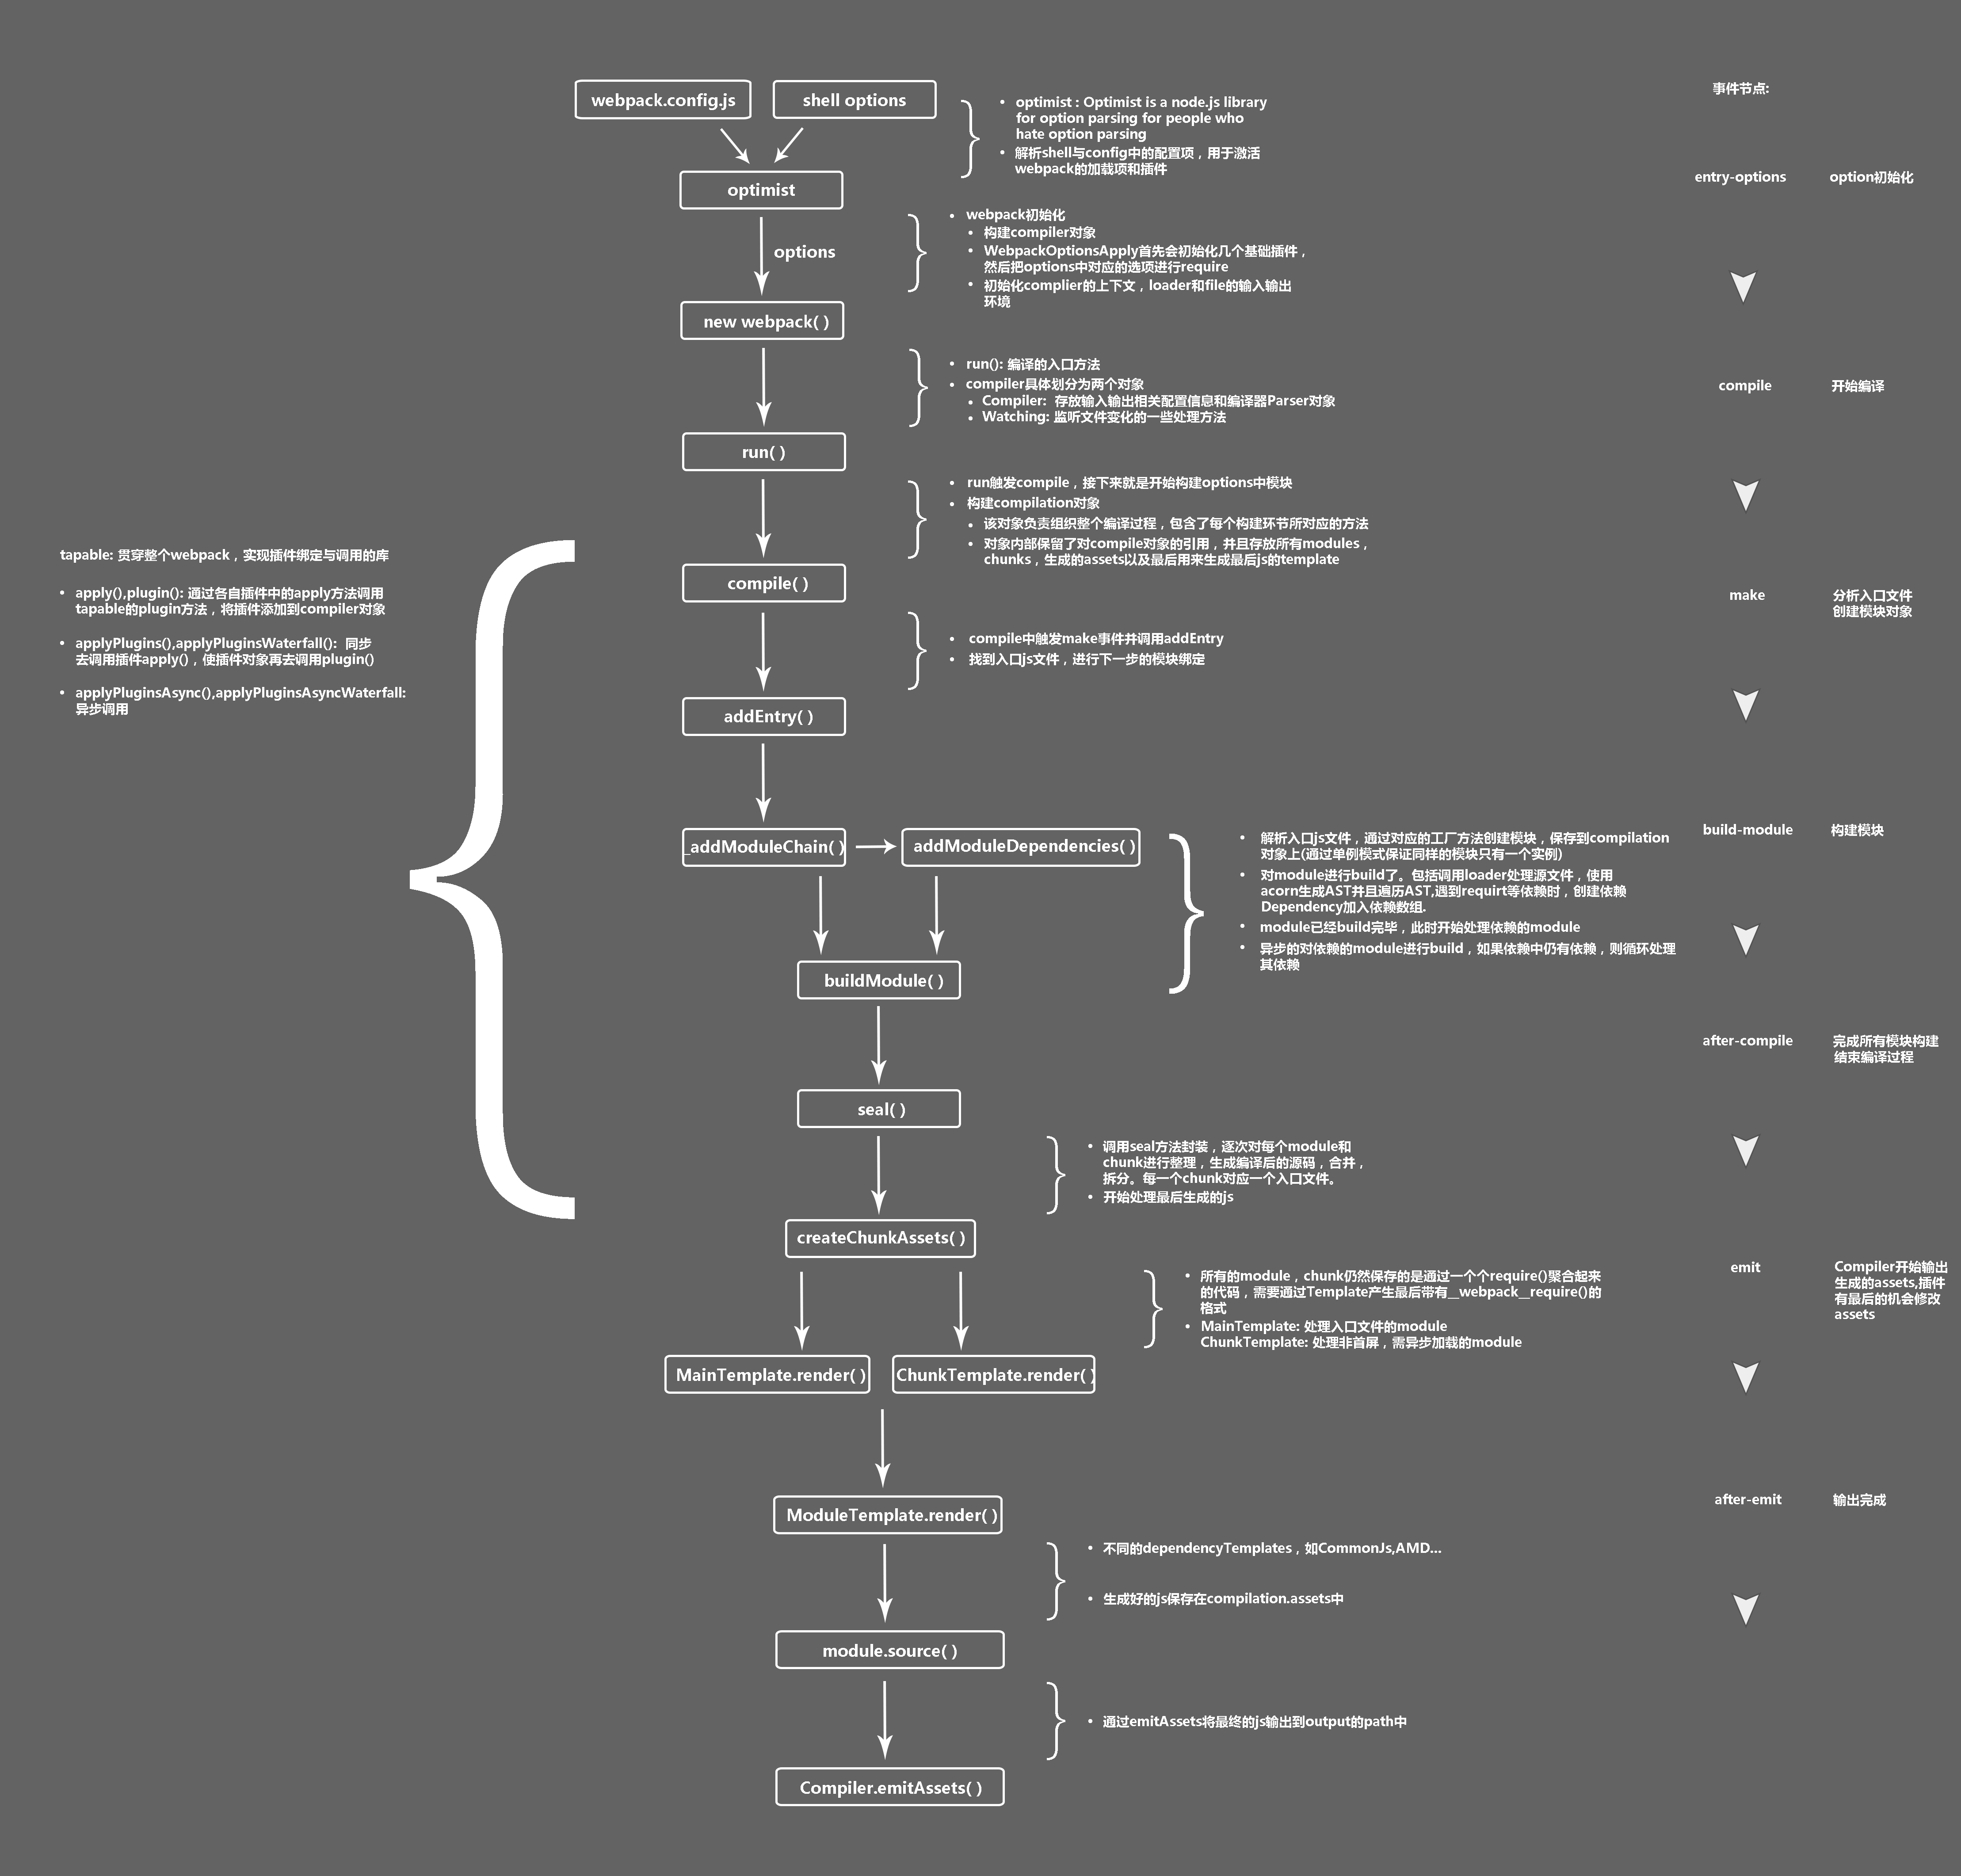
从上面提到的第3点,我们可以知道webpack的编译过程大致如下:
'before run'
  'run'
    compile:func//调用compile函数
        'before compile'
           'compile'//(1)compiler对象的第一阶段
               newCompilation:object//创建compilation对象
               'make' //(2)compiler对象的第二阶段
                    compilation.finish:func
                       "finish-modules"
                    compilation.seal
                         "seal"
                         "optimize"
                         "optimize-modules-basic"
                         "optimize-modules-advanced"
                         "optimize-modules"
                         "after-optimize-modules"//首先是优化模块
                         "optimize-chunks-basic"
                         "optimize-chunks"//然后是优化chunk
                         "optimize-chunks-advanced"
                         "after-optimize-chunks"
                         "optimize-tree"
                            "after-optimize-tree"
                            "should-record"
                            "revive-modules"
                            "optimize-module-order"
                            "advanced-optimize-module-order"
                            "before-module-ids"
                            "module-ids"//首先优化module-order,然后优化module-id
                            "optimize-module-ids"
                            "after-optimize-module-ids"
                            "revive-chunks"
                            "optimize-chunk-order"
                            "before-chunk-ids"//首先优化chunk-order,然后chunk-id
                            "optimize-chunk-ids"
                            "after-optimize-chunk-ids"
                            "record-modules"//record module然后record chunk
                            "record-chunks"
                            "before-hash"
                               compilation.createHash//func
                                 "chunk-hash"//webpack-md5-hash
                            "after-hash"
                            "record-hash"//before-hash/after-hash/record-hash
                            "before-module-assets"
                            "should-generate-chunk-assets"
                            "before-chunk-assets"
                            "additional-chunk-assets"
                            "record"
                            "additional-assets"
                                "optimize-chunk-assets"
                                   "after-optimize-chunk-assets"
                                   "optimize-assets"
                                      "after-optimize-assets"
                                      "need-additional-seal"
                                         unseal:func
                                           "unseal"
                                      "after-seal"
                    "after-compile"//(4)完成模块构建和编译过程(seal函数回调)
    "emit"//(5)compile函数的回调,compiler开始输出assets,是改变assets最后机会
    "after-emit"//(6)文件产生完成
注意:上面没有标出第三个阶段,也就是compiler的'build-module'阶段,在这个阶段,我们调用了addEntry等方法通过入口文件_addModuleChain,processModuleDependencies等方法分析模块的依赖关系!
详细内容可以参考下面这种图:
4.上面的第二段代码有compiler.watch方法的调用 其本质是使用了相关的配置生成了Watching对象:
var watching = new Watching(this, watchOptions, handler);我们看看Watching对象是如何处理的:
 Watching.prototype.watch = function(files, dirs, missing) {
  this.watcher = this.compiler.watchFileSystem.watch(files, dirs, missing, this.startTime, this.watchOptions, function(err, filesModified, contextModified, missingModified, fileTimestamps, contextTimestamps) {
    this.watcher = null;
    if(err) return this.handler(err);
    this.compiler.fileTimestamps = fileTimestamps;
    this.compiler.contextTimestamps = contextTimestamps;
    this.invalidate();
  }.bind(this), function(fileName, changeTime) {
    this.compiler.applyPlugins("invalid", fileName, changeTime);
  }.bind(this));
};
这个很容易看出来,如果我们的文件发生了变化,那么我们直接调用Watching实例的invalidate方法,并通知compiler重新开始编译过程!这也是我们最重要的watch逻辑!这也是我们为什么有上面这样的代码:
  if (args.watch) {
    compiler.watch(args.watch || 200, doneHandler);
  } else {
    compiler.run(doneHandler);
  }
而且我们知道compiler的watch方法返回的是一个watching,那么我们看看Watching对象的内部结构:
function Watching(compiler, watchOptions, handler) {
this.startTime = null;
this.invalid = false;//是否已经文件变化
this.error = null;
this.stats = null;
this.handler = handler;
this.compiler = compiler;//compiler句柄
this.running = true;
}
Watching.prototype._go = function() {
};
Watching.prototype._done = function(err, compilation) {
};
Watching.prototype.watch = function(files, dirs, missing) {
};

Watching.prototype.invalidate = function() {
if(this.watcher) {
  this.watcher.pause();
  this.watcher = null;
}
if(this.running) {
  this.invalid = true;
  return false;
} else {
  this._go();
}
};
Watching.prototype.close = function(callback) {
if(callback === undefined) callback = function() {};
if(this.watcher) {
  this.watcher.close();
  this.watcher = null;
}
if(this.running) {
  this.invalid = true;
  this._done = function() {
    callback();
  };
} else {
  callback();
}
};
通过上面的结果你应该可以知道invalidate和close方法的具体作用了,这里就不在赘述
5.我们看看如何获取到我们最重要的compiler对象
 // Run compiler.
  const compiler = webpack(webpackConfig);
  // Hack: remove extract-text-webpack-plugin log
  if (!args.verbose) {
    compiler.plugin('done', (stats) => {
      stats.stats.forEach((stat) => {
        stat.compilation.children = stat.compilation.children.filter((child) => {
          return child.name !== 'extract-text-webpack-plugin';
        });
      });
    });
  }
(1)我们的'done'回调是当'emit,after-emit'都调用结束了以后才会触发的,所以这时候我们所有的文件assets都已经生成结束了。
(2)当我们调用webpack方法的时候,返回的就是compiler对象!
(3)我们的stats对象有一个compilation属性,从构造函数就可以看到:
class Stats {
  constructor(compilation) {
    this.compilation = compilation;
    this.hash = compilation.hash;
  }
}
同时我们的compilation.children也是一个数组
 this.children.forEach(child => {
      this.fileDependencies = this.fileDependencies.concat(child.fileDependencies);
      this.contextDependencies = this.contextDependencies.concat(child.contextDependencies);
      this.missingDependencies = this.missingDependencies.concat(child.missingDependencies);
    });
不过我们的compilation对象的fileDependencies,contextDependencies等会包含所有的子模块的内容!至于上面的'done'回调处理,我们就是为了防止我们的extract-text-webpack-plugin输出太多的log而设置的!请看下面的参考文献
参考资料: http://webpack.github.io/docs/node.js-api.html#stats
http://taobaofed.org/blog/2016/09/09/webpack-flow/
webpack-contrib/extract-text-webpack-plugin#35
http://webpack.github.io/docs/plugins.html#the-parser-instance
