从零开始实现一个React(二):组件和生命周期 #5
Comments
|
板凳 期待详细讲 setState 的地方 尤其是对于setState 异步原因,以及事务机制 |
|
@Sunshine168 嗯,后面会有一篇文章来讲setState |
|
另外感觉这里举例的生命周期不是很对~ 用WillMount 和 WillUpdate 会好点~ 这里用didMount和didUpdate 不是很准确。 这两个周期都应该是子组件都render完 父组件才会执行的。 这个版本 父子组件执行生命周期的顺序就会不对了~ |
|
赞 |
|
@Sunshine168 有道理,修改了~ |
|
// 当vnode为字符串时,渲染结果是一段文本 |
|
@qinkangwu 是的,示例代码仓库里我是这样写的,文章中忘记改了 |
|
在写第三篇时,发现这篇文章中很多实现都有些问题,而且实现方式和第三篇文章割裂开了,所以重写了这篇文章的部分内容。 |
|
正在重新细读,感觉重写的内容跨度有点大~ |
|
发现一保存diff.js文件 parcel的热更新会无限执行 这是parcel hmr的bug吗 |
|
@xwchris 我也发现这个问题了,还没仔细找原因 |
|
不是很明白component.base的作用(以及base._component),能不能在文章中額外解釋一下? |
|
@austin880625 component.base保存的是组件的dom对象,反过来base._component保存的是dom对象所对应的组件,这个就是为了把他们关联起来 |
|
chapter-2 这个分支中, ./src/react-dom/render.js 文件中第1行 "Componet" 是不是拼写错误?应该是 Component。 而如果修改为Component,第11行创建依然使用了new Component 创建实例, 控制台报错 |

|
@losefish 感谢指出,已经修复了 |
|
createElemen的变化那个标题,Element 少了个 t |
|
你这生命周期实现的不对啊老铁。DidMount应该是DOM已经append到document里了,至少在这里是可以获取到真实DOM的,看了源码仅仅只是把vnode 转换为了dom,但是没有append进去。 |
|
@MeCKodo 嗯,这是做了简单的处理,如果要严格实现正确的生命周期需要额外加一个队列保存组件挂载的顺序。我后面考虑改进一下 |
|
看不懂,到这一步调试不出来了 |
|
class Root extends React.Component {
  render() {
    return (
      <Parent>
        <Child />
        <Child />
      </Parent>
    );
  }
} |
|
那个为什么 在 new Component() 的时候,会自带一个 base 并保存真实 dom 结构的? |
|
@132yse base是在这里赋值的,但是我也没理解为什么要这么做一次。 |
|
@jiachaosun 这个上面已经回答了呀,就是用来保存组件实例最终渲染出来的DOM,至于为什么要这么做,你自己看哪些地方用到了 |
|
组件下面的 Component 章节,标题应该是 Component 而不是 |
|
有一个问题: function (vnode, container) {
container.innerHTML = '' // 这段代码只执行一次
return render(vnode, container) // 这段代码会根据vnode的层级递归执行
} |
|
@calpa 感谢指出,已经改了 |
为什么函数内第一行代码只执行一次,而第二行会执行多次? |
|
@hawaiiey 因为ReactDOM.render只调了一次阿, 下面的render是别的地方调用的 |
|
@hujiulong 看了挺多文章,你这个能看下去, 只是这一章代码太多,描述太少 看着有点懵逼啊。。。 |
|
一直想看react源码,但是看不进去,正好看到了这几篇文章,感觉写的非常好,希望会对自己之后解读react源码有帮助。 |
|
为啥要写 |
因为用了 |
不懂为什么要用 |
|
@nearxu 我没这样写,_render返回的是dom |
不会循环引用吗 |
|
生命周期那块没太懂o(╥﹏╥)o |
在 |
|
@BaoXianPower 你在定义React组件的时候,就已经实现了render函数啊 |
明白了. 在 createComponent 中 |
|
init.constructor = component这句话感觉这里没啥用呀? }` |
|
render.js中的_render()定义后在哪使用了??看完所有代码没找到使用的地方 |
改写后的 |
|
赞 |
|
过于sweet ~ |
前言
在上一篇文章JSX和虚拟DOM中,我们实现了基础的JSX渲染功能,但是React的意义在于组件化。在这篇文章中,我们就要实现React的组件功能。
组件
React定义组件的方式可以分为两种:函数和类,函数定义可以看做是类定义的一种简单形式。
createElement的变化
回顾一下上一篇文章中我们对
React.createElement的实现:这种实现我们前面暂时只用来渲染原生DOM元素,而对于组件,createElement得到的参数略有不同:
如果JSX片段中的某个元素是组件,那么createElement的第一个参数
tag将会是一个方法,而不是字符串。例如在处理
<Welcome name="Sara" />时,createElement方法的第一个参数tag,实际上就是我们定义Welcome的方法:我们不需要对createElement做修改,只需要知道如果渲染的是组件,tag的值将是一个函数
组件基类React.Component
通过类的方式定义组件,我们需要继承
React.Component:所以我们就需要先来实现React.Component这个类:
Component
React.Component包含了一些预先定义好的变量和方法,我们来一步一步地实现它:
先定义一个
Component类:state & props
通过继承
React.Component定义的组件有自己的私有状态state,可以通过this.state获取到。同时也能通过this.props来获取传入的数据。所以在构造函数中,我们需要初始化
state和propssetState
组件内部的
state和渲染结果相关,当state改变时通常会触发渲染,为了让React知道我们改变了state,我们只能通过setState方法去修改数据。我们可以通过Object.assign来做一个简单的实现。在每次更新
state后,我们需要调用renderComponent方法来重新渲染组件,renderComponent方法的实现后文会讲到。你可能听说过React的
setState是异步的,同时它有很多优化手段,这里我们暂时不去管它,在以后会有一篇文章专门来讲setState方法。render
上一篇文章中实现的render方法只支持渲染原生DOM元素,我们需要修改
ReactDOM.render方法,让其支持渲染组件。修改之前我们先来回顾一下上一篇文章中我们对
ReactDOM.render的实现:我们需要在其中加一段用来渲染组件的代码:
组件渲染和生命周期
在上面的方法中用到了
createComponent和setComponentProps两个方法,组件的生命周期方法也会在这里面实现。createComponent方法用来创建组件实例,并且将函数定义组件扩展为类定义组件进行处理,以免其他地方需要区分不同定义方式。setComponentProps方法用来更新props,在其中可以实现componentWillMount,componentWillReceiveProps两个生命周期方法renderComponent方法用来渲染组件,setState方法中会直接调用这个方法进行重新渲染,在这个方法里可以实现
componentWillUpdate,componentDidUpdate,componentDidMount几个生命周期方法。渲染组件
现在大部分工作已经完成,我们可以用它来渲染组件了。
渲染函数定义组件
渲染前文提到的
Welcome组件:在浏览器中可以看到结果:
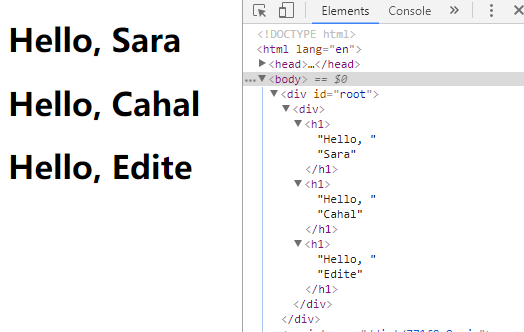
试试更复杂的例子,将多个组件组合起来:
在浏览器中可以看到结果:
渲染类定义组件
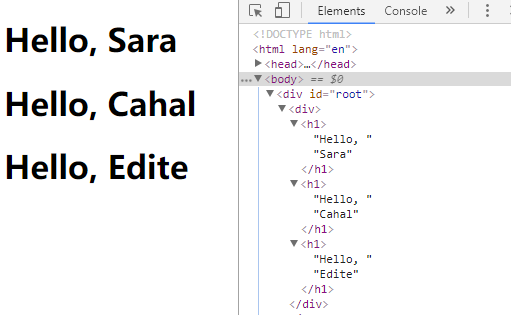
我们来试一试将刚才函数定义组件改成类定义:
运行起来结果和函数定义组件完全一致:
再来尝试一个能体现出类定义组件区别的例子,实现一个计数器
Counter,每点击一次就会加1。并且组件中还增加了两个生命周期函数:
可以看到结果:
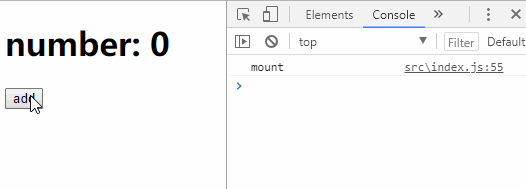
mount只在挂载时输出了一次,后面每次更新时会输出update
后话
至此我们已经从API层面实现了React的核心功能。但是我们目前的做法是每次更新都重新渲染整个组件甚至是整个应用,这样的做法在页面复杂时将会暴露出性能上的问题,DOM操作非常昂贵,而为了减少DOM操作,React又做了哪些事?这就是我们下一篇文章的内容了。
这篇文章的代码:https://github.com/hujiulong/simple-react/tree/chapter-2
从零开始实现React系列
React是前端最受欢迎的框架之一,解读其源码的文章非常多,但是我想从另一个角度去解读React:从零开始实现一个React,从API层面实现React的大部分功能,在这个过程中去探索为什么有虚拟DOM、diff、为什么setState这样设计等问题。
整个系列大概会有四篇左右,我每周会更新一到两篇,我会第一时间在github上更新,有问题需要探讨也请在github上回复我~
上一篇文章
从零开始实现一个React(一):JSX和虚拟DOM
下一篇文章
从零开始实现一个React(三):diff算法
The text was updated successfully, but these errors were encountered: