HOW TO
This short tutorial will focus on achieving the most basic implementation of NavMeshPlus.
To begin with, Create a new project from Unity's "2D Template".
Add a Tilemap GameObject to your scene (By right-clicking your Scene hierarchy and choosing the 2D Object folder, and then Tilemap within). The first one you create should simultaneously create a Grid GameObject in the root of your scene and nest your new Tilemap underneath it. Add two more Tilemaps (for a total of 3) and and name them Ground, Walls and Pond.
Import sprites that will be used as a palette. For example, you could just use 3 solid sold-colored sprites: a green color for ground, a black for walls, and blue for the pond. It's up to you.
Create a new palette and drag in your imported sprites.
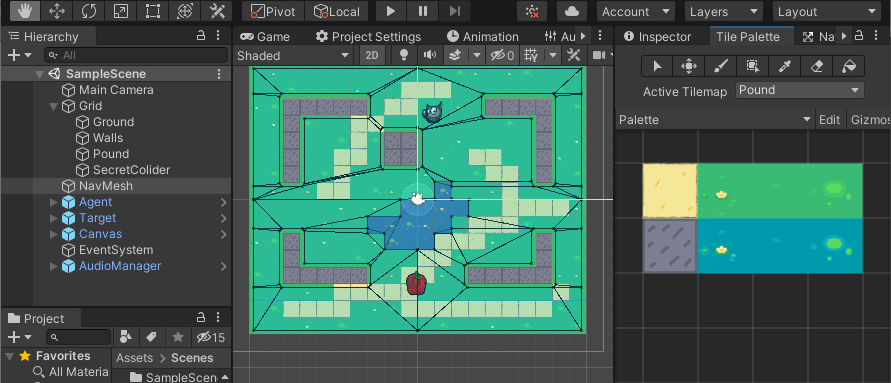
Using the sprites imported into your palette, choose Ground as the "Active Tile Map", and then paint the ground into your seen any way you'd like. In our example, we're using the solid "green" brush.
Next, change "Active Tile Map" in your palette to Walls. Paint some obstacles. Then select Pond and do the same, drawing a body of water.
Download NavMeshPlus and copy NavMeshComponents into your Assets folder.
Now, in your scene, right click and choose Create Empty to add an empty GameObject into the root of your scene.
Name your new empty GameObject, name it "NavMesh", and rotate it -90, 0, 0.
With your NavMesh object selected, in the Inspector click Add Component and choose Nav Mesh Surface 2d.
Now select your Walls Tilemap GameObject (from within the Grid GameObject), and similarly, Add Component here, too. Choose a Nav Mesh Modifier component.
Go back to your NavMesh and, within the Nav Mesh Surface 2d component section of the inspector, hit "Bake".

As you may be able to see, clicking "Bake" caused the whole scene to be highlighted. Hence, the entire area is considered "walkable" at this point. Let's override it.
In the Nav Mesh Modifier component -- remember, that's on your Walls -- check "Override Area" and in the "Area Type" field, choose "Not Walkable".
Now hit "Bake" again (within the NavMesh object). You should see that the Walls you painted have been carved out of the highlighted areas. They are no longer considered "walkable".

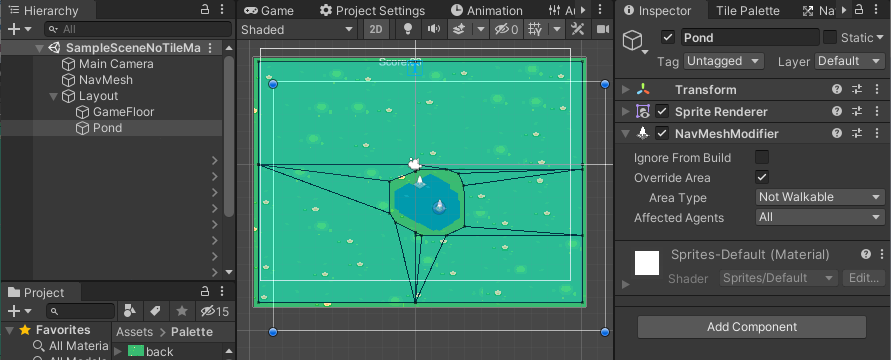
Now add a Nav Mesh Modifier Component to your Pond Tilemap. Override area like you did with Walls, and choose "Pond" for "Area Type".
Bake again, and see that the Pond is also carved out from your nav mesh.
At this point, you can add GameObjects with a Nav Mesh Agent component, which are capable of interacting with (i.e., walking on) your NavMesh.
Important note: When a "Nav Mesh Agent" starts to interact with your scene (e.g., when they start to move in-game) the system tends to rotate the GameObject upon which the component is placed. This can be undesirable (as in, your object may be rotate away from your plane of view and hence become invisible), so you should fix its rotation by adding something like the following to a new or existing script:
	void Start()	{
		var agent = GetComponent<NavMeshAgent>();
		agent.updateRotation = false;
		agent.updateUpAxis = false;
	}
Once this is added to the Start method for all of your agents, you are ready for action.
With new API introduced in Unity 2019.3 there is an ablitiy to choose geometry source. By default NavMeshSurface2d uses sprite Mesh to buld its navigation surface, so surface will stick to sprite "outline".
But if you change "Use Geometry" option from "Render Meshes" to "Phisics Colliders", NavMeshSurface2d would build its surface form 2D colliders.
Lets create new PoundCollider inside Grid object. Add Polygon Collider 2d and NavMeshModifier to it, override its area to "Pound". Now click "Edit Collider" to make desired pound's shape.
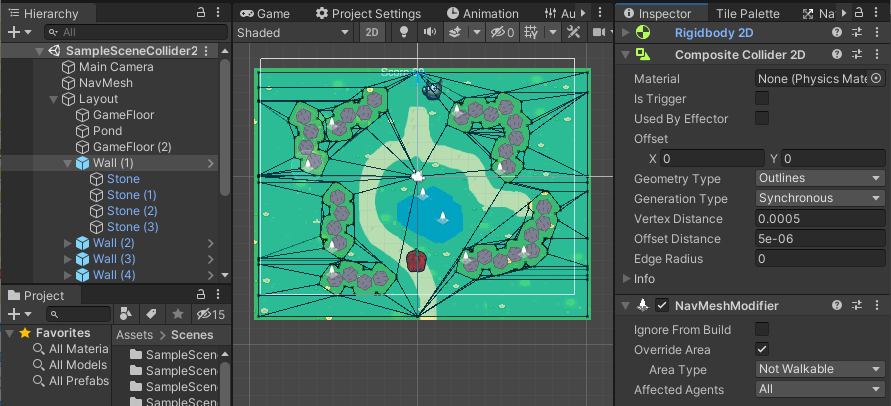
Select NavMesh object and change "Use Geometry" option from "Render Meshes" to "Phisics Colliders", click "Bake" and new Mesh will appear.
Walls stay the same, becase Walls object had composite collider with exact same box shape as sprite mesh. But pound now shaped not from tilemap sprites, but from Plygon Collider 2D.
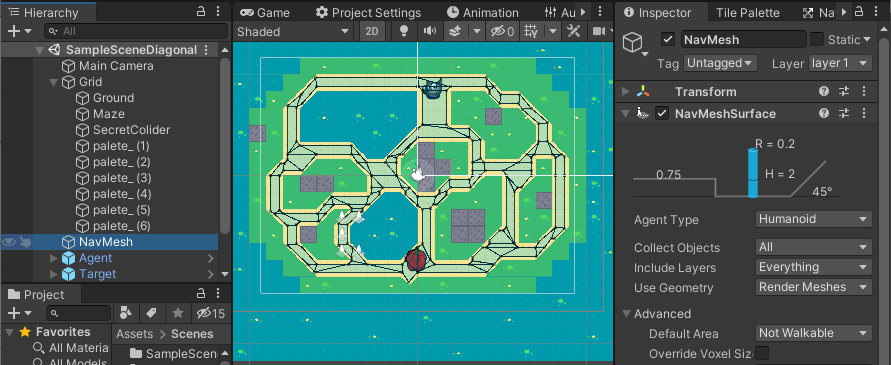
Another common task is not to carve out obstacles, but to navigate through a maze, wherein our agents can only follow a strict path.
To do that, Bake your NavMesh with "Default Area" selected to "Not Walkable", and the Nav Mesh Modifier component set to be "Walkable", and you will get this:
Any sprite within the Grid object with a Nav Mesh Modifier 2d will be added into Bake process. (Sprite must have a mesh). You can build bridges or barricades, and these objects will be added into your NavMesh as static data.
Try out a fully-featured 2D "run-and-chase" game I made to demo NavMesh2d: https://github.com/h8man/RedHotSweetPepper.

##NON-TILED
NavMeshSurface2d can bake objects that are not a part of Tilemap, or even if there is not Tilemap. To do that place all GameObjects with NavMeshModifier that define your layout under object with NavMeshSurface2d, and select appropriate option Collect Objects - Children
Some games want to use hexagonal, isometric, or diamond-shaped grids. NavMeshPlus can be done in other types of grid as well as long as the spites share the shape of your grid.
But in some cases, the sprite can differ from your grid shape, but we still want clean navigation though the tilemap.
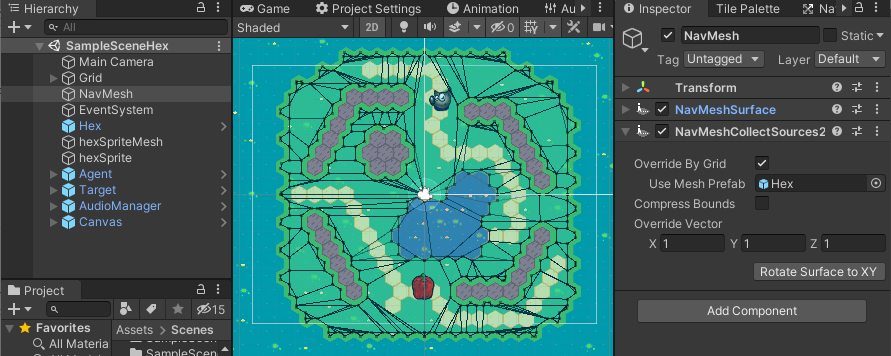
To do that, we override all tiles with a grid. First we need to have a mesh that has the form of a tile. For this hexagonal tile example, we'll import a mesh shaped like a hexagon. (Use Blender or any other 3D software):
Add your hexagon to the scene and rotate it to face the camera, and scale it down to match the size of your cells:

In the Nav Mesh Surface 2d component, check "Override By Grid" and all tiles will have a shape of used prefab. Even if this option disabled, all sprites without a proper mesh will be substituted with used one.
If we remove the prefab and leave the override option, all tiles will be considered as squares. images/Grid-05.png
References:
- NavMeshSurface - https://docs.unity3d.com/Manual/class-NavMeshSurface.html
- NavMeshSurface2d - https://github.com/h8man/NavMeshPlus
- The Game Demo - https://github.com/h8man/RedHotSweetPepper
- Forum to discuss - https://forum.unity.com/threads/2d-navmesh-pathfinding.503596/