Hacking
If you're thinking about hacking on NVM for Windows, please consider posting an issue or getting in touch with me. I'll accept most contributions, but it's worth letting me know before going to the effort.
Please note that this is my first Go app. I'm open to suggestions. Please contact me privately if you have a suggestion to improve the project.
First, NVM is written in Go, so you must install Go in order to hack on NVM. You'll also need to clone or fork the repository.
There is no Go-specific framework or structure since this is such a small app. However; there is a general approach and some key component that should be understood:
NVM is primarily a tool for installing multiple versions of node.js and hot-switching between these environments. As the README states, NVM uses a symlink approach to accomplish this.
Define: Symlink Approach
The symlink approach points a "virtual" directory to a known physical directory... kind of like a shortcut. For example, C:\Program Files\nodejs could point to C:\Path\to\node\v0.10.10. The target of the symlink can be changed, i.e. C:\Path\to\node\v0.10.32, but the original symlink path remains the same (C:\Program Files\nodejs). NVM hot-swaps the node.js environment by changing the symlink target.
Using Node.js
In order to use node, the symlink must be on the system path. By adding the symlink to the path, the operating system has a consistent location to find the node executable, even if NVM changes the target.
Environment Variables
In order to maintain a clean system, NVM for Windows creates two environment variables and appends them to the PATH. This is done instead of adding the symlink directly to the PATH.
NVM_HOME contains the directory where NVM is installed. NVM_SYMLINK contain the path where the symlink should be created. Both of these are added to the PATH, as shown below:
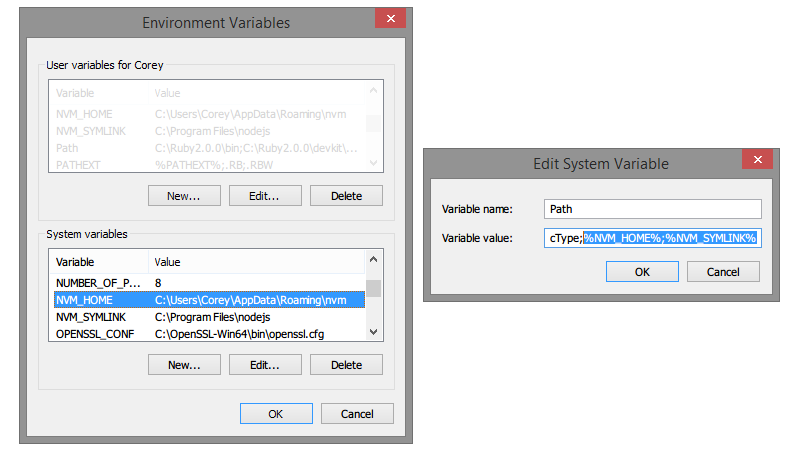
This approach is used to prevent pollution in the environment variables. This is particularly useful when the uninstaller is run. The uninstaller removes NVM_HOME and NVM_SYMLINK and does a find/replace on the PATH to remove these variables from it. This results in a clean and complete uninstall of NVM that doesn't leave any orphan environment variables.
Beware of Permissions
Some Windows executables/commands require special privileges. Sometimes it is not enough to have a user account with administrative. Even as an administrator, a user account needs to elevate it's privileges for specific operations. This is true for things like mklink (the command for creating a symlink), or for modifying anything in the C:\Program Files or C:\Program Files(x86) directories. When elevated privileges are required, Windows will typically open a prompt (UAC) to request access. This doesn't always work very well for command line applications though.
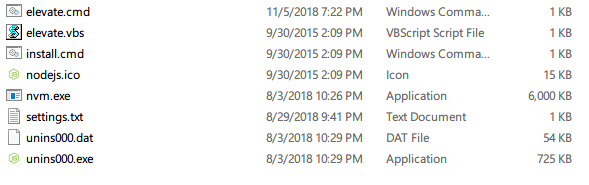
To resolve this, there are two scripts that accompany the main nvm executable. These are elevate.vbs and elevate.cmd. These helper scripts are capable of executing commands with elevated permissions with the caveat that the user must be an administrative account.
settings.txt
This file saves the pertinent information used to run NVM. You can see an example.
root refers to the directory that contains the various node.js installations. This defaults to, but doesn't have to be the NVM_HOME directory. When a user runs nvm install X.X.X, a folder called vX.X.X is created in the root. All files are downloaded to this location.
path refers to the symlink. This is deprecated.
proxy refers to a proxy URL. Set this to "none" if no proxy should be used.
arch refers to the preferred system architecture. It is impossible to change the actual system architecture, but this setting allows users to force a 32-bit version of node to run in a 64-bit environment.
Installer
NVM for Windows should provide a "it just works" experience. If it's not simple, we haven't done our job as developers. If you add a new feature that requires setup, please update the installer to support this.
NVM for Windows is a straightforward Go app. Navigate to the src directory and type go run nvm.go to run it. This is the equivalent of typing nvm at the command line, so go run nvm.go list would be the same as nvm list. The key difference is you'll be using the source code.
To compile a full nvm.exe, you can type go build nvm.go. You typically won't need to do this if you use the build file (see below).
The NVM for Windows installer was built with InnoSetup. If you have this installed, you can edit the installer by opening the nvm.iss file. It is also possible to edit with your favorite text editor.
In order to build the installer, the project root must be changed. Use the directory you cloned the nvm repository into. You should also update the version if you have made changes.
If you're using InnoSetup, you can compile and run the installer right from InnoSetup. It is also possible to use the tools in the buildtools directory to compile the installer, but if you're making changes to it, you should really be using InnoSetup.
If you make changes to the installer that require a plugin, you should get in touch with me. I will only accept contributions containing plugins if the plugins are available freely and are something I can quickly integrate into my workflow.
Requires goxc:
A file called build.bat is available in the source code. This is the simplest way to build a release. Read the code (there's not too much), but here's what it does for you:
- Retrieves the version number from the nvm.iss file (assumes it is on line 4) and creates a
distoutput directory. This directory will exist directly under the project root. - Configures the local Go environment and builds the
nvm.exefile. This gets stored in thebindirectory (directly under the project root). - Generates the
nvm-noinstall.zip, which is available for those who want to manually install NVM. - Compiles the installer using the build tools packaged in the repository.
- Zips the installer (nvm-setup.zip) & removes the temporary files.
That's it. Those are the files you'll find on the release page.
To validate your installation, double check the environment variables. Two new environment variables should exist: NVM_HOME and NVM_SYMLINK. These are added to the PATH variable. Remember, they should look like:
The NVM_HOME variable should point to the NVM installation root, not the Node root! For example, the contents of this file will contain the nvm.exe file:
The NVM_SYMLINK will point to a symlink directory, not a physical directory. In other words, it will look like a shortcut:

At this point, the nvm command should be available (may require restarting the terminal/shell in order for the shell to recognize the new PATH updates).
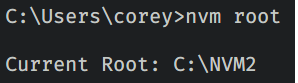
Next, execute nvm root to determine where your Node.js installation files are stored. This is normally defined during the installation process, but it can also be defined through the command line utility (run nvm help for details).
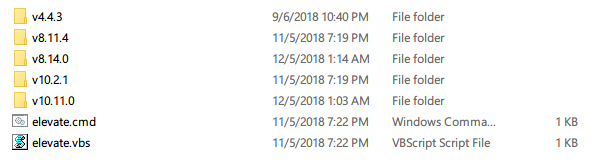
Next, install a few versions of Node.js. They should appear in the root directory alongside the elevate scripts.
Each individual Node directory will look like:
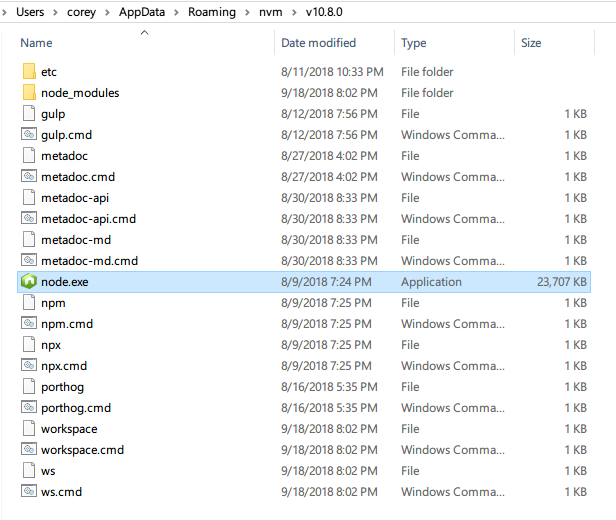
Notice the presence of the node.exe file, the node_modules directory, and the npm/npx global commands. The other files in this screenshot are just global modules/tools I already had when this screenshot was taken (so you won't have these)... gulp, metadoc, porthog, and workspace/ws.
NOTICE: You may also see a node32.exe or a node64.exe. This is normal if you have install both 32-bit and 64-bit versions of a Node instance. The active version is always called node.exe. The 32/64-bit executable is renamed to node.exe (and vice versa) when switching versions.