If you go to main React-native site, you can see these steps below to setup:
OS X - This repo only contains the iOS implementation right now, and Xcode only runs on Mac.
New to Xcode? Download it from the Mac App Store.
Homebrew is the recommended way to install node, watchman, and flow.
brew install node.
brew install --HEAD watchman. We recommend installing watchman, otherwise you might hit a node file watching bug.
brew install flow. If you want to use flow.
npm install -g react-native-cli
react-native init AwesomeProject
cd AwesomeProject
In the newly created folder AwesomeProject/
Open AwesomeProject.xcodeproj and hit run in Xcode
Open index.ios.js in your text editor of choice and edit some lines
Hit cmd+R (twice) in your iOS simulator to reload the app and see your change!
Congratulations! You've just successfully run and modified your first React Native app.
Let's look what's inside the AwesomeProject/ just created:
AwesomeProject.xcodeproj/
iOS/
index.ios.js
node_modules/
package.json
To give you the full picture, here is what exactly happens when running react-native init AwesomeProject:
- A folder named AwesomeProject is created
- In it, the package.json file is created
- npm install --save react-native is run, which installs react-native and its dependencies into AwesomeProject/node_modules and declares react-native as a dependency of your project in AwesomeProject/package.json
- The globally installed react-native CLI tool then hands over control to the local CLI tool that has just been installed into AwesomeProject/node_modules/react-native/local-cli/cli.js
- This in turn executes AwesomeProject/node_modules/react-native/init.sh, which is yet another helper script that takes care of putting the boiler plate application code in place, like the minimal React Native code in file index.ios.js and the Objective-C code plus other goodies in subfolder iOS, and the Xcode® project definition in subfolder AwesomeProject.xcodeproj
We already saw that the React Native based JavaScript code that makes up our actual application lives in index.ios.js.
The package.json file is no surprise for those who already worked with Node.js; it defines some metadata for our project and, most importantly, declares react-native (this time, the real thing, i.e.,
the actual framework that makes our application possible) as a dependency of our own project.
The node_modules folder is simply a result of the npm install run that took place during project
initialization. It contains the react-native code, which in turn consists of other NPM dependencies,
helper scripts, and a lot of JavaScript and Objective-C code.
The initialization process also provided the minimum Xcode project definitions plus some Objective-C boilerplate code, which allows us to open our new project in Xcode and to instantly run the application without any further ado. All of this could have been done manually, but would include a lot of steps that are identical no matter what kind of application we are going to write, thus it makes sense to streamline this process via react-native init.
To integrate thirth-party libraries into ReactNative project, please add the file Podfile under root folder.
Podfile is similar to package.json; it declares Objective-C library dependencies for the CocoaPods
dependency manager. We will talk about this in more detail later in the book, and ignore it for
now.
The takeaway here is that our AwesomeProject project is multiple things at once. It is an Xcode® project, but it’s also an NPM project. It’s a React Native based JavaScript application, but it also contains some iOS glue code that is needed to make our JavaScript code run on iOS in the first place.
- Install React Native Using CocoaPods
There are three use cases when you consider using CocoaPods in your projects
- You want to integrate third-party libraries (that use CocoaPods) into your newly created ReactNative project.
- Your project currently uses CocoaPods to manage dependencies and libraries.
- You want to add to existing project the ReactNative framework.
CocoaPods is a package management tool for iOS/Mac development. We need to use it to download React Native. If you haven't install CocoaPods yet, Run this command to install.
gem install cocoapods
You will need to install Ruby to use the gem command
When you are ready to work with CocoaPods, add the following line to Podfile. If you don't have one, then create it under the root directory of your project.
pod 'React'
pod 'React/RCTText'
Add any subspecs you want to use in your project
Remember to install all subspecs you need. The element cannot be used without pod 'React/RCTText'.
Then install your pods:
$ pod install
-
Suppose you puts all
javascriptfile under folderReactComponent, and you use therequireto import javascript module to use, consider add the filepackage.jsonunder folderReactComponent:package.json { "name": "my project", "version": "1.0.0" }
-
Start Development Server
In root directory, we need to start React Native development server.
(JS_DIR=`pwd`/ReactComponent; cd Pods/React; npm run start -- --root $JS_DIR)
This command will start up a React Native development server within our CocoaPods dependency to build our bundled script. The --root option indicates the root of your React Native apps – this will be our ReactComponents directory containing the single index.ios.js file. This running server will package up the index.ios.bundle file accessible via http://localhost:8081/index.ios.bundle
Then you can use the require function to import javascript modules.
In case your Xcode built failed. Please follow steps below:
- Clone main react native repository from github:
git clone https://github.com/facebook/react-native - Copy Examples/SampleApp to Examples/AwesomeProject
mkdir Examples/AwesomeProjectcp -R Examples/SampleApp/* Examples/AwesomeProject - Run packager.sh to point to AwesomeProject just created:
packager/packager.sh --root=./Examples/AwesomeProject - Now reopen again AwesomeProject in Xcode and start building.
-
In order to build and run on your device, follow these steps below:
curl http://localhost:8081/index.ios.js > main.jsbundleIn Xcode, click on Project name, goto Build Phases, and link the main.jsbundle to Assets
Open AppDelegate.m, remove the default code, and edit as below:**
NSURL *jsCodeLocation;jsCodeLocation = [[NSBundle mainBundle] URLForResource:@"main" withExtension:@"jsbundle"];RCTRootView *rootView = [[RCTRootView alloc] initWithBundleURL:jsCodeLocation moduleName:@"SampleApp" launchOptions:self.launchOptions]; -
Now try to build and run project on your device.
Phuhh. Congratulation if you come to this step. I hope you're seeing your AwesomeProject running on your iPhone 5. Now it's time to understand what's going on.
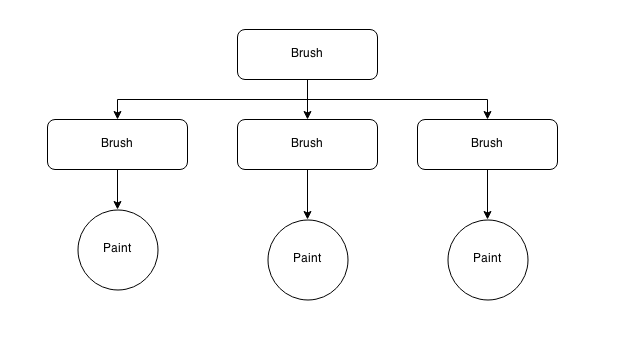
In traditional iOS architecture, if you're an artist, you have:
- A
Canvas, it's theUIWindowclass you often use to create your window application. - A
Brush, it's theUIViewControllerthat you use to draw something onCanvas - A
Paint, it's the color and the view for your application. You use it with aBrush, and paint on aCanvas.
For more complex application design, you will have many Brush, as well as Paint. They're nested to others in a top-down manner to compose GUI.
Example:
// Creating the Canvas
self.window = [[UIWindow alloc] initWithFrame:[UIScreen mainScreen].bounds];
// Creating the Brush
MyViewController  *rootViewController = [[MyViewController alloc] init];
rootViewController.launchOptions = launchOptions;
// Make the Canvas use the Brush
self.window.rootViewController = rootViewController;
[self.window makeKeyAndVisible];
return YES;
You create Canvas with Frame, then create the Brush, link it to the Canvas to make it the rootViewController.
Inside the Brush, now you can create Paint, it's the subView of the Brush:
RCTRootView *rootView = [[RCTRootView alloc] initWithBundleURL:jsCodeLocation moduleName:@"AdmobTest" launchOptions:self.launchOptions];
rootView.frame = CGRectMake(0, 50, viewRect.size.width, viewRect.size.height - 50);
[self.view addSubview:rootView];
You can add as many subView as you want.
Sweet!
So React-Native is just a Paint. If you see in the code below:
NSURL *jsCodeLocation;
jsCodeLocation = [[NSBundle mainBundle] URLForResource:@"main" withExtension:@"jsbundle"];
RCTRootView *rootView = [[RCTRootView alloc] initWithBundleURL:jsCodeLocation moduleName:@"SampleApp" launchOptions:self.launchOptions];
you will see that to create new React-Native view, you have to pass two parameters:
-
The
jsLocationaddress: it's the local or remote url for theReact component. -
The module name: It's the name that you register with
AppRegistryinindex.ios.jsfile:AppRegistry.registerComponent('SampleApp', () => SampleApp);
After creating the React-Native View, now you can use its properties like any other iOS View, it's the Paint of your project.
It's enough for theory. There is a small exercise for you before you come to chapter 2.
Create new react native view, and put it inside a `ViewController`, style the view with backgroundColor blue.
Please do the exercise by yourself before coming here! If you're completely new to iOS, i recommend you to learn some basic Objective-C. There is a good resource here for you to learn.
Now create two file MyViewController.h and MyViewController.m in xcode. The code for each file is listed below:
// MyViewController.h
#import <UIKit/UIKit.h>
#import "RCTRootView.h"
@interface MyViewController : UIViewController
@property (weak, nonatomic) NSDictionary *launchOptions;
@end

// MyViewController.m
#import "MyViewController.h"

@implementation MyViewController
- (void)viewDidLoad
{
    [super viewDidLoad];
    NSURL *jsCodeLocation;
    jsCodeLocation = [[NSBundle mainBundle] URLForResource:@"main" withExtension:@"jsbundle"];

    RCTRootView *rootView = [[RCTRootView alloc] initWithBundleURL:jsCodeLocation moduleName:@"AdmobTest" launchOptions:self.launchOptions];
    rootView.frame = CGRectMake(0, 50, viewRect.size.width, viewRect.size.height - 50);
    [self.view addSubview:rootView];
}
@end
Now modify the default SampleApp's AppDelegate.m:
#import "AppDelegate.h"
#import "MyViewController.h"
@implementation AppDelegate

- (BOOL)application:(UIApplication *)application didFinishLaunchingWithOptions:(NSDictionary *)launchOptions
{
  //NSURL *jsCodeLocation;

  // Loading JavaScript code - uncomment the one you want.

  // OPTION 1
  // Load from development server. Start the server from the repository root:
  //
  // $ npm start
  //
  // To run on device, change `localhost` to the IP address of your computer, and make sure your computer and
  // iOS device are on the same Wi-Fi network.
  //jsCodeLocation = [NSURL URLWithString:@"http://localhost:8081/index.ios.bundle"];

  // OPTION 2
  // Load from pre-bundled file on disk. To re-generate the static bundle, run
  //
  // $ curl http://localhost:8081/index.ios.bundle -o main.jsbundle
  //
  // and uncomment the next following line


    self.window = [[UIWindow alloc] initWithFrame:[UIScreen mainScreen].bounds];
    //UIViewController *rootViewController = [[UIViewController alloc] init];
    MyViewController  *rootViewController = [[MyViewController alloc] init];
    rootViewController.launchOptions = launchOptions;
    self.window.rootViewController = rootViewController;
    [self.window makeKeyAndVisible];
    return YES;
}

@end
You'll see i comment out all default SampleApp code, and put in our new MyViewController created above.
Try to build and run project again. You will understand what's React Native View is about.
We're ready to go to next step: Adding Flexbox layout.