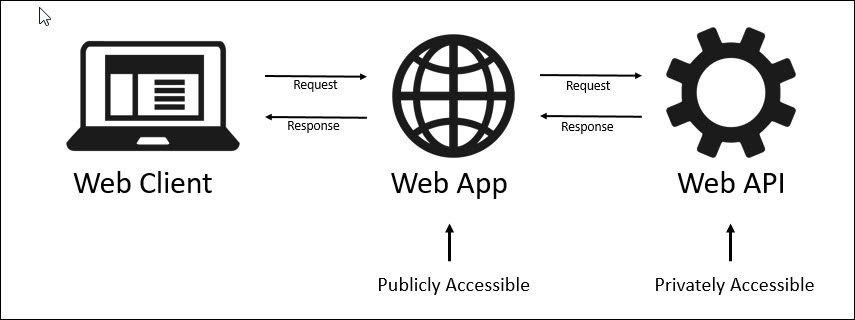
In this section, we will deploy a (very) simple web application and a (very) simple web api. The web application will be exposed publicly, while the web api will only be accessible internally.
This section builds upon the learnings from the Deploy Load Balanced Web section. I will not repeat the details learned in the last section here. In order to gain a full understanding, please make sure you understand the last section.
(We will use a different application for this section)
As you can see from the image above, we still have a simple web app that is publicly accessible. This app calls another simple web app that acts as a web api. The web api is not publicly accessible. The picture does not depict it, but the web app will be sitting behind a load balancer that exposes the service publicly. The web api sits behind an internal load balancer.
The web app and web api apps will be a very simple php apps that simply expose the host name. The web app will call the web api and will expose the hostname of both the api and the web. This should adequately illustrate that both services are being load balanced.
During this section, we will be performing the following functions:
- Deploy the web container into our DC/OS cluster
- Deploy a public marathon-lb into our DC/OS cluster
- Deploy the web api container into our DC/OS cluster
- Deploy a private marathon-lb into our DC/OS cluster
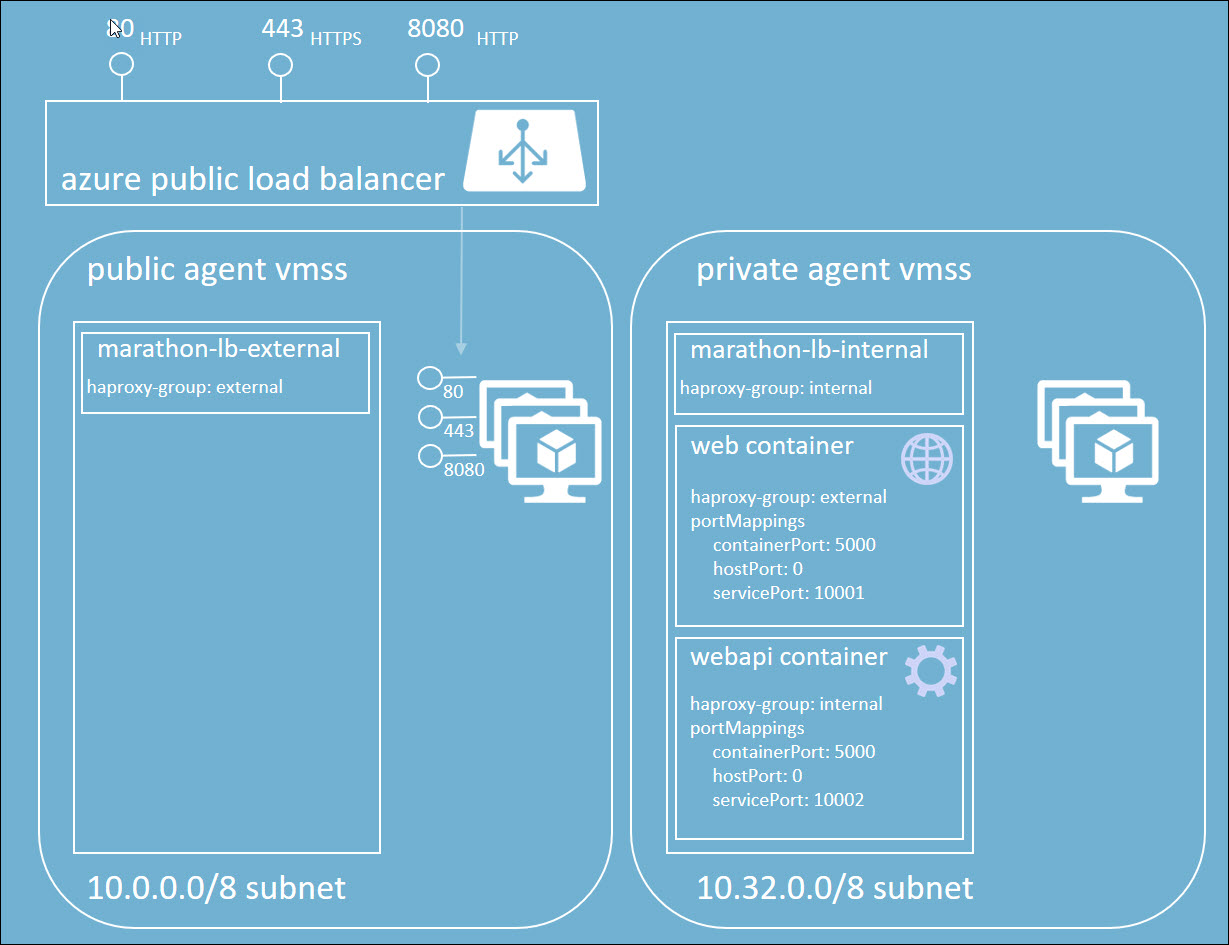
Given the learnings in the DC/OS Architecture section, our topology has the following characteristics:
- The web application will be deployed to the private agent pool
- The web api application will be deployed to the private agent pool
- A marathon-lb instance will be deployed to the public agent pool
- A marathon-lb instance will be deployed to the private agent pool
We will discuss the particulars as we proceed.
Below, I will briefly discuss the code you will need for dockerizing the web and webapi apps. It is likely the best option for you to simply clone this repo.
import os
import socket

from flask import Flask, request

app = Flask(__name__)

@app.route('/')
def returnHost():
    hostname = socket.gethostname()
    return hostname

if __name__ == '__main__':
    app.run(host='0.0.0.0', port=5000)
This is a very simple python app that simply returns the hostname.
Flask
FROM python:3-onbuild
EXPOSE 5000
CMD ["python", "webapi.py"]
As you can see, we are using the python image with the build triggers. This image greatly simplifies the creation of a python image. From the documentation:
The build will COPY a requirements.txt file, RUN pip install on said file, and then copy the current directory into /usr/src/app.
import os
import sys
import requests
import socket
from flask import Flask
from dotenv import load_dotenv, find_dotenv

app = Flask(__name__)

@app.route('/')
def index():
    webapiHostName = get_webapi_hostname()
    hostName = get_hostname()

    return 'My hostname... "{0}" Webapi hostname:... "{1}"'.format(hostName, webapiHostName)

def get_hostname():
    return socket.gethostname();

def get_webapi_hostname():
    # the web container MUST be run with --link <appName>:webapi
    # link_alias = 'webapi'

    # Load the environment variables from the .env file.
    # They will be overwritten if environment vars are set
    load_dotenv(find_dotenv())
    url = os.environ.get("APPURL")

    # Request data from the app container
    response = requests.get(url)
    return response.text

if __name__ == '__main__':
    app.run(host='0.0.0.0', port=5000)
As you can see, this app is slightly more complicated. The important thing to understand here is that the web app is making a call to discover the url for the web api. The other thing to understand is that we want to be able to run this locally, as well as in an orchestrator like DC/OS. To that end, we use an environment variable called "APPURL". If the environement variable is set, it will use that. However, if it is not set, it will use the value in the local .env file (shown next)
APPURL="http://webapi:5000"
FROM python:3-onbuild
EXPOSE 5000
CMD ["python", "web.py"]
Flask
requests
python-dotenv
- Open a command prompt
- Change directory to the python-returnhostname-api directory
- Run the following command (please replace the yourgitusername token with your git username):
docker build -t <yourgitusername>/python-returnhostname-api .
For me it looks like this:
docker build -t rbagby/python-returnhostname-api .
4. Change directory to the python-returnhostname-web directory
5. Run the following command:
docker build -t <yourgitusername>/python-returnhostname-web .
For me it looks like this:
docker build -t rbagby/python-returnhostname-web .
6. Run the following command to see the built docker images
docker images
Again, assuming you are running Docker for Windows, you can run the containers locally with the following commands (please replace the yourgitusername token with your git username):
Web API
docker run -d --name webapi -p 5000:5000 <yourgitusername>/python-returnhostname-api
For me it looks like this:
docker run -d --name webapi -p 5000:5000 rbagby/python-returnhostname-api
Web
docker run -d --name web --link webapi:webapi -p 5001:5000 <yourgitusername>/python-returnhostname-web
For me it looks like this:
docker run -d --name web --link webapi:webapi -p 5001:5000 rbagby/python-returnhostname-web
You can see that we are taking advantage of the convenience of the --link flag. This allows us to easily add a link from the web container to the webapi container - with the alias webapi (the left side of the colon is the name or id of the container you are linking to, while the right side is the alias).
If you go back and review the url specified in the .env file, you will notice that it is http://webapi:5000. Hopefully, it is clear how we are able to run both containers locally:
- The web app will use the url in the .env file when calling the web api
- The web container is run with a --link, linking to the webapi container, specifying an alias of webapi
It is important to note that, while it it convenient for testing, the use of --link is generally not recommended for real applications
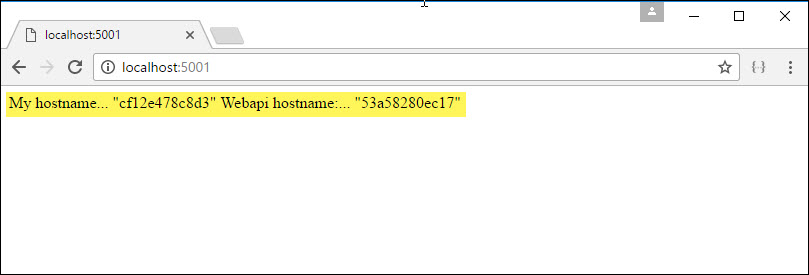
You can test this solution by opening a browser to http://localhost:5001. You should see something like this:
This section assumes that you have a Docker Hub account. If you do not, you can sign up for one. If you would prefer not to, you can always skip this section and use the image I pushed to my Docker Hub account.
Perform the following steps to push the image we created to Docker Hub:
- Open a command prompt
- Login to Docker Hub
docker login
3. Push your web api image (please replace the yourgitusername token with your git username):
docker push <yourgitusername>/python-returnhostname-api
For me it looks like this:
docker push rbagby/python-returnhostname-api
4. Push your web image (please replace the yourgitusername token with your git username):
docker push <yourgitusername>/python-returnhostname-web
For me it looks like this:
docker push rbagby/python-returnhostname-web
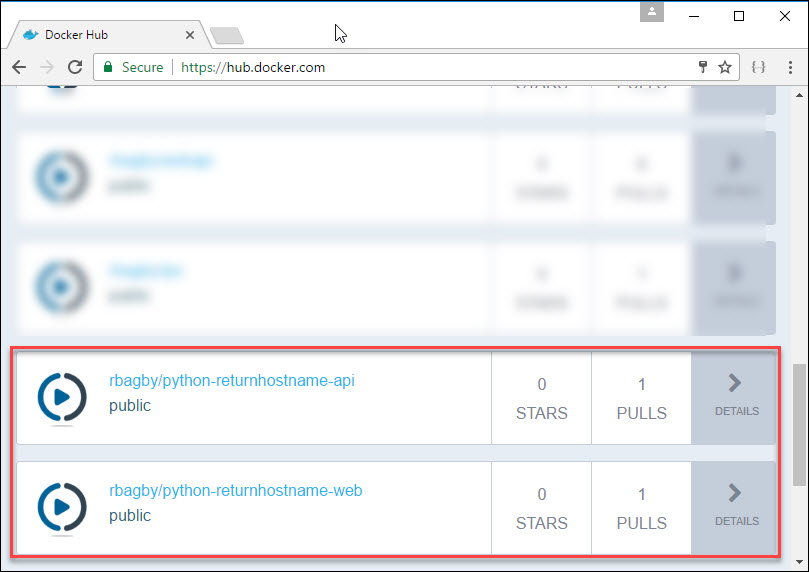
You should now see your images in Docker Hub:
This section and the next 3 assume that you have already opened an SSH tunnel to your master node
If you have the previous application running in DC/OS - Destroy them - lets start from scratch
(repeat from Deploy Load Balanced Web) Remembering the topology, we want to deploy a marathon-lb instance into the public agent pool. The easiest way to do this is to deploy it via the Universe. To deploy marathon-lb, perform the following steps:
- Open a browser to http://localhost:8080 (assuming you tunnelled to port 8080)
- Click on the 'Universe' tab on the left
- Scroll down to the marathon-lb package and click 'Install'
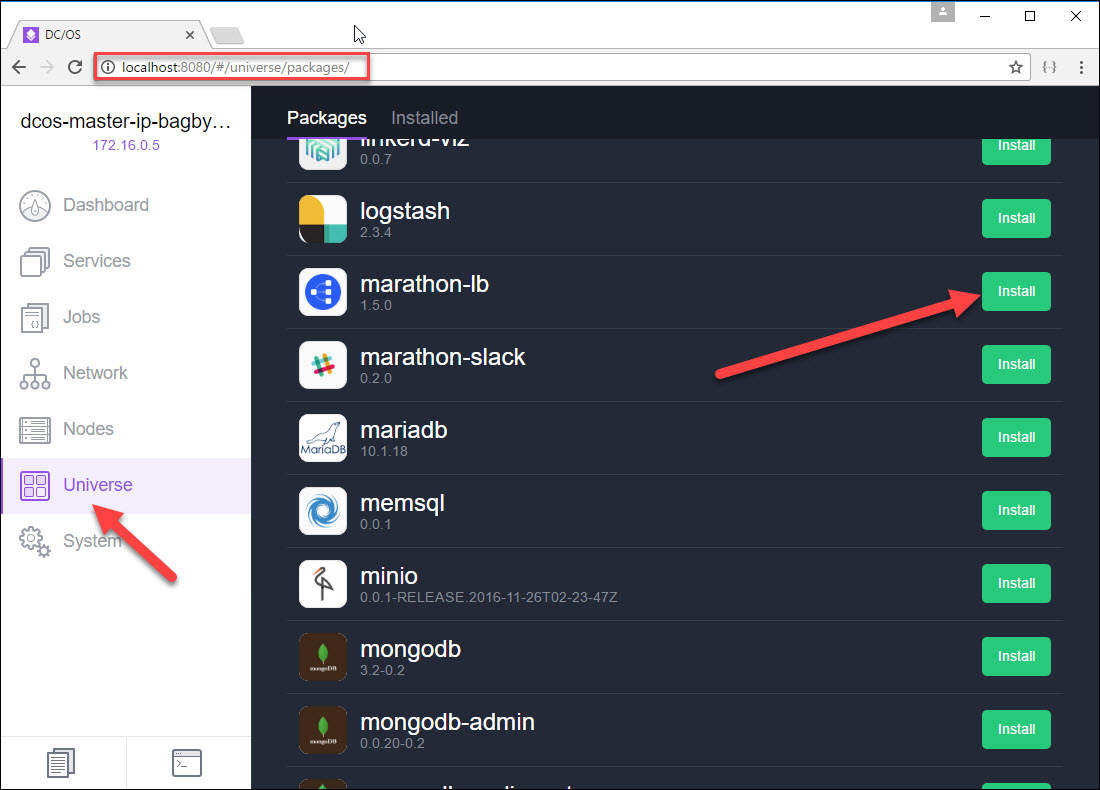
It is now deployed. I won't go into the same amount of detail as I did in Deploy Load Balanced Web, but here are some reminders:
- The group is set to 'external'. It will only expose services with HAPROXY-GROUP set to 'external'
- The package was deployed with the role of slave_public. The nodes in the public agent pool have this role. Thus, this package was deployed in the public agent pool.
{
	"marathon-lb":{
	    "name":"marathon-lb-internal",
	    "haproxy-group":"internal",
	    "bind-http-https":false,
	    "role":""
	}
}
Notice how the HAPROXY_GROUP is set to internal. Any apps deployed with their HAPROXY_GROUP set to the same will be exposed via this LB. Also notice that the role is blank. Because it is not set to slave_public, it will, by default, be deployed to the private agent pool.
To deploy our app via the DC/OS CLI, perform the following steps:
- Open a command prompt
- Change directory to the marathon directory, assuming you have cloned this repository. On my machine, it is: C:\Development\Technologies\DCOS\dcos-primer\marathon
- Type the following command:
dcos package install --options=marathon-lb-internal.json marathon-lb
Type 'yes' and click return to complete...
The marathon-lb instance should be deployed in the private agent pool. We will examine that after we have deployed the web and web api.
{
  "id": "webapi",
  "instances": 2,
  "cpus": 0.5,
  "mem": 32.0,
  "container": {
	"type": "DOCKER",
	"docker": {
	  "image": "rbagby/python-returnhostname-api",
	  "network": "BRIDGE",
	  "portMappings": [
		{ "containerPort": 5000, "hostPort": 0, "servicePort": 10002 }
	  ]
	}
  },
  "healthChecks": [{
	  "protocol": "HTTP",
	  "path": "/",
	  "portIndex": 0,
	  "timeoutSeconds": 10,
	  "gracePeriodSeconds": 10,
	  "intervalSeconds": 2,
	  "maxConsecutiveFailures": 10
  }],
  "labels":{
	"HAPROXY_GROUP":"internal"
  }
}
The following are important facts to note:
- The HAPROXY_GROUP is set to 'internal'. This means that only the LB with the matching HAPROXY_GROUP will expose this service. In our case, this will be the marathon-lb instance that, as we will see later, was deployed to the private agent pool.
- The servicePort was set to 10002. This is very important. In marathon-lb, services are exposed on their service port. This service will be reachable via the following internal URL: http://marathon-lb-internal.marathon.mesos:10002. Remember that we set the name of our marathon-lb instance to 'marathon-lb-internal'.
- The image is set to the image we pushed into docker hub
- We are deploying 2 instances of the web api app
To deploy our app via the DC/OS CLI, perform the following steps:
- Open a command prompt
- Change directory to the marathon directory, assuming you have cloned this repository. On my machine, it is: C:\Development\Technologies\DCOS\dcos-primer\marathon
- Type the following command:
dcos marathon app add python-webapi-marathon.json
The web api app should be deployed in the private agent pool. We will examine that after we have deployed the web
{
  "id": "web",
  "instances": 2,
  "cpus": 0.5,
  "mem": 32.0,
  "env": {
	"APPURL": "http://marathon-lb-internal.marathon.mesos:10002"
  },
  "container": {
	"type": "DOCKER",
	"docker": {
	  "image": "rbagby/python-returnhostname-web",
	  "network": "BRIDGE",
	  "portMappings": [
		{ "containerPort": 5000, "hostPort": 0, "servicePort": 10001 }
	  ]
	}
  },
  "healthChecks": [{
	  "protocol": "HTTP",
	  "path": "/",
	  "portIndex": 0,
	  "timeoutSeconds": 10,
	  "gracePeriodSeconds": 10,
	  "intervalSeconds": 2,
	  "maxConsecutiveFailures": 10
  }],
  "labels":{
	"HAPROXY_GROUP":"external",
	"HAPROXY_0_VHOST":"bagbyacsmesosagents.westus.cloudapp.azure.com",
	"HAPROXY_0_MODE":"http"
  }
}
The following are important facts to note:
- The HAPROXY_GROUP is set to 'external'. This means that only the LB with the matching HAPROXY_GROUP will expose this service. In our case, this will be the marathon-lb instance that, as we will see later, was deployed to the public agent pool.
- The servicePort was set to 10001.
- The image is set to the image we pushed into docker hub
- The HAPROXY_0_VHOST should be set to the the dns name of the Public IP Address associated to the public agent pool load balancer. In my case, it is: bagbyacsmesosagents.westus.cloudapp.azure.com. You can find it in the Azure portal. Setting this will route traffic from that setting to our web app. You need to change this
- We are also deploying 2 instances of the web app
- We set the environment variable of APPURL to the service URL for the web api app. Remember that the web app will use this environment variable when calling the web api.
To deploy our app via the DC/OS CLI, perform the following steps:
- Open a command prompt
- Change directory to the marathon directory, assuming you have cloned this repository. On my machine, it is: C:\Development\Technologies\DCOS\dcos-primer\marathon
- Type the following command:
dcos marathon app add python-web-marathon.json
The web api app should be deployed in the private agent pool. We will examine that after we have deployed the web
- Open a browser to the dns name of the Public IP Address associated to the public agent pool load balancer. Again, in my case, it is: bagbyacsmesosagents.westus.cloudapp.azure.com.
- Take note of the hostname for the web and the web api
- Refresh the web page (depending upon the browser, you may have to wait a short period of time before refreshing - chrome works best here)
- Take note of the hostnames. They should be different.
-
Open the DC/OS UI
-
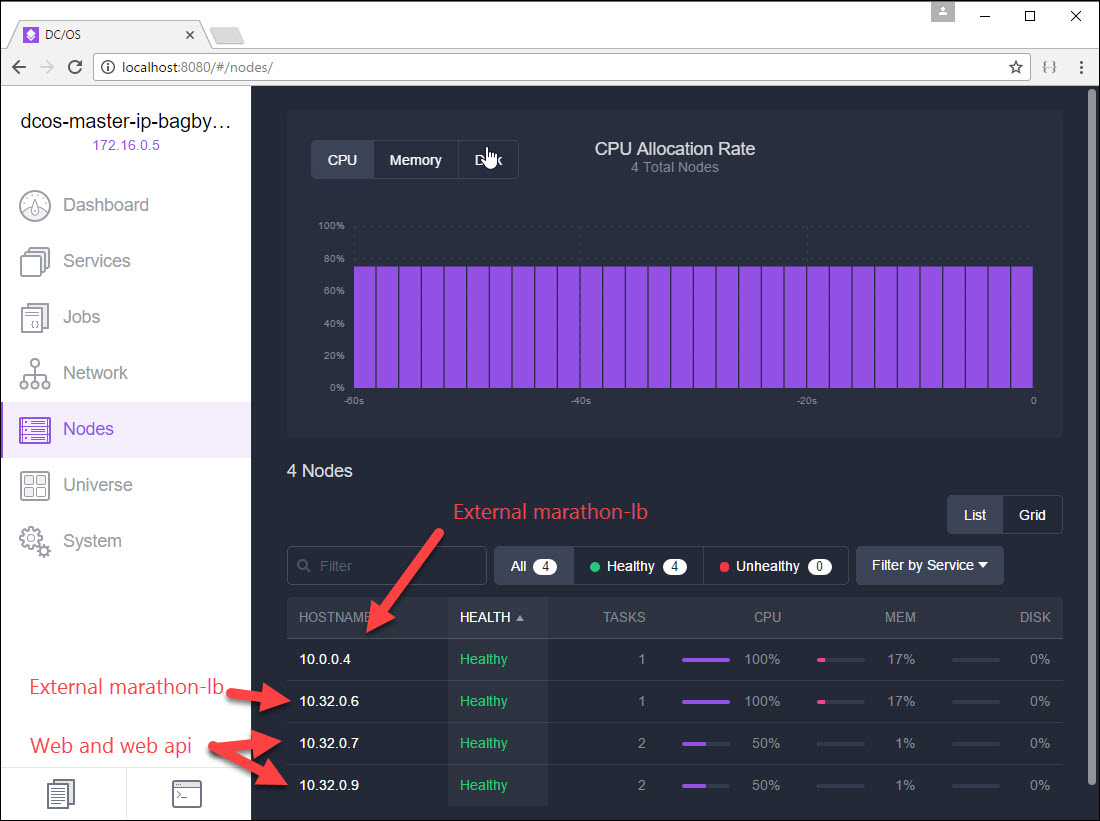
Click on the 'Nodes' tab. You should see something like below:
-
Click on the node from the 10.0.0.0/8 subnet. You will see something like the following, validating that the external load balancer is deployed on that node.

-
Click on the 3 nodes from the 10.32.0.0/8 subnet. You will see something like the following:


This should clearly illustrate that the only package deployed to the public agent pool was the external load balancer, while all of the services, including the internal load balancer were deployed to the private agent pool.
In this section, we have learned how to accomplish the following:
- Create a docker image
- Run a container locally in docker
- Take advantage of --link for simple test docker applications
- Use environment variables for app config items like service urls
- Deploy an external facing marathon-lb into our cluster
- Deploy an internal facing marathon-lb into our cluster
- Service discovery in marathon-lb
- Push an image to Docker Hub
- Deploy an image from Docker Hub into our DC/OS Cluster
