For 10th Gen Intel Core CPUs, a iMac20,x SMBIOS is best suited because it supports the iGPU (other than iMacPro1,1 and MacPro7,1). For i5/i7, use iMac20,1, for i9 use iMac20,2.
Since I have an i9-10850K, I am using iMac20,2. The system runs smoother than using iMac19.1 which if for Coffee Lake CPUs. The performance is also better and the idle frequency is lower. But it can be optimized even further with the help of CPUFriend.kext and an additional data provider kext which can be generated using a python script called CPUFriendFriend (click on »Code« and select »Download zip«).
This optimization has to be performed on the each machine individually (unless you are using an i9 10850K as well). To do so, we first verify the current Board-ID by executing the following command in terminal:
ioreg -l | grep -i board-id
Terminal should return either one of these:
"board-id" = <"Mac-CFF7D910A743CAAF"> (for iMac20,1)
"board-id" = <"Mac-AF89B6D9451A490B"> (for iMac20,2)
If your result differs, do the following:
- Change
PlatformInfo/Generic/SystemProductNameto eitheriMac20,1oriMac20,2 - Generate new SMBIOS data with GenSMBIOS or OC Auxiliary Tools.
- Save the
config.plistand reboot to apply the new SMBIOS.
NOTE: You will be asked to verify your AppleID since you are technically reporting a new machine to Apple's Servers.
- Unpack
CPUFriendFriend-master.zip - Double-click
CPUFriendFriend.commandto run it. You should see the following prompt:

- Enter a hex value for the
Low Frequency Mode. It's the lowest possible frequency the CPU should clock down to without crashing. I am using08for 800 MHz. Add your value and hitEnter. - Next, adjust the
Energy Performance Preference (EPP):

This This describes how fast the CPU scales from the lowest to the highest Turbo frequency, which has an impact on the overall power consumption. I use00. - Next, you have to specify the
Performance Bias Range, which is used to set the general bias of the system between performance and energy efficiency. The scale ranges from00(maximum performance) to15(maximum power saving). Since this is more relevant for notebooks than an i9 workstation, I am using01:

- Next, you can apply Additional Energy Savings Options from the MacBook Air SMBIOS (optional):

Make your choice and hitEnter - Finally, the
CPUFriendDataProver.kextand additional Files are created:
- Copy
CPUFriendDataProver.kextandCPUFriend.kextinto the kext folder - Add them to the
Kernel/Addsection of your config.plist and enable them - Save and reboot
- Download, install and run IntelPowerGadget.
- Observe the frequency graph:
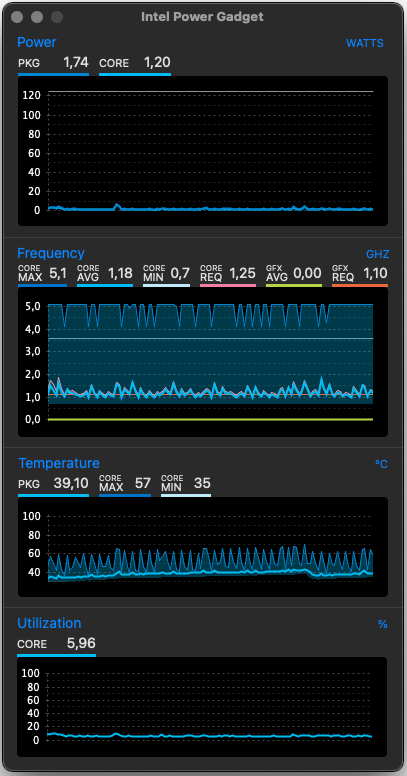
Both, CoreMax (top line) and CoreAvg (jagged blue line) should drop if the computer is idling, whereby the upper line can only drop as low as the solid straight line (= base frequency – in my case 3.6 GHz), which means that the CPU is not boosting.
At the lower end of the scale, CoreMin should be below 1 gHz, since we entered 800 MHz as the LFM value. In this case it is even lower – 700 MHz. Thus, the CPU power management is working fine.
If the frequency is never below the base frequency or permanently above it, something is probably wrong with the CPU power management – unless you’ve modified the CPU parameters in the BIOS by disabling speed step or overclocking all cores, etc.